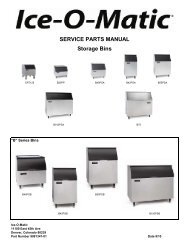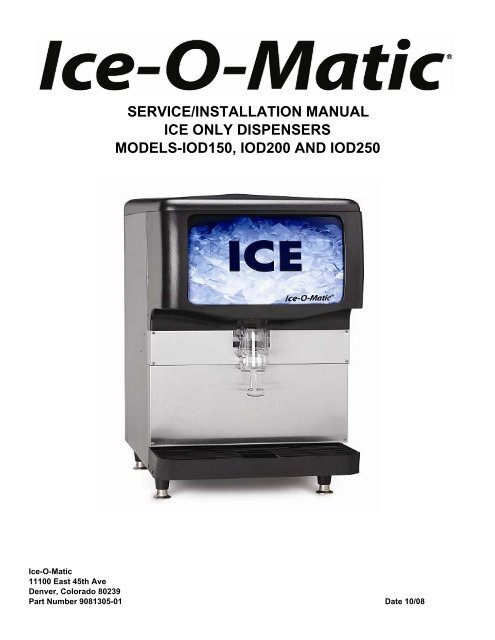
Service/installation Manual Ice Only Dispensers ... - Ice-O-Matic
Service/installation Manual Ice Only Dispensers ... - Ice-O-Matic
Service/installation Manual Ice Only Dispensers ... - Ice-O-Matic

Create successful ePaper yourself
Turn your PDF publications into a flip-book with our unique Google optimized e-Paper software.
SERVICE/INSTALLATION MANUAL<br />
ICE ONLY DISPENSERS<br />
MODELS-IOD150, IOD200 AND IOD250<br />
<strong>Ice</strong>-O-<strong>Matic</strong><br />
11100 East 45th Ave<br />
Denver, Colorado 80239<br />
Part Number 9081305-01 Date 10/08
Introduction IOD150,IOD200,IOD250<br />
To the owner or user: This product manual is a source of information about the <strong>installation</strong>, start up,<br />
cleaning, maintenance and repair of the product.<br />
The IOD150, IOD200 and IOD250 are ice only counter top dispensers designed to use 22 inch wide<br />
and 30 inch wide respectfully <strong>Ice</strong>-O-<strong>Matic</strong> cubed ice machines as the source of ice.<br />
The IOD ice dispenser is a machine that stores ice in an insulated, sanitary container: upon demand it<br />
dispenses that ice into a cup or glass.<br />
Table of Contents<br />
Introduction Page 1<br />
Specifications and Limitations Page 2<br />
For The Installer Page 3<br />
Installation Page 4<br />
Water Glass Filler Kit Page 5-6<br />
Initial Start Up Page 7<br />
Gate Restrictor Plate Page 8<br />
Cleaning And Sanitizing Page 9-10<br />
Warranty Information Page 2<br />
Keep this manual for future reference.<br />
<strong>Ice</strong>-O-<strong>Matic</strong><br />
11100East 45 th Ave.<br />
Denver Colorado 80239<br />
Technical Assistance<br />
1-800-423-3367<br />
The IOD150, IOD200 and IOD250 Parts <strong>Manual</strong> is available separately, Part Number 9081306-01<br />
Page 1
Specifications and Limitations IOD150, IOD200, IOD250<br />
Limitations:<br />
Must meet the same limitations as the cuber installed on top of it:<br />
50� F. air minimum<br />
100� F. air maximum<br />
Must be installed indoors.<br />
Must allow at least 6-inch clearance at the rear and both sides when using an air-cooled ice<br />
machine.<br />
Must allow space for the utility connection at the back.<br />
Must have a drain.<br />
Options (Field Installed) (*Required)<br />
*Thermostatic Bin Control Kit (22 Inch <strong>Ice</strong> Series) Part Number 1051134-01<br />
*Thermostatic Bin Control Kit (30 Inch <strong>Ice</strong> Series) Part Number 1051020-02<br />
<strong>Manual</strong> Water Glass Filler Kit Part Number KWGFID<br />
*<strong>Ice</strong> Machine Adapters<br />
*22 inch cuber Part Number KBT15022<br />
*22 inch machine on a 30 inch dispenser Part Number KBT25022<br />
*30 inch cuber Part Number KBT25030<br />
Dispenser Specifications<br />
Storage Basic Min. Circuit<br />
Model Number Capacity (lbs) Electrical Actuation Ampacity Max. Fuse Size<br />
IOD150 150 115/60/1 Lever 3.0 15<br />
IOD200 220 115/60/1 Lever 3.5 15<br />
IOD250 250 115/60/1 Lever 3.5 15<br />
Dimensions (Inches)<br />
Model Number Width Depth Height (Excludes 4” Legs)<br />
IOD150 22 inches 30 inches 35 5/8 inches<br />
IOD200 30 inches 30 inches 35 5/8 inches<br />
IOD250 30 inches 30 inches 39 5/8 inches<br />
Note: Counter top 4 inch legs are included with the dispenser.<br />
<strong>Ice</strong>-O-<strong>Matic</strong> ice machines are not designed for outdoor<br />
<strong>installation</strong>s.<br />
Machine requires voltage indicated on rating nameplate. Failures<br />
caused by improper voltage are not considered factory defects.<br />
Extended periods of operation at temperatures exceeding limitations<br />
constitutes misuse under the terms of the <strong>Ice</strong>-O-<strong>Matic</strong> Manufacture’s<br />
Limited Warranty, resulting in a loss of warranty coverage.<br />
Specifications and design are subject to change without notice.<br />
The IOD150, IOD200 and IOD250 carry a 2-year Parts warranty<br />
and a 1 year Labor Warranty.<br />
These dispensers are designed to dispense cubed ice only.<br />
Flaked ice will not work.<br />
The dispenser will agitate for 4 seconds every (1) hour.<br />
Page 2
For The Installer IOD150, IOD200, IOD250<br />
Equipment Description<br />
The IOD150, IOD200 and IOD250 are counter top mounted ice only dispensers. These units are<br />
designed to dispense cube ice only and have ice storage capacities of 150 lb.,220 lb. and 250 lb.<br />
respectively.<br />
Site Preparation<br />
The site chosen for the dispenser must be capable of supporting the dispenser with a full bin of ice<br />
plus all other loads being placed on the surface supporting the dispenser. If an ice machine is being<br />
placed on the dispenser, the weight of the ice machine must be included in the calculations to<br />
determine the support structure needed for the dispenser.<br />
Allow sufficient clearance above the unit for removal of the cover and for pouring ice into the bin.<br />
A 115 volt, 15 amp electric outlet needs to be located within 6 feet of the unit. The outlet must be<br />
properly grounded and fused. No other electrical appliance should be on the circuit. ALL<br />
ELECTRICAL WIRING MUST CONFORM TO NATIONAL AND LOCAL CODES<br />
Do not place the dispenser next to heat sources such as ovens, heat ducts or in the warm air<br />
discharge from adjacent equipment.<br />
The unit must be located near a building drain. Drain lines must be properly vented and pitched to<br />
ensure free flowing of wastewater to the drain.<br />
These dispensers are designed to dispense cubed ice only. Do not use flaked, crushed or<br />
compressed ice forms.<br />
If an <strong>Ice</strong>-O-<strong>Matic</strong> ice machine is to be placed on top of the dispenser, an adapter will be required.<br />
<strong>Ice</strong> Machine Adapter 22 inch cuber Part Number KBT42<br />
<strong>Ice</strong> Machine Adapter 22 inch cuber on 30 wide dispenser Part Number KBT43<br />
<strong>Ice</strong> Machine Adapter 30 inch cuber Part Number KBT44<br />
This ice dispenser has been specifically designed to provide protection against personal injury and<br />
eliminates contamination of ice. To ensure continued protection and sanitation, observe the following:<br />
�ALWAYS: disconnect power to the dispenser before servicing or cleaning.<br />
�NEVER: place hands inside of hopper or grate area without disconnecting power to the dispenser.<br />
�Agitator rotation occurs automatically when dispenser is energized.<br />
�ALWAYS: be sure the removable lid is properly installed to prevent unauthorized access to the<br />
hopper interior and possible contamination of the ice.<br />
�ALWAYS: be sure the upper and lower front panels are securely fastened.<br />
�ALWAYS: keep area around the dispenser clean of ice cubes.<br />
�CAUTION: Dispenser cannot be used with crushed or flaked ice.<br />
Use of bagged ice, which has frozen into chunks, can void warranty.<br />
The dispenser agitator is not designed to be an ice crusher. Use of large chunks of ice which “jam<br />
up” inside the hopper will cause failure of the agitator motor and damage to the hopper. If bagged ice<br />
is used, it must be carefully and completely broken into small, cubed size pieces before filling into the<br />
dispense hopper.<br />
Page 3
Installation IOD150, IOD200, IOD250<br />
1. Locate the ice dispenser on the counter. Allow vertical clearance above the unit for the removal of<br />
the cover and for pouring ice into the hopper.<br />
2. Plan the unit drain. A one-inch (1”) I.D. drain tube is required for draining. Routing is either<br />
through the back or the base. Sufficient fittings are included with the unit to install in most cases.<br />
3. In order to comply with the National Sanitation Foundation (NSF) requirements, this unit must be<br />
either elevated above the counter top sufficiently to provide space for cleaning under the unit or<br />
sealed to the countertop<br />
Elevating the unit may be accomplished by using the legs. They will screw into threaded holes in<br />
the base of the unit. Note: Before installing legs the plastic plugs must be removed.<br />
IMPORTANT:<br />
It is the responsibility of the Installer to ensure that the water supply to the dispensing equipment is<br />
provided with protection against backflow by an air gap as defined in ANSI/ASME A112.1.2-1979: or<br />
an approved vacuum breaker or other such method as proved effective by test.<br />
Water pipe connections and fixtures directly connected to a potable water supply shall be sized,<br />
installed and maintained according to Federal, State and Local Codes.<br />
DRIP TRAY ASSEMBLY<br />
Drip Tray Drain Assembly (See Illustration Below): Route the drain tube to an open drain with the end<br />
of the tube above the “flood” level of the drain. Use the tubing, fittings, clamps and insulation provided<br />
with the Dispenser to assemble the drain. The completed drain line must pitch continuously<br />
downward and contain no “traps” or improper drainage will result.<br />
Note: This equipment must be<br />
installed with adequate backflow<br />
protection to comply with Federal,<br />
State and Local Codes.<br />
Drip Tray Drain Fitting<br />
Solvent Bond<br />
Hose Clamp<br />
Page 4<br />
Barb Adapter 1” Barb x ¾ MPT<br />
Coupling ¾ Socket x ¾ FPT<br />
Drain Line 1-Inch Plastic Tubing with Insulation
Water Glass Filler Kit IOD150, IOD200, IOD250<br />
Installation Instructions<br />
WARNING: Disconnect power to unit before proceeding with <strong>installation</strong>.<br />
1. Prepare the unit as follows:<br />
�Remove the lower front panel<br />
�Locate faucet-mounting holes in the front panel. (Reference page 6 for hole locations)<br />
2. Install faucet and tubing assembly as shown below.<br />
3. Connect field water supply to ¼ male flare fitting on tubing assembly. Apply water pressure and<br />
check all connections for leaks. Check faucet for proper operation. Maximum water pressure is<br />
125 psi. Check that tubing assembly does not interfere with wiring or electrical connections.<br />
4. Carefully reinstall panels on unit.<br />
Page 5
Water Glass Filler Kit (Con’t) IOD150, IOD200, IOD250<br />
Faucet mounting hole locations.<br />
IOD150 Dimensions<br />
A 4.0 Inches<br />
B 2.5 Inches<br />
IOD200 and IOD250 Dimensions<br />
A 6.125 Inches<br />
B 3.125 Inches<br />
The water inlet tubing can be routed<br />
either from the back or from<br />
underneath the dispenser.<br />
If from the back, remove the back<br />
and bottom access panels.<br />
Page 6
Initial Start Up IOD150, IOD200, IOD250<br />
1. Sanitize the ice storage system as instructed on Page 10.<br />
2. Fill the hopper with sanitary ice.<br />
3. Plug the unit’s power cord into an electrical outlet and the lighted sign should come on.<br />
4. Dispense several containers of ice.<br />
Note: In normal operation, pushing the ice<br />
dispenser mechanism will cause ice to flow<br />
from the ice chute. <strong>Ice</strong> flow will continue until<br />
the dispenser mechanism is released or until<br />
the hopper runs out of ice.<br />
CAUTION: Use caution to avoid spilling ice<br />
when filling dispenser. Clean up immediately<br />
any spilled ice from filling or operating the unit.<br />
To prevent contamination of ice, the lid must be<br />
installed on the unit at all times.<br />
Note: This unit is provided with a timer that will activate the ice dispenser rotor for 4 seconds<br />
each time the unit is plugged into an electrical outlet and every hour (1) thereafter.<br />
The agitation cycle helps to keep the ice from fusing together during long periods of non-use.<br />
No ice is dispensed during the agitation.<br />
<strong>Ice</strong> Machine Installation<br />
Make sure the counter the dispenser is place on is structurally able to hold the combined weight of the<br />
dispenser, ice and ice machine.<br />
Remove the dispenser cover. (Retain for future use)<br />
Place the appropriate stainless steel KBT adapter onto the top of the dispenser.<br />
22 inch wide ice machine on a 22-inch wide dispenser. Part number KBT42<br />
22 inch wide ice machine on a 30-inch wide dispenser. Part Number KBT43<br />
30 inch wide ice machine on a 30-inch wide dispenser. Part Number KBT44<br />
Install the thermostatic bin control kit when applicable. Part Number 1051020-02<br />
Note: The thermostatic bin control kit is required on all ICE Series Cubers.<br />
Using silicone sealant, place a bead of sealant onto the top edges of the area on the adapter where<br />
the ice machine will go.<br />
Install the ice machine onto the dispenser, center the machine left to right and align the machine flush<br />
to the back.<br />
Install the thermostatic bin control cap tube into the thermal well mounted in the bin.<br />
Note: The thermostatic bin control kit is required on all ICE Series Cubers. (P.N.1051020-02)<br />
Fasten together at the back of the machine using fasteners from the icemaker and mounting hardware<br />
from the kit.<br />
Place the front cover plate onto the dispenser in front of the ice machine.<br />
Follow the ice machine start-up instructions included with the ice machine.<br />
Completion<br />
Make a final check for any leaks and correct as necessary.<br />
Reinstall the splash panel and secure it with two Phillips head screws.<br />
Check for proper operation of the dispense system.<br />
Instruct the site manager regarding the requirements for maintaining, operation and sanitizing the<br />
dispenser.<br />
Page 7
Gate Restrictor Plate IOD150, IOD200, IOD250<br />
CAUTION: Disconnect power to dispenser and ice machine before installing, removing or<br />
adjusting restrictor.<br />
ADJUSTMENT<br />
This plate may be adjusted as shown to reduce or increase the dispensing rate of ice, especially<br />
desirable when using glasses or other containers with small openings. Adjustment can be made by<br />
sliding up or down with the nuts loosened, to obtain the desired amount of restriction.<br />
Page 8
Cleaning and Sanitizing IOD150, IOD200, IOD250<br />
The sink, grill and splash panel area should be cleaned daily.<br />
The following dispenser maintenance should be performed at the intervals indicated:<br />
Daily (Or As Required)<br />
Remove foreign material from vending area drip tray to prevent drain blockage.<br />
Weekly (Or As Required) Clean vending area. Check for proper water drainage from the vending<br />
area.<br />
Monthly Clean and sanitize the hopper interior. (See Cleaning Instructions)<br />
CLEANING PRECAUTIONS<br />
WARNING: Disconnect Power Before Cleaning! Do not use metal scrapers, sharp objects<br />
or abrasives on the ice storage hopper, top cover and the agitator disk, as damage may result.<br />
Do not use solvents or other cleaning agents, as they may attack the plastic material.<br />
Soap Solution – Use a mixture of mild detergent and warm (100�F) potable water.<br />
Page 9
Cleaning and Sanitizing IOD150, IOD200, IOD250<br />
MONTHLY AND INITIAL START UP:<br />
Sanitize the <strong>Ice</strong> Storage System.<br />
Note: This should be done by qualified personnel.<br />
CLEANING PRECAUTIONS<br />
WARNING: Disconnect Power Before Cleaning! Do not use metal scrapers, sharp objects<br />
or abrasives on the ice storage hopper, top cover and the agitator disk, as damage may result.<br />
Do not use solvents or other cleaning agents, as they may attack the plastic material.<br />
Soap Solution – Use a mixture of mild detergent and warm (100�F) potable water.<br />
1. Disconnect power to the dispenser and ice machine.<br />
2. Remove and discard all remaining ice.<br />
3. Mix a solution of 1 ounce of household bleach to 2 gallons of potable water, or mix a solution of any<br />
locally approved sanitizer, following the directions for mixing and applying that sanitizer.<br />
Caution: When pouring liquid into the hopper, do not exceed the rate of ½ gallon per minute.<br />
4.Remove the agitator assembly.<br />
5. Using a long handle nylon bristle brush, clean the interior of the hopper, and top cover with soap<br />
solution. Clean the agitator assembly with soap solution using a nylon brush or a sponge.<br />
Thoroughly rinse the hopper, top cover and agitator with clean potable water.<br />
6. Remove merchandiser and ice chute cover from the dispenser.<br />
7. With a nylon bristle brush or sponge, clean the inside of the ice chute, gasket and cover with soap<br />
solution and rinse thoroughly to remove all traces of detergent.<br />
8. Re-assemble Agitator assembly. Take special care to ensure that the thumbscrew is tight.<br />
9. Using a mechanical spray bottle filled with a sanitizing solution, spray the entire interior and agitator<br />
assembly. Allow to air dry.<br />
10. Re-assemble ice chute assembly.<br />
11. Using a mechanical spray bottle filled with a sanitizing solution, spray the inside of the ice chute.<br />
Allow to air dry.<br />
12. Reinstall merchandiser.<br />
13. Wipe the top edge of the ice hopper with the sanitizing solution, allow to air dry.<br />
14. Pour in fresh, sanitary ice and replace the cover. Re-connect power to the dispenser and ice<br />
machine.<br />
Page 10
Troubleshooting IOD150, IOD200, IOD250<br />
IMPORTANT: only qualified personnel should service internal components or electrical wiring.<br />
Should the dispenser fail to operate properly, check that there is power to the unit and that the hopper<br />
contains ice. If the unit does not dispense, check the following chart under the appropriate symptoms<br />
to aid in locating the defect.<br />
TROUBLE PROBABLE CAUSE<br />
Blown fuse or circuit breaker.<br />
A. Short circuit in wiring.<br />
B. Defective gate solenoid.<br />
C. Defective Agitator<br />
Gate does not open, Agitator does not turn.<br />
A. No power.<br />
B. Bent depressor plate (does not actuate switch)<br />
C. Defective dispensing switch.<br />
Gate does not open, or is sluggish. Agitator turns.<br />
A Stuck or bent dispenser plate. (does not release ice)<br />
B. Excessive pressure against gate slide.<br />
C. Defective rectifier.<br />
<strong>Ice</strong> Dispenses Continually<br />
A. Stuck or bent depressor plate. (does not release switch)<br />
B. Defective dispensing switch.<br />
C. Improper switch <strong>installation</strong>.<br />
Slushy <strong>Ice</strong>. Water in Hopper<br />
A. Blocked drain<br />
B. Unit not level<br />
C. Poor ice quality due to water quality or icemaker problems.<br />
D. Improper use of flaked ice.<br />
Page 11
Wiring Diagram IOD150, IOD200, IOD250<br />
Page 12