4 in 1 rechargeable heater fan/defroster 12v - Maplin Electronics
4 in 1 rechargeable heater fan/defroster 12v - Maplin Electronics
4 in 1 rechargeable heater fan/defroster 12v - Maplin Electronics

You also want an ePaper? Increase the reach of your titles
YUMPU automatically turns print PDFs into web optimized ePapers that Google loves.
4 IN 1 RECHARGEABLE HEATER FAN/DEFROSTER 12V<br />
WELCOME<br />
This product has been carefully eng<strong>in</strong>eered and manufactured to give you dependable operation.<br />
Please read this manual thoroughly before operat<strong>in</strong>g your new product as it conta<strong>in</strong>s the <strong>in</strong>formation<br />
you need to become familiar with its features and obta<strong>in</strong> the performance that will br<strong>in</strong>g you cont<strong>in</strong>ued<br />
enjoyment for many years. Please keep this manual on file for future reference.<br />
IMPORTANT<br />
PRIOR TO USE, READ AND UNDERSTAND ALL WARNINGS, CAUTIONS AND INSTRUCTIONS INCLUDED<br />
IN THIS INSTRUCTION MANUAL, AND THOSE PUBLISHED BY YOUR VEHICLE BATTERY MANUFACTURER<br />
AND MANUFACTURER OF ANY DEVICE INTENDED TO BE USED WITH THIS UNIT. RETAIN THESE<br />
INSTRUCTIONS FOR FUTURE REFERENCE.<br />
Safety Instructions<br />
• Use this product with 12-Volt DC systems or cordless operation. Do not connect to 6 or 24-Volt<br />
DC Batteries. (Only use <strong>in</strong> 12V DC sockets rated at 20 Amps or higher!)<br />
• This unit has a built <strong>in</strong> lead acid battery. Although the unit arrives partially charged from the factory,<br />
it should be fully charged before first use.<br />
• Recharge the battery after each use or every 2 months to maximize the life of the battery.<br />
• Do not operate this device or place this unit near flammable materials.<br />
• Do not use the product when charg<strong>in</strong>g the battery with AC or DC adapters as it may cause damage<br />
to the AC adapter and/or the product.<br />
• The vehicle voltage must be present <strong>in</strong> the cigarette lighter, even when the ignition is switched<br />
off and the ignition key removed, so that the device may be operated. If this is not the case with<br />
your vehicle, a specialist garage can make a bypass for cont<strong>in</strong>uous operation.<br />
• Please ensure 12V DC operation power cord is fully extended prior to and dur<strong>in</strong>g use, to prevent<br />
any overheat<strong>in</strong>g issues.<br />
• The <strong>fan</strong> <strong>heater</strong> is not suitable for <strong>in</strong>stallation <strong>in</strong>ternally but only for <strong>in</strong>stallation on the dashboard or<br />
foot well.<br />
• Please do not operate the <strong>fan</strong> <strong>heater</strong> while you are driv<strong>in</strong>g.<br />
• The AC adapter is for charg<strong>in</strong>g only. The unit cannot be operated by us<strong>in</strong>g the AC adapter.<br />
• Observe m<strong>in</strong>imum distance from other devices (at least 20 cm)<br />
• Always keep the open<strong>in</strong>gs of the <strong>fan</strong> <strong>heater</strong> uncovered<br />
• Protect the <strong>fan</strong> <strong>heater</strong> from damp.<br />
• Always unplug when the device is not be<strong>in</strong>g used.<br />
• Do not open the unit. There are no user replaceable parts <strong>in</strong> this unit. Do<strong>in</strong>g so will void the<br />
warranty.<br />
• This device conta<strong>in</strong>s sealed, non-spillable lead-acid battery and must be disposed properly<br />
when the device is discarded. Contact your local government recycl<strong>in</strong>g authority for proper<br />
disposal methods. Failure to follow <strong>in</strong>struction may cause damage or explosion hazard.<br />
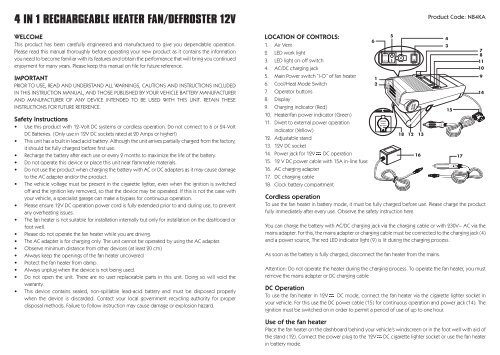
LOCATION OF CONTROLS:<br />
1. Air Vent<br />
2. LED work light<br />
3. LED light on-off switch<br />
4. AC/DC charg<strong>in</strong>g jack<br />
5. Ma<strong>in</strong> Power switch “I-O” of <strong>fan</strong> <strong>heater</strong><br />
6. Cool/Heat Mode Switch<br />
7. Operator buttons<br />
8. Display<br />
9. Charg<strong>in</strong>g <strong>in</strong>dicator (Red)<br />
10. Heater/<strong>fan</strong> power <strong>in</strong>dicator (Green)<br />
11. Divert to external power operation<br />
<strong>in</strong>dicator (Yellow)<br />
12. Adjustable stand<br />
13. 12V DC socket<br />
14. Power jack for 12V DC operation<br />
15. 12 V DC power cable with 15A <strong>in</strong>-l<strong>in</strong>e fuse<br />
16. AC charg<strong>in</strong>g adapter<br />
17. DC charg<strong>in</strong>g cable<br />
18. Clock battery compartment<br />
Product Code: N84KA<br />
Cordless operation<br />
To use the <strong>fan</strong> <strong>heater</strong> <strong>in</strong> battery mode, it must be fully charged before use. Please charge the product<br />
fully immediately after every use. Observe the safety <strong>in</strong>struction here.<br />
You can charge the battery with AC/DC charg<strong>in</strong>g jack via the charg<strong>in</strong>g cable or with 230V~ AC via the<br />
ma<strong>in</strong>s adapter. For this, the ma<strong>in</strong>s adapter or charg<strong>in</strong>g cable must be connected to the charg<strong>in</strong>g jack (4)<br />
and a power source, The red LED <strong>in</strong>dicator light (9) is lit dur<strong>in</strong>g the charg<strong>in</strong>g process.<br />
As soon as the battery is fully charged, disconnect the <strong>fan</strong> <strong>heater</strong> from the ma<strong>in</strong>s.<br />
6<br />
1<br />
2<br />
Attention: Do not operate the <strong>heater</strong> dur<strong>in</strong>g the charg<strong>in</strong>g process. To operate the <strong>fan</strong> <strong>heater</strong>, you must<br />
remove the ma<strong>in</strong>s adapter or DC charg<strong>in</strong>g cable<br />
DC Operation<br />
To use the <strong>fan</strong> <strong>heater</strong> <strong>in</strong> 12V DC mode, connect the <strong>fan</strong> <strong>heater</strong> via the cigarette lighter socket <strong>in</strong><br />
your vehicle. For this use the DC power cable (15) for cont<strong>in</strong>uous operation and power jack (14). The<br />
ignition must be switched on <strong>in</strong> order to permit a period of use of up to one hour.<br />
Use of the <strong>fan</strong> <strong>heater</strong><br />
Place the <strong>fan</strong> <strong>heater</strong> on the dashboard beh<strong>in</strong>d your vehicle’s w<strong>in</strong>dscreen or <strong>in</strong> the foot well with aid of<br />
the stand (12). Connect the power plug to the 12V DC cigarette lighter socket or use the <strong>fan</strong> <strong>heater</strong><br />
<strong>in</strong> battery mode.<br />
CR2022<br />
CLOCK<br />
BATTERY<br />
5<br />
18 12 13<br />
16<br />
4<br />
3<br />
15<br />
17<br />
7<br />
8<br />
11<br />
10<br />
9<br />
14
Select switch sett<strong>in</strong>g “I” on the ON/OFF switch (5). With this sett<strong>in</strong>g, the green <strong>in</strong>dicator light (10) is lit<br />
and the <strong>fan</strong> <strong>heater</strong> is ready to use.<br />
To choose between cool and hot air, use the Cool/Heat switch (6). Here “Cool” stands for cool air and<br />
“Heat” for hot air.<br />
Now you can start the <strong>fan</strong> <strong>heater</strong> manually or automatically with the timer switch.<br />
Start<strong>in</strong>g the <strong>fan</strong> <strong>heater</strong> manually<br />
To start the <strong>fan</strong> <strong>heater</strong> manually, press and hold down the “+” button (7) for 3 seconds. “ON” appears<br />
<strong>in</strong> the display and the <strong>fan</strong> <strong>heater</strong> is operat<strong>in</strong>g.<br />
To switch it off, press and hold down the “-“ button (7) for 3 seconds. “OFF” appears <strong>in</strong> the display and<br />
the <strong>fan</strong> <strong>heater</strong> is deactivated.<br />
Start<strong>in</strong>g the <strong>fan</strong> <strong>heater</strong> automatically<br />
To use the <strong>fan</strong> <strong>heater</strong> <strong>in</strong> automatic mode, press and hold down the “S” button (7) for 3 seconds. If the<br />
symbol “C” appears <strong>in</strong> the display, the time is locked. Press and hold down the “S” button aga<strong>in</strong> for 3<br />
seconds this will release the timer. The symbol “P” appears <strong>in</strong> the display and the start/stop time can<br />
be set.<br />
Sett<strong>in</strong>g the <strong>fan</strong> <strong>heater</strong>’s start time<br />
To set the start time, press the “+” button (7) briefly. Now the display show “ON” and flashes.<br />
With the aid of the “+” and “-“ buttons (7) you can set a time at which the <strong>fan</strong> <strong>heater</strong> is to start. You must<br />
first <strong>in</strong>put the hours. After <strong>in</strong>putt<strong>in</strong>g the hours, wait about 3 seconds until the display flashes for the<br />
m<strong>in</strong>utes. Now <strong>in</strong>put the m<strong>in</strong>utes. The time is set as soon as the display stops flash<strong>in</strong>g and “OFF AUTO”<br />
is displayed.<br />
Sett<strong>in</strong>g the <strong>fan</strong> <strong>heater</strong>’s switch-off time<br />
To set the switch-off time, press the “-“ button (7) briefly. Now the display shows “OFF” and flashes.<br />
With the aid of the “+” and “-“ buttons (7) you can set a time at which the <strong>fan</strong> <strong>heater</strong> is to be switched<br />
off. Firstly, as with the start time, the hours must be <strong>in</strong>put. After <strong>in</strong>putt<strong>in</strong>g the hours, wait about 3<br />
seconds until the display flashes for the m<strong>in</strong>utes. Now <strong>in</strong>put the m<strong>in</strong>utes. The time is set as soon as the<br />
display stops flash<strong>in</strong>g and “OFF AUTO” is displayed.<br />
Sett<strong>in</strong>g the time with the timer switch<br />
To set the time, press the “S” button briefly. Now the display flashes for the hours as already described<br />
for sett<strong>in</strong>g the start/stop time. The time can be set with the “+” and “-“<br />
button (7). After <strong>in</strong>putt<strong>in</strong>g the hours, wait about 3 seconds until the display flashes to the m<strong>in</strong>utes. Now<br />
<strong>in</strong>put the m<strong>in</strong>utes. The time is set as soon as the display stops flash<strong>in</strong>g and “OFF AUTO” is displayed.<br />
The last step is sav<strong>in</strong>g the <strong>in</strong>put. To do this, press and hold down the “S” button for 3 seconds until the<br />
symbol “C” appears <strong>in</strong> the display.<br />
Automatic mode operation<br />
Note:<br />
1. DO NOT switch off the ma<strong>in</strong> power switch (5) of <strong>fan</strong> <strong>heater</strong>. Otherwise, the <strong>fan</strong> <strong>heater</strong> will not be<br />
switched on automatically at the preset time.<br />
2. As the operation time <strong>in</strong> battery mode is limited, if you would like to prolong the operation time,<br />
you need to connect the <strong>fan</strong> <strong>heater</strong> via the cigarette socket <strong>in</strong> your vehicle. Use the DC power<br />
cable (15) for cont<strong>in</strong>uous operation and power jack (14). The vehicle voltage must be present <strong>in</strong><br />
the cigarette lighter, even when the ignition is switched off and the ignition key removed, so that<br />
the device may be operated. When <strong>fan</strong> <strong>heater</strong>’s battery voltage is runn<strong>in</strong>g low, it will divert to<br />
power from your vehicle’s battery, the yellow LED <strong>in</strong>dicator light (11) is lit dur<strong>in</strong>g operation.<br />
Additional functions<br />
The <strong>fan</strong> <strong>heater</strong> has a “battery monitor” function that ensures trouble-free start<strong>in</strong>g of the vehicle <strong>in</strong> car<br />
power mode i.e. the car battery cannot be discharged.<br />
The <strong>heater</strong> also has a LED light (2). To activate this, please select the switch position “Light” on the LED<br />
light switch (3). To switch the light off, please select the switch position “LED”.<br />
12V DC devices of any k<strong>in</strong>d below 10Amp may also be operated via the <strong>in</strong>built 12V socket (13).<br />
Faults/Causes<br />
The <strong>fan</strong> <strong>heater</strong> is not work<strong>in</strong>g!<br />
1. Check that the contacts <strong>in</strong> the vehicle’s 12V DC socket are clean and if necessary clean them.<br />
2. Check <strong>in</strong> the vehicle’s fuse block that the fuse used for the 12V DC socket is <strong>in</strong>tact. Replace it if<br />
necessary.<br />
3. Check that the fuse on the <strong>fan</strong> <strong>heater</strong>’s power cord is <strong>in</strong>tact. Replace it if necessary.<br />
4. Timer clock has no display and <strong>fan</strong> <strong>heater</strong> cannot be switched ON, the clock battery must be<br />
replaced for cont<strong>in</strong>uous operation.<br />
Clock Battery replacement<br />
The clock battery can be replaced by unscrew<strong>in</strong>g the battery compartment (18). Replace same type of<br />
battery 3V CR2032 and tighten the screws.<br />
SPECIFICATION<br />
Built <strong>in</strong> battery : Built 2 x 6V 5Ah <strong>rechargeable</strong> lead acid battery<br />
Voltage : 12 Volt<br />
Clock battery: 3V CR2032<br />
Current Draw: max. 8 Amps<br />
12V Power socket: 12V DC max. 10Amp<br />
Work light : 2 x white LED<br />
Length of Power Cord: 1 Meter with 15Amp <strong>in</strong>-l<strong>in</strong>e blade fuse<br />
AC charg<strong>in</strong>g time : 14 hours for charg<strong>in</strong>g with AC adapter<br />
DC charg<strong>in</strong>g time : 6-8 hours for charg<strong>in</strong>g with DC adapter<br />
WEEE Directive & Product Disposal<br />
At the end of its serviceable life, this product should not be treated as<br />
household or general waste. It should be handed over to the applicable<br />
collection po<strong>in</strong>t for the recycl<strong>in</strong>g of electrical and electronic equipment,<br />
or returned to the supplier for disposal.<br />
Notice to customers<br />
This symbol on the battery <strong>in</strong>dicates that the battery is to be collected separately.<br />
The follow<strong>in</strong>g apply only to users <strong>in</strong> European countries.<br />
�� ����� �������� ��� ��������� ���� ��������� ����������� ��� ��� ������������ �����������<br />
po<strong>in</strong>t. Do not dispose of as household waste<br />
�� ���� ����� ������������� �������� ���� ��������� ��� ������ ������������ ��� ������� ���<br />
waste management.