Color-Coated Screws and Fasteners - Electronic Fasteners Inc
Color-Coated Screws and Fasteners - Electronic Fasteners Inc
Color-Coated Screws and Fasteners - Electronic Fasteners Inc

You also want an ePaper? Increase the reach of your titles
YUMPU automatically turns print PDFs into web optimized ePapers that Google loves.
The type “Basic”, “BA”, <strong>and</strong> “BB” fasteners are<br />
designed to be installed using st<strong>and</strong>ard presses<br />
(mechanical, hydraulic, or impact) commonly found in<br />
a shop environment. The tooling required is simply<br />
a punch <strong>and</strong> an anvil which can be installed in the<br />
press to be used. For the type “Basic” fastener,<br />
both the punch <strong>and</strong> anvil are flat. For the type<br />
“BA” <strong>and</strong> “BB” fasteners, a clearance hole (F<br />
& G dimensions) is required in the punch for<br />
the appendage. See<br />
Table 1 below for<br />
recommended punch<br />
clearance hole size.<br />
Due to the wide<br />
variety of press<br />
equipment available<br />
<strong>and</strong> the simplicity<br />
of the punch <strong>and</strong><br />
anvil required, it is<br />
intended that customers fabricate their own punch<br />
<strong>and</strong> anvil to fit their particular equipment <strong>and</strong><br />
applications.<br />
Table 1- RECCOMENDED ANVIL CLEARANCE HOLES<br />
FOR TYPE ‘BA’ AND TYPE ‘BB’ FASTENERS<br />
Installation Guidelines<br />
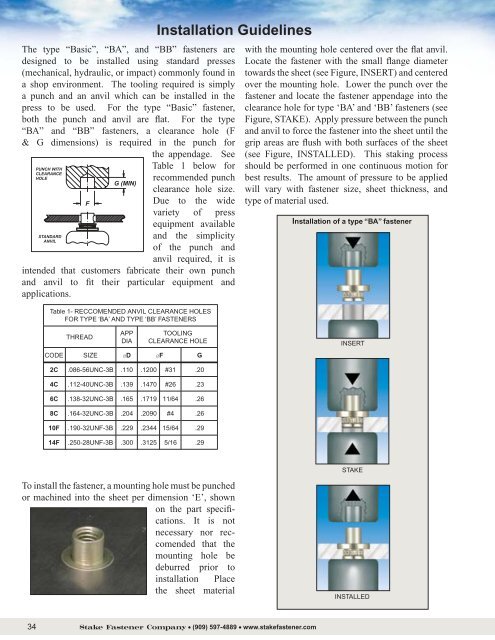
with the mounting hole centered over the flat anvil.<br />
Locate the fastener with the small flange diameter<br />
towards the sheet (see Figure, INSERT) <strong>and</strong> centered<br />
over the mounting hole. Lower the punch over the<br />
fastener <strong>and</strong> locate the fastener appendage into the<br />
clearance hole for type ‘BA’ <strong>and</strong> ‘BB’ fasteners (see<br />
Figure, STAKE). Apply pressure between the punch<br />
<strong>and</strong> anvil to force the fastener into the sheet until the<br />
grip areas are flush with both surfaces of the sheet<br />
(see Figure, INSTALLED). This staking process<br />
should be performed in one continuous motion for<br />
best results. The amount of pressure to be applied<br />
will vary with fastener size, sheet thickness, <strong>and</strong><br />
type of material used.<br />
Installation of a type “BA” fastener<br />
THREAD<br />
APP<br />
DIA<br />
TOOLING<br />
CLEARANCE HOLE<br />
CODE SIZE ∅D ∅F G<br />
INSERT<br />
2C<br />
.086-56UNC-3B<br />
.110<br />
.1200<br />
#31<br />
.20<br />
4C<br />
.112-40UNC-3B<br />
.139<br />
.1470<br />
#26<br />
.23<br />
6C<br />
.138-32UNC-3B<br />
.165<br />
.1719<br />
11/64<br />
.26<br />
8C<br />
.164-32UNC-3B<br />
.204<br />
.2090<br />
#4<br />
.26<br />
10F<br />
.190-32UNF-3B<br />
.229<br />
.2344<br />
15/64<br />
.29<br />
14F<br />
.250-28UNF-3B<br />
.300<br />
.3125<br />
5/16<br />
.29<br />
STAKE<br />
To install the fastener, a mounting hole must be punched<br />
or machined into the sheet per dimension ‘E’, shown<br />
on the part specifications.<br />
It is not<br />
necessary nor reccomended<br />
that the<br />
mounting hole be<br />
deburred prior to<br />
installation Place<br />
the sheet material<br />
INSTALLED<br />
34 Stake Fastener Company • (909) 597-4889 • www.stakefastener.com