
You also want an ePaper? Increase the reach of your titles
YUMPU automatically turns print PDFs into web optimized ePapers that Google loves.
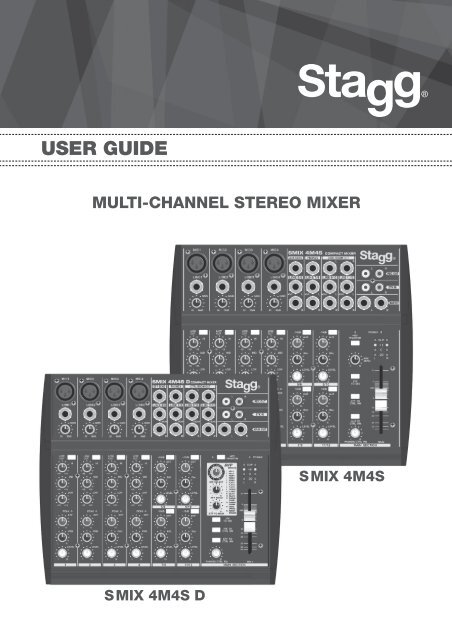
<strong>USER</strong> <strong>GUIDE</strong><br />
MULTI-CHANNEL STEREO MIXER<br />
S MIX 4M4S<br />
S MIX 4M4S D
FEATURES<br />
4 mono input channels and 4 stereo input channels.<br />
3-band frequency EQ for each input channel.<br />
Low-noise mic pre-amp on microphone inputs.<br />
Optional low cut filter to reduce low frequency interference for mono input channels.<br />
10dB attenuator switch on stereo channel.<br />
Individual stereo play input and record output channel.<br />
Monitor and headphones outputs.<br />
Peak indicator on each mono channel.<br />
+48V phantom power for condenser microphones.<br />
Built-in 16-preset DSP effect processor. (SMIX 4M4S D)<br />
2
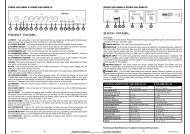
CONTROL PANEL<br />
MONO CHANNEL SECTION<br />
1. MIC This is an XLR type connector for microphones.<br />
The input level ranges from -60 to -20dB. This connector can<br />
provide +48V phantom power for condenser microphones<br />
when the phantom power is switched on.<br />
2. LINE This is a balanced 1/4” phone jack for linking a line<br />
level source The input level ranges from -40 to 0dB.<br />
3. GAIN Use this knob to adjust the level of the input signal<br />
to the optimal level. For optimal S/N ratio and dynamic<br />
range, adjust this knob so that the peak indicator lights up<br />
occasionally.<br />
4. LOW CUT Push down this switch to activate a low cut filter,<br />
which allows high frequencies but attenuates low frequencies.<br />
5. HI This control determines the level of high frequencies in<br />
the output signal.<br />
6. MID This control determines the level of mid frequencies<br />
in the output signal.<br />
7. LOW This control determines the level of low frequencies<br />
in the output signal.<br />
8. AUX (4M4S ONLY) Use this knob to control the signal<br />
level sent from each channel to the AUX bus. It is set before the<br />
channel fader, so it is not dependent on the fader position.<br />
8. EFF (4M4S D ONLY)<br />
Use this knob to control the signal level sent from each channel<br />
to the built-in effects processor. It is set after the channel fader,<br />
so it is dependent on the fader position. Adjust this knob when<br />
you use effects processor on this channel.<br />
9. PAN This control is used for distributing the signal level<br />
of the channel feed to L / R buses. When the control is set to<br />
12 o’clock, the signal is split evenly between L and R.<br />
10. PEAK Indicator This LED signal will warn you of any<br />
excessively high signal levels in the channel. The signal is<br />
sampled in front of channel fader. It will light approximately<br />
3dB before clipping and therefore give warning of a possible<br />
overload.<br />
11. LEVEL (Channel Fader)<br />
This rotary fader controls the output level feed to the main bus<br />
from the input channel, adjusting the volume balance between<br />
the channels.<br />
3
STEREO CHANNEL SECTION<br />
3A<br />
1. L/MONO - R These are two unbalanced 2-pole phone<br />
jacks for stereo line input. The input level range is -10dB.<br />
If the source signal is mono please use the left channel.<br />
2. -10dB Press this switch to attenuate the line input signal<br />
-10dB to fit a high level signal source.<br />
3A. AUX (4M4S only) Use this knob to control the signal<br />
level sent from each channel to the AUX bus. It is set before<br />
the channel fader, so it is not dependent on the fader<br />
position.<br />
3B. EFF (4M4S D only) Use this knob to control the<br />
signal level sent from each channel to the built-in effects<br />
processor. It is set after the channel fader, so it is dependent<br />
on the fader position. Adjust this knob when you use effects<br />
processor on this channel.<br />
4. BAL The BAL control for the stereo channels determines<br />
the relative volume of the left and right input signals.<br />
5. LEVEL (Channel Fader)<br />
This rotary fader controls the output level feed to the main<br />
bus from the input channel, adjusting the volume balance<br />
between the channels.<br />
EFF<br />
3B<br />
4
MASTER CONTROL SECTION<br />
1. AUX SEND<br />
This jack socket sends the signals to an auxiliary source.<br />
1. EFF SEND / FT SW (4M4S D MODEL ONLY)<br />
This is a 1/4” jack input for sending EFF output signals. It also can be linked to a foot switch to control<br />
the built-in effects processor.<br />
2. PHONES<br />
This jack socket sends the signals from main output or tape player to the headphones.<br />
3. CTRL RM<br />
These two jack sockets send stereo signals from the master output or an external player to the control<br />
room speakers.<br />
4. REC OUT<br />
These two RCA sockets send stereo signals for recording purposes.<br />
5. 2TK IN<br />
This RCA output receives stereo signals from external players.<br />
6. MAIN (L,R)<br />
These balanced 1/4” (Ø 6.3 mm) jack outputs send balanced line level signals from the mixer to external<br />
devices such as an EQ unit or a power amplifier. By using a mono jack in the outputs, the outputs<br />
become unbalanced.<br />
7.POWER Indicator<br />
Indicator Indicates the status of the internal DC power supply.<br />
8. Output Level meter<br />
This level meter indicates the signal level of the stereo main output (Left and Right) or play input<br />
(simultaneously with the signal sent to the phones jack).<br />
9. MAIN output control<br />
This slide fader is used for adjusting the final output level sent to the main output sockets.<br />
10. +48V Phantom Power Switch and Indicator<br />
This switch is used for turning on or off +48V phantom power. +48V voltage will be present on the<br />
socket of each microphone input channel when this switch is pressed down.<br />
Important: set all channel faders to minimum before turning on or off. Do not plug or unplug a<br />
microphone after the switch has been turned on. Do not turn on the switch when a dynamic<br />
microphone is in use.<br />
11. AUX SEND<br />
This knob controls the signal level sent to the AUX SEND socket.<br />
12. 2TK TO MIX<br />
The input signal from the 2TK RET sockets can be fed to the main bus when this switch is pressed down.<br />
13. 2TK TO CTRL RM<br />
Press down this button to feed the PLAY signal from an external device to the control room and<br />
headphones; release this button to feed the main signal to the control room and headphones.<br />
5
MASTER CONTROL SECTION<br />
S MIX 4M4S<br />
S MIX 4M4S D<br />
14. AUX TO CTRL RM<br />
Press down this button to feed the AUX signal to the control room and headphones; and the AUX signal<br />
is not controlled by 13.<br />
15. PHONES / CTRL RM<br />
This knob controls the signal level to the control room and headphones.<br />
16. EFF SELECT<br />
This knob is used for selecting one from 16 kinds of effects (refer to the effects table beside the<br />
selector).<br />
17. EFF SEND<br />
This knob is used for controlling the signal level feed to the internal effect unit from all input channels<br />
and also controlling the signal level output from the EFF SEND sockets.<br />
18. EFF TO MAIN<br />
Main effect output level knob for controlling the effect signal level of the main output.<br />
19. EFF TO CTRL RM<br />
Use this knob to control the signal level of the control room and headphones.<br />
REAL PANEL SECTION<br />
1. 17.5Vx2 AC Power Supply Socket<br />
This AC power supply socket is where you plug in the adapter provided (do not use any other adapter).<br />
2. AC Power Switch<br />
Use this switch to turn on or off the AC power.<br />
6
SPECIFICATIONS<br />
ing 1.47Kg SMIX 4M4S D - 1.42Kg SMIX 4M4S<br />
260x225x45 SMIX 4M4S D<br />
250x225x45 SMIX 4M4S<br />
7
IMPORTANT SAFETY INSTRUCTIONS<br />
READ AND KEEP THESE INSTRUCTIONS. HEED ALL WARNINGS.<br />
• If, after you have followed the instructions outlined above, this device fails to function, please<br />
contact your dealer. Under no circumstances should this device be opened. Leave all servicing to<br />
qualified personnel.<br />
• Electrical appliances must never be used in conditions of high humidity or heat.<br />
To prevent any risk of fire or electric shock, never spill or splash liquids on this device.<br />
Should this happen, unplug the power cable from the mains outlet and switch off the mixer immediately.<br />
• We would like to draw your intention to the instructions printed on the notice attached to the back<br />
of the appliance.<br />
• Exposure to extremely high noise levels may cause permanent hearing damage (especially when<br />
using headphones). Please use this device responsibly for you and your neighbourhood.<br />
MARKING & CONFORMITY<br />
1. The CE mark on this product means it conforms to the EMC Directive (2004/108/CE), CE marking<br />
Directive (93/68/EEC) and Low Voltage Directive (2006/95/EC).<br />
2. The «Crossed-out Wheeled Bin» is to draw your attention to the WEEE (Waste Electric & Electronic<br />
Equipment) Directive (2002/96/EC). It means this apparatus must be collected separately for recycling.<br />
3. «RoHS compliant» means this device conforms to the Directive (2002/95EC) on the restriction of<br />
the use of certain hazardous substances in electrical and electronic equipments, such as: Mercury,<br />
Lead, Cadmium, Hexavalent Chromium, Polybrominated Buphenyl (PBB) and Polybrominated<br />
Diphenyl Esthers (PBDE).<br />
DISTRIBUTOR / DEALER<br />
RoHS<br />
compliant<br />
EMD Music 08-2011-UK<br />
8