Streetable Silverado Part I
Streetable Silverado Part I
Streetable Silverado Part I

Create successful ePaper yourself
Turn your PDF publications into a flip-book with our unique Google optimized e-Paper software.
<strong>Streetable</strong> <strong>Silverado</strong> <strong>Part</strong> I<br />
BRINGING A DATED CUSTOM TRUCK INTO THE MODERN AGE<br />
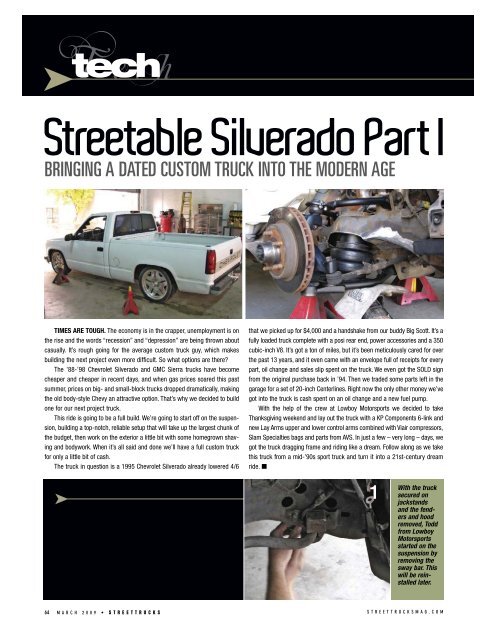
TIMES ARE TOUGH. The economy is in the crapper, unemployment is on<br />
the rise and the words “recession” and “depression” are being thrown about<br />
casually. It’s rough going for the average custom truck guy, which makes<br />
building the next project even more difficult. So what options are there?<br />
The ’88-’98 Chevrolet <strong>Silverado</strong> and GMC Sierra trucks have become<br />
cheaper and cheaper in recent days, and when gas prices soared this past<br />
summer, prices on big- and small-block trucks dropped dramatically, making<br />
the old body-style Chevy an attractive option. That’s why we decided to build<br />
one for our next project truck.<br />
This ride is going to be a full build. We’re going to start off on the suspension,<br />
building a top-notch, reliable setup that will take up the largest chunk of<br />
the budget, then work on the exterior a little bit with some homegrown shaving<br />
and bodywork. When it’s all said and done we’ll have a full custom truck<br />
for only a little bit of cash.<br />
The truck in question is a 1995 Chevrolet <strong>Silverado</strong> already lowered 4/6<br />
that we picked up for $4,000 and a handshake from our buddy Big Scott. It’s a<br />
fully loaded truck complete with a posi rear end, power accessories and a 350<br />
cubic-inch V8. It’s got a ton of miles, but it’s been meticulously cared for over<br />
the past 13 years, and it even came with an envelope full of receipts for every<br />
part, oil change and sales slip spent on the truck. We even got the SOLD sign<br />
from the original purchase back in ’94. Then we traded some parts left in the<br />
garage for a set of 20-inch Centerlines. Right now the only other money we’ve<br />
got into the truck is cash spent on an oil change and a new fuel pump.<br />
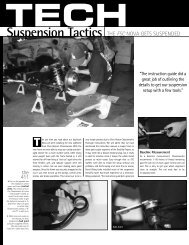
With the help of the crew at Lowboy Motorsports we decided to take<br />
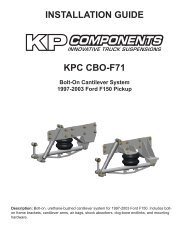
Thanksgiving weekend and lay out the truck with a KP Components 6-link and<br />
new Lay Arms upper and lower control arms combined with Viair compressors,<br />
Slam Specialties bags and parts from AVS. In just a few – very long – days, we<br />
got the truck dragging frame and riding like a dream. Follow along as we take<br />
this truck from a mid-’90s sport truck and turn it into a 21st-century dream<br />
ride. ■<br />
1<br />
With the truck<br />
secured on<br />
jackstands<br />
and the fenders<br />
and hood<br />
removed, Todd<br />
from Lowboy<br />
Motorsports<br />
started on the<br />
suspension by<br />
removing the<br />
sway bar. This<br />
will be reinstalled<br />
later.<br />
64 M A R C H 2 0 0 9 • S T R E E T T R U C K S<br />
S T R E E T T R U C K S M A G . C O M
TEXT AND PHOTOS BY KEVIN WHIPPS<br />
Next the spindle nut<br />
holding on the rotor was<br />
removed as well as the<br />
caliper.<br />
2<br />
8<br />
Using a plasma cutter,<br />
Todd carefully cut out<br />
the pocket.<br />
A jack was then placed<br />
under the lower control<br />
arm to allow the spindle<br />
to be removed while<br />
keeping the spring<br />
compressed.<br />
3<br />
9<br />
The stock frame curls in<br />
for the spring, and clearance<br />
has to be made for<br />
that as well. The plasma<br />
cutter does this easily,<br />
but a grinder and<br />
sawzall could be used<br />
also with a little bit of<br />
finesse.<br />
After the bolts were<br />
removed connecting the<br />
upper and lower control<br />
arm to the spindle, the<br />
jack was lowered and<br />
both the spindle and<br />
spring were removed.<br />
4<br />
10<br />
The frame has to be<br />
notched for both the<br />
lower control arm side<br />
towards the cab and the<br />
tie rods. Todd has a<br />
unique way of doing<br />
this, which he starts by<br />
marking out where to<br />
cut on the frame.<br />
The upper control arm<br />
was then unbolted from<br />
the frame and placed to<br />
the side.<br />
5<br />
11<br />
The lower control arm<br />
was unbolted and placed<br />
to the side as well.<br />
6<br />
12<br />
A pie-shaped notch was<br />
then cut out of the frame<br />
using a plasma cutter.<br />
The frame is then<br />
marked for clearance for<br />
the airbag.<br />
7<br />
13<br />
Using some finesse and<br />
a BFH, Todd beat the<br />
lower portion of the<br />
frame so that the pie<br />
shaped hole was<br />
closed up.<br />
S T R E E T T R U C K S M A G . C O M<br />
S T R E E T T R U C K S • M A R C H 2 0 0 9 65
LOW-BUCK SILVERADO PART I<br />
14 20<br />
Next Todd bolted in the<br />
KP Components Lay Arm<br />
upper control arm using<br />
the stock bolts and<br />
alignment cams.<br />
With everything together,<br />
Todd welded up the<br />
frame. The frame now<br />
has enough clearance<br />
for the lower control<br />
arms, the tie rods and<br />
the airbags, as well as<br />
allowing enough room to<br />
tuck a 22-inch wheel.<br />
15<br />
21<br />
The steering tie rods are<br />
bolted to the spindle.<br />
Once the frame was<br />
ground down smooth, it<br />
looked as good as stock<br />
and just as strong. It<br />
also looks a ton better<br />
than just notching for<br />
the arms individually.<br />
16<br />
22<br />
The bag and upper cup<br />
assembly are then bolted<br />
into the frame and<br />
lower control arm.<br />
On the bench the upper<br />
cup was bolted to the<br />
Slam Specialties bag<br />
and the fitting is tightened<br />
inside of the cup.<br />
The new KP Components<br />
Lay Arms lower control<br />
arms were bolted to<br />
the frame.<br />
17<br />
18<br />
23<br />
Using a 22-inch wheel<br />
that we borrowed from a<br />
friend, we tested everything<br />
out for clearance.<br />
We could get away with<br />
beating back the firewall<br />
to lay frame, but since<br />
we’re planning on bodydropping<br />
the truck soon,<br />
we decided to leave it<br />
alone. It’ll work fine with<br />
our 20s.<br />
The new drop spindle is<br />
next and was bolted to<br />
the lower control arm<br />
using new castle nuts.<br />
19<br />
24<br />
On the right is the KP<br />
Components bolt-in<br />
shock mount, and on the<br />
left is the unit we had to<br />
modify to clear the piecut<br />
frame. It was bolted<br />
to the frame using the<br />
large hole in the frame<br />
as a guide and then the<br />
shock was mounted up.<br />
66 M A R C H 2 0 0 9 • S T R E E T T R U C K S S T R E E T T R U C K S M A G . C O M
LOW-BUCK SILVERADO PART I<br />
This is where the engine<br />
harness connects to the<br />
interior harness, which<br />
hits the tire when the<br />
truck is laid out. Todd<br />
cuts out the sheetmetal<br />
around the hole so that<br />
he can relocate it.<br />
25<br />
31<br />
We also relocated<br />
the coolant<br />
reservoir from<br />
the firewall on<br />
the passenger<br />
side to the core<br />
support on the<br />
driver’s side.<br />
The patch piece was<br />
traced onto a piece of<br />
sheetmetal then cut out<br />
so we can fill the hole<br />
we just cut.<br />
26<br />
32<br />
With the fender<br />
on a stand,<br />
Todd tacked in<br />
the new inner<br />
fender.<br />
We cut out an area<br />
below the stock booster<br />
that matches the panel<br />
we removed.<br />
27<br />
The piece was then<br />
tacked in, as was the<br />
filler piece. This gave us<br />
the clearance we needed<br />
for the wheels.<br />
28<br />
33<br />
Once the fender<br />
was tacked in<br />
place, the stock<br />
inner fender was<br />
cut out with a<br />
cut off wheel.<br />
Todd made a cool<br />
bracket to hold the<br />
ABS module, fuse box<br />
and charcoal canister<br />
out of some ½-inch<br />
round tubing and the<br />
stock ABS bracket.<br />
29<br />
34<br />
Then Todd<br />
secured it some<br />
more with a few<br />
additional tack<br />
welds on the<br />
inside of the<br />
new fender.<br />
The bracket was mounted<br />
to the firewall and<br />
the stock booster.<br />
30<br />
35<br />
Finally, Todd laid<br />
down some<br />
seam sealer to<br />
clean up everything.<br />
Stay<br />
tuned next<br />
month when we<br />
finish off the<br />
rear of the truck<br />
and install the<br />
KP 6-link.<br />
S T R E E T T R U C K S M A G . C O M<br />
S T R E E T T R U C K S • M A R C H 2 0 0 9 67