RA Replacing all crankshaft main bearing shells (S54) - Ad Kusters
RA Replacing all crankshaft main bearing shells (S54) - Ad Kusters
RA Replacing all crankshaft main bearing shells (S54) - Ad Kusters

Create successful ePaper yourself
Turn your PDF publications into a flip-book with our unique Google optimized e-Paper software.
11 21 531 <strong>Replacing</strong> <strong>all</strong> <strong>crankshaft</strong> <strong>main</strong> <strong>bearing</strong> <strong>shells</strong><br />
(<strong>S54</strong>)<br />
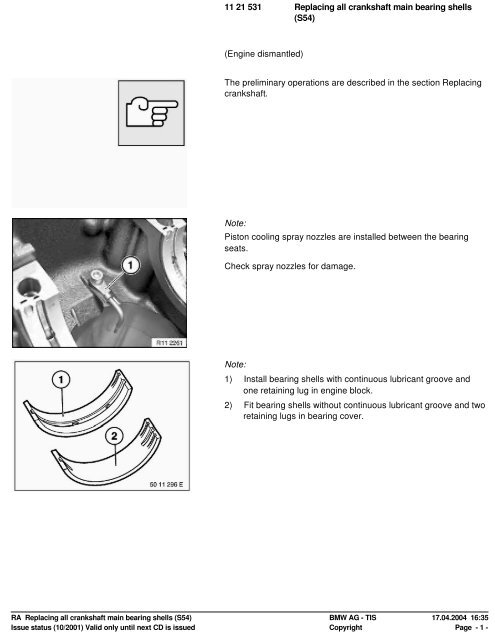
(Engine dismantled)<br />
The preliminary operations are described in the section <strong>Replacing</strong><br />
<strong>crankshaft</strong>.<br />
Note:<br />
Piston cooling spray nozzles are inst<strong>all</strong>ed between the <strong>bearing</strong><br />
seats.<br />
Check spray nozzles for damage.<br />
Note:<br />
1) Inst<strong>all</strong> <strong>bearing</strong> <strong>shells</strong> with continuous lubricant groove and<br />
one retaining lug in engine block.<br />
2) Fit <strong>bearing</strong> <strong>shells</strong> without continuous lubricant groove and two<br />
retaining lugs in <strong>bearing</strong> cover.<br />
<strong>RA</strong> <strong>Replacing</strong> <strong>all</strong> <strong>crankshaft</strong> <strong>main</strong> <strong>bearing</strong> <strong>shells</strong> (<strong>S54</strong>) BMW AG - TIS 17.04.2004 16:35<br />
Issue status (10/2001) Valid only until next CD is issued Copyright Page - 1 -
Inst<strong>all</strong>ation:<br />
When the <strong>bearing</strong> <strong>shells</strong> or the <strong>crankshaft</strong> are replaced, the<br />
classification for <strong>bearing</strong> shell arrangement in the engine block is<br />
eliminated.<br />
Only inst<strong>all</strong> yellow <strong>bearing</strong> <strong>shells</strong> in the engine block.<br />
Note:<br />
The axial guide on the <strong>crankshaft</strong> is fitted to <strong>bearing</strong> point 6.<br />
Insert pilot <strong>bearing</strong> shell in the engine block.<br />
Note:<br />
The <strong>crankshaft</strong> is marked with yellow, green or white paint<br />
according to the tolerance of the <strong>main</strong> journal.<br />
Insert <strong>crankshaft</strong> in engine block.<br />
Inst<strong>all</strong>ation:<br />
The <strong>bearing</strong> shell classification for the <strong>bearing</strong> cover is marked on<br />
the <strong>crankshaft</strong> in yellow, green or white paint.<br />
Place <strong>main</strong> <strong>bearing</strong> <strong>shells</strong> with same color code as that of<br />
<strong>crankshaft</strong> in <strong>main</strong> <strong>bearing</strong> caps.<br />
<strong>RA</strong> <strong>Replacing</strong> <strong>all</strong> <strong>crankshaft</strong> <strong>main</strong> <strong>bearing</strong> <strong>shells</strong> (<strong>S54</strong>) BMW AG - TIS 17.04.2004 16:35<br />
Issue status (10/2001) Valid only until next CD is issued Copyright Page - 2 -
The <strong>bearing</strong> <strong>shells</strong> are marked with yellow, green or white paint.<br />
1) Bearing shell<br />
2) Guide <strong>bearing</strong><br />
Observe grinding stage of <strong>main</strong> <strong>bearing</strong> journals.<br />
Note:<br />
Main <strong>bearing</strong> caps 1 to 5 are marked on exhaust side.<br />
Main <strong>bearing</strong> caps 6 and 7 are not marked.<br />
Main <strong>bearing</strong> cap 6 is thrust <strong>bearing</strong>.<br />
Check clearance on <strong>main</strong> <strong>crankshaft</strong> <strong>bearing</strong>.<br />
Inst<strong>all</strong> <strong>crankshaft</strong> and place special tool 00 2 590 (Plastigage<br />
Type PG1) on oil-free <strong>crankshaft</strong>.<br />
Do not twist <strong>crankshaft</strong>.<br />
Insert <strong>main</strong> <strong>bearing</strong> caps in such a way that guide grooves of <strong>main</strong><br />
<strong>bearing</strong> <strong>shells</strong> lie on one side.<br />
Align <strong>main</strong> <strong>bearing</strong> cap flush with side of <strong>bearing</strong> seat.<br />
<strong>RA</strong> <strong>Replacing</strong> <strong>all</strong> <strong>crankshaft</strong> <strong>main</strong> <strong>bearing</strong> <strong>shells</strong> (<strong>S54</strong>) BMW AG - TIS 17.04.2004 16:35<br />
Issue status (10/2001) Valid only until next CD is issued Copyright Page - 3 -
Inst<strong>all</strong>ation:<br />
To check <strong>main</strong> <strong>bearing</strong> clearance, use the old <strong>main</strong> <strong>bearing</strong><br />
screws.<br />
There must be no oil in the blind holes (risk of cracking).<br />
Note:<br />
Wash and oil <strong>main</strong> <strong>bearing</strong> bolts.<br />
1) Tighten down <strong>main</strong> <strong>bearing</strong> screws with jointing torque.<br />
2) Tighten down <strong>main</strong> <strong>bearing</strong> screws using special tool<br />
00 9 120 and torsion angle.<br />
Tightening torque, 11 11 1AZ.<br />
Remove <strong>main</strong> <strong>bearing</strong> cap and read off <strong>bearing</strong> clearance at width<br />
of pinched plastic thread on measuring scale.<br />
Crankshaft <strong>bearing</strong> clearance radial.<br />
If necessary, fit new <strong>bearing</strong> <strong>shells</strong> with a different color code to<br />
correct <strong>bearing</strong> clearance.<br />
Note:<br />
Remove plastic thread.<br />
Coat <strong>main</strong> <strong>bearing</strong> <strong>shells</strong> and <strong>crankshaft</strong> with engine oil.<br />
Insert <strong>main</strong> <strong>bearing</strong> cap in such a way that grooves of <strong>main</strong><br />
<strong>bearing</strong> shell guide lie on one side.<br />
Align <strong>main</strong> <strong>bearing</strong> cap flush with side of <strong>bearing</strong> seat.<br />
<strong>RA</strong> <strong>Replacing</strong> <strong>all</strong> <strong>crankshaft</strong> <strong>main</strong> <strong>bearing</strong> <strong>shells</strong> (<strong>S54</strong>) BMW AG - TIS 17.04.2004 16:35<br />
Issue status (10/2001) Valid only until next CD is issued Copyright Page - 4 -
Inst<strong>all</strong>ation:<br />
Always replace screws of <strong>main</strong> <strong>bearing</strong> caps with new ones.<br />
There must be no oil in the blind holes (risk of cracking).<br />
Note:<br />
Wash and oil <strong>main</strong> <strong>bearing</strong> bolts.<br />
Holders for oil lines are fitted on <strong>main</strong> <strong>bearing</strong> caps 3 and 5.<br />
Caution!<br />
Holders (1 and 2) are different.<br />
Holder (1) with elongated hole in vertical direction.<br />
Holder (2) with elongated hole in horizontal direction.<br />
Tightening specifications for <strong>main</strong> <strong>bearing</strong>:<br />
1) Tighten <strong>all</strong> screws on <strong>main</strong> <strong>bearing</strong> cover with jointing torque.<br />
2) Unfasten screws on <strong>main</strong> <strong>bearing</strong> cover 6.<br />
3) Strike back and front of <strong>crankshaft</strong> with plastic hammer to<br />
center thrust <strong>bearing</strong> (do not damage <strong>crankshaft</strong>).<br />
4) Tighten screws of <strong>main</strong> <strong>bearing</strong> cover 6 with jointing torque.<br />
5) Tighten down <strong>all</strong> screws on <strong>main</strong> <strong>bearing</strong> caps with special<br />
tool 00 9 120 and torsion angle.<br />
Tightening torque, 11 11 1AZ.<br />
Check axial play.<br />
If permitted end float is exceeded, check <strong>crankshaft</strong>, guide<br />
<strong>bearing</strong> <strong>shells</strong> and engine block, replacing if necessary,<br />
end float.<br />
<strong>RA</strong> <strong>Replacing</strong> <strong>all</strong> <strong>crankshaft</strong> <strong>main</strong> <strong>bearing</strong> <strong>shells</strong> (<strong>S54</strong>) BMW AG - TIS 17.04.2004 16:35<br />
Issue status (10/2001) Valid only until next CD is issued Copyright Page - 5 -