Providing Patch Management With N-central - N-able Technologies
Providing Patch Management With N-central - N-able Technologies
Providing Patch Management With N-central - N-able Technologies
You also want an ePaper? Increase the reach of your titles
YUMPU automatically turns print PDFs into web optimized ePapers that Google loves.
N-<strong>central</strong> 7.2 <strong>Providing</strong> <strong>Patch</strong> <strong>Management</strong> <strong>With</strong> N-<strong>central</strong><br />
If you selected Approved for Install, you will need to Specify your target devices (or<br />
device groups) by navigating through the list of folders and choosing the service organization,<br />
customer and folder (or folders) for which the associated devices will have the patch installed.<br />
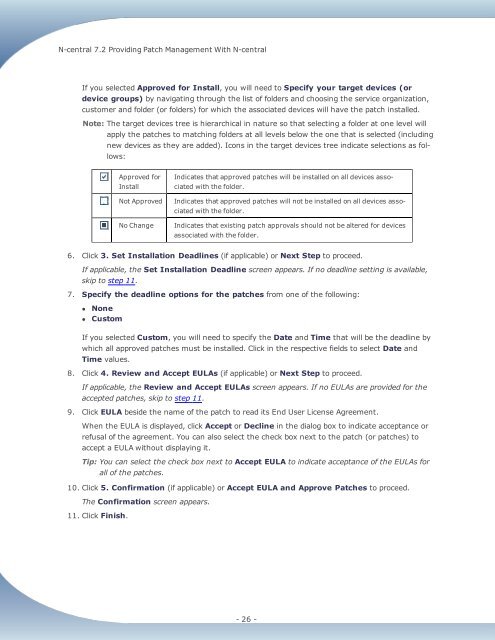
Note: The target devices tree is hierarchical in nature so that selecting a folder at one level will<br />
apply the patches to matching folders at all levels below the one that is selected (including<br />
new devices as they are added). Icons in the target devices tree indicate selections as follows:<br />
Approved for<br />
Install<br />
Not Approved<br />
No Change<br />
Indicates that approved patches will be installed on all devices associated<br />
with the folder.<br />
Indicates that approved patches will not be installed on all devices associated<br />
with the folder.<br />
Indicates that existing patch approvals should not be altered for devices<br />
associated with the folder.<br />
6. Click 3. Set Installation Deadlines (if applic<strong>able</strong>) or Next Step to proceed.<br />
If applic<strong>able</strong>, the Set Installation Deadline screen appears. If no deadline setting is avail<strong>able</strong>,<br />
skip to step 11.<br />
7. Specify the deadline options for the patches from one of the following:<br />
• None<br />
• Custom<br />
If you selected Custom, you will need to specify the Date and Time that will be the deadline by<br />
which all approved patches must be installed. Click in the respective fields to select Date and<br />
Time values.<br />
8. Click 4. Review and Accept EULAs (if applic<strong>able</strong>) or Next Step to proceed.<br />
If applic<strong>able</strong>, the Review and Accept EULAs screen appears. If no EULAs are provided for the<br />
accepted patches, skip to step 11.<br />
9. Click EULA beside the name of the patch to read its End User License Agreement.<br />
When the EULA is displayed, click Accept or Decline in the dialog box to indicate acceptance or<br />
refusal of the agreement. You can also select the check box next to the patch (or patches) to<br />
accept a EULA without displaying it.<br />
Tip: You can select the check box next to Accept EULA to indicate acceptance of the EULAs for<br />
all of the patches.<br />
10. Click 5. Confirmation (if applic<strong>able</strong>) or Accept EULA and Approve <strong>Patch</strong>es to proceed.<br />
The Confirmation screen appears.<br />
11. Click Finish.<br />
- 26 -


