A5 Rotavator aw:Layout 1 - Coopers of Stortford
A5 Rotavator aw:Layout 1 - Coopers of Stortford
A5 Rotavator aw:Layout 1 - Coopers of Stortford

You also want an ePaper? Increase the reach of your titles
YUMPU automatically turns print PDFs into web optimized ePapers that Google loves.
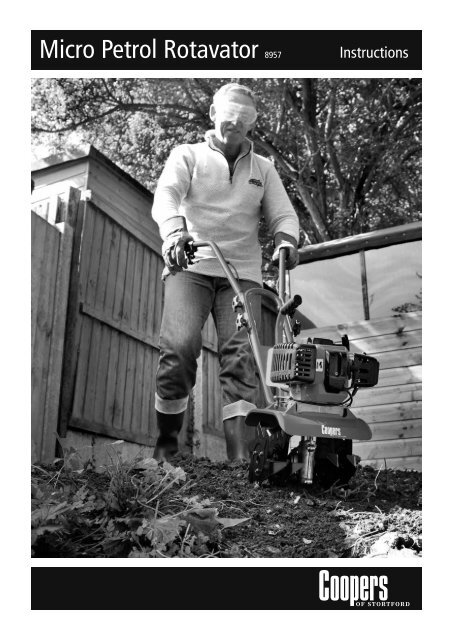
Micro Petrol <strong>Rotavator</strong> 8957<br />
Instructions
INTRODUCTION<br />
Congratulations on your purchase <strong>of</strong> a new rotavator.<br />
We are certain you will be pleased with your purchase<br />
<strong>of</strong> one <strong>of</strong> the finest rotavators on the market. It has<br />
been designed, engineered and manufactured to give<br />
you the best possible dependability and performance.<br />
We want to help you get the best results from your<br />
rotavator and to operate it safely. These instructions<br />
contain the information on how to do exactly that.<br />
Please read and retain these instructions carefully. The<br />
instructions will enable you to assemble and maintain<br />
your rotavator properly. Should you experience any<br />
problems you cannot easily remedy, please contact<br />
your nearest authorised service centre. Always observe<br />
the “SAFETY INFORMATION” section. We reserve the<br />
right to discontinue or change specifications or design<br />
at any time without notice and without incurring any<br />
obligation whatsoever.<br />
SAFETY INFORMATION<br />
• Read these instructions carefully. Be thoroughly<br />
familiar with the controls and the proper use <strong>of</strong> the<br />
rotavator. Know how to stop and disengage the<br />
controls quickly.<br />
• Never allow children to operate the rotavator. Never<br />
allow adults to operate the rotavator without proper<br />
instructions.<br />
• Keep the area <strong>of</strong> operation clear <strong>of</strong> all persons,<br />
particularly small children and pets.<br />
• Of course, it is not possible or practical to warn you<br />
about all the hazards associated with operating or<br />
maintaining a tiller. You must use your own good<br />
judgement.<br />
• You will find important safety information in a<br />
variety <strong>of</strong> forms.<br />
• Damage Prevention messages – you will also see<br />
other important messages that are preceded by the<br />
word NOTICE.<br />
• Safety Labels–on the product.<br />
• Instructions–how to use this tiller correctly and<br />
safely.<br />
• Safety Messages–preceded by a safety alert<br />
symbol and one <strong>of</strong> three safety words: DANGER,<br />
WARNING and CAUTION.<br />
You may be SERIOUSLY HURT if<br />
DANGER you do not follow instructions.<br />
WARNING<br />
CAUTION<br />
You may be or SERIOUSLY HURT<br />
if you do not follow instructions.<br />
You CAN be HURT if you do not<br />
follow instructions.<br />
Your rotavator or other property<br />
NOTICE can be damaged if you do not<br />
follow instructions.<br />
Each message tells you what the hazard is,<br />
what can and/or may happen, and what you<br />
can do to avoid and/or reduce injury.<br />
2
Contents<br />
INTRODUCTION 2<br />
SAFETY INFORMATION 2<br />
PREPARATION 4<br />
OPERATION 4<br />
MAINTENANCE 5<br />
CUSTOMER RESPONSIBILITIES 5<br />
ASSEMBLY 6<br />
SAFETY LABEL INFORMATION 7<br />
KNOWING YOUR ROTAVATOR 8<br />
STOPPING TINES 9<br />
STOPPING ENGINE 9<br />
TILLING 10<br />
DEPTH STAKE 10<br />
CULTIVATING 11<br />
TINE REMOVAL 11<br />
TO TRANSPORT ROTAVATOR 12<br />
ADDING PETROL 12<br />
STARTING ENGINE 13<br />
BREAKING IN YOUR ROTAVATOR 14<br />
STORING YOUR ROTAVATOR 14<br />
MAINTENANCE 15 – 17<br />
SERVICE AND ADJUSTMENTS 18<br />
TROUBLE SHOOTING 19<br />
3
PREPARATION<br />
• The rotavator tines can throw rocks and<br />
other objects with enough force to cause<br />
injury.<br />
• Thoroughly inspect the area where the<br />
rotavator is going to be used and remove<br />
all foreign objects.<br />
• Disengage all clutches, throttle levers into<br />
neutral before starting the engine.<br />
• Do not operate the rotavator without<br />
wearing adequate outer garments. Always<br />
wear eye protection, trousers and adequate<br />
footwear that will improve footing on<br />
slippery surfaces.<br />
• The rotating tines can/will cause injury.<br />
Keep <strong>aw</strong>ay from the tines whenever the<br />
engine is running. If you need to adjust the<br />
tines or work on the unit for any reason,<br />
always stop the engine. Disconnect the<br />
spark plug cap if you need to clean or<br />
handle the tines.<br />
• Handle fuel with extreme care, it is highly<br />
flammable.<br />
• Never add fuel to a running or hot engine.<br />
• Always fill the fuel tank outdoors, never<br />
indoors.<br />
• Replace fuel cap securely and clean up<br />
spilled fuel before restarting the machine.<br />
• Never attempt to make any adjustments<br />
while the engine is running.<br />
OPERATION<br />
• Do not put hands or feet near or under rotating parts.<br />
• Exercise extreme caution when operating on or crossing<br />
gravel drives, walks or roads.<br />
• If you strike a foreign object, stop the engine, remove the<br />
wire to spark plug, and thoroughly inspect the rotavator<br />
for any damage. Repair the damage before restarting and<br />
operating the rotavator.<br />
• Exercise extreme caution to avoid slipping or falling.<br />
• If the rotavator should start to vibrate abnormally, stop the<br />
engine and check immediately for the cause. Vibration is<br />
generally a warning for trouble with the rotavator, such as<br />
loose or damaged tilling tines, hidden objects in the soil,<br />
or the ground that is too hard to till.<br />
• Take all possible precautions when leaving the machine<br />
unattended. Disengage the tines and stop the engine.<br />
• Before cleaning, repairing or inspecting, shut <strong>of</strong>f the<br />
engine and make certain all moving parts have stopped.<br />
Disconnect the spark plug wire and keep the wire <strong>aw</strong>ay<br />
from the spark plug to prevent accidental starting.<br />
• Do not run the engine indoors, exhaust fumes are<br />
dangerous.<br />
• Never operate the rotavator without proper guards, plates<br />
or other safety protective devices in place.<br />
• Always keep children and pets <strong>aw</strong>ay from rotavator.<br />
• Do not overload the rotavator capacity by attempting to<br />
till too deep too fast.<br />
• Never operate the rotavator at high speeds on slippery<br />
surfaces.<br />
• Never allow bystanders near the unit.<br />
• Use only genuine factory attachments and accessories<br />
approved by the manufacturer <strong>of</strong> the rotavator.<br />
• Never operate the rotavator without good visibility<br />
or light.<br />
• Look around the engine for signs <strong>of</strong> oil or petrol leaks.<br />
Wipe up any spills before starting the engine.<br />
• Be careful when using the rotavator in hard ground. The<br />
tines may catch in the ground and propel the rotavator<br />
forward. If this occurs, let go <strong>of</strong> the handlebars and do not<br />
restrain the machine, you may be injured.<br />
4
MAINTENANCE<br />
• Keep machine, attachments and accessories in safe<br />
working condition.<br />
• Look for signs <strong>of</strong> damage to the tines. Replace any<br />
rotavator tines and parts that are worn out, bent,<br />
cracked, chipped or damaged in any way.<br />
• Check that the debris shield is securely installed and<br />
in good condition.<br />
• Check shear pins, engine mounting bolts and other<br />
bolts at frequent intervals for proper tightness to be<br />
sure the rotavator is in safe working condition.<br />
• Check the air filter. A dirty air filter will restrict air<br />
flow to the carburetor, reducing engine and tilling<br />
performance.<br />
• Check the throttle operation. The throttle must<br />
operate smoothly for good throttle control.<br />
• Check the fuel level. Starting with a full tank will<br />
help to eliminate or reduce operating interruptions<br />
for refuelling.<br />
• Never store the machine with fuel in the fuel tank<br />
inside a building where ignition sources are present,<br />
such as hot water and space heaters, clothes dryers,<br />
and alike. Allow the engine to cool down before<br />
storing in any enclosure.<br />
• Always refer to these instructions for important<br />
details if the rotavator is to be stored for an<br />
extended period.<br />
CUSTOMER RESPONSIBILITIES<br />
• Read and observe the safety rules.<br />
• Follow a regular schedule in maintaining, caring for<br />
and using your rotavator.<br />
• Follow instructions under “Maintenance and<br />
Storage” section <strong>of</strong> these instructions.<br />
• Make sure all repairs to the machine are<br />
done correctly.<br />
• If a part is replaced, make sure it is the correct part<br />
and the bolts or nuts are tightened.<br />
5
ASSEMBLY<br />
UNPACK CARTON AND INSTALL HANDLEBAR<br />
SYSTEM. (Fig.1)<br />
• Position handles A on the lower assembly B.<br />
• Install one side at a time.<br />
• Insert bolts C and washers D.<br />
• Install and tighten handlebar knobs E.<br />
INSTALL DEPTH STAKE (WHEEL) ASSEMBLY. (Fig.2)<br />
• Insert depth stake A in to the upper shaft B.<br />
• Install and tighten the bolt and nut C.<br />
6
SAFETY LABEL INFORMATION<br />
This page will show you where to find the safety<br />
labels on your rotavator. You will find that some labels<br />
warn you <strong>of</strong> potential hazards. Others will provide<br />
important safety and maintenance information.<br />
Please read them carefully and do not remove them.<br />
(Fig.3)<br />
7
KNOWING YOUR ROTAVATOR<br />
READ THESE INSTRUCTIONS AND THE SAFETY<br />
INFORMATION BEFORE OPERATING YOUR<br />
ROTAVATOR.<br />
Compare the illustrations with your rotavator to<br />
familiarise yourself with the location <strong>of</strong> various<br />
controls and adjustments. Save these instructions for<br />
future reference. (Fig.4)<br />
• Choke Control: A used when starting a cold engine.<br />
• Depth Stake: B controls forward speed and the<br />
depth at which the tiller will dig.<br />
• Recoil Starter Handle: C used to start the engine.<br />
• Throttle Control: D controls engine speed.<br />
• Off Switch: E shuts <strong>of</strong>f the engine.<br />
8
HOW TO USE YOUR ROTAVATOR<br />
Know how to operate all controls before adding<br />
fuel, oil, or attempting to start engine.<br />
STOPPING TINES (Fig. 5)<br />
• Release throttle lever A.<br />
STARTING & STOPPING ENGINE (Fig.6)<br />
•Start switch A.<br />
•Stop switch B.<br />
CAUTION<br />
The operation <strong>of</strong> any rotavator can result in foreign objects thrown into the<br />
eyes, which can result in severe eye damage. Always wear safety glasses<br />
or face shields before starting your rotavator and while tilling.<br />
We recommend a wide vision safety mask over standard safety glasses.<br />
9
HOW TO USE YOUR ROTAVATOR<br />
TILLING<br />
The speed and depth <strong>of</strong> tilling is regulated by the<br />
position <strong>of</strong> the depth stake and wheel height. The<br />
depth stake should always be installed for digging.<br />
It serves as a brake to slow the rotavator’s forward<br />
motion to enable the tines to penetrate the ground.<br />
Also, the more the depth stake is lowered into the<br />
ground the deeper the tines will dig. If cultivating is<br />
desired, remove wheels or depth stake.<br />
DEPTH STAKE (Fig. 7)<br />
Adjust depth stake by removing the hairpin clip and<br />
clevis pin. Change to desired position. Replace the<br />
clevis pin and hairpin clip.<br />
• For normal tilling height, set the depth stake A to<br />
the second or third hole from the top.<br />
10
HOW TO USE YOUR ROTAVATOR<br />
Know how to operate all controls before adding fuel,<br />
oil, or attempting to start engine.<br />
CULTIVATING<br />
Cultivating can be accomplished by removing the drag<br />
bar or the wheels and repeatedly moving the<br />
rotavator in a forward and reverse direction. This<br />
allows the tines to dig in both directions. Be careful,<br />
the tiller may be difficult to control without the drag<br />
bar or the wheels attached.<br />
TINE REMOVAL<br />
Know how to operate all controls before adding fuel,<br />
oil, or attempting to start engine.<br />
• Remove hairpin clip A<br />
• Remove clevis pin B<br />
• Pull out the tine(s).<br />
11
TO TRANSPORT ROTAVATOR<br />
AROUND THE YARD<br />
• Lift and move the tiller by the transport bar A.<br />
AROUND TOWN<br />
• Disconnect spark plug wire.<br />
• Drain fuel tank.<br />
• Transport in upright position to prevent leakage or<br />
damage.<br />
CAUTION<br />
Fill the fuel tank to within 1/2 inch <strong>of</strong> top <strong>of</strong> fuel<br />
tank to prevent spills and to allow for fuel<br />
expansion. If petrol is accidently spilled, move<br />
machine <strong>aw</strong>ay from the area <strong>of</strong> spill. Avoid<br />
creating any source <strong>of</strong> ignition until petrol vapours<br />
have disappeared. Wipe <strong>of</strong>f any spilled oil or fuel.<br />
DO NOT store, spill or use petrol<br />
near an open flame.<br />
NOTICE<br />
Be very careful not to allow dirt to enter the<br />
engine when checking or adding oil or fuel. Use<br />
clean oil and fuel and store in approved, clean,<br />
covered containers. Use clean funnels.<br />
CAUTION<br />
Before lifting or transporting, allow rotavator<br />
engine and muffler to cool down. Disconnect spark<br />
plug wire. Drain petrol from fuel tank.<br />
ADDING PETROL<br />
Fill fuel tank A to bottom <strong>of</strong> filler neck. DO NOT<br />
overfill. Use fresh, clean, regular unleaded petrol with<br />
a minimum octane rating <strong>of</strong> 87. You must mix the fuel<br />
with good quality 2 stroke oil. Please refer to page for<br />
mixture information. Purchase fuel in quantities that<br />
can be used within 30 days to assure fuel freshness. If<br />
you will be storing the fuel (not recommended) you<br />
must add a fuel stabiliser with the fuel, such as “Fresh<br />
Fuel” so that the fuel stays fresh.<br />
• Remove drag bar.<br />
• Tilt rotavator back and lay on handle bars.<br />
• Fill in the fuel, tighten the cap.<br />
• Tilt the rotavator back up.<br />
• Install the drag bar.<br />
12
STARTING ENGINE<br />
When starting engine for the first time or if the<br />
engine has run out <strong>of</strong> fuel, it will/may take extra<br />
pulls <strong>of</strong> the recoil starter to move fuel from the tank<br />
to the engine.<br />
• To start a cold engine, move the choke lever to the<br />
closed position A.<br />
• To start a warm engine, leave the choke lever in<br />
the open position B.<br />
• Press the priming bulb C repeatedly until fuel can<br />
be seen in the clear plastic fuel return tube D.<br />
• Place your one hand on the lifting handle. With<br />
your other hand, hold the recoil starter handle E<br />
firmly and pull briskly.<br />
• Once the engine starts, if the choke lever was<br />
moved to the closed position slowly move it to the<br />
open position as the engine warms up.<br />
• Allow the engine to warm up for a few moments<br />
if it was a cold start.<br />
• The tines should not be rotating with the engine<br />
at idle. If the tines are rotating, adjust the idle<br />
speed correctly before using the tiller.<br />
NOTICE<br />
NOTICE<br />
It is important to prevent gum deposits from<br />
forming in essential fuel system parts such as the<br />
carburetor, fuel filter, fuel hose or tank during<br />
storage. Also, experience indicates that alcohol<br />
blended fuels can attract moisture which leads to<br />
separation and formation <strong>of</strong> acids during storage.<br />
Acidic gas can damage the fuel system <strong>of</strong> an<br />
engine while in storage.<br />
Fuel stabiliser is an acceptable alternative in<br />
minimising the formation <strong>of</strong> fuel gum deposits<br />
during storage. Add stabiliser to petrol in fuel tank<br />
or storage container. Always follow the mix ratio<br />
found on stabiliser container. Run engine for<br />
10 minutes after adding stabiliser to allow the<br />
stabiliser to reach the carburetor. Do not drain the<br />
fuel tank and carburetor if using fuel stabiliser.<br />
13
BREAKING IN YOUR ROTAVATOR<br />
Break-in your rotavator belt(s), pulleys, transmission<br />
and tines (tine control) before you begin using the<br />
rotavator.<br />
• Start engine, tip tines <strong>of</strong>f the ground by pressing<br />
down on the handles and engage the throttle (tine<br />
control – if applicable) to start tine rotation. Allow<br />
tines to rotate for 3 to 5 minutes.<br />
• Limit the amount <strong>of</strong> time over which the rotavator is<br />
to be used continuously to somewhere around<br />
30-40 minutes per session, and take 10-20 minutes<br />
<strong>of</strong> rest between work sessions. Also try to keep the<br />
total amount <strong>of</strong> work performed in a single day<br />
under 2 hours or less.<br />
• DO NOT use full throttle operation.<br />
STORING YOUR ROTAVATOR<br />
ROTAVATOR<br />
• Clean entire rotavator.<br />
• Inspect and replace tines, hoses, belts (if applicable).<br />
• Lubricate parts as necessary.<br />
• Be sure that all nuts, bolts and screws are securely<br />
fastened. Inspect moving parts for damage,<br />
breakage, and wear. Replace if necessary.<br />
• Touch up all rusted or chipped paint surfaces, sand<br />
lightly before painting to be sure paint adhesion.<br />
ENGINE<br />
• Drain the fuel tank.<br />
• Start the engine and let it run until the fuel lines<br />
and carburetor are empty <strong>of</strong> fuel.<br />
• Never use engine or carburetor cleaner products in<br />
the fuel tank.<br />
CYLINDER<br />
• Remove spark plug.<br />
• Pour 1/2 fl/oz (15 ml) <strong>of</strong> oil through spark plug hole<br />
into cylinder.<br />
• Pull starter handle slowly several times to distribute<br />
oil into the cylinder.<br />
• Replace the spark plug back into the cylinder.<br />
OTHER<br />
• Do not store petrol from one season to another.<br />
• Replace your petrol canister if it starts to rust.<br />
• If possible, store your rotavator indoors and cover it<br />
to give it protection from dust and dirt.<br />
• Cover your rotavator with a suitable protective cover<br />
that does not retain moisture. Do not use plastic.<br />
Plastic cannot breathe which allows condensation<br />
to form and will cause your unit to rust.<br />
14
MAINTENANCE<br />
Fill in dates as you Before Every Every Every<br />
complete regular service each use 10 hours 20 hour 50 hours<br />
Inspect air filter<br />
√<br />
Clean air filter<br />
√<br />
Replace air filter<br />
√<br />
Replace spark plug<br />
√<br />
Clean engine cylinder fins<br />
√<br />
Inspect and replace tines √<br />
Replace fuel filter<br />
√<br />
Inspect throttle cable<br />
√<br />
Check all nuts & bolts<br />
√<br />
Inspect and replace drag bar √<br />
Inspect and replace wheels √<br />
Grease transmission<br />
√<br />
Service Dates<br />
GENERAL RECOMMENDATIONS<br />
Some adjustments will need to be made periodically<br />
to properly maintain your rotavator. All adjustments in<br />
these instructions should be checked at least once<br />
each year.<br />
• Once a year you should replace the spark plug,<br />
clean or replace air filter and check tines for wear.<br />
• A new spark plug and air filter assure proper air-fuel<br />
mixture and help your engine run better and last<br />
longer.<br />
BEFORE EACH USE<br />
• CHECK TINE OPERATION<br />
• CHECK FOR LOOSE FASTENERS<br />
• CHECK THROTTLE CABLE<br />
• CHECK DRAG BAR<br />
• CHECK WHEELS<br />
• NO FUEL LEAKS<br />
15
AIR FILTER<br />
Service the air cleaner cartridge every 10 hours.<br />
More <strong>of</strong>ten if engine is used in very dusty conditions.<br />
• Loosen air filter wing nut.<br />
• Close the choke lever so dirt does not enter the<br />
carburetor.<br />
• Remove air filter cover.<br />
• Carefully remove air filter cartridge. Be careful not to<br />
allow dirt or debris to enter the carburetor.<br />
• Clean the filter by using a filter cleaner. DO NOT use<br />
solvents.<br />
• If the filter is very dirty or damaged, replace with a<br />
new filter.<br />
• Clean and replace the cover, tighten and secure the<br />
cover screws.<br />
COOLING SYSTEM<br />
Your engine is air cooled. For proper engine<br />
performance and long life, keep your engine clean.<br />
• Remove blower housing and clean as necessary.<br />
• Keep cylinder fins free <strong>of</strong> dirt and chaff with a<br />
stiff-bristled brush.<br />
• DO NOT use pressurised washer to clean the engine.<br />
MUFFLER<br />
Do not operate rotavator without muffler. Do not<br />
tamper with exhaust system. Damaged mufflers or<br />
spark arrester could create a fire hazard. Inspect<br />
periodically and replace if necessary. If your engine is<br />
equipped with a spark arrester screen assembly,<br />
remove every 25 hours for cleaning and inspection.<br />
Replace if damaged.<br />
Replace spark plug at the beginning <strong>of</strong> each tilling<br />
season or after every 50 hours <strong>of</strong> use, whichever<br />
comes first. Spark plug type and gap setting is shown<br />
in “PRODUCT SPECIFICATIONS”.<br />
CAUTION<br />
Petroleum solvents, such as kerosene,<br />
are not to be used to clean filter.<br />
They may cause deterioration <strong>of</strong> the filter.<br />
Do not use pressurised air to clean or dry cartridge.<br />
16
TRANSMISSION<br />
Your transmission is sealed and will not require<br />
lubrication if it is serviced.<br />
CLEANING<br />
Do not clean your rotavator when the engine and<br />
transmission are hot. We do not recommend using<br />
pressurised water to clean your unit unless the gasket<br />
area around the transmission and the engine muffler,<br />
air filter and carburetor are covered to keep water out.<br />
Water in the engine will damage the internal parts <strong>of</strong><br />
the engine.<br />
• Clean engine, finish, etc. <strong>of</strong> all foreign matter A.<br />
• Keep finished surfaces free <strong>of</strong> all petrol, oil, etc.<br />
• Protect painted surfaces with automotive type wax.<br />
CAUTION<br />
CAUTION<br />
When reassembling outer tines, be sure right & left<br />
tines are mounted to correct side <strong>of</strong> tine shaft.<br />
Tines are sharp. Wear gloves or other protection<br />
when handling tines.<br />
17
SERVICE AND ADJUSTMENTS<br />
ENGINE<br />
Maintenance, repair or replacement <strong>of</strong> the emission<br />
control devices and systems, which are being done at<br />
the customer’s expense, may be performed by any<br />
non road engine repair facility or individual.<br />
ADJUSTING CARBURETOR<br />
The carburetor has been preset at the factory and<br />
adjustments should not be necessary.<br />
However, engine performance can be affected by<br />
differences in fuel, temperature, altitude or load. If the<br />
carburetor needs to be adjusted, contact your nearest<br />
authorised service centre.<br />
• Idle speed control screw A.<br />
• Air/fuel mixture screw B<br />
(Authorized Service Centre Only).<br />
18
TROUBLESHOOTING<br />
PROBLEM CAUSE CORRECTION<br />
Will not start<br />
1. Out <strong>of</strong> fuel<br />
2. Engine not CHOKED properly<br />
3. Engine flooded<br />
4. Dirty air filter<br />
5. Water in fuel<br />
6. Clogged fuel tank, line<br />
7. Loose spark plug wire<br />
8. Bad spark plug or improper gap<br />
9. Carburetor out <strong>of</strong> adjustment<br />
1. Fill fuel tank<br />
2. See TO START ENGINE in Operation Section<br />
3. Wait several minutes before starting again<br />
4. Clean or replace air filter<br />
5. Drain fuel tank and carburetor, fill with fresh fuel<br />
6. Remove fuel tank or filter and clean<br />
7. Make sure plug wire is seated properly on plug<br />
8. Replace spark plug or adjust gap.<br />
9. Make necessary adjustments<br />
Hard to start<br />
Loss <strong>of</strong> power<br />
Engine overheats<br />
Excessive bounce<br />
/difficult handling<br />
Soil balls up<br />
or Clumps<br />
Engine runs but<br />
labours when<br />
tilling<br />
1. Throttle control not set properly<br />
2. Dirty air filter<br />
3. Bad spark plug or improper gap<br />
4. Stale or dirty fuel<br />
5. Loose spark plug wire<br />
6. Carburetor out <strong>of</strong> adjustment<br />
1. Engine is overloaded<br />
2. Dirty air filter<br />
3. Bad spark plug or improper gap<br />
4. Stale or dirty fuel<br />
5. Water in fuel<br />
6. Clogged fuel tank, line<br />
7. Loose spark plug wire<br />
8. Dirty or clogged muffler<br />
9. Carburetor out <strong>of</strong> adjustment<br />
10. Poor compression<br />
1. Dirty air filter<br />
2. Dirty engine<br />
3. Partially plugged muffler<br />
4. Improper carburetor adjustment<br />
1. Ground too dry and hard<br />
2. Wheels and depth stake incorrectly<br />
adjusted<br />
1. Ground too wet<br />
1. Tilling too deep<br />
2. Throttle control not properly<br />
adjusted<br />
3. Carburetor out <strong>of</strong> adjustment<br />
1. Place throttle control in "FAST" position<br />
2. Clean or replace air filter<br />
3. Replace spark plug or adjust gap.<br />
4. Drain fuel tank and carburetor, fill with fresh fuel<br />
5. Make sure plug wire is seated properly on plug<br />
6. Make necessary adjustments<br />
1. Set depth stake or wheels for shallow tilling<br />
2. Clean or replace air filter<br />
3. Replace spark plug or adjust gap.<br />
4. Drain fuel tank and carburetor, fill with fresh fuel<br />
5. Drain fuel tank and carburetor, fill with fresh fuel<br />
6. Remove fuel tank or filter and clean<br />
7. Make sure plug wire is seated properly on plug<br />
8. Clean or replace muffler<br />
9. Make necessary adjustments<br />
10. Contact an authorized service center<br />
1. Clean or replace air filter<br />
2. Clean cylinder fins, air filter, muffler<br />
3. Remove and clean muffler<br />
4. Adjust carburetor<br />
1. Moisten ground or wait for more favourable soil<br />
conditions<br />
2. Adjust wheels and depth stake<br />
1. Wait for more favourable soil conditions<br />
1. Set depth stake for shallower tilling.<br />
2. Check throttle control setting.<br />
3. make necessary adjustments.<br />
19
<strong>Coopers</strong> <strong>of</strong> <strong>Stortford</strong> – an “Aladdin’s Cave”<br />
We are a traditional family owned and run Home and Garden<br />
Store located on Bridge Street trading from the original 16th<br />
century timber framed building where there has been a business<br />
operating for more than 300 years. This charming building is<br />
made up <strong>of</strong> three linked premises including a 19th century<br />
malthouse. Our main shop entrance leads into the original 16th<br />
century timber framed building where, on the ceiling (currently<br />
above the cookshop), can be seen examples <strong>of</strong> original, rare,<br />
early pargetting (plaster ceiling decoration). The <strong>of</strong>fices above<br />
the shop remain a labyrinth <strong>of</strong> passages with beamed ceilings<br />
and sloping floors and amazingly, there is still a section <strong>of</strong> 17th<br />
century wooden panelling remaining.<br />
As you’d expect the store has seen many changes throughout its<br />
life having been a saddler’s shop, a maltsters, a stable, a wine<br />
store, the town’s first post <strong>of</strong>fice, a cycle shop, a supplier <strong>of</strong><br />
agricultural hand tools and horse collars, a warehouse for army<br />
surplus webbing, a builder’s merchant, a café, a hardware store<br />
and <strong>of</strong> course what it is known as today, <strong>Coopers</strong> <strong>of</strong> <strong>Stortford</strong>.<br />
In store and through our store’s national mail order catalogue,<br />
we pride ourselves on being specialists in selling “function led”<br />
products. By that we mean products which are designed to make<br />
everyday life easier, many <strong>of</strong> which are <strong>of</strong> <strong>Coopers</strong> own invention,<br />
idea and/or design.<br />
Our store is also full <strong>of</strong> those really practical, traditional items<br />
which might have been used by your great grandparents but<br />
which are so hard to find on the High Street these days. So much<br />
so, that our customers travel from all over the country to visit us,<br />
describing the store as an “Aladdin’s Cave” with “hidden<br />
treasures around every corner”.<br />
Above all we believe in traditional customer service. Our products<br />
are tested by our staff who have an encyclopaedic knowledge <strong>of</strong><br />
all that we stock, so they are just the people you should trust for<br />
sound, impartial advice.<br />
Our departments and specialities include:<br />
• Horticulture, Gardening Equipment<br />
and Garden Furniture<br />
• Cookshop<br />
• Housewares, Cleaning and Utility<br />
• Bathroom, Tools, Ironmongery and DIY<br />
• Pet Shop and Bird Care<br />
• Motoring, Travel and Leisure<br />
• Fitness, Health and Personal Care<br />
• Footwear and Apparel<br />
• Home, Lighting and Furniture<br />
• Margaret Kay - Signature Florist, Vintner and Chocolatier<br />
Why not come and visit us today<br />
Call <strong>Coopers</strong> <strong>of</strong> <strong>Stortford</strong><br />
0844 482 4400<br />
or buy online<br />
www.coopers<strong>of</strong>stortford.co.uk<br />
Order 24 hours<br />
7 days a week