MDX-655P - MICRONIX, spol. s ro
MDX-655P - MICRONIX, spol. s ro
MDX-655P - MICRONIX, spol. s ro

You also want an ePaper? Increase the reach of your titles
YUMPU automatically turns print PDFs into web optimized ePapers that Google loves.
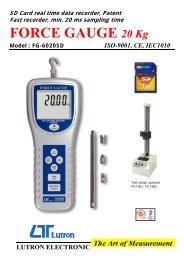
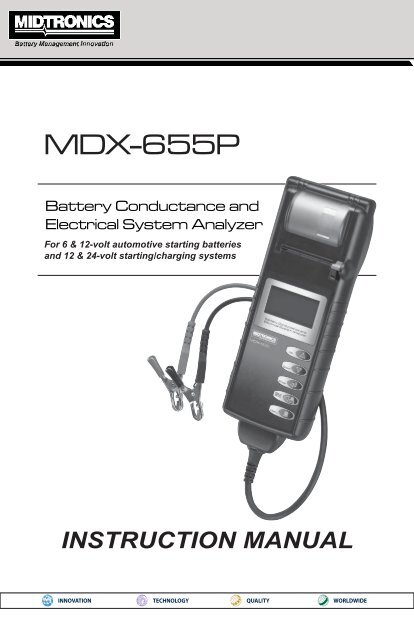
<st<strong>ro</strong>ng>MDX</st<strong>ro</strong>ng>-<st<strong>ro</strong>ng>655P</st<strong>ro</strong>ng><br />
Battery Conductance and<br />
Electrical System Analyzer<br />
For 6 & 12-volt automotive starting batteries<br />
and 12 & 24-volt starting/charging systems<br />
INSTRUCTION MANUAL
Blank page
Contents<br />
Safety Guidelines 5<br />
Capabilities 5<br />
Registering Your <st<strong>ro</strong>ng>MDX</st<strong>ro</strong>ng>-Series Tester 7<br />
Display and Keypad 7<br />
User Interface 8<br />
UP and DOWN Ar<strong>ro</strong>ws 8<br />
ENTER Button 8<br />
BACK/PRINT Button 8<br />
MENU Button 8<br />
Options Menu 9<br />
P<strong>ro</strong>cedure 9<br />
Preparations Before the Test 10<br />
Connecting the Tester 10<br />
Battery Test 11<br />
Battery Test Results 12<br />
Starter System Test 14<br />
Starter System Test Results 14<br />
Charging System Test 15<br />
Charging System Test Results 15<br />
www.midt<strong>ro</strong>nics.com<br />
• 3 •
Test Messages 17<br />
Er<strong>ro</strong>r Messages 18<br />
Maintenance & T<strong>ro</strong>ubleshooting 19<br />
Changing The Cable Assembly 19<br />
Changing The Printer Paper 20<br />
Printer T<strong>ro</strong>ubleshooting 21<br />
T<strong>ro</strong>ubleshooting the Display 21<br />
Replacing the Battery 21<br />
• 4 •<br />
www.midt<strong>ro</strong>nics.com
!<br />
Safety Guidelines<br />
Because of the possibility of personal injury, always use extreme caution when<br />
working with batteries.<br />
Battery posts, terminals, and related accessories contain lead and lead<br />
compounds. Wash hands after handling.<br />
Capabilities<br />
The tester tests 6 & 12-volt regular flooded, AGM flat plate, AGM spiral, and GEL<br />
batteries. It displays the test results in seconds and features a built-in printer to<br />
p<strong>ro</strong>vide customers with a copy of the results.<br />
Additional features include the ability to:<br />
• test the Starting and Charging system<br />
• test batteries f<strong>ro</strong>m rated f<strong>ro</strong>m 100 to 2000 CCA<br />
• detect bad cells<br />
• p<strong>ro</strong>tect against reverse polarity<br />
• test discharged batteries<br />
• test multiple rating systems<br />
• p<strong>ro</strong>vide a multi-lingual user interface.<br />
www.midt<strong>ro</strong>nics.com<br />
• 5 •
• 6 • www.midt<strong>ro</strong>nics.com
Registering Your <st<strong>ro</strong>ng>MDX</st<strong>ro</strong>ng>-Series Tester<br />
Before using your tester, we recommend that you register it online to activate<br />
your warranty. Registration will also make it faster and easier for you to obtain<br />
technical support and service.<br />
To register, log on at www.midt<strong>ro</strong>nics.com/warranty.html and have your serial<br />
number ready. The number is at the bottom of the label on the back of the<br />
tester.<br />
Serial<br />
number<br />
Serial Number Label<br />
Display and Keypad<br />
When you first connect the tester to a battery, it functions as a voltmeter until<br />
you press the ENTER button.<br />
IMPORTANT: If you connect the tester to a voltage source greater than 30 Vdc,<br />
you may damage the tester’s circuitry.<br />
The menu-driven display will then guide you step by step th<strong>ro</strong>ugh the test<br />
p<strong>ro</strong>cess. Use the keypad buttons to sc<strong>ro</strong>ll to and select options in the menu.<br />
To turn off the tester when not connected to the battery, briefly press and hold<br />
the MENU button.<br />
www.midt<strong>ro</strong>nics.com<br />
• 7 •
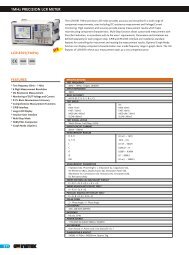
User Interface<br />
Printer<br />
Decision<br />
Button<br />
Toolbar<br />
IR<br />
Output<br />
Display Showing<br />
Battery Result<br />
1<br />
2<br />
3<br />
4<br />
Measured<br />
voltage<br />
Measured<br />
rating<br />
Selected<br />
rating<br />
1 UP and DOWN Ar<strong>ro</strong>ws<br />
Use these keys to choose test<br />
parameters and sc<strong>ro</strong>ll to menu<br />
options.<br />
2 ENTER Button<br />
Use this button to make<br />
selections.<br />
3. BACK/PRINT Button<br />
Use this button to move to<br />
the previous screen or move<br />
back one space when creating<br />
custom headers. You can also<br />
use this button to printout test<br />
results using the built-in printer.<br />
4 MENU Button<br />
Use the MENU button to<br />
access the Main Menu options<br />
of the tester.<br />
For information about the<br />
options, see “Options Menu”.<br />
• 8 •<br />
www.midt<strong>ro</strong>nics.com
P<strong>ro</strong>cedure<br />
Options Menu<br />
1. Press the MENU button to access the Options Menu.<br />
2. Use the UP () and DOWN () ar<strong>ro</strong>ws to move to the line you want to edit.<br />
3. Press the ENTER button to make highlighted line editable.<br />
4. Use the UP () and DOWN () ar<strong>ro</strong>ws to select the character for that cursor<br />
location.<br />
5. Press the ENTER button to move to the next location.<br />
6. Press the MENU button to return to the Options Menu.<br />
Option<br />
View/Print<br />
QC Mode<br />
Export Data<br />
Perform Test<br />
Language Selection<br />
Set Address<br />
Time<br />
Date<br />
Counter<br />
Contrast<br />
Temperature Units<br />
Voltmeter<br />
Explanation<br />
Display the previous test result. Press the PRINT<br />
button to print the results.<br />
A quick test to check battery inventory<br />
Export the last test result to an IR Reader p<strong>ro</strong>gram.<br />
Begin the Battery Test p<strong>ro</strong>cedure.<br />
Select a language for the tester.<br />
Enter the address to display on the top of the printout.<br />
(Limit: 8 lines, 21 characters per line)<br />
Select 24-hour or AM/PM and set the time.<br />
Select the date format as well as set the correct date.<br />
Clear or display battery and system test by results.<br />
Adjust the contrast setting of the tester display.<br />
Select the temperature units<br />
Degrees F or Degrees C<br />
Automatically test battery voltage when the clamps are<br />
fi rst connected to the battery terminals. Press ENTER<br />
to continue testing the battery. Press BACK to return to<br />
the menu. (Default: ON)<br />
www.midt<strong>ro</strong>nics.com<br />
• 9 •
Preparations Before the Test<br />
Before connecting the tester, clean the battery posts with a wire brush and a<br />
mixture of baking soda and water. When testing side-post batteries, install and<br />
tighten lead terminal adapters.<br />
IMPORTANT: Do not test at steel bolts. Failure to install terminal adapters or<br />
installing terminal adapters that are worn or dirty may result in inaccurate<br />
test results. To avoid damage, never use a wrench to tighten the<br />
adapters more than 1/4 turn.<br />
If you are testing in the vehicle, make sure all accessory loads are off, the key is<br />
not in the ignition, and the doors are closed.<br />
Connecting the Tester<br />
• Connect the red clamp to the positive (+) terminal and the black clamp to<br />
the negative (–) terminal.<br />
• For a p<strong>ro</strong>per connection, <strong>ro</strong>ck the clamps back and forth. The tester requires<br />
that both sides of each clamp be firmly connected before testing. A<br />
poor connection will p<strong>ro</strong>duce a CHECK CONNECTION or WIGGLE CLAMPS<br />
message. If the message appears, clean the terminals and reconnect the<br />
clamps.<br />
• The preferred test postion is at the battery terminals. If the battery is not<br />
accessible, you may test at the jumper post; however, the available power<br />
measurement may be lower than the actual value.<br />
• 10 •<br />
www.midt<strong>ro</strong>nics.com
Battery Test<br />
When you first connect the tester to the battery, it functions as a voltmeter<br />
until you press the ENTER button to start the test. This function can be turned<br />
off th<strong>ro</strong>ugh the Options Menu<br />
After you press ENTER, sc<strong>ro</strong>ll to each parameter using the UP or DOWN<br />
ARROW button and press ENTER to select. If any messages appear during the<br />
test, see “Test Messages”<br />
1. BAT. LOCATION: Sc<strong>ro</strong>ll to and select IN VEHICLE or OUT OF VEHICLE for a<br />
battery not connected to a vehicle. Following an IN VEHICLE test you will be<br />
p<strong>ro</strong>mpted to test the starting and charging systems.<br />
IMPORTANT: The performance of the starting and charging systems depends<br />
on the battery’s condition. It is important that the battery is good and<br />
fully charged before any further system testing.<br />
2. APPLICATION: Sc<strong>ro</strong>ll to and select AUTOMOTIVE, MOTORCYCLE, TRUCK.<br />
3. BATTERY TYPE: Sc<strong>ro</strong>ll to and select REGULAR FLOODED, AGM FLAT PLATE,<br />
AGM SPIRAL, or GEL where applicable.<br />
4. BATTERY STANDARD: Sc<strong>ro</strong>ll to and select the battery’s rating system. Not<br />
all rating systems are available for each application.<br />
Standard Description Range<br />
JIS# Japanese Industrial Standard, shown on a<br />
battery as a combination of numbers and letters.<br />
26A17 thru<br />
245H52<br />
EN Eu<strong>ro</strong>pa-Norm 100–2000<br />
DIN Deutsche Industrie-Norm 100–1200<br />
SAE Society of Automotive Engineers, the<br />
100–2000<br />
Eu<strong>ro</strong>pean labeling of CCA<br />
IEC International Elect<strong>ro</strong>technical Commission 100–1200<br />
www.midt<strong>ro</strong>nics.com<br />
• 11 •
5. BATTERY RATING: Sc<strong>ro</strong>ll to and select the rating units. Hold down the UP<br />
or DOWN ARROW button to increase the sc<strong>ro</strong>lling speed.<br />
6. Press ENTER to start test. After several seconds the tester displays the decision<br />
on the battery’s condition and the measured voltage. The tester also<br />
displays your selected battery rating and the rating units.<br />
Battery Test Results<br />
Decision<br />
GOOD BATTERY<br />
GOOD-RECHARGE<br />
Interpretation<br />
Return the battery to service.<br />
Fully charge the battery and return it to service.<br />
CHARGE & RETEST<br />
Fully charge the battery and retest. Failure<br />
to fully charge the battery before retesting<br />
may cause inaccurate results. If CHARGE &<br />
RETEST appears again after you fully charge the<br />
battery, replace the battery.<br />
REPLACE BATTERY Replace the battery and retest. A REPLACE<br />
BATTERY result may also mean a poor<br />
connection between the battery cables and the<br />
battery. After disconnecting the battery cables,<br />
retest the battery using the out-of-vehicle test<br />
before replacing it.<br />
BAD CELL-REPLACE Replace the battery and retest.<br />
24 VOLT SYSTEM 24-volt system detected. Disconnect batteries<br />
and test individually.<br />
READY TO INSTALL Battery has just been activated and is ready to<br />
install in vehicle (Motorcycle only)<br />
NEEDS CHARGE Fully charge battery and retest using BEFORE<br />
DELIVERY. (Motorcycle only)<br />
Failure to fully charge the battery before<br />
retesting may cause false readings.<br />
• 12 •<br />
www.midt<strong>ro</strong>nics.com
7. Press the ENTER ( ) button to p<strong>ro</strong>ceed, with the starter test, BACK/PRINT<br />
to print the test results or MENU to return to the Options Menu.<br />
NOTE: For an in-vehicle test, the display alternates between the test results<br />
and the message “PRESS FOR STARTER TEST.<br />
See “Maintenence & T<strong>ro</strong>ubleshooting” in this manual for more information<br />
about the printer.<br />
IMPORTANT: The tester retains the results of the last test only. When you start<br />
a new test, the last results are overwritten.<br />
www.midt<strong>ro</strong>nics.com<br />
• 13 •
Starter System Test<br />
IMPORTANT: Before starting the test, inspect the alternator drive belt. A belt<br />
that is glazed or worn, or lacks the p<strong>ro</strong>per tension, will prevent the engine<br />
f<strong>ro</strong>m achieving the rpm levels needed for the test.<br />
Once you have completed an in-vehicle test, the display alternates between<br />
the battery test results and the message PRESS FOR STARTER TEST.<br />
1. Press the ENTER ( ) button to p<strong>ro</strong>ceed with the starter test.<br />
2. Start the engine when p<strong>ro</strong>mpted.<br />
3. The tester displays the decision on the starter system, cranking voltage,<br />
and cranking time in milliseconds.<br />
Starter System Test Results<br />
Decision<br />
CRANKING NORMAL<br />
LOW VOLTAGE<br />
CHARGE BATTERY<br />
REPLACE BATTERY<br />
NO START<br />
CRANKING SKIPPED<br />
Interpretation<br />
The starter voltage is normal and the battery is<br />
fully charged.<br />
The starter voltage is low and the battery is fully<br />
charged.<br />
The starter voltage is low and the battery is<br />
discharged. Fully charge the battery and repeat<br />
the starter system test.<br />
Battery must be replaced before the starting<br />
system can be tested.<br />
No vehicle start detected.<br />
A start was not detected.<br />
4. Press the ENTER ( ) button to p<strong>ro</strong>ceed with the charging system test, BACK/<br />
PRINT button to print the test results, MENU to return to the Options Menu.<br />
NOTE: For an in-vehicle test, the display alternates between the test results<br />
and the message “PRESS FOR CHARGING TEST.<br />
See “Maintenence & T<strong>ro</strong>ubleshooting” in this manual for more information<br />
about the printer.<br />
• 14 •<br />
www.midt<strong>ro</strong>nics.com
Charging System Test<br />
Once you have completed an in-vehicle test, the display alternates between<br />
the battery test results and the message PRESS FOR CHARGING TEST. Press<br />
the ENTER ( ) button to p<strong>ro</strong>ceed with the charging test.<br />
Following the on-screen p<strong>ro</strong>mpts:<br />
1. Rev the engine.<br />
2. Turn on high beams headlights and the blower fan.<br />
3. Rev engine with loads on.<br />
4. Idle engine and turn off loads.<br />
5. The Charging System decision is displayed at the end of the p<strong>ro</strong>cedure.<br />
Charging System Test Results<br />
Decision<br />
NO PROBLEMS<br />
NO OUTPUT<br />
LOW OUTPUT<br />
Interpretation<br />
System is showing normal output f<strong>ro</strong>m the alternator.<br />
No alternator output detected.<br />
√ Check all connections to and f<strong>ro</strong>m the alternator,<br />
especially the connection to the battery. If the<br />
connection is loose or heavily cor<strong>ro</strong>ded, clean or<br />
replace the cable and retest.<br />
√ If the belts and connections are in good working<br />
condition, replace the alternator. (Older vehicles<br />
use external voltage regulators, which may require<br />
only replacement of the voltage regulator.)<br />
Alternator not p<strong>ro</strong>viding suffi cient current to power the<br />
system’s electrical loads and charge the battery.<br />
√ Check the belts to ensure the alternator is <strong>ro</strong>tating<br />
with the engine running. Replace b<strong>ro</strong>ken or<br />
slipping belts and retest.<br />
√ Check the connections f<strong>ro</strong>m the alternator to<br />
the battery. If the connection is loose or heavily<br />
cor<strong>ro</strong>ded, clean or replace the cable and retest.<br />
www.midt<strong>ro</strong>nics.com<br />
• 15 •<br />
continued
Decision<br />
HIGH OUTPUT<br />
EXCESSIVE<br />
RIPPLE<br />
Interpretation<br />
Alternator voltage output exceeds the normal limits.<br />
√ Make sure there are no loose connections and<br />
the g<strong>ro</strong>und connection is normal. If there are no<br />
connection p<strong>ro</strong>blems, replace the regulator. Most<br />
alternators have a built-in regulator that requires<br />
replacing the alternator. In older vehicles that<br />
use external voltage regulators, you may need to<br />
replace only the voltage regulator.<br />
Excessive AC ripple detected.<br />
√ One or more diodes in the alternator is not<br />
functioning or there is stator damage.<br />
6. Press the BACK/PRINT button to print the test results or MENU to return to<br />
the Options Menu.<br />
See “Maintenence & T<strong>ro</strong>ubleshooting” in this manual for more information<br />
about the printer.<br />
• 16 •<br />
www.midt<strong>ro</strong>nics.com
Test Messages<br />
For a more decisive result, the tester may p<strong>ro</strong>mpt you for additional information.<br />
The messages in the following table may appear before the tester can display<br />
a result.<br />
Test Message<br />
Interpretation<br />
BAT. TEMPERATURE Select ambient temperature above or below 0 ºC<br />
CHARGE STATE<br />
SURFACE CHARGE<br />
DETECTED<br />
CHECK<br />
CONNECTION<br />
ENGINE REV NOT<br />
DETECTED PRESS<br />
WHILE REVVING<br />
REVERSE<br />
CONNECTION<br />
SYSTEM NOISE<br />
CHECK LOADS<br />
UNSTABLE<br />
BATTERY<br />
WIGGLE<br />
CLAMPS<br />
Select before or after battery has been charged.<br />
Remove the surface charge before it begins testing.<br />
Testing will resume after charge has been removed.<br />
One or both clamps are not making p<strong>ro</strong>per contact<br />
with the battery terminals.<br />
Tester has not detected an increase in engine r.p.m.<br />
Clamps are connected in the w<strong>ro</strong>ng polarity:<br />
positive to negative or negative to positive.<br />
In-vehicle testing. Tester has detected computer,<br />
ignition noise or parasitic drain. Make sure all vehicle<br />
loads are off including open doors and ignition switch.<br />
Out-of-vehicle. Weak battery, should be charged and<br />
retested.<br />
Clamps are not making good contact with<br />
battery terminals<br />
www.midt<strong>ro</strong>nics.com<br />
• 17 •
Er<strong>ro</strong>r Messages<br />
Er<strong>ro</strong>r Message<br />
BATTERY POWER TOO<br />
LOW TO USE PRINTER.<br />
CONNECT TO FULLY<br />
CHARGED BATTERY<br />
11.50 TO 16.00V<br />
CONNECT TO<br />
12V BATTERY<br />
LOW INTERNAL AA<br />
BATTERIES. REPLACE<br />
AA BATTERIES SOON!<br />
NON 12 VOLT SYSTEM<br />
DETECTED<br />
PRINTER DOOR OPEN.<br />
CLOSE DOOR AND TRY<br />
TO PRINT AGAIN<br />
Interpretation<br />
Battery being tested has fallen below 9 volts.<br />
Connect to a fully charged battery to use the<br />
printer.<br />
Tester is not connected to the battery<br />
Internal AA batteries are low and need to be<br />
replaced. See “Maintenance & T<strong>ro</strong>ubleshooting”<br />
section.<br />
System being tested is not 12-volts.<br />
Door covering printer paper is not secure.<br />
PRINTER OUT OF PAPER<br />
REPLACE WITH THERMAL<br />
PRINTER PAPER.<br />
2.5 IN. DIA. MAX.<br />
2.25 IN. WIDE MAX<br />
Printer is out of thermal paper. Replace with new<br />
<strong>ro</strong>ll. See “Maintenance & T<strong>ro</strong>ubleshooting” section.<br />
QC DATA MEMORY FULL<br />
PRINT RESULTS OR<br />
CLEAR MEMORY.<br />
QC mode memory is full. Select QC mode f<strong>ro</strong>m the<br />
Options Menu to clear the memory.<br />
• 18 •<br />
www.midt<strong>ro</strong>nics.com
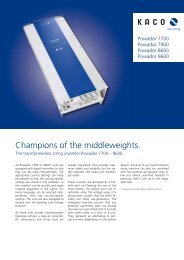
Maintenance & T<strong>ro</strong>ubleshooting<br />
Changing The Cable Assembly<br />
1. Identify the circled screw.<br />
2. Remove the screw.<br />
3. Grasp the housing and firmly pull the cable assembly f<strong>ro</strong>m housing.<br />
4. To attach a new cable, align the cable and tester housings and push together.<br />
Insert the screw and tighten.<br />
www.midt<strong>ro</strong>nics.com<br />
• 19 •
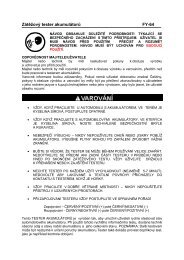
Changing The Printer Paper<br />
The IR printer only uses thermal paper in a <strong>ro</strong>ll with the dimensions 2.25 in x 85<br />
ft (57 mm x 25.9 m). You can purchase replacement <strong>ro</strong>lls at most office supply<br />
stores.<br />
To replace the paper <strong>ro</strong>ll:<br />
1. Unlock the printer door by gently pressing on the red lever. Remove the<br />
spent <strong>ro</strong>ll.<br />
release lever: press in this direction<br />
paper<br />
compartment<br />
paper<br />
sensor<br />
2. Place a new <strong>ro</strong>ll of paper in the compartment, and pull the paper forward<br />
so that it extends past the serrated edge of the paper slot.<br />
paper feeds f<strong>ro</strong>m<br />
underneath the <strong>ro</strong>ll<br />
3. Close the door and make sure the lever locks securely.<br />
• 20 •<br />
www.midt<strong>ro</strong>nics.com
Printer T<strong>ro</strong>ubleshooting<br />
If the tester is not connected to a 12-volt battery with at least 11.5 volts of power<br />
or the paper sensor does not detect paper in the compartment during the print<br />
p<strong>ro</strong>cess, the tester displays one of er<strong>ro</strong>r messages described in the table:<br />
Er<strong>ro</strong>r Message<br />
PRINTER OUT OF PAPER<br />
REPLACE WITH THERMAL<br />
PRINTER PAPER.<br />
2.5 IN. DIA. MAX<br />
2.25 IN. WIDE MAX<br />
√<br />
√<br />
√<br />
Interpretation<br />
Verify that the paper is inserted correctly.<br />
Insert a new <strong>ro</strong>ll of paper.<br />
Verify that the paper sensor is clean and undamaged<br />
BATTERY POWER TOO<br />
LOW TO USE PRINTER.<br />
CONNECT TO FULLY<br />
CHARGED BATTERY.<br />
11.50 V TO 16.00 V<br />
PRINTER DOOR OPEN<br />
CLOSE DOOR AND TRY<br />
TO PRINT AGAIN<br />
To print, the tester must be p<strong>ro</strong>perly connected to a<br />
vehicle battery having at least 9 volts.<br />
√ Connect to a vehicle battery with enough voltage to<br />
enable printing.<br />
√ Make sure that the clamps are connected p<strong>ro</strong>perly:<br />
red clamp to the positive (+) terminal and the black<br />
clamp to the negative (-) terminal.<br />
√<br />
Check that both sides of the clamps are making contact<br />
with the terminals.<br />
√ Check that the door covering the printer paper is<br />
p<strong>ro</strong>perly closed and latched.<br />
T<strong>ro</strong>ubleshooting the Display<br />
If the display does not turn on:<br />
• Check the connection to the vehicle battery.<br />
• The vehicle battery may be too low (below 1 volt) to power the analyzer.<br />
Fully charge the battery and retest.<br />
• The analyzer’s AA batteries may need to be replaced. (alkaline recommended).<br />
• If the analyzer does not power on when you press and hold the MENU button,<br />
replace the AA batteries.<br />
www.midt<strong>ro</strong>nics.com<br />
• 21 •
Replacing the Battery<br />
The tester can test down to 5.5 volts when the unit’s internal batteries are not<br />
functioning. The tester displays LOW INTERNAL AA BATTERIES, REPLACE AA<br />
BATTERIES SOON! when the internal AA batsteries need to be replaced.<br />
NOTE: Setup information will be retained while you change the internal batteries.<br />
Use the following p<strong>ro</strong>cedure to remove and replace the internal AA batteries.<br />
1. Turn the tester face down.<br />
2. Remove the screw securing the battery compartment cover using a small<br />
Phillips screwdriver.<br />
3. Lift the door off and remove the discharged battery.<br />
4. Insert fresh AA batteries making sure the positive and negative terminals<br />
are positioned correctly.<br />
5. Reposition the cover and tighten the screw.<br />
• 22 • www.midt<strong>ro</strong>nics.com
www.midt<strong>ro</strong>nics.com<br />
• 23 •
Patents<br />
The <st<strong>ro</strong>ng>MDX</st<strong>ro</strong>ng>-Series is made in the U.S.A. by MIDTRONICS, INC. and is p<strong>ro</strong>tected<br />
by one or more of the following U.S. Patents: 6,323,650; 6,316,914; 6,304,087;<br />
6,249,124; 6,163,156; 6,091,245; 6,051,976; 5,831,435; 5,821,756; 5,757,192;<br />
5,592,093; 5,585,728; 5,572,136; 4,912,416; 4,881,038; 4,825,170; 4,816,768;<br />
4,322,685; Canadian patents: 1,280,164; 1,295,680; United Kingdom patents:<br />
0,417,173; 0,672,248; German patents: 689 23 281.0-08; 693 25 388.6; 93 21 638.6;<br />
and other U.S. and Foreign patents issued and pending. This p<strong>ro</strong>duct may utilize<br />
technology exclusively licensed to Midt<strong>ro</strong>nics, Inc. by Johnson Cont<strong>ro</strong>ls, Inc. and/<br />
or Moto<strong>ro</strong>la, Inc.<br />
Limited Warranty<br />
This battery tester is warranted to be free of defects in materials and workmanship<br />
for a period of two years f<strong>ro</strong>m the date of purchase. Midt<strong>ro</strong>nics will, at our option,<br />
repair the unit or replace the unit with a remanufactured tester. This limited warranty<br />
applies only to Midt<strong>ro</strong>nics battery testers and does not cover any other equipment,<br />
static damage, water damage, overvoltage, d<strong>ro</strong>pping unit or damage resulting<br />
f<strong>ro</strong>m extraneous causes including owner misuse. Midt<strong>ro</strong>nics is not liable for any<br />
incidental or consequential damages for breach of this warranty. The warranty is<br />
void if owner attempts to disassemble the unit or modify the cable assembly.<br />
Service<br />
For service, contact Midt<strong>ro</strong>nics for a Return Authorization number, and return the<br />
unit to Midt<strong>ro</strong>nics freight prepaid, If Midt<strong>ro</strong>nics determines that the failure was<br />
caused by misuse, alteration, accident, or abnormal condition of operation or<br />
handling, purchaser will have the option of purchasing a replacement tester or the<br />
unit will be returned freight collect. Battery testers beyond the warranty period are<br />
subject to the repair charges in effect at that time.<br />
www.midt<strong>ro</strong>nics.com<br />
Corporate Headquarters<br />
Willowb<strong>ro</strong>ok, IL USA<br />
USA Toll Free: 1.800.776.1995<br />
Phone: 1.630.323.2800<br />
Fax: 1.630.323.2844<br />
E-Mail: net2@midt<strong>ro</strong>nics.com<br />
Canadian Inquiries<br />
Toll Free: 1.866.592.8053<br />
Fax: 1.630.323.7752<br />
E-Mail: canada@midt<strong>ro</strong>nics.com<br />
Midt<strong>ro</strong>nics b.v.<br />
Eu<strong>ro</strong>pean Headquarters<br />
Serving Eu<strong>ro</strong>pe, Africa,the Middle<br />
East and The Netherlands<br />
Phone: +31 306 868 150<br />
Fax: +31 306 868 158<br />
E-Mail: info-eu<strong>ro</strong>pe@midt<strong>ro</strong>nics.com<br />
167-046A-GB 7/08<br />
Midt<strong>ro</strong>nics China Office<br />
China Operations<br />
Shenzhen, China<br />
Phone: +86 755 8202 2037<br />
Fax: +86 755 8202 2039<br />
E-Mail: chinainfo@midt<strong>ro</strong>nics.com<br />
Asia/Pacific (excluding China)<br />
Contact Corporate Headquarters at<br />
+1.630.323.2800 or<br />
E-Mail: asiapacinfo@midt<strong>ro</strong>nics.com<br />
2008 Midt<strong>ro</strong>nics, Inc. All rights reserved.