PROLiNK Hurricane 5200C Combo ADSL2+ Modem/Router
PROLiNK Hurricane 5200C Combo ADSL2+ Modem/Router
PROLiNK Hurricane 5200C Combo ADSL2+ Modem/Router

Create successful ePaper yourself
Turn your PDF publications into a flip-book with our unique Google optimized e-Paper software.
Package Contents<br />
• 1 x H<strong>5200C</strong> <strong>Modem</strong> <strong>Router</strong><br />
• 1 x RJ-45 straight cable<br />
• 1 x RJ-11 DSL cable<br />
• 1 x Power Adaptor<br />
• 1 x DSL Splitter<br />
• 1 x Setup CD<br />
• 1 x USB Cable (optional)<br />
• Quick Installation Guide<br />
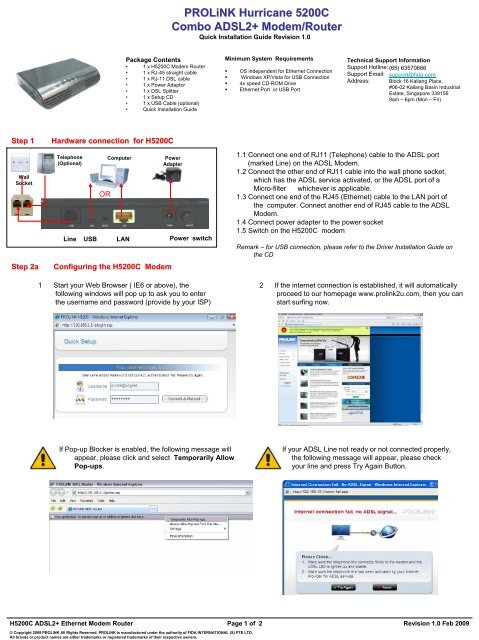
Step 1 Hardware connection for H<strong>5200C</strong><br />
Wall<br />
Socket<br />
Telephone<br />
(Optional)<br />
OR<br />
Computer Power<br />
Adapter<br />
Line USB LAN Power switch<br />
Step 2a Configuring the H<strong>5200C</strong> <strong>Modem</strong><br />
1 Start your Web Browser ( IE6 or above), the<br />
following windows will pop up to ask you to enter<br />
the username and password (provide by your ISP)<br />
If Pop-up Blocker is enabled, the following message will<br />
appear, please click and select Temporarily Allow<br />
Pop-ups.<br />
<strong>PROLiNK</strong> <strong>Hurricane</strong> <strong>5200C</strong><br />
<strong>Combo</strong> <strong>ADSL2+</strong> <strong>Modem</strong>/<strong>Router</strong><br />
Quick Installation Guide Revision 1.0<br />
Minimum System Requirements<br />
� OS independent for Ethernet Connection<br />
� Windows XP/Vista for USB Connection<br />
� 4x speed CD-ROM Drive<br />
� Ethernet Port or USB Port<br />
H<strong>5200C</strong> <strong>ADSL2+</strong> Ethernet <strong>Modem</strong> <strong>Router</strong> Page 1 of 2 Revision 1.0 Feb 2009<br />
© Copyright 2009 <strong>PROLiNK</strong> All Rights Reserved. <strong>PROLiNK</strong> is manufactured under the authority of FIDA INTERNATIONAL (S) PTE LTD.<br />
All brands or product names are either trademarks or registered trademarks of their respective owners.<br />
Technical Support Information<br />
Support Hotline: (65) 63570666<br />
Support Email: support@fida.com<br />
Address: Block 16 Kallang Place,<br />
#06-02 Kallang Basin Industrial<br />
Estate, Singapore 339156<br />
9am – 6pm (Mon – Fri)<br />
1.1 Connect one end of RJ11 (Telephone) cable to the ADSL port<br />
(marked Line) on the ADSL <strong>Modem</strong>.<br />
1.2 Connect the other end of RJ11 cable into the wall phone socket,<br />
which has the ADSL service activated, or the ADSL port of a<br />
Micro-filter whichever is applicable.<br />
1.3 Connect one end of the RJ45 (Ethernet) cable to the LAN port of<br />
the computer. Connect another end of RJ45 cable to the ADSL<br />
<strong>Modem</strong>.<br />
1.4 Connect power adapter to the power socket<br />
1.5 Switch on the H<strong>5200C</strong> modem<br />
Remark – for USB connection, please refer to the Driver Installation Guide on<br />
the CD<br />
2 If the internet connection is established, it will automatically<br />
proceed to our homepage www.prolink2u.com, then you can<br />
start surfing now.<br />
If your ADSL Line not ready or not connected properly,<br />
the following message will appear, please check<br />
your line and press Try Again Button.
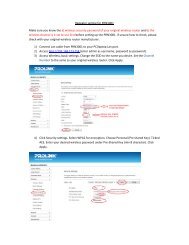
Step 2b Manually Configuring the H<strong>5200C</strong> <strong>Modem</strong> – please proceed to this step if step2a not working<br />
1. Start your Web Browser ( IE6 or above), key in<br />
192.168.1.1 , Click Quick Setup icon<br />
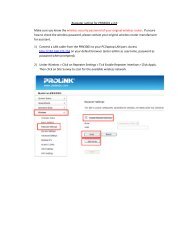
3. From status, you can check your WAN IP, internet<br />
connection time and so on<br />
H<strong>5200C</strong> <strong>ADSL2+</strong> Ethernet <strong>Modem</strong> <strong>Router</strong> Page 2 of 2 Revision 1.0 Feb 2009<br />
© Copyright 2009 <strong>PROLiNK</strong> All Rights Reserved. <strong>PROLiNK</strong> is manufactured under the authority of FIDA INTERNATIONAL (S) PTE LTD.<br />
All brands or product names are either trademarks or registered trademarks of their respective owners.<br />
2. Enter User Name and Password for internet<br />
connection (provided by your Internet service<br />
provider), and Press Commit and Reboot button.<br />
4. If you need to setup other features, Default User<br />
Name: admin Password: password