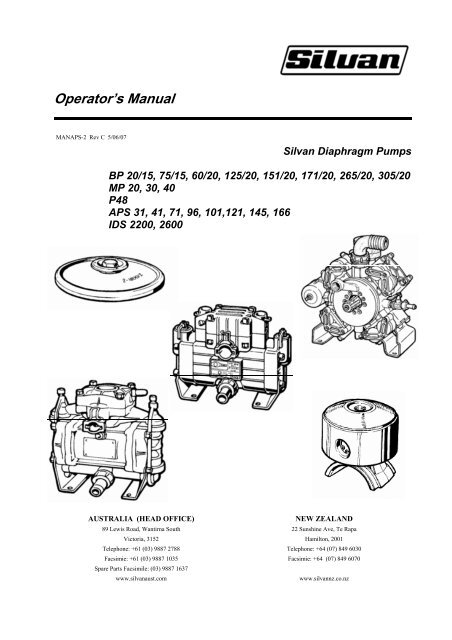
Operator's Manual - Silvan Australia
Operator's Manual - Silvan Australia
Operator's Manual - Silvan Australia

You also want an ePaper? Increase the reach of your titles
YUMPU automatically turns print PDFs into web optimized ePapers that Google loves.
Operator’s <strong>Manual</strong><br />
MANAPS-2 Rev C 5/06/07<br />
<strong>Silvan</strong> Diaphragm Pumps<br />
BP 20/15, 75/15, 60/20, 125/20, 151/20, 171/20, 265/20, 305/20<br />
MP 20, 30, 40<br />
P48<br />
APS 31, 41, 71, 96, 101,121, 145, 166<br />
IDS 2200, 2600<br />
AUSTRALIA (HEAD OFFICE)<br />
NEW ZEALAND<br />
89 Lewis Road, Wantirna South 22 Sunshine Ave, Te Rapa<br />
Victoria, 3152 Hamilton, 2001<br />
Telephone: +61 (03) 9887 2788 Telephone: +64 (07) 849 6030<br />
Facsimie: +61 (03) 9887 1035 Facsimie: +64 (07) 849 6070<br />
Spare Parts Facsimile: (03) 9887 1637<br />
www.silvanaust.com<br />
www.silvannz.co.nz
Contents<br />
Page<br />
Warranty 2<br />
About your Warranty 3<br />
Safety Information 4<br />
Specification 5<br />
Identification 5<br />
Installation 9<br />
Operation 10<br />
Maintenance 11<br />
Trouble Shooting 12<br />
Notes 13<br />
PUMP DETAILS<br />
Record the details of your pump and the supplying <strong>Silvan</strong> dealer here for future<br />
reference when discussing service, ordering parts or making a warranty claim.<br />
PUMP MODEL NO.<br />
PUMP SERIAL NO.<br />
ENGINE MODEL.<br />
ENGINE SERIAL NO.<br />
SELLINGDEALER<br />
ADDRESS<br />
_____________________________<br />
_____________________________<br />
_____________________________ (If Fitted)<br />
_____________________________ (If Fitted)<br />
________________________________________________<br />
________________________________________________<br />
_____________________________<br />
TELEPHONE<br />
CONTACT NAME<br />
DATE OF PURCHASE<br />
_____________________________<br />
_____________________________<br />
_____________________________<br />
Page 1
New Product Warranty<br />
the <strong>Silvan</strong><br />
Warranty<br />
This warranty is the only warranty applicable to <strong>Silvan</strong> new products ('Products') and, to the<br />
maximum extent permitted by law, is expressly in lieu of any other conditions or warranties<br />
expressed or implied in relation to the Products.<br />
Subject only to legislative obligations to the contrary, <strong>Silvan</strong> shall not be liable for incidental or<br />
consequential damage resulting from ownership or use of a Product.<br />
<strong>Silvan</strong> does not authorize any person to create for it any other obligation or liability in<br />
connection with these products.<br />
<strong>Silvan</strong> warrants its authorised Dealer, who in turn warrants the original purchaser (owner) of each new<br />
<strong>Silvan</strong> product that it will repair or replace the product, or, pay the cost of repair or replacement, as<br />
determined by <strong>Silvan</strong> without charge for labour or any defective or malfunctioning parts in accordance<br />
with the warranty limitations and adjustment schedule below.<br />
The warranty period begins on the date the product is delivered to the first retail purchaser for a period<br />
of 12 months<br />
This Warranty Covers<br />
Only conditions resulting directly from defects in workmanship or material under normal use and<br />
service.<br />
Warranty Exclusions<br />
The Warranty does not cover:<br />
Conditions resulting from misuse, use of incompatible chemicals, exceeding machine<br />
specifications including overloading, impact damage, negligence, accidental damage or failure<br />
to perform recommended maintenance services.<br />
Any product which has been repaired by other than an authorised <strong>Silvan</strong> service outlet in a<br />
way which, in the sole and absolute judgement of <strong>Silvan</strong>, adversely affect its performance or<br />
reliability.<br />
The replacement of maintenance items such as diaphragms, batteries, V belts and ground<br />
engaging components, etc.<br />
Loss of time, inconvenience, loss of use of the product liability to third parties or any other<br />
consequential damages.<br />
Incidental costs associated with a warranty repair including any travel costs, out of hour’s<br />
labour charges, cleaning costs, transportation costs, freight costs or any communication costs.<br />
The repair of a defective product qualifying under this warranty will be performed by any authorised<br />
<strong>Silvan</strong> service outlet within a reasonable time following the delivery of the product, at the cost of the<br />
owner, to the service outlet’s place of business. The product will be repaired or replaced, using new<br />
parts supplied by <strong>Silvan</strong>. <strong>Silvan</strong>, in its absolute discretion, may choose to pay the cost of replacement<br />
or repair of the product.<br />
The owner is responsible for the performance of regular maintenance services as specified in the<br />
Owner/Operator <strong>Manual</strong> applicable to the product. Failure to carry out regular maintenance may<br />
invalidate warranty<br />
Page 2
About your Warranty<br />
<strong>Silvan</strong> <strong>Australia</strong> Pty. Ltd. builds equipment to a high level of specification using components from<br />
quality suppliers. The following information is provided to assist you with any repairs required<br />
within the warranty period.<br />
• All warranty repairs on <strong>Silvan</strong> products are carried out by <strong>Silvan</strong> dealers. If any<br />
warranty repairs are required on <strong>Silvan</strong> products, it is recommended that the product be<br />
returned to the place of purchase.<br />
• It is good practice to keep a record of equipment maintenance both during and after the<br />
warranty period.<br />
The previous information on warranty coverage explains the extent and limitations of your<br />
Warranty coverage on <strong>Silvan</strong> Products.<br />
Honda Engine Warranty (If supplied)<br />
A separate Honda engine manufacturers manual and warranty policy may be supplied if the<br />
pump has been purchased with an Honda engine attached.<br />
Any engine problem should be reported to your <strong>Silvan</strong> dealer in the first instance, however, any<br />
authorised Honda servicing dealer can carry out warranty repairs on the engine provided all the<br />
details of the purchase and engine are supplied.<br />
Page 3
Safety Information<br />
Before operating the sprayer read the following safety instructions.<br />
Failure to comply with these warnings may result in serious injury or death.<br />
Whilst your pump has been designed and manufactured to incorporate all necessary safety<br />
features it is essential that any person who operates or works on the machine is aware of the<br />
safety precautions that should be exercised.<br />
The pump is designed and<br />
manufactured solely for the purpose of<br />
applying agricultural chemicals to<br />
crops. Under no circumstances should it<br />
be used for any other purpose.<br />
Before using this pump carefully read<br />
and ensure you understand the contents<br />
of this manual and any other manual<br />
supplied with the pump, sprayer or<br />
machine that the pump is fitted to.<br />
Before operating the pump read all the<br />
safety warnings which are carried on<br />
various parts of the machine.<br />
Never allow an inadequately trained<br />
person to attach or operate the pump.<br />
Do not operate the pump whilst wearing<br />
loose clothing, unrestrained long hair,<br />
jewellery or anything which could<br />
become entangled in rotating<br />
components or limit your vision.<br />
Do not operate the pump at speeds<br />
greater than 540 PTO rpm.<br />
Do not operate the pump without all the<br />
tractor and sprayer or machine safety<br />
shields in place. Carefully check that<br />
PTO and driveline shields are correctly<br />
installed if used.<br />
Disconnect the tractor PTO or power<br />
supply before performing any operation<br />
on the pump.<br />
Before use of any chemicals refer to the<br />
chemical manufacturer’s label and<br />
safety instructions for safe handling<br />
procedures and correct method of use.<br />
Always use the recommended personal<br />
protective clothing and safety<br />
equipment.<br />
Do not pump flammable liquids or<br />
gases.<br />
Children must be kept clear of the<br />
pump.<br />
Page 4
Specification<br />
PUMP TYPE<br />
BP 20/15<br />
BP 60/20<br />
BP 75/15<br />
BP 125/20<br />
BP 151/20<br />
BP 171/20<br />
BP 265/20<br />
BP 305/20<br />
No OF<br />
DIAPHRAGM DELIVERY<br />
l/min<br />
2<br />
2<br />
3<br />
3<br />
4<br />
4<br />
6<br />
6<br />
18.7<br />
58<br />
68<br />
117<br />
138<br />
152<br />
252<br />
296<br />
PRESSURE<br />
bar p.s.i<br />
15 215<br />
20 290<br />
15 215<br />
20 290<br />
20 290<br />
20 290<br />
20 290<br />
20 290<br />
POWER<br />
(HP)<br />
0.83<br />
3.3<br />
2.68<br />
6.8<br />
7.8<br />
9.38<br />
14.3<br />
15.8<br />
Max<br />
RPM<br />
550<br />
550<br />
550<br />
550<br />
550<br />
550<br />
550<br />
550<br />
WEIGHT<br />
Kg.<br />
7<br />
10<br />
10<br />
13<br />
24<br />
24<br />
55<br />
55<br />
MP 20<br />
MP 30<br />
MP 40, MP40AP<br />
2<br />
2<br />
3<br />
19<br />
29<br />
39<br />
30 435<br />
30 435<br />
30 435<br />
1.6<br />
2.3<br />
3.2<br />
550<br />
550<br />
550<br />
7<br />
7<br />
9<br />
P 48, P 48 AP<br />
2<br />
51<br />
30 435<br />
4.1<br />
550<br />
13<br />
APS 31<br />
APS 41<br />
APS 71<br />
APS 96<br />
APS 101<br />
APS 121<br />
APS 145<br />
APS 166<br />
3<br />
3<br />
3<br />
4<br />
3<br />
3<br />
4<br />
5<br />
25<br />
38<br />
68<br />
89<br />
97<br />
115<br />
141<br />
163<br />
40 580<br />
40 580<br />
40 580<br />
40 580<br />
50 725<br />
50 725<br />
50 725<br />
50 725<br />
2.7<br />
4.1<br />
7.4<br />
9.5<br />
12.3<br />
14.5<br />
18.0<br />
20.5<br />
550<br />
550<br />
550<br />
550<br />
550<br />
550<br />
550<br />
550<br />
10<br />
10<br />
18<br />
22<br />
38<br />
38<br />
48<br />
56<br />
IDS 2200<br />
IDS 2600<br />
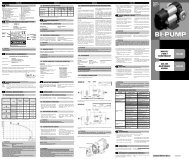
Pump Identification<br />
On receiving the pump the following data is<br />
found on the name plate.<br />
6<br />
6<br />
208<br />
249<br />
1. Pump Type<br />
2. Maximum Delivery (at 0 Bar)<br />
3. Delivery at Maximum Pressure<br />
4. Maximum Pressure Permitted in Pump<br />
5. Maximum RPM<br />
6. Manufacture’s Serial No<br />
50 725<br />
50 725<br />
25.8<br />
32.1<br />
550<br />
550<br />
76<br />
76<br />
Component Identification<br />
Refer to the diagrams on the following pages<br />
for the position of the various components<br />
relating to your pump.<br />
1. Mounting Base<br />
2. Ball Valve 3/8”<br />
3. Input / Output shaft<br />
4. Oil Reservoir<br />
5. Pressure Accumulator<br />
6. Pump Head<br />
7. Inlet Hose Barb<br />
8. Inlet Valve Cap<br />
9. Pump Crankcase<br />
10. Bypass Coupling<br />
11. Inlet Manifold<br />
12. Delivery Manifold<br />
13. Oil Level Cap<br />
14. Safety Valve<br />
15. Pump Shaft Protection<br />
16. Delivery Coupling<br />
17. Oil Cap<br />
18. Identification Label<br />
Page 5
Identification<br />
BP 20 / 15 BP 75 / 15<br />
BP 60 / 20 BP 125 / 20<br />
BP 151 / 20, BP 171 / 20 BP 265 / 20, BP 305 / 20<br />
Page 6
Identification<br />
MP20 , MP30<br />
MP40<br />
MP40AP<br />
P48<br />
APS 31, APS 41 APS 71<br />
Page 7
Identification<br />
APS 96 APS 101, APS 121<br />
APS 145 APS 166<br />
IDS 2200, IDS 2600<br />
Page 8
Installation<br />
When a dealer or an owner installs a pump,<br />
the following guidelines must be met:<br />
1. The suction hose from the tank to the pump<br />
must be equal to, or greater than the outside<br />
diameter of the pump inlet connector (7).<br />
2. The pump suction hose should be wire<br />
reinforced to prevent collapse and firmly hoseclamped<br />
at the connection.<br />
3. The suction line from the tank to the pump<br />
should be kept as short as possible and must<br />
have a minimum of bends.<br />
6. The suction hose between the tank and the<br />
filter should have a shutoff valve installed, to<br />
allow the strainer to be cleaned without<br />
emptying the tank. The parts of this valve<br />
must not be smaller than the OD of the pump<br />
inlet connector.<br />
7. The maximum suction lift should be no<br />
more than 1m for continuous operation and<br />
3m for a maximum of 5 min during tank<br />
filling.<br />
8. Do not connect pump suction to mains feed, the<br />
maximum inlet pressure is 1m (1.5psi)<br />
4. A suction filter must be fitted between the<br />
tank and the pump.<br />
5. The filter strainer should be approximately<br />
50 mesh. The minimum filter area should be<br />
250cm 2 per 100 l/min rated delivery of the<br />
pump. eg. BP60/20 has a rated delivery of<br />
58.2 l/min therefore the minimum filter area<br />
would be 250/100 x 58.2 =145.5cm 2 .<br />
Tank Filling Only - Max 5<br />
Continuous Use<br />
Page 9
Operation<br />
This pump has been designed and<br />
constructed solely to pump agricultural liquid<br />
chemicals, normally used for pest, weed and<br />
fungus control.<br />
It must not to be used to pump:<br />
• Liquids with a density and viscosity greater<br />
than water.<br />
• Chemical products if the compatibility with the<br />
materials of the pump is not known.<br />
• Sea water or other salty concentrations.<br />
• Water with a temperature above 40°C and<br />
less than 5°C.<br />
• Any type of varnish.<br />
• Solvents and thinners for any type of varnish.<br />
• Any type of fuel or lubricant.<br />
• Liquids containing granules or floating solid<br />
parts.<br />
• Chlorine.<br />
• For special liquids please contact <strong>Silvan</strong><br />
service department.<br />
Pre Operational Checks<br />
1. Check the oil level while the pump is<br />
standing still and sitting horizontally. The oil<br />
must reach the level indicated on the sight<br />
glass (fig 1) or be visible on the oil level plug<br />
(fig 2) depending on the pump model. Top up<br />
with SAE 20W/30 oil if necessary.<br />
2. Adjust the air pressure in the pressure<br />
accumulator if fitted (fig 3) in accordance with<br />
the operating pressure used to spray. Adjust<br />
according to Table A. The pressure can be<br />
measured using a car tyre pressure gauge.<br />
Spraying (Bar)<br />
pressure (psi)<br />
Surge air (Bar)<br />
pressure (psi)<br />
2 - 5<br />
29 - 73<br />
2<br />
29<br />
TABLE A<br />
5 - 10<br />
73 - 145<br />
2 - 5<br />
29 - 73<br />
10 - 20<br />
145 - 290<br />
5 - 7<br />
73 - 102<br />
20 - 50<br />
290 - 725<br />
7<br />
102<br />
Start Up<br />
1. Ensure the control valve is in the bypass<br />
position and any taps not being used are in<br />
the closed position. For details of the control<br />
valve operation you need to refer to the<br />
operation manual pertaining to the control<br />
valve that will be fitted to your pump.<br />
Repeat this procedure each time the pump<br />
has been emptied of liquid ie. Run dry.<br />
2. Bring the pump to operating speed of<br />
between 400 and 540 Rpm.<br />
3. Switch off the bypass and bring the pump<br />
to operating pressure for the particular<br />
application using the pressure regulator.<br />
4. Check the oil level during the first hours of<br />
operation and top up if necessary.<br />
Shutdown<br />
Flush the pump after use by running clean<br />
water for a few minutes<br />
If there is a risk of freezing run the pump dry<br />
for a few minutes to remove all liquid from the<br />
pump.<br />
Page 10
Maintenance<br />
Disconnect the tractor PTO or power<br />
supply before performing any operation<br />
on the pump.<br />
Oil<br />
The level and condition of oil should be<br />
frequently checked (eg. each time the tank is<br />
filled) as it effects the operation of the pump<br />
and the condition and life of the diaphragm. It<br />
is advised to replace the oil every 300 hours<br />
of work or annually, whichever occurs first<br />
and at anytime the diaphragms are replaced.<br />
Oil Level<br />
When the pump is stationary the oil level must<br />
correspond to the reference indicator found on<br />
the oil sight glass (fig 2) or oil level cap (fig 1)<br />
depending on the type of pump. The oil level<br />
may vary when the diaphragm pump is<br />
working: As the pump is started the oil level<br />
will initially drop and then return to functioning<br />
level when the liquid begins to pump.<br />
During operation pay attention to any drop in<br />
the oil level:<br />
a) If this happens during the first few hours of<br />
operation it is normal and it is sufficient to top<br />
up with SAE 20W/30 type oil as in fig. 1. For<br />
pumps BP 60/20 and P48 where the oil sight<br />
glass is not present, remove the pressure<br />
accumulator assembly (fig 3). When<br />
remounting the manifold tighten the<br />
connecting plate screws to a torque of 17 Nm<br />
b) If this happens after many hours of<br />
operation and continues after 1 or 2 top ups, it<br />
is a symptom of diaphragm swelling caused<br />
by restricted suction (dirty filter, collapsed<br />
suction hose or chemical attack to<br />
diaphragm). In this case check the filter and<br />
suction system and/or refer to your <strong>Silvan</strong><br />
dealer to check the diaphragm.<br />
Diaphragm Failure<br />
If the oil becomes white (water present in oil),<br />
it may be a symptom of breakage of one or<br />
more diaphragms. It is necessary to stop work<br />
and inspect the condition of the diaphragms.<br />
If broken, it is necessary to replace the<br />
complete set.<br />
Continued use with water in the oil will cause<br />
serious damage to internal parts of the pump<br />
If it is not possible to replace broken<br />
diaphragms within one day of failure, empty<br />
the crankcase of water and pour in oil or<br />
diesel oil to stop rust from forming on the<br />
internal components.<br />
Suction<br />
The suction system must be inspected to<br />
ensure:<br />
1. There are no suction air leaks. Check for<br />
entry of air caused by:<br />
- entry of air caused by hose wear;<br />
- loose fittings;<br />
- worn joints;<br />
2. There are no small leaks or drips when the<br />
pump is stationary. If this occurs it means air<br />
will enter the pump when in operation.<br />
3. The filter is be kept clean with frequent<br />
inspections (after every tank load) especially if<br />
powder based products are used.<br />
Pump Mounting<br />
Periodically check, especially when there is<br />
vibration during use that the pump mounting<br />
bolts on the machine frame are tightened and<br />
if necessary re-tighten.<br />
Pressure Accumulator<br />
Check the inflation of the pressure<br />
accumulator, if fitted, according to Table A<br />
especially if there are vibrations on the<br />
delivery hose and/or the pressure gauge.<br />
Freezing Conditions<br />
If frosts or freezing conditions are likely to<br />
occur then drain all water from the pump to<br />
ensure the pump is not damaged by freezing<br />
water expanding inside the pump.<br />
Diaphragm Replacement<br />
At the end of every season it is advised to<br />
check the condition of the diaphragms and<br />
replace if worn or distorted. If the pump heads<br />
and/or diaphragms are removed the retaining<br />
bolts should re-tensioned according to the<br />
<strong>Silvan</strong> Torque Specifications chart.<br />
Inlet and Outlet Valves<br />
Periodically check (every 300 hours under<br />
normal working conditions) the condition of<br />
the inlet and outlet valves. The check must<br />
be more frequent if sandy liquid or abrasive<br />
liquids are used. They must also be carried<br />
out if changes of pressure, irregular<br />
functioning and strange noises are apparent.<br />
Page 11
Lubrication and Maintenance<br />
Maintenance Program Chart<br />
MAINTENANCE INTERVALS<br />
OPERATION<br />
Every<br />
8 hours<br />
Every<br />
50<br />
hours<br />
Every<br />
300<br />
hours<br />
End of<br />
Season<br />
CHECK LEVEL OIL<br />
X<br />
CHECK PRESSURE ACCUMULATOR<br />
CHECK SUCTION FITTINGS<br />
CHECK AND CLEAN SUCTION FILTER<br />
CHECK PUMP MOUNTING<br />
CHECK DIAPHRAGM<br />
X<br />
X<br />
X<br />
X<br />
O<br />
CHANGE OIL O(1) O(2)<br />
CHECK INLET/OUTLET VALVES<br />
CHECK TIGHTENING OF PUMP BOLTS<br />
O<br />
O<br />
Note: X operation to be carried out by the operator<br />
O operation to be carried out by specialised technician<br />
(1) Every 300 hours or annually, whichever occurs first.<br />
(2) To be carried out same at same time as diaphragm change<br />
Trouble Shooting<br />
Pump does not prime<br />
• No liquid in tank or not covering suction inlet.<br />
• Suction filter blocked.<br />
• Suction filter stop valve closed.<br />
• Suction filter bowl loose or missing O-ring.<br />
• Suction line loose allowing pump to suck air<br />
• Control lever not in by-pass position.<br />
• Pump valve springs broken or valves worn.<br />
Pump does not reach correct pressure<br />
• Pump not operating at full 540 rpm.<br />
• Suction filter blocked.<br />
• Suction filter stop valve partly closed<br />
• Pressure regulator not correctly adjusted<br />
• Pressure regulator valve and seats worn.<br />
• Pressure gauge faulty<br />
• Pump diaphragms ruptured (pump oil grey or<br />
milky).<br />
• Worn nozzles or capacity of nozzles<br />
greater than capacity of the pump.<br />
• Worn pump inlet / outlet valves<br />
Pump and hoses vibrating.<br />
• Pump surge chamber pressure incorrectly<br />
adjusted or surge diaphragm ruptured.<br />
• Air entering the suction line through loose<br />
or damaged fittings.<br />
• Pump valves or valve springs worn or<br />
damaged.<br />
• Worn nozzles or capacity of nozzles<br />
greater than capacity of the pump.<br />
• Air trapped in filter or suction lines.<br />
Water in Oil<br />
• Broken diaphragms<br />
Page 12
NOTES<br />
Page 13
NOTES<br />
Page 14
SILVAN AUSTRALIA PTY. LTD.<br />
ABN 48 099 851 144<br />
AUSTRALIA (HEAD OFFICE)<br />
89 Lewis Road, Wantirna South<br />
Victoria, 3152<br />
Telephone: +61 (03) 9887 2788<br />
Facsimie: +61 (03) 9887 1035<br />
Spare Parts Facsimile: (03) 9887 1637<br />
www.silvanaust.com<br />
NEW ZEALAND<br />
22 Sunshine Ave, Te Rapa<br />
Hamilton, 2001<br />
Telephone: +64 (07) 849 6030<br />
Facsimie: +64 (07) 849 6070<br />
www.silvannz.co.nz