Grainsaver Kit - Silvan Australia
Grainsaver Kit - Silvan Australia
Grainsaver Kit - Silvan Australia

You also want an ePaper? Increase the reach of your titles
YUMPU automatically turns print PDFs into web optimized ePapers that Google loves.
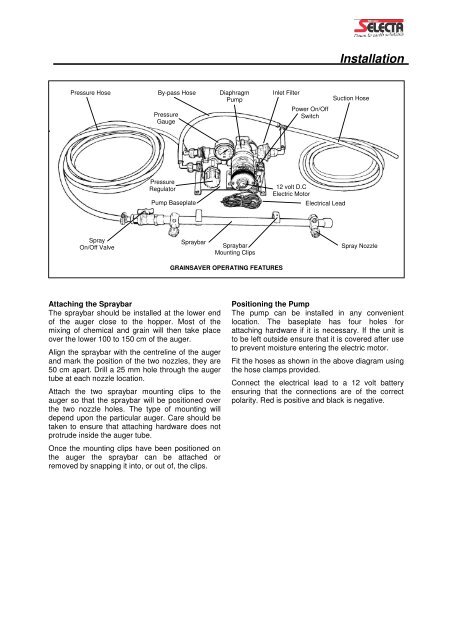
Installation<br />
Pressure Hose By-pass Hose Diaphragm Inlet Filter<br />
Pump<br />
Pressure<br />
Gauge<br />
Power On/Off<br />
Switch<br />
Suction Hose<br />
Pressure<br />
Regulator<br />
Pump Baseplate<br />
12 volt D.C<br />
Electric Motor<br />
Electrical Lead<br />
Spray<br />
On/Off Valve<br />
Spraybar<br />
Spraybar<br />
Mounting Clips<br />
Spray Nozzle<br />
GRAINSAVER OPERATING FEATURES<br />
Attaching the Spraybar<br />
The spraybar should be installed at the lower end<br />
of the auger close to the hopper. Most of the<br />
mixing of chemical and grain will then take place<br />
over the lower 100 to 150 cm of the auger.<br />
Align the spraybar with the centreline of the auger<br />
and mark the position of the two nozzles, they are<br />
50 cm apart. Drill a 25 mm hole through the auger<br />
tube at each nozzle location.<br />
Attach the two spraybar mounting clips to the<br />
auger so that the spraybar will be positioned over<br />
the two nozzle holes. The type of mounting will<br />
depend upon the particular auger. Care should be<br />
taken to ensure that attaching hardware does not<br />
protrude inside the auger tube.<br />
Once the mounting clips have been positioned on<br />
the auger the spraybar can be attached or<br />
removed by snapping it into, or out of, the clips.<br />
Positioning the Pump<br />
The pump can be installed in any convenient<br />
location. The baseplate has four holes for<br />
attaching hardware if it is necessary. If the unit is<br />
to be left outside ensure that it is covered after use<br />
to prevent moisture entering the electric motor.<br />
Fit the hoses as shown in the above diagram using<br />
the hose clamps provided.<br />
Connect the electrical lead to a 12 volt battery<br />
ensuring that the connections are of the correct<br />
polarity. Red is positive and black is negative.