
You also want an ePaper? Increase the reach of your titles
YUMPU automatically turns print PDFs into web optimized ePapers that Google loves.
TROUBLESHOOTING<br />
Spray Pattern Problems Remedies<br />
1. Air enters between fluid nozzle and 1. Remove fluid nozzle to clean seat.<br />
Fluttering tapered seat of gun body. If it is damaged, replace nozzle<br />
2. Air is suctioned from fluid needle packing. 2. Thigten fluid needle packing.<br />
1. Paint buildup on air cap, partially 1. Remove obstructions from horn holes.<br />
Crescent clogs horn holes. Air pressure from But do not use metal objects to clean<br />
both horns differs.<br />
horn holes.<br />
1. Paint buildup on the periphery of the fluid 1. Remove obstructions.<br />
Inclined nozzle hole or air cap center hole or damage. Replace if damaged.<br />
2. Loose fluid nozzle. 2. Remove fluid nozzle, clean seated section<br />
1. Paint viscosity too low. 1. Add paint to increase viscosity.<br />
Split 2. Fluid output too high. 2. Adjust fluid adj. knob or<br />
pattern adj. knob.<br />
Heavy 1. Paint viscosity too high. 1. Reduce viscosity.<br />
Center 2. Fluid output too low. 2. Increase fluid output.<br />
1. Fluid nozzle and fluid needle set are 1. Clean or replace fluid nozzle and fluid<br />
Spit not seating properly. needle set.<br />
2. The first-stage travel of trigger 2. Replace fluid nozzle and fluid<br />
(when only air discharges) decreases. needle set.<br />
3. Paint buildup inside air cap set 3. Clean air cap set.<br />
PROBLEMS AND REMEDIES<br />
Problem Where it Parts to be Cause Remedy<br />
occurred checked Retighten Adjust Clean Replace<br />
Air leaks Air valve set Air valve *Dirt or damage on seat x x<br />
(from tip<br />
of air cap) Air valve seat set *Dirt or damage on seat x x<br />
EUROPEAN SALES<br />
BRANCHES:<br />
ANEST IWATA Europe S.r.l.<br />
Corso Vigevano 46, 10155 Torino - Italy<br />
Tel. 011-24 80 868 (4 linee ric. aut.)<br />
Fax 011-85 19 44<br />
*Wear on air valve spring<br />
O ring *Damaged or deteriorated x<br />
Paint Fluid nozzle Fluid nozzle - *Dirt, damage, wear<br />
leaks fluid needle set on seat x x<br />
*Loose fluid needle<br />
adj. knob<br />
*Wear on needle spring<br />
Fluid nozzle - *Insufficient tightening x<br />
gun body<br />
*Dirt or damage on seat x x<br />
Fluid needle - *Needle does not return due<br />
packing set to packing set too tight x x<br />
*Needle does not return due<br />
to paint buildup<br />
on fluid needle x x<br />
Fluid needle Needle packing *Wear x x<br />
set<br />
Packing seat *Insufficient tightening x<br />
Paint does not Tip of gun Fluid adj. knob *Insufficient opening x<br />
flow<br />
Tip hole of nozzle *Clogged x<br />
Paint filter *Clogged x x<br />
Quality Air Spray Guns Since 1944<br />
www.anest-iwataeu.com/airgunsa<br />
ANEST IWATA France S.A.<br />
38074 Saint Quentin Fallavier<br />
Cedex Centre Evolic B.P. 7405<br />
Tél. 04 74 94 59 69<br />
Fax 04 74 94 34 39<br />
AIR <strong>GUN</strong>SA S.r.l.<br />
46, Corso Vigevano -10155 Torino - Italy<br />
Tel. +39 011-24 80 868<br />
Fax +39 011-85 19 44<br />
www.anest-iwataeu.com<br />
e-mail: info@anest-iwataeu.com<br />
x<br />
ANEST IWATA (U.K.) LTD<br />
Unit 2, Cedar Trade Park,<br />
Ferndown Industrial Estate,<br />
Wimborne, Dorset - BH21 7SB U.K.<br />
Tel. 01202 - 895999 Fax: 01202 -895666<br />
x<br />
x<br />
Instruction Manual<br />
<strong>AZ3</strong> <strong>HTE</strong> <strong>SPRAY</strong> <strong>GUN</strong><br />
Before use, adjustment or maintenance, it is important to read this instruction<br />
manual very carefully. This manual must be stored in a safe place for<br />
GB<br />
any future reference that may be necessary.<br />
IMPORTANT<br />
This spray gun should be operated only by an adequately trained operator, for safe use and maintenance of the equipment.<br />
Any misuse or handling other than those indicated in this Instruction Manual is not covered by guarantee. AIR <strong>GUN</strong>SA disclaims<br />
all responsibility for any accident or damage caused by failure to observe the operational and safety procedures as from this<br />
manual. In the interest of user friendliness, this manual contains information in a brief and concise form.<br />
For any additional information you may require regarding. spray guns operations, or if any missing parts or any damage during<br />
transportation is found, please contact your nearest ANEST IWATA Company (see last cover page).<br />
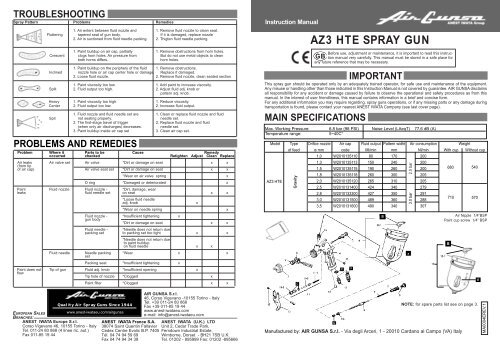
MAIN SPECIFICATIONS<br />
Max. Working Pressure: 6.8 bar (98 PSI) Noise Level (LAeqT) 77,6 dB (A)<br />
Temperature range:<br />
5~40C°<br />
Model Type Orifice nozzle Air cap Fluid output Pattern widht Air consumption Weight<br />
of feed ø mm code Ml/min mm Nl/min With cup Without cup<br />
1,0 W2010135110 80 170 200<br />
1,3 W2010135113 150 240 200<br />
1,5 W2010135115 190 260 200<br />
680 540<br />
1,8 W2010135118 260 300 205<br />
<strong>AZ3</strong> <strong>HTE</strong><br />
2,0 W2010135120 265 310 205<br />
2,5 W2010131400 424 340 279<br />
2,8 W2010133300 427 350 291<br />
3,0 W2010131500 489 360 288<br />
710 570<br />
3,5 W2010131600 490 340 307<br />
Gravity<br />
Manufactured by: AIR <strong>GUN</strong>SA S.r.l. - Via degli Arceri, 1 - 20010 Cardano al Campo (VA) Italy<br />
2.0 bar<br />
3.0 bar<br />
18<br />
Air Nipple 1/4”BSP<br />
Paint cup screw 1/4” BSP<br />
18-1<br />
NOTE: for spare parts list see on page 3.<br />
B<br />
E<br />
MA0004EREV.1
SAFETY WARNINGS<br />
FIRE OR EXPLOSION HAZARD<br />
1. Fluid and solvents can be highly flammable or combustible.<br />
- Use in well-ventilated spray booth.<br />
- Avoid any ignition sources such as smoking, open<br />
flames, electrical hazard, etc.<br />
2. NEVER use HALOGENATED HYDROCARBON SOL-<br />
VENTS (1.1.1 TRICHLORINE, ETHYL CHLORIDE, etc.), which<br />
can chemically react with aluminium and zinc parts and<br />
cause an explosion. Be sure that all fluids and solvents<br />
used are chemically compatible with aluminium and zinc parts.<br />
If in doubt, consult your fluid or solvent supplier to ensure compatibility. Details of materials used in the gun are available<br />
on request.<br />
3. To reduce the risk of static sparking, grounding continuity to the spray equipment and object being sprayed must be<br />
maintained.<br />
MISUSE HAZARD<br />
1. NEVER point gun in the direction of human body.<br />
2. NEVER exceed the maximum safe working pressure of the equipment.<br />
3. ALWAYS release air and fluid pressures before c!eaning, disassembling or servicing. For emergency stop and prevention<br />
of unintended operation, a ball valve installation near the gun to stop air supply is recommended.<br />
HAZARD CREATED WHILE COATING MATERIALS ARE ATOMIZED AND <strong>SPRAY</strong>ED<br />
1. Toxic vapours produced by spraying certain materials can create intoxication and serious damage to health.<br />
- Use the gun in well-ventilated areas.<br />
- Always wear protective eyewear, gloves, respirator, etc., to prevent the toxic vapour hazard, solvents and paint<br />
from coming into contact with your eyes or skin.<br />
2. Noise level mentioned in main specifications was measured at 1.0 m behind the tip of the gun, 1.6 m height from floor.<br />
- Wear earplugs if required.<br />
OTHER HAZARDS<br />
1. NEVER enter working areas of robots, reciprocators, conveyors, etc., unless machines are switched off.<br />
2. NEVER spray foods or chemicals through the spray gun.<br />
3. NEVER modify this product for any applications.<br />
HOW TO OPERATE<br />
Suggest air pressure is from 2.0 to 4.0 bar in order to obtain the<br />
best transfer efficiency.<br />
Set the spray distance from the gun to the workpiece as near as<br />
possible within the range of 200 - 300 mm.<br />
Keep fluid output as small as possible to the extent that the job will<br />
not be hindered. It will lead to better finishing with fine atomization.<br />
The gun should be held so that gun is perpendicular to the surface<br />
of the workpiece at all times. And, the gun should move in a straight<br />
and horizontal line. Arcing the gun causes uneven painting.<br />
Recommended paint viscosity differs according to paint property and painting conditions. From 15 to 23 sec./<br />
Ford #4 is recommendable<br />
MAINTENANCE AFTER PAINTING<br />
1) Pour remaining paint into another container and then clean paint passages and air cap. Spray a small amount<br />
of thinner to clean paint passages. Incomplete cleaning will cause adverse pattern shape and particles. Clean fully<br />
and promptly two-component paint after use.<br />
2) Clean other sections with attached brush soaked with thinner and waste cloth.<br />
3) Clean paint passages fully before disassembly.<br />
4) Remove fluid nozzle after removing fluid needle set or while keeping fluid needle pulled, in order to protect seat<br />
section.<br />
5) While keeping fluid needle set inserted, tighten fluid needle packing set by hand. Then tighten gradually by spanner.<br />
Adjust packing set while pulling trigger and watching movement of fluid needle set since too much tightening<br />
will slow down movement of fluid needle and result in leakage from tip of nozzle.<br />
6) Turn pattern adj. knob counterclockwise to full opening, and then tighten pattern adj. guide into gun body.<br />
WARNING<br />
WARNING<br />
TURN OFF AIR AND COATING MATERIALS TO THE <strong>GUN</strong> AND RELEASE PRESSURE BY TRIG-<br />
GERING THE <strong>GUN</strong> BEFORE DISASSEMBLING, CLEANING OR SERVICING.<br />
PAY ATTENTION WHEN DISASSEMBLING <strong>SPRAY</strong> <strong>GUN</strong> SINCE YOU MUST TOUCH SHARP PARTS.<br />
BEFORE DISASSEMBLING READ CAREFULLY THIS INSTRUCTION MANUAL.<br />
NEVER USE COMMERCIAL OR OTHER PARTS INSTEAD OF AIR <strong>GUN</strong>SA ORIGINAL SPARE<br />
PARTS<br />
NEVER IMMERSE THE WHOLE <strong>GUN</strong> INTO LIQUID SUCH AS THINNER<br />
NEVER DAMAGE HOLES OF AIR CAP, FLUID NOZZLE OR FLUID NEEDLE<br />
SPARE PARTS LIST<br />
DESCRIPTION<br />
REF.PART<br />
DESCRIPTION<br />
REF.PART<br />
INSTALLATION<br />
IMPORTANT:<br />
- This gun should be operated by adequately trained operators only.<br />
- Ensure that the gun has not been damaged during transportation.<br />
- Clean dry air should be supplied to the gun.<br />
1. Connect an air hose to air hose joint tightly.<br />
2. Connect a container to fluid joint .<br />
3. Flush the gun fluid passage with a compatible solvent.<br />
4. Pour paint into container, test spray, and adjust fluid output as well as pattern width.<br />
AIR CAP Ref. Part 1<br />
NOZZLE Ref. Part 2<br />
NOZZLE HOLDER Ref. Part 3<br />
<strong>GUN</strong> BODY Ref. Part 4<br />
PATTERN ADJ. Ref. Part 5<br />
FLUID NEEDLE ADJ. KNOB Ref. Part 6<br />
FLUID NEEDLE GUIDE Ref. Part 7<br />
FLUID NEEDLE SPRING Ref. Part 8<br />
FLUID NEEDLE Ref. Part 9<br />
NEEDLE PACKING NUT Ref. Part 10<br />
AIR VALVE SET Ref. Part 11<br />
AIR VALVE SPRING Ref. Part 11-1<br />
AIR VALVE Ref. Part 11-2<br />
AIR VALVE SEAT SET Ref. Part 11-3<br />
TRIGGER STUD Ref. Part 12<br />
TRIGGER Ref. Part 13<br />
PLUG Ref. Part 14<br />
THREADED BUSHING 1/4” BSP Ref. Part 15<br />
SCREW Ref. Part 16<br />
AIR NIPPLE 1/4” BSP Ref. Part 17<br />
CUP SET Ref. Part 18<br />
LID + NON DRIP SET Ref. Part 18-1<br />
NON DRIP SET 5 pcs.<br />
Ref. Part B<br />
PACKING SET<br />
Ref. Part C<br />
AIR FLOW CONTROL VALVE Ref. Part D<br />
PAINT FILTER<br />
Ref. Part E<br />
2<br />
3