User Manual - Lightsounds
User Manual - Lightsounds
User Manual - Lightsounds

You also want an ePaper? Increase the reach of your titles
YUMPU automatically turns print PDFs into web optimized ePapers that Google loves.
<strong>User</strong> <strong>Manual</strong>
Contents<br />
1 Connections 5<br />
1.1 Stand Alone Setup 5<br />
1.2 Turntables/CD Players and Internal Mixer Setup 6<br />
1.3 MP3 players (iPod®) and Internal Mixer Setup 7<br />
1.4 Turntable/CD Player and External Mixer Setup 8<br />
2 Installation 9<br />
2.1 Windows 9<br />
2.2 Mac OS X 11<br />
2.3 Launching CROSS DJ 11<br />
2.4 License Key 11<br />
3 Configuring CROSS DJ 12<br />
3.1 Audio Configuration 12<br />
3.2 MIDI Configuration 14<br />
4 Controller Overview 15<br />
4.1 Top Panel 15<br />
4.2 Rear Panel 18<br />
4.3 Front Panel 19<br />
5 Software Overview 20<br />
5.1 Menu 20<br />
5.4 Integrated Mixer<br />
C<br />
21<br />
5.5 Dock 22<br />
5.7 Preview Deck M<br />
22<br />
6 Importing Audio 23<br />
6.1 Importing Folders<br />
Y<br />
23<br />
CM<br />
8 First Mix with CROSS DJ and U-MIXMYCONTROL PRO 25<br />
9 Troubleshooting 26<br />
CY<br />
CMY<br />
K<br />
vibe-watermark-bright.pdf<br />
5.2 Head-Up Display (HUD) 20<br />
5.3 Players 21<br />
5.6 Browser 22<br />
6.2 iTunes® Integration 23<br />
7 Loading Tracks 24<br />
10 Frequently Asked Questions 27<br />
2 / 30
Important safety instructions<br />
C<br />
M<br />
Y<br />
CM<br />
MY<br />
CY<br />
CMY<br />
K<br />
1 Read these Instructions.<br />
2 Keep these Instructions.<br />
3 Heed all Warnings.<br />
4 Follow all Instructions.<br />
5 Do not use this apparatus near water.<br />
6 Clean only with a damp cloth.<br />
7 Do not block any of the ventilation openings. Install in accordance with the manufacturer’s instructions.<br />
8 Do not install near any heat sources such as radiators, heat registers, stoves, or other apparatus (including<br />
amplifiers) that produce heat.<br />
9 Do not defeat the safety purpose of the polarized plug. The wide blade is provided for your safety. If the<br />
provided plug does not fit into your outlet, consult an electrician for replacement of the obsolete outlet.<br />
10 Protect the power cord from being walked on or pinched particularly at plug, convenience receptacles,<br />
and point where they exit from the apparatus.<br />
11 Only use attachments/accessories specified by the manufacturer.<br />
12 Use only with a cart, stand, tripod, bracket, or table specified by the manufacturer, or sold with the<br />
apparatus. When a cart is used, use caution when moving the cart/apparatus combination to avoid injury<br />
from tip-over.<br />
13 Unplug this apparatus during lighting storms or when unused for long periods of time.<br />
14 Refer all servicing to qualified service personnel. Serving is required when the apparatus has been<br />
C<br />
shall not be exposed to dripping or splashing M and that no objects filled with liquids, such as vases, shall be<br />
placed on the apparatus.<br />
Y<br />
The lightning flash with arrowhead symbol within the equilateral triangle is intended to alert the use to<br />
CM<br />
the presence of un-insulated “dangerous voltage” within the product’s enclosure that may be of<br />
The exclamation point within the equilateral triangle is intended to alert the user to the presence of<br />
MY<br />
important operation and maintenance (servicing) instructions in the literature accompanying this<br />
CY<br />
CMY<br />
K<br />
vibe-watermark-bright.pdf<br />
damaged in any way, such as power-supply cord or plug is damaged, liquid has been spilled or objects<br />
have fallen into the apparatus, the apparatus has been exposed to rain or moisture, does not operate<br />
instructions.pdf 10/11/2009 15:36:39<br />
normally, or has been dropped.<br />
WARNING<br />
To reduce the risk of the fire or electric shock, do not expose this apparatus to rain or moisture. The apparatus<br />
CAUTION: To reduce the risk of electric shock, do not remove<br />
any cover. No user-serviceable parts inside. Refer servicing to<br />
qualified service personnel only.<br />
sufficient magnitude to constitute a risk of electric shock.<br />
appliance.<br />
CAUTION<br />
CAUTION<br />
To prevent electric shock, do not use this polarized plug with an extension cord, receptacle or other outlet<br />
unless the blades can be fully inserted to prevent blade exposure<br />
3 / 30
Welcome<br />
Thank you for choosing MixVibes U-MIX CONTROL PRO. MixVibes U-MIX CONTROL PRO is a DJ package including<br />
CROSS DJ software and an external MIDI DJ controller with an internal sound interface. This is the perfect package<br />
for DJs seeking a compact, professional DJ solution which makes no compromise on the design and quality of the<br />
hardware.<br />
Take a few minutes to run through this quick start guide and you’ll be on your way to making great mixes on<br />
MixVibes U-MIX CONTROL PRO in no time at all!<br />
We invite you be a part of the MixVibes community to share your experiences with other DJs, find help and advice,<br />
and check for available updates. See you online on the forum 1 or on the website 2 !<br />
Minimum System Requirements for PC<br />
• Windows XP SP2 or Windows Vista SP2 or Windows 7. We recommend Windows 7 or XP over Vista.<br />
• Intel Core 2 Duo / 1.8 GHz or equivalent<br />
• 1 GB RAM<br />
• One available USB port<br />
• Hard drive space for music<br />
Minimum System Requirements for MAC<br />
• Mac OS X 10.4<br />
• Intel Core 2 Duo / 1.8 GHz or higher<br />
• 1 GB RAM<br />
• One available USB port<br />
• Hard drive space for music<br />
Box Contents<br />
• CROSS DJ installation disc<br />
Y<br />
• 1 USB cable; 1 RCA cable; 1 male RCA to male mini jack (3.5mm)<br />
C<br />
M<br />
• U-MIX CONTROL PRO - USB DJ MIDI controller with an internal sound interface<br />
• This user manual<br />
1 http://forum.mixvibes.com<br />
2 http://www.mixvibes.com<br />
CM<br />
MY<br />
CY<br />
CMY<br />
K<br />
4 / 30<br />
vibe-watermark-bright.pdf
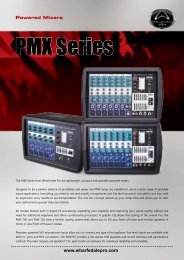
1 Connections<br />
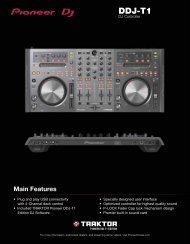
1.1 Stand Alone Setup<br />
1 Connect outputs 1/2 of your U-MIX CONTROL PRO to your sound system (amplifier, powered speakers, or<br />
home stereo).<br />
2 Connect your headphones to one of the ’headphones’ outputs of your U-MIX CONTROL PRO.<br />
3 If necessary, connect your microphone to the ’microphone’ input of your U-MIX CONTROL PRO.<br />
4 Connect the supplied USB cable between the USB output of your U-MIX CONTROL PRO and a free USB slot<br />
of your computer.<br />
5 To turn on your U-MIX CONTROL PRO, set the rear panel selector to ’USB’.<br />
6 After installing the software, set the CROSS DJ Audio preferences as described in the Audio Configuration<br />
part of this manual: 3.1 on page 12.<br />
MIXVIBES<br />
SOFTWARE<br />
USB<br />
9V<br />
0.5A POWER<br />
DC IN OFF USB OUTPUT 3/4 OUTPUT 1/2<br />
INPUT 3/4 INPUT 1/2<br />
R L<br />
LN PH<br />
R L<br />
R L<br />
R L<br />
R L<br />
MIN MAX MIN MAX<br />
TOUCH SENSOR<br />
LEVEL C.F. CURVE<br />
C<br />
M<br />
MICROPHONE<br />
Y<br />
CM<br />
MY<br />
CY<br />
CMY<br />
K<br />
Stand alone setup<br />
5 / 30<br />
LN PH<br />
HEADPHONES<br />
L R<br />
SPEAKERS<br />
vibe-watermark-bright.pdf<br />
REAR<br />
FRONT
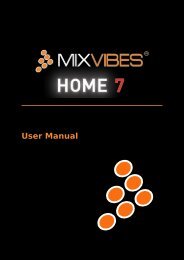
1 Connections<br />
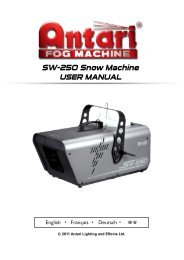
1.2 Turntables/CD Players and Internal Mixer Setup<br />
1 If you are using vinyl, plug the ground of your turntable to the ground lug on the U-MIX CONTROL PRO.<br />
2 Connect the outputs of your decks (vinyl or CD) to the RCA inputs of your U-MIX CONTROL PRO plugging<br />
the left deck into the inputs 1/2 and right deck into the inputs 3/4. Match the left channel (usually white)<br />
with the white RCA sockets on the U-MIX CONTROL PRO, and right (usually red) with the red sockets.<br />
3 If you are using turntables with phono outputs, set the U-MIX CONTROL PRO’s input selectors to ’Phono’.<br />
If you are using turntables with line outputs or CD players, set the input selectors on the U-MIX CONTROL<br />
PRO to ’Line’.<br />
4 Connect outputs 1/2 of your U-MIX CONTROL PRO to your sound system (amplifier, powered speakers, or<br />
home stereo).<br />
5 Connect your headphones to one of the ’headphones’ outputs of your U-MIX CONTROL PRO.<br />
6 If necessary, connect your microphone to the ’microphone’ input of your U-MIX CONTROL PRO.<br />
7 Connect the supplied USB cable between the USB output of your U-MIX CONTROL PRO and a free USB slot<br />
of your computer.<br />
8 To turn on your U-MIX CONTROL PRO, set the rear panel selector to ’USB’.<br />
9 After installing the software, set the CROSS DJ Audio preferences as described in the Audio Configuration<br />
part of this manual: 3.1 on page 12.<br />
MIXVIBES<br />
SOFTWARE<br />
USB<br />
SPEAKERS CD PLAYER TURNTABLE<br />
C<br />
M<br />
Y<br />
9V<br />
0.5A POWER<br />
DC IN OFF USB OUTPUT 3/4 OUTPUT 1/2<br />
INPUT 3/4 INPUT 1/2<br />
R L<br />
LN PH<br />
R L<br />
R L<br />
R L<br />
R L<br />
MIN MAX MIN MAX<br />
TOUCH SENSOR<br />
LEVEL C.F. CURVE<br />
CM<br />
MY<br />
MICROPHONE<br />
CY<br />
CMY<br />
LN PH<br />
Turntables/CD Players and internal mixer setup<br />
K<br />
6 / 30<br />
LINE<br />
PHONO<br />
LINE<br />
PHONO<br />
LN PH<br />
HEADPHONES<br />
L R<br />
LN PH<br />
vibe-watermark-bright.pdf<br />
REAR<br />
FRONT
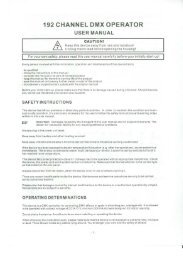
1 Connections<br />
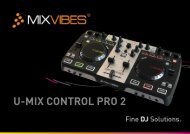
1.3 MP3 players (iPod®) and Internal Mixer Setup<br />
1 Connect the outputs of your MP3 players to the RCA inputs of your U-MIX CONTROL PRO plugging the left<br />
MP3 player into the inputs 1/2 and right MP3 player into the inputs 3/4.<br />
2 Set the U-MIX CONTROL PRO’s input selectors to ’Line’.<br />
3 Connect outputs 1/2 of your U-MIX CONTROL PRO to your sound system (amplifier, powered speakers, or<br />
home stereo).<br />
4 Connect your headphones to one of the ’headphones’ outputs of your U-MIX CONTROL PRO.<br />
5 If necessary, connect your microphone to the ’microphone’ input of your U-MIX CONTROL PRO.<br />
6 Connect the supplied USB cable between the USB output of your U-MIX CONTROL PRO and a free USB slot<br />
of your computer.<br />
7 To turn on your U-MIX CONTROL PRO, set the rear panel selector to ’USB’.<br />
8 After installing the software, set the CROSS DJ Audio preferences as described in the Audio Configuration<br />
part of this manual: 3.1 on page 12.<br />
MIXVIBES<br />
SOFTWARE<br />
USB<br />
SPEAKERS<br />
C<br />
M<br />
9V<br />
0.5A POWER<br />
DC IN OFF USB OUTPUT 3/4 OUTPUT 1/2<br />
INPUT 3/4 INPUT 1/2<br />
R L<br />
LN PH<br />
R L<br />
R L<br />
R L<br />
R L<br />
MIN MAX MIN MAX<br />
TOUCH SENSOR<br />
LEVEL C.F. CURVE<br />
Y<br />
CM<br />
MICROPHONE<br />
MY<br />
CY<br />
CMY<br />
K<br />
LN PH<br />
LINE<br />
PHONO<br />
Mp3 / iPod (1)<br />
LINE<br />
PHONO<br />
LN PH<br />
HEADPHONES<br />
L R<br />
MP3 players (iPod®) and internal mixer setup<br />
7 / 30<br />
Mp3 / iPod (2)<br />
LN PH<br />
vibe-watermark-bright.pdf<br />
REAR<br />
FRONT
1 Connections<br />
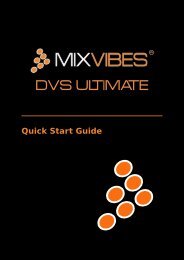
1.4 Turntable/CD Player and External Mixer Setup<br />
1 If you are using vinyl, plug the ground of your turntable to the ground lug on the U-MIX CONTROL PRO or<br />
on your DJ mixer.<br />
2 Connect the outputs of your decks (vinyl or CD) to the RCA inputs of your U-MIX CONTROL PRO plugging<br />
the left deck into the inputs 1/2 and right deck into the inputs 3/4. Match the left channel (usually white)<br />
with the white RCA sockets on the U-MIX CONTROL PRO, and right (usually red) with the red sockets.<br />
3 If you are using turntables with phono outputs, set the U-MIX CONTROL PRO’s input selectors to ’Phono’.<br />
If you are using turntables with line outputs or CD players, set the input selectors to ’Line’.<br />
4 Connect the outputs of your U-MIX CONTROL PRO to the line inputs of your mixer. Connect the outputs<br />
1/2 into a line input of your mixer and the outputs 3/4 into another one.<br />
5 Connect your headphones to the external mixer’s headphone output and plug your sound system<br />
(amplifier, powered speakers, or home stereo) to the external mixer’s main output.<br />
6 If necessary, connect your microphone to the external mixer’s microphone input.<br />
7 Connect the U-MIX CONTROL PRO to a free USB slot of your computer.<br />
8 To turn on your U-MIX CONTROL PRO, set the rear panel selector to ’USB’.<br />
9 After installing the software, set the CROSS DJ Audio preferences as described in the Audio Configuration<br />
part of this manual: 3.1 on page 12.<br />
MIXVIBES<br />
SOFTWARE<br />
USB<br />
C<br />
M<br />
CM<br />
MICROPHONE MIXER<br />
Y<br />
9V<br />
0.5A POWER<br />
DC IN OFF USB OUTPUT 3/4 OUTPUT 1/2<br />
INPUT 3/4 INPUT 1/2<br />
R L<br />
LN PH<br />
R L<br />
R L<br />
R L<br />
R L<br />
MIN MAX MIN MAX<br />
TOUCH SENSOR<br />
LEVEL C.F. CURVE<br />
MY<br />
CY<br />
CMY<br />
LN PH<br />
LINE<br />
PHONO<br />
CD PLAYER<br />
Turntable/CD Player and external mixer setup<br />
K<br />
8 / 30<br />
LINE<br />
PHONO<br />
LN PH<br />
vibe-watermark-bright.pdf<br />
TURNTABLE<br />
LN PH<br />
REAR<br />
SPEAKERS HEADPHONES<br />
L R
2 Installation<br />
Please log in on our forum in order to register your product and to check for the latest download version of CROSS<br />
software. If it is newer than what is on your CD-ROM, we recommend installing it instead.<br />
2.1 Windows<br />
1 Insert CROSS DJ installation disc into your computer’s CD-ROM drive. The installation program will launch<br />
automatically. In case it does not, open Windows Explorer, navigate to the CROSS DJ installation disc and<br />
double-click on the file «Install Cross DJ.exe».<br />
2 Choose your language and click OK.<br />
C<br />
M<br />
3 Read and accept the End-<strong>User</strong> License Agreement by clicking I Agree.<br />
J<br />
CM<br />
MJ<br />
CJ<br />
CMJ<br />
N<br />
C<br />
M<br />
J<br />
CM<br />
MJ<br />
CJ<br />
CMJ<br />
N<br />
install_language.pdf 26/02/2009 20:50:35<br />
C<br />
M<br />
Y<br />
CM<br />
MY<br />
CY<br />
CMY<br />
Language Selection<br />
install_licence_dj.pdf 01/07/2009 13:50:47<br />
End-<strong>User</strong> License Agreement<br />
install_components_dj.pdf 01/07/2009 13:49:37<br />
4 Select the Components you want to install and click Next.<br />
C<br />
M<br />
J<br />
Components Selection<br />
K<br />
9 / 30<br />
vibe-watermark-bright.pdf
2 Installation<br />
install_install_location_dj.pdf 01/07/2009 13:50:27<br />
5 Choose the folder in which you want to install CROSS DJ and click Next.<br />
C<br />
J<br />
CM<br />
MJ<br />
CJ<br />
CMJ<br />
N<br />
C<br />
Start Menu Folder Location<br />
M<br />
C 7 Once the installation is complete you can click Finish. If the check box Run CROSS DJ is selected,<br />
install_finish_dj.pdf Y 01/07/2009 13:49:59<br />
M<br />
CROSS DJ will launch automatically.<br />
CM<br />
MY<br />
CY<br />
CMY<br />
K<br />
Choose Install location<br />
6 Choose the Start Menu folder in which you want to create the CROSS DJ shortcut. To start the installation,<br />
M<br />
install_start_menu_folder_dj.pdf 01/07/2009 13:49:12<br />
click Install.<br />
C<br />
M<br />
J<br />
CM<br />
MJ<br />
CJ<br />
CMJ<br />
N<br />
Finish Installation<br />
10 / 30<br />
vibe-watermark-bright.pdf
2 Installation<br />
2.2 Mac OS X<br />
1 Insert the CROSS DJ installation disc into your computer’s CD-ROM drive.<br />
2 Double-click the CROSS DJ icon on your desktop.<br />
install_mac_application_dj.pdf 07/07/2009 11:45:59<br />
3 Drag and drop CROSS DJ into your "Applications" folder.<br />
2.3 Launching CROSS DJ<br />
C<br />
M<br />
J<br />
CM<br />
Enter the License Key found on the sleeve of your installation disc and click Submit.<br />
M<br />
MJ<br />
CJ<br />
CMJ<br />
N<br />
C<br />
Y<br />
CM<br />
MY<br />
CY<br />
CMY<br />
K<br />
Installing CROSS DJ<br />
Windows Go to [Start > All Programs > MixVibes > Cross DJ] and click on the CROSS DJ icon.<br />
Mac OS X Go to [Applications > Cross DJ] and double-click on CROSS DJ.<br />
2.4 License Key<br />
C<br />
M<br />
J<br />
CM<br />
serial_number_dj.pdf 01/07/2009 15:53:32<br />
License key<br />
11 / 30<br />
vibe-watermark-bright.pdf
3 Configuring CROSS DJ<br />
3.1 Audio Configuration<br />
1 Go to [File > Preferences > Audio]. Look at the figure on the following page to view the list.<br />
2 Select "MixVibes ASIO U-MIX CONTROL PRO" from the pull down menu.<br />
3 Choose your desired sample rate and buffer size. The default settings are 44.1kHz sample rate and<br />
256 samples of buffer.<br />
4 Select the inputs of the U-MIX CONTROL PRO from the pull down menus.<br />
1 Stand alone setup: Select no input.<br />
2 Turntables/CD Players and internal mixer setup: Select "U-Mix Control Pro 1/U-Mix Control Pro<br />
2" for stereo input 1 and "U-Mix Control Pro 3/U-Mix Control Pro 4" for stereo input 2. Press the<br />
SOURCE button of the controller (shift + headphones).<br />
3 MP3 players (iPod®) and internal mixer setup: Select "U-Mix Control Pro 1/U-Mix Control Pro 2" for<br />
stereo input 1 and "U-Mix Control Pro 3/U-Mix Control Pro 4" for stereo input 2. Press the SOURCE<br />
button of the controller (shift + headphones).<br />
4 Turntable/CD Player and external mixer setup: Select "U-Mix Control Pro 1/U-Mix Control Pro 2" for<br />
stereo input 1 and "U-Mix Control Pro 3/U-Mix Control Pro 4" for stereo input 2. Press the SOURCE<br />
button of the controller (shift + headphones).<br />
5 Adjust the input gain depending on your input source to have enough level but without clipping.<br />
6 Set the input level to Line. Make sure to follow the connection instructions: 1 on page 5.<br />
7 Select the outputs of the U-MIX CONTROL PRO from the pull down menus.<br />
put is your system’s Master out) and "U-Mix Control Pro 3/U-Mix Control Pro 4" for stereo output 2<br />
C<br />
(this output is your system’s Cue/Monitor out).<br />
2" for stereo output 1 (this Moutput<br />
is your system’s Master out) and "U-Mix Control Pro 3/U-Mix<br />
3 MP3 players (iPod®) and internal Y mixer setup: Select "U-Mix Control Pro 1/U-Mix Control Pro 2" for<br />
Pro 4" for stereo output 2 (this output is your system’s Cue/Monitor out).<br />
CM<br />
4 Turntable/CD Player and external mixer setup: Select "U-Mix Control Pro 1/U-Mix Control Pro 2"<br />
4" for stereo output 2 (this output MY is linked to player 2).<br />
CY<br />
1 Stand alone setup: Select the routing mode Dual Stereo.<br />
2 Turntables/CD Players and internal mixer setup: Select the routing mode Dual Stereo.<br />
CMY<br />
3 MP3 players (iPod®) and internal mixer setup: Select the routing mode Dual Stereo.<br />
vibe-watermark-bright.pdf<br />
1 Stand alone setup: Select "U-Mix Control Pro 1/U-Mix Control Pro 2" for stereo output 1 (this out-<br />
2 Turntables/CD Players and internal mixer setup: Select "U-Mix Control Pro 1/U-Mix Control Pro<br />
Control Pro 4" for stereo output 2 (this output is your system’s Cue/Monitor out).<br />
stereo output 1 (this output is your system’s Master out) and "U-Mix Control Pro 3/U-Mix Control<br />
for stereo output 1 (this output is linked to player 1) and "U-Mix Control Pro 3/U-Mix Control Pro<br />
8 Select your routing mode.<br />
4 Turntable/CD Player and external mixer setup: Select the routing mode External Mixer.<br />
K<br />
12 / 30
C<br />
M<br />
Y<br />
CM<br />
MY<br />
CY<br />
CMY<br />
K<br />
3 Configuring CROSS DJ<br />
Here is a description of the different routing modes:<br />
Simple Stereo The sum of the Master and Cue/Monitor signals are routed to outputs 1/2 on your U-MIX CONTROL<br />
PRO.<br />
Dual Stereo The Master signal is routed to outputs 1/2 and the Cue/Monitor signal is routed to outputs 3/4 on<br />
your U-MIX CONTROL PRO.<br />
Split Mono The Master and Cue/Monitor signals are folded down to mono. The mono Master is routed to output<br />
1 and the mono Cue/Monitor is routed to output 2 on your U-MIX CONTROL PRO.<br />
External Mixer Deck A direct out is routed to outputs 1/2 on your U-MIX CONTROL PRO, Deck B direct out is<br />
routed config_audio_dj_le_umcp.pdf to outputs 3/4. and the14/01/2011 Cue/Monitor 15:38:33 out is routed to outputs 5/6.<br />
2<br />
3<br />
4<br />
4 5<br />
5<br />
8<br />
C<br />
M<br />
Y<br />
CM<br />
Audio Configuration Pane<br />
MY<br />
CY<br />
CMY<br />
K<br />
6<br />
6<br />
13 / 30<br />
7<br />
7 vibe-watermark-bright.pdf
C<br />
M<br />
Y<br />
CM<br />
MY<br />
CY<br />
CMY<br />
K<br />
3 Configuring CROSS DJ<br />
3.2 MIDI Configuration<br />
1 Go to [File > Preferences > MIDI].<br />
2 Select your MIDI input device by clicking on its tab.<br />
3 Select your MIDI device mapping by clicking on its picture.<br />
4 If necessary you can:<br />
• add and delete a mapping (a).<br />
• duplicate a mapping to personalize it (b).<br />
• import a mapping for example use a mapping posted by another user on our forum (c).<br />
config_midi_umcp.pdf • export a mapping14/01/2011 for example 15:39:20 share it with other users (d).<br />
a b c d<br />
C<br />
M<br />
Y<br />
CM<br />
MY<br />
MIDI Configuration Pane<br />
CY<br />
CMY<br />
K<br />
14 / 30<br />
vibe-watermark-bright.pdf
C<br />
M<br />
Y<br />
CM<br />
MY<br />
CY<br />
CMY<br />
K<br />
4 Controller Overview<br />
4.1 Top Panel<br />
Each U-MIX CONTROL PRO button has a primary and a secondary function. Primary functions are direct, just press<br />
the desired button. To access the secondary functions, hold SHIFT and press the desired button.<br />
top_panel_umcp.pdf 24/09/2010 17:36:34<br />
20 21 22 8<br />
15 18 19<br />
16<br />
14<br />
12<br />
7 6<br />
5<br />
4<br />
24<br />
23<br />
9<br />
1<br />
6 7 8 22 21 20<br />
5 18 19 15<br />
4<br />
16<br />
14<br />
12<br />
3 3<br />
13 13<br />
10 11 17 2 10 11 17<br />
2. Crossfader: blends audio between the left and right channels.<br />
M<br />
3. Volume: adjusts the players’ audio level.<br />
C<br />
4. 5. 6. Equalization:<br />
Y<br />
• If you turn the buttons: a 3-band equalizer is available to modify the equalization of your media file.<br />
Treble, medium and bass can be adjusted with these knobs.<br />
CM<br />
• If you press the buttons: kills basses or mediums or trebles frequencies of your media file.<br />
7. Gain: adjusts the pre-fader, pre-EQ audio level of the corresponding channel.<br />
MY<br />
8. Cue/Monitor: sends the corresponding deck to the headphones mix.<br />
Shift function Source: Input selectors (Player or Line In). If you want to use a turntable, a CD player or a MP3<br />
player (iPod®), you have to select Line In. CY<br />
CMY<br />
K<br />
Top panel<br />
vibe-watermark-bright.pdf<br />
1. Shift: holding shift gives many of the buttons a secondary function. Secondary functions are printed inside a<br />
grey box.<br />
MIXER CONTROLS<br />
9. Master: adjusts the master output level and displays if signal clipping occurs.<br />
15 / 30
4 Controller Overview<br />
PLAYBACK CONTROLS<br />
10. Cue: If no Cue Point is assigned, or if the deck is paused, press Cue to set a Current Cue Point. While the<br />
media is playing, press it again to skip back to the Current Cue Point and pause playback. You can hold down Cue<br />
to start playback from the Current Cue Point. Release it to skip back to the Current Cue Point and pause playback.<br />
You can hold down Cue and Play/Pause simultaneously to start playback from the Current Cue Point. Release both<br />
buttons to allow playback to continue.<br />
Shift function Cue/Set: defines a cue point on the fly.<br />
11. Play/Pause: starts or pauses playback of a media file.<br />
Shift function Cue Play: jumps the media back to the Current Cue Point without stopping playback.<br />
12. Jog Wheel: the jog wheel can be used for a number of functions. When the media is first loaded you can use<br />
the jog wheel to cue up the media. When a media is playing and Vinyl mode is active you can use the top panel of<br />
the jog wheel to scratch and the jog wheel margin to temporarily change the pitch of the media. When a media<br />
is playing and Vinyl mode is not active you can use the jog wheel to temporarily change the pitch of the media.<br />
Note: this will automatically revert back to the default pitch when you let go of the jog wheel.<br />
Shift function Jog Seek: skips through the media at high speed.<br />
PITCH CONTROLS<br />
13. Pitch bend: hold these buttons down to temporarily alter the speed the playing media. When released, the<br />
media playback will return to the speed designated by the pitch slider.<br />
Shift function Fine: hold these buttons down to temporarily and finely alter the speed the playing media.<br />
14. Pitch slider: changes the speed of the currently playing media.<br />
15. Speed/Tempo/Hybrid select: selects Speed or Tempo or Hybrid.<br />
C<br />
If Speed mode has been selected you can adjust the pitch like with a normal turntable.<br />
If the Tempo mode has been activated it is possible to change the pitch via the pitch fader without influencing the<br />
M<br />
tone pitch. This means that the song’s tonal key remains the same while changing its speed.<br />
the tempo mode in the (-33%; +33%) speedY range and to the speed mode below -66% and above +66%. In the<br />
the pitch transitions.This mode gives the best of the speed and tempo modes: a more natural sound at extreme<br />
CM<br />
speed values, and a wide constant-pitch range around 0% speed.<br />
Shift function Pitch range: sets the range of the pitch slider. Push this button to change it between 4%, 6%, 8%,<br />
MY<br />
16%, 32% and 100%.<br />
this button is off, the jog wheel will allow you CYto<br />
change the speed.<br />
Shift function Match: only synchronizes the CMY BPM with the adjacent player.<br />
K<br />
vibe-watermark-bright.pdf<br />
The hybrid mode is a combination of the speed and the tempo warping modes, hence its name. It is equivalent to<br />
remaining speed ranges (-66%; -33%) and (33%; 66%), the pitch is gradually increased or decreased to smooth<br />
16. Vinyl: while a track is playing with this option turned on, you can use the jog wheel to scratch your media; if<br />
17. Sync: synchronizes the BPM and the beat with the adjacent player.<br />
16 / 30
4 Controller Overview<br />
LOCATORS CONTROLS<br />
18. Select: switches between the commands of the locators 1/2/3 and the locators 4/5/6. If the select button is<br />
on, you can play with the locators 4/5/6.<br />
19. Locator: defines and reaches six locator points (hot cues) in the media being played. To save a locator point,<br />
push a locator button. To go to a locator point, push a previously saved locator button again. Once it is assigned,<br />
the locator button will light up.<br />
Shift function Clear locators: clears a defined locator point.<br />
LOOP CONTROLS<br />
20. Auto Loop:<br />
• If you turn the button: changes the currently selected auto loop length or change the length of the active<br />
loop by moving its end point.<br />
Shift function Smart Seek/Loop Jump: moves forward or backward the amount of beats as defined in the Smart<br />
Seek Length. If an auto loop is enable, the loop will also be moved backwards or forwards.<br />
• If you press the button: enables/disables an auto loop.<br />
Shift function Smart Seek/Loop Jump Length: selects the step size in beats.<br />
EFFECT CONTROLS<br />
21. Effect:<br />
• If you turn the button: selects an effect.<br />
• If you press the button: enables/disables current effect.<br />
22. Effect amount: sets current effect amount. C<br />
BROWSE CONTROLS<br />
23. Browse:<br />
M<br />
• If you turn the button: allows to navigate in the media windows to find the appropriate media.<br />
Y<br />
Shift function Quick Browse: allows to navigate faster in the media windows to find the appropriate media.<br />
• If you press the button: opens the highlighted directory.<br />
CM<br />
Shift function Back: returns to the parent directory.<br />
24. Load: loads the highlighted media into a player.<br />
MY<br />
CY<br />
CMY<br />
K<br />
17 / 30<br />
vibe-watermark-bright.pdf
C<br />
M<br />
Y<br />
CM<br />
MY<br />
CY<br />
CMY<br />
K<br />
4 Controller Overview<br />
4.2 Rear Panel<br />
rear_panel-umcp.pdf 04/10/2010 12:04:56<br />
1 2 3 4 5 6 7 8 9 10<br />
20 21 22 8<br />
15 18 19<br />
7<br />
Rear panel<br />
24 6<br />
23<br />
5 18<br />
22 21<br />
19<br />
20<br />
15<br />
16 4<br />
16<br />
1. Power adapter input: connect the power adapter here (optional, can be bought separately if USB power is<br />
too low).<br />
2. Power switch (adaptor / Off / USB): set the switch to Adaptor when using the exclusive adaptor, set to USB<br />
14<br />
12<br />
3<br />
12<br />
14<br />
13 13<br />
when using power provided from the computer via USB.<br />
3. USB connection: used to connect U-MIX CONTROL PRO to your computer.<br />
4. Output 1/2-3/4: use these standard RCA outputs to connect to an external mixer or your sound system<br />
(amplifier, powered speakers, or home stereo). If you have a speakers set with a cable mini jack male, use an<br />
adapter male RCA to female mini-jack (3.5mm).<br />
10<br />
11 17 11 17<br />
5. Touch sensor level: adjusts the level of touch sensitivity for the jog wheel; adjust it if CROSS DJ is not<br />
detecting your touches correctly.<br />
C<br />
(CD/MP3 player, iPod® for example) or phono (turntable) level. A turntable outputs a considerably weaker audio<br />
M<br />
signal than a CD or MP3 player, and therefore requires extra pre-amplification in order to achieve a comparable<br />
8. Input 1/2-3/4: use these standard RCA Yinputs<br />
to connect your decks or MP3 players. The phono level inputs<br />
9. Ground lug: when using a turntable, connect CM the ground lead from your turntable to the ground lug to help<br />
10. Kensington® safety slot: accommodates a plug associated with a padlock, then connected to a cable to<br />
MY<br />
be fixed around a fixed object, or difficult to move.<br />
CY<br />
CMY<br />
K<br />
vibe-watermark-bright.pdf<br />
6. C.F. Curve: adjust the shape of the crossfader curve from a quick cut for scratching or to a longer fade for<br />
mixing.<br />
7. Line/Phono switch: this switch allows you to set the pre-amplification level for each stereo input to the line<br />
volume.<br />
and line level inputs share the same connectors. Use the input source selectors to select the input sources.<br />
preventing hum.<br />
18 / 30
C<br />
M<br />
Y<br />
CM<br />
MY<br />
CY<br />
CMY<br />
K<br />
3 3<br />
13 13<br />
4 Controller Overview<br />
10 11 17 2 10 11 17<br />
4.3 Front Panel<br />
1<br />
2<br />
3<br />
C<br />
This output is coupled with the RCA output 3/4.<br />
M<br />
Y<br />
CM<br />
MY<br />
CY<br />
CMY<br />
K<br />
Rear panel<br />
1. Microphone thru input: connect a 1/4” microphone to this input. Mic signal is sent directly to the outputs<br />
(there is no software control on this input).<br />
2. Microphone level: controls the hardware input level of the microphone (there is no software control on this<br />
input level).<br />
3. Microphone switch (off / on / talk over): OFF: No microphone sound is output. ON: Microphone sound is<br />
output normally. TALK OVER: Microphone sound is output; when sound is input to a connected microphone, the<br />
TALK OVER function operates and all sound other than that from the microphone is attenuated by 14 dB: that<br />
allows you to be heard when you’re speaking. When not using the TALK OVER function, it is recommended to set<br />
the switch to the OFF or ON position.<br />
4. Headphones mix: controls the balance in the headphones via software between the master output and the<br />
headphone cue.<br />
4<br />
5<br />
6<br />
vibe-watermark-bright.pdf<br />
5. Headphones level: controls the hardware output level of the headphone (does not correspond to the monitor<br />
volume software knob).<br />
6. Headphones output: connect your 1/4” or 1/8” headphones to this output for cueing and mix monitoring.<br />
19 / 30
C<br />
M<br />
Y<br />
CM<br />
MY<br />
CY<br />
CMY<br />
K<br />
5 Software Overview<br />
Once CROSS DJ is configured, you will see the following graphical interface:<br />
5.1 Menu<br />
overview_dj_le.pdf 28/09/2010 15:22:36<br />
C<br />
M 1 2 3 3 2<br />
Y<br />
CM<br />
3 Deck Selectors.<br />
MY<br />
4 The Beat Matcher display gives a visual representation of the synchronization between the players.<br />
CY<br />
CMY<br />
K<br />
<strong>User</strong> Interface<br />
The menu lets you access various commands in CROSS DJ.<br />
5.2 Head-Up Display (HUD)<br />
The Head-Up Display contains essential information about your mix:<br />
1 MixVibes logo.<br />
2 Input level meters.<br />
5 Zoom.<br />
6 Clock.<br />
C<br />
M<br />
J<br />
CM<br />
MJ<br />
hud_dj.pdf 14/12/2009 12:24:46<br />
4 5 6<br />
Head-Up Display<br />
20 / 30<br />
Menu<br />
Head-Up<br />
Display<br />
Player<br />
Integrated<br />
Mixer<br />
Dock<br />
Browser<br />
Preview Deck<br />
vibe-watermark-bright.pdf
5 Software Overview<br />
5.3 Players<br />
The Players control the various playback functions of an audio file.<br />
1 Mode selector between Vinyl or CD.<br />
C<br />
M<br />
Y<br />
CM<br />
MY<br />
1 2 3 4 5<br />
9 10 11121314 15<br />
7 Match the speed or tempo of the other deck.<br />
CY<br />
C<br />
8 Sync to the nearest down-beat of the other deck.<br />
CMY<br />
player_dj_le.pdf 28/09/2010 17:18:37<br />
9 Full track display. Gives an overview of the waveform for the entire audio file. Clicking on the waveform<br />
K<br />
will jump to the clicked point in theMtrack. Y<br />
CM<br />
MY<br />
CY<br />
CMY<br />
K<br />
Player<br />
2 Displays the Title, Artist and Duration of the audio file.<br />
3 Track gain.<br />
6<br />
7<br />
8<br />
16<br />
4 Mode selector for the pitch fader. Selects between Speed, Tempo, or Hybrid modes.<br />
5 Pitch fader.<br />
6 Pitch range selector. Set the range of the pitch fader up to +/- 100%.<br />
10 Set locators for seamless cue points.<br />
11 Auto loop.<br />
12 Reverse the playback direction.<br />
13 Smart seek.<br />
14 <strong>Manual</strong> loop.<br />
15 Effect.<br />
16 Play/Pause and Cue.<br />
5.4 Integrated Mixer<br />
When in External Mixer routing mode, only functions 1-3 will be available.<br />
21 / 30<br />
vibe-watermark-bright.pdf
5 Software Overview<br />
C<br />
1 Record Master.<br />
M<br />
Y<br />
CM<br />
MY<br />
CY<br />
CMY<br />
K<br />
mixer_dj_le.pdf 04/10/2010 15:19:36<br />
1<br />
6<br />
2<br />
4<br />
7<br />
8<br />
C<br />
M<br />
Y<br />
The dock is the central component of the media management. It hosts multiple tabs which can be un-docked to<br />
CM<br />
MY<br />
CY<br />
CMY<br />
Integrated Mixer<br />
9<br />
10<br />
11<br />
12<br />
5<br />
3<br />
2 Input selectors (Player or Line In). If you want to use a turntable, a CD player or a MP3 player (iPod®),<br />
you have to select Line In.<br />
3 Player output meters.<br />
4 Gain.<br />
5 Master output meter.<br />
6 Pre Fader Listen.<br />
7 EQ.<br />
8 Crossfader.<br />
9 Master Level.<br />
10 Cue Mix.<br />
11 Cue Level.<br />
12 Players Level.<br />
5.5 Dock<br />
view two or more lists at the same time. To un-dock a tab, click on the arrow to the right of the tab icon.<br />
5.6 Browser<br />
player. When in Play mode the preview deckK will play the track currently selected in the browser.<br />
vibe-watermark-bright.pdf<br />
The browser displays the track information in list view and enables you to scroll through your collection and load<br />
tracks into the players.<br />
5.7 Preview Deck<br />
The preview deck enables you to quickly preview and select tracks in the headphones without loading them into a<br />
22 / 30
C<br />
M<br />
J<br />
CM<br />
MJ<br />
CJ<br />
CMJ<br />
N<br />
6 Importing Audio<br />
6.1 Importing Folders<br />
To import an entire music folder:<br />
1 Go to [File > Import Directory...]<br />
2 Choose import_media.pdf a folder or disc containing 26/02/2009 your music 20:48:47 and click Choose.<br />
3 CROSS DJ will import all the audio tracks into the Collection.<br />
C<br />
If you use Apple’s iTunes® software to manage your track collection, you can access your iTunes® Library and<br />
2 Select the tracks you want to import.<br />
Y<br />
M<br />
CM<br />
MY<br />
CY<br />
CMY<br />
K<br />
Locating a Folder<br />
You can also import files by going to [File > Import File...] or playlists by going to [File > Import Playlist...].<br />
6.2 iTunes® Integration<br />
playlists by clicking on the iTunes® tab in the Dock.<br />
To import tracks from iTunes®:<br />
1 While viewing your collection, un-dock the iTunes® tab.<br />
vibe-watermark-bright.pdf<br />
3 Drag and drop your selection into the collection window or right-click (CTRL+click on Mac) and choose<br />
Add to Collection.<br />
23 / 30
7 Loading Tracks<br />
After importing your audio tracks you can load them into the players. There are three ways of loading tracks:<br />
With the controller<br />
Use the ’Browse’ control to scroll through your collection. Load the highlighted track into one of the players by<br />
using the ’Load A’ or ’Load B’ controls.<br />
With the mouse<br />
• Drag and drop a track from the collection to one of the players.<br />
• Right-click (CTRL+click on Mac) and select Load in Player A, B or Active.<br />
With the keyboard<br />
Use the up and down arrow keys to scroll through your collection. Load the highlighted track into one of the<br />
players by using the Load shortcut SHIFT + Arrow left/right (Configure your shortcuts in [File > Preferences ><br />
Keyboard > Media Rack]).<br />
C<br />
M<br />
Y<br />
CM<br />
MY<br />
CY<br />
CMY<br />
K<br />
24 / 30<br />
vibe-watermark-bright.pdf
8 First Mix with CROSS DJ and U-MIX CONTROL PRO<br />
1 Load a track into the player A and the waveform will appear.<br />
2 Start playback of the audio in the player.<br />
3 You should now hear the music in your speakers: You can start mixing.<br />
4 While the track on deck A is playing for the audience, press the Cue/Monitor button on deck B so that you<br />
can pre-listen the track you will be preparing on deck B on your headphones while the audience continues<br />
to listen to the track being played on deck A over the speakers.<br />
5 The two audio tracks are most likely not at the same tempo. You need to match the tempo of both tracks,<br />
and synchronize one player with the other by:<br />
• adjusting the pitch (via the sync_and_HUD_dj.pdf pitch fader and the pitchbend 01/07/2009 buttons or 16:31:13 the jogwheel platter of the<br />
U-MIX CONTROL PRO). Use the Beat Matcher in the Head-Up Display as visual indicator.<br />
integrated mixer of the U-MIX CONTROL C PRO.<br />
C<br />
M<br />
J<br />
CM<br />
MJ<br />
CJ<br />
CMJ<br />
N<br />
M<br />
Y<br />
CM<br />
MY<br />
CY<br />
CMY<br />
K<br />
Beat Matcher<br />
• using the Sync buttons to automatically perform those two tasks. Pressing the Sync button will<br />
adjust the playback position to match the downbeat of the other player and match the tempo of<br />
the other player.<br />
6 Adjust the level using the Gain knob, which allows you to set the overall level to match that of the track<br />
playing on the other deck.<br />
vibe-watermark-bright.pdf<br />
7 To go from one track to another, move the crossfader from left to right, or use the channels faders on the<br />
8 You can also change the channel equalization of the mixer to make the transition more smoothly between<br />
the two tracks.<br />
9 You can also use the effects and loops to highlight different parts of an audio track.<br />
25 / 30
9 Troubleshooting<br />
The audio tracks are not playing back<br />
• Make sure you selected the correct audio interface in the audio preferences window.<br />
• Make sure you activated the correct audio inputs and outputs of your audio interface in the audio<br />
preferences window.<br />
• Make sure you selected the correct Routing Mode in the audio preferences window.<br />
There is no sound going out of the speakers<br />
• Check for activity on the output meter of the internal mixer. If there is no response from the meter, check<br />
all the controls of the mixer: faders, gain, kills, etc.<br />
• If you are in external mixer mode, check your connections from your audio interface to your mixer and<br />
from your mixer to your sound system. Make sure you have the proper inputs selected on your mixer.<br />
The controller has no effect on CROSS DJ<br />
• If the Power LED is OFF:<br />
• Check that the button is not on OFF or AC position.<br />
• Check/change the USB cable and turn the switch on the USB position.<br />
• Use an adaptor and turn the switch on the AC position.<br />
• If the Power LED is ON:<br />
• Change the USB port.<br />
C<br />
• Close the program and open it again after you have connected and powered on the controller<br />
correctly.<br />
There are some audio dropouts or slow response<br />
Y<br />
setting is too low, choose a larger buffer CM size and test again.<br />
• Disable your anti-virus, spyware and MYfirewall<br />
softwares.<br />
M<br />
• Close useless background processes CY by deactivating them. For example on Windows, hit CTRL + ALT +<br />
• If you are very serious about your CMY DJing, the first thing to do is partition your HD and dedicate a clean<br />
backdoors that can considerably slow down your application.<br />
K<br />
vibe-watermark-bright.pdf<br />
• Choose a buffer size setting in the Audio preferences. If you hear crackling sounds, it means your latency<br />
• Close any unnecessary applications.<br />
• Turn off your computer’s wireless card (or disconnect from the Internet).<br />
DEL, open the Task manager, go to the processes tab, close the useless processes.<br />
install only to MixVibes. Make sure you never use Internet. This will avoid all potential worms and<br />
26 / 30
10 Frequently Asked Questions<br />
How do I update my software?<br />
To download the latest version of your MixVibes software, you will need to be registered on the MixVibes Forum.<br />
To register:<br />
• Go to our forum.<br />
• Click on “Register” on the “Board Index” sidebar.<br />
• Read the terms and click on “I agree to the terms”.<br />
• Fill out your profile with your user name, valid e-mail address, and password.<br />
• IMPORTANT: You will need your software license key to complete the registration (written on the back of<br />
your installation CD sleeve).<br />
• You will receive an e-mail with an activation link to complete registration.<br />
To download/install:<br />
• Go to the Download Center.<br />
• Select your version of MixVibes and find the latest update.<br />
• Click the “download” button near the bottom of the page.<br />
• Once the download is finished, extract the folder and run the EXE or DMG file.<br />
How do I play music from my turntable or my CD/MP3 player<br />
(iPod®)?<br />
C<br />
page 12. Do not forget to adjust the Minput<br />
gain depending on your input source to have enough output<br />
3 Press the SOURCE button of the controller (shift + headphones) or select Line In as the input source in<br />
Y<br />
the internal mixer of CROSS DJ.<br />
CM<br />
How do I recover my lost serial number?<br />
We recommend keeping your serial number<br />
MY<br />
(which is printed on the back of the installation CD sleeve) by<br />
How do I know the controller’s CMY firmware version?<br />
1 Make sure your controller is connected via USB to the computer.<br />
K<br />
CY<br />
vibe-watermark-bright.pdf<br />
1 Make the connections as described in the Connections part of this manual: 1.2 on page 6, 1.3 on<br />
page 7 and 1.4 on page 8.<br />
2 Set the CROSS DJ Audio preferences as described in the Audio Configuration part of this manual: 3.1 on<br />
level or to avoid clipping.<br />
registering on the forum, and entering it in the space provided. We’ll be able to recover it for you in case you lose<br />
it.<br />
27 / 30
10 Frequently Asked Questions<br />
2 Power the device OFF.<br />
3 Press and hold the SHIFT and BASS_B buttons of the U-MIX CONTROL PRO.<br />
4 Power the device ON, keep holding the SHIFT and BASS_B buttons.<br />
5 The firmware version is given by the lighted LEDs: Version X .Y<br />
1 X (on the deck A): 1 (PITCH MODE), 2 (SELECT), 3 (LOCATOR1), 4 (LOCATOR2), 5 (LOCATOR3), 6<br />
(VINYL), 7 (BEND-), 8 (BEND+), 9 (SYNC)<br />
2 Y (on the deck B): 1 (PITCH MODE), 2 (SELECT), 3 (LOCATOR1), 4 (LOCATOR2), 5 (LOCATOR3), 6<br />
(VINYL), 7 (BEND-), 8 (BEND+), 9 (SYNC)<br />
6 Press SHIFT to go back to normal Mode.<br />
How do I upgrade my controller’s firmware?<br />
1 Make sure your controller is connected via USB to the computer.<br />
2 Power the device OFF.<br />
3 Press and hold the SHIFT and BROWSE buttons of the U-MIX CONTROL PRO.<br />
4 Power the device ON, keep holding the SHIFT and BROWSE buttons.<br />
5 Both "SOURCE(AB)" buttons should light up (SHIFT and BROWSE buttons shouldn’t be pressed anymore).<br />
6 A new drive named "midiUpgDisk" should be found in your system.<br />
7 Drag and drop the firmware file ("U-MIX_PRO_*V*.bin") into the "midiUpgDisk" drive.<br />
(60%), TREB(AB): Update Data (90%), LOAD(AB): Update Success (if LOAD(AB) Turn Off means Updating<br />
C<br />
Error).<br />
9 After the firmware is updated, the LEDs will turn off.<br />
M<br />
Can I use U-MIX CONTROL PRO with DJ software other than CROSS<br />
Y<br />
DJ?<br />
CM<br />
Yes, your U-MIX CONTROL PRO is a standard MIDI controller that sends MIDI commands. U-MIX CONTROL PRO can<br />
MY<br />
How can I record the mixes that I create with the U-CONTROL MIX<br />
CY<br />
PRO?<br />
You can record your mix by choosing whether CMYyou<br />
want to save the channel A, B or Master and then by clicking on<br />
settings in [File > Preferences > Recording].<br />
K<br />
vibe-watermark-bright.pdf<br />
8 The Kill-LEDs will start to flash while upgrading: BASS(AB): Update Data (30%), MID(AB): Update Data<br />
be used with any software that accepts MIDI commands.<br />
the REC button present in the upper part of the integrated mixer of CROSS DJ. You can customize the recording<br />
28 / 30
Index<br />
Audio configuration, 12<br />
Audio routing modes, 13<br />
Effect, 17<br />
Firmware, 27, 28<br />
Jog wheel touch sensor level, 18<br />
Line, 18<br />
Locator (hot cue), 17, 21<br />
Loop, 17, 21<br />
Microphone, 19<br />
MP3 player / iPod, 7, 12, 15, 18, 22, 27<br />
Phono, 18<br />
Recording, 22, 28<br />
Serial number, 27<br />
Shift, 15<br />
Source, 15, 22<br />
Talk over, 19<br />
Turntables / CD, 6, 8, 12, 15, 18, 22, 27<br />
Update, 27<br />
C<br />
M<br />
Y<br />
CM<br />
MY<br />
CY<br />
CMY<br />
K<br />
29 / 30<br />
vibe-watermark-bright.pdf
Contact<br />
• For all technical or sales information, please contact your local reseller or MixVibes directly:<br />
MixVibes<br />
4, rue de la Sablière<br />
92230 Gennevilliers<br />
FRANCE<br />
www.mixvibes.com<br />
• Technical support:<br />
• online on our forum 1<br />
• Sales Information:<br />
• by email to sales@mixvibes.com<br />
C<br />
M<br />
Y<br />
Copyright 2011 MixVibes. All rights reserved.<br />
CM<br />
The contents of this guide may change without prior notice. Best efforts have been put forth to insure the accuracy<br />
as specifically permitted herein, no portion MY of the information on this guide may be reproduced in any form or by<br />
are the property of their respective owners.<br />
CY<br />
CMY<br />
This guide may be updated from time to time. Please check for updates on our website 2 .<br />
K<br />
vibe-watermark-bright.pdf<br />
vibe-watermark-dark.pdf 2<br />
of the contents of this guide. MixVibes is not liable for any errors, typographical or other, contained herein. Except<br />
any means without the prior written permission of MixVibes. Trademarks and trade names displayed on this guide<br />
MIXVIBES U-MIX CONTROL PRO - <strong>User</strong> manual 1.5.1<br />
1 http://forum.mixvibes.com<br />
2 http://www.mixvibes.com<br />
30 / 30