Manual - MCM Electronics
Manual - MCM Electronics
Manual - MCM Electronics

You also want an ePaper? Increase the reach of your titles
YUMPU automatically turns print PDFs into web optimized ePapers that Google loves.
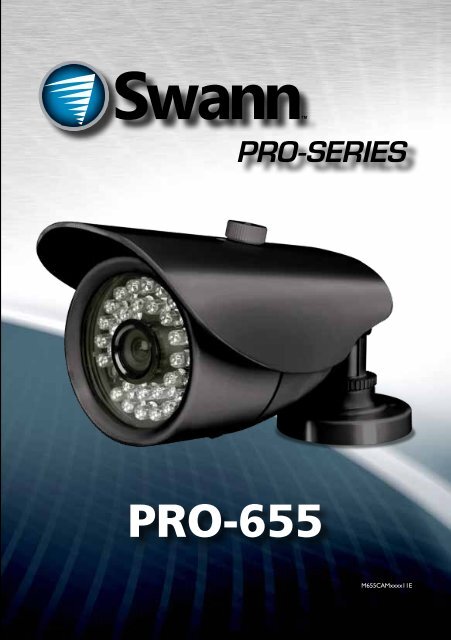
PRO-655<br />
M655CAMxxxx11E<br />
1
2<br />
About the Camera<br />
Congratulations on your purchase of this PRO-655 from Swann! You’ve chosen well: we think this is<br />
one of the finest CCTV video cameras available. The PRO-655 is great for monitoring a specific area and<br />
is able to provide a high level of detail, even at night - it can see up to 20m/65ft in the dark.<br />
Placement Guide<br />
The PRO-655 has a 6mm, 50° lens built-in which allows it to focus its attention onto one specific area.<br />
What does this mean for you when placing it<br />
• The camera will focus on the one particular area in front of the<br />
lens, but won’t see much happening to the sides of it. You’ll<br />
need to aim the camera specifically at what you want to see.<br />
• Objects and people will look like they are slightly closer to the<br />
camera than they really are. You’ll be able to monitor a space<br />
which is as long (or longer) than it is wide.<br />
The PRO-655 is great for monitoring long, narrow spaces such as hallways or corridors. It’s also great<br />
for monitoring a specific space, such as a doorway, smaller room or staircase.<br />
It’s best mounted high-up in a corner looking down into the space being monitored, so that it can look<br />
over intervening obstacles. Also, the higher the camera is mounted, the harder it’ll be for an intruder<br />
to access the camera or interfere with it.<br />
Installing the Camera<br />
The camera mounts onto a flat, vertical surface using screws. The surface must have sufficient strength<br />
to hold the camera. Materials such as hardwood, brick or masonry are good options, and we’ve included<br />
all the gear you’ll need to mount it there (except the tools - sorry, you’ll still need your own drill). You<br />
can mount the camera onto a metal surface, but you’ll need to supply your own mounting hardware.<br />
To mount the camera:<br />
• Using the holes on the camera stand as a guide, mark the locations on your wall to drill. Make<br />
sure the wall is thick and strong enough that you won’t drill through it.<br />
• If the wall is masonry, brickwork or similar, use the provided wall plugs. If the wall is made of<br />
wood, then the camera can be screwed directly onto the wall.<br />
• Ensure that the cable is protected from the weather. The camera is weatherproof, but the cable<br />
(particularly the power and video-out plugs) is not.<br />
• Once the camera has been mounted, ensure that it is securely fixed in place. The camera is vandal<br />
resistant, but that won’t help if an intruder can remove the whole camera!<br />
Troubleshooting<br />
Problem: At night, all I see is white.<br />
Solution: The camera is most likely looking through a window. At night, the infrared light the camera<br />
uses to see in the dark can ‘bounce back’ off a reflective surface (such as glass, water, spider webs,<br />
some ceramics and so on) and effectively blind the camera. If you want to see outside, mount the<br />
camera outside - we made it weatherproof for a reason!<br />
Problem: I see only a blank screen where my image should be.<br />
Solution: Check the wiring to the camera, and ensure the camera is being supplied power from<br />
the included power adapter. Try using a different video lead, or connecting the camera to a different<br />
television or monitor. Be sure there are no devices interrupting your signal, such as a DVR or VCR that<br />
isn’t outputting the signal correctly.<br />
Problem: I can’t see anything at night.<br />
Solution: The maximum range of the night vision is just that, the maximum range. If there’s nothing<br />
in this range, you won’t see anything. Also, some dark objects (like the proverbial black cat) may not<br />
reflect enough light to be seen except as a silhouette if the background is brighter. Some objects which<br />
can easily be seen in visible light don’t reflect much infrared light.<br />
9.3m<br />
28ft<br />
50°<br />
10m<br />
33ft
Connection Guide and Specifications<br />
Connect the extension cables<br />
DC socket to the DC plug on<br />
3 the power adapter<br />
Plug in the camera<br />
power adapter into<br />
4 a wall socket<br />
Connect the camera’s DC<br />
and BNC socket cable to the<br />
1 extension cable’s DC and BNC plugs<br />
2A. Connecting Directly to TV 2B. Connecting to Your Existing DVR<br />
Connect a BNC to RCA<br />
adapter and connect to video<br />
2 input on your TV or VCR<br />
Connect the BNC extension<br />
cable to an open channel on<br />
2 the back of the DVR<br />
INPUT<br />
Tips & Tricks<br />
• Try to aim the camera at an area which is evenly lit. Objects or people in shadows near brightly lit<br />
objects are very hard to see.<br />
• It’s better to have the camera in the shade looking into the light than vice-versa.<br />
• When running your cable, try to avoid bending it at sharp angles. This can interrupt the signal<br />
flow and degrade the quality of your images. If the cable must be bent, try to make the bend as<br />
gradual as possible.<br />
• Don’t put your cable near live electrical wiring. AC electricity generates radio “noise” which can<br />
interfere with the signal from your camera.<br />
Technical Specifications<br />
Video<br />
Image Sensor 1/3” CCD<br />
Video Quality 540 TV Lines<br />
Effective Pixels NTSC: 568 x 494<br />
PAL: 752 x 582<br />
Min. Illumination 0 Lux (IR on)<br />
White Balance Automatic<br />
Electronic Shutter NTSC: 1/60 ~ 1/100 000<br />
PAL: 1/50 ~ 1/100 000<br />
Gain Control Automatic<br />
Backlight Comp. Yes<br />
Wide Dynamic Range Yes<br />
Lens<br />
6mm<br />
Viewing Angle 50°<br />
Night Vision<br />
Range<br />
Up to 20m (65ft)<br />
IR Cut Filter No<br />
Number of IR LEDs 24<br />
Infrared Wavelength 850nm<br />
IR LED Life (Average) 10, 000 hours<br />
General<br />
Operating Power<br />
Operating Temp.<br />
Casing<br />
Dimensions<br />
Weight<br />
DC 12V @ 300mA<br />
-20°C ~ 45°C (-4°F ~ 113°F)<br />
Aluminium<br />
165mm x 115mm x 67mm<br />
(6.5” x 4.5” x 3.15”)<br />
465g / 17.5oz (approx)<br />
3
Helpdesk / Technical Support Details<br />
Swann Technical Support<br />
All Countries E-mail: tech@swannsecurity.com<br />
USA toll free<br />
1-800-627-2799<br />
(Su, 2pm-10pm US PT)<br />
(M-Th, 6am-10pm US PT)<br />
(F 6am-2pm US PT)<br />
USA Exchange & Repairs<br />
1-800-627-2799 (Option 1)<br />
(M-F, 9am-5pm US PT)<br />
Telephone Helpdesk<br />
0203 027 0979<br />
See http://www.worldtimeserver.com for information on time zones and the current time in<br />
Melbourne, Australia compared to your local time.<br />
Swann Communications USA Inc.<br />
12636 Clark Street<br />
Santa Fe Springs CA 90670<br />
USA<br />
AUSTRALIA toll free<br />
1300 138 324<br />
(M 9am-5pm AUS ET)<br />
(Tu-F 1am-5pm AUS ET)<br />
(Sa 1am-9am AUS ET)<br />
NEW ZEALAND toll free<br />
0800 479 266<br />
UK<br />
Warranty Information<br />
Swann Communications<br />
Unit 13, 331 Ingles Street,<br />
Port Melbourne Vic 3207<br />
Swann Communications LTD.<br />
Stag Gates House<br />
63/64 The Avenue<br />
SO171XS<br />
United Kingdom<br />
Swann Communications warrants this product against defects in workmanship and material for a period of<br />
one (1) year from it’s original purchase date. You must present your receipt as proof of date of purchase for<br />
warranty validation. Any unit which proves defective during the stated period will be repaired without charge<br />
for parts or labour or replaced at the sole discretion of Swann. The end user is responsible for all freight<br />
charges incurred to send the product to Swann’s repair centres. The end user is responsible for all shipping<br />
costs incurred when shipping from and to any country other than the country of origin.<br />
The warranty does not cover any incidental, accidental or consequential damages arising from the use of<br />
or the inability to use this product. Any costs associated with the fitting or removal of this product by a<br />
tradesman or other person or any other costs associated with its use are the responsibility of the end user.<br />
This warranty applies to the original purchaser of the product only and is not transferable to any third party.<br />
Unauthorized end user or third party modifications to any component or evidence of misuse or abuse of the<br />
device will render all warranties void.<br />
By law some countries do not allow limitations on certain exclusions in this warranty. Where applicable by<br />
local laws, regulations and legal rights will take precedence.<br />
4<br />
Advanced security made easy<br />
© Swann Communications 2011<br />
FCC Verification<br />
This equipment has been tested and found to comply with the limits for Class B digital device, pursuant to part 15 of<br />
the FCC Rules. These limits are designed to provide reasonable protection against harmful interference in a residential<br />
installation. This equipment generates, uses and can radiate radio frequency energy and, if not installed and used<br />
in accordance with the instructions, may cause harmful interference to radio or television reception, which can be<br />
determined by turning the equipment off and on, the user is encouraged to try to correct the interference by one or<br />
more of the following measures:<br />
• Reorient or relocate the receiving antenna<br />
• Increase the separation between the equipment and the receiver<br />
• Connect the equipment into an outlet on a circuit different from that to which the receiver is connected<br />
• Consult the dealer or an experienced radio/TV technician for help<br />
WARNING: Modifications not approved by the party responsible for compliance could void user’s authority to<br />
operate the equipment.