Spirit Combo - Accu-Chek
Spirit Combo - Accu-Chek
Spirit Combo - Accu-Chek

You also want an ePaper? Increase the reach of your titles
YUMPU automatically turns print PDFs into web optimized ePapers that Google loves.
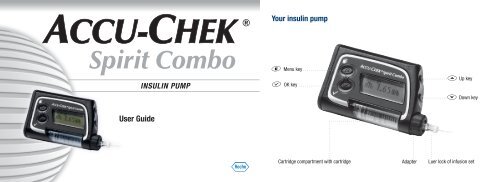
ACCU-CHEK ®<br />
<strong>Spirit</strong> <strong>Combo</strong><br />
INSULIN PUMP<br />
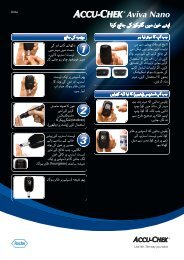
Your insulin pump<br />
d Menu key<br />
f OK key<br />
a Up key<br />
s Down key<br />
User Guide<br />
Cartridge compartment with cartridge<br />
Adapter<br />
Luer lock of infusion set
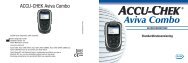
Overview of ADVANCED user menu<br />
Overview of STANDARD and CUSTOM user menus<br />
j j Press d to move forwards<br />
jj<br />
Press d + a simultaneously<br />
to move backwards<br />
jj<br />
Press f to select or save<br />
jj<br />
Press a to go up<br />
jj<br />
Press s to go down<br />
BRP = Basal Rate Profile 2–4<br />
RUN<br />
f<br />
f<br />
STOP<br />
Accessible menus in CUSTOM user<br />
menu can be selected using<br />
<strong>Accu</strong>-<strong>Chek</strong> PC software (sold<br />
separately).<br />
j j Press d to move forwards<br />
jj<br />
Press d + a simultaneously<br />
to move backwards<br />
jj<br />
Press f to select or save<br />
jj<br />
Press a for up<br />
jj<br />
Press s for down<br />
RUN<br />
f<br />
f<br />
STOP<br />
= not accessible in STANDARD<br />
user menu<br />
BRP 4<br />
BRP 3<br />
BRP 2<br />
BRP 4<br />
BRP 3<br />
BRP 2
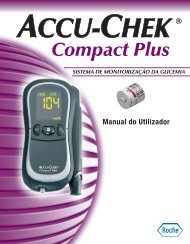
Pump details and accessories<br />
Battery key<br />
Battery cover<br />
Battery<br />
Infrared window<br />
(next to Battery cover)<br />
Adapter<br />
Cartridge Compartment<br />
Cartridge<br />
Piston rod<br />
End plate<br />
Cartridge plunger
Dear <strong>Accu</strong>-<strong>Chek</strong> <strong>Spirit</strong> <strong>Combo</strong> insulin pump user,<br />
This User Guide is provided for you, as a diabetes patient, and for<br />
healthcare professionals. It contains all the necessary information<br />
for safe and efficient use of your <strong>Accu</strong>-<strong>Chek</strong> <strong>Spirit</strong> <strong>Combo</strong> insulin<br />
pump. Regardless of your level of experience with pump therapy,<br />
please read this document carefully before beginning insulin<br />
pump therapy. Always refer to this document first, when you<br />
have questions about or have problems using your insulin pump.<br />
If you cannot find the solution to your problem in this document,<br />
then we recommend that you contact your local pump support.<br />
You will find the address on the inside back cover of this manual.<br />
Do not use your insulin pump for the delivery of medication other<br />
than U100 short-acting regular insulin or fast-acting insulin<br />
analogue.<br />
Your <strong>Accu</strong>-<strong>Chek</strong> <strong>Spirit</strong> <strong>Combo</strong> insulin pump is a valuable medical<br />
device. We strongly encourage you to add your insulin pump to<br />
your home contents insurance policy to protect you in case of<br />
accidental damage or loss. Ask your insurance agent for details.<br />
Your <strong>Accu</strong>-<strong>Chek</strong> <strong>Spirit</strong> <strong>Combo</strong> insulin pump has been developed<br />
exclusively for the continuous delivery of U100 short-acting<br />
insulin or fast-acting insulin analogue. Whether insulin pump<br />
therapy is the appropriate way of treating your diabetes<br />
must be decided by your healthcare professional. The exact<br />
insulin type for the treatment of your insulin-dependent diabetes<br />
mellitus will be prescribed by your doctor or healthcare team.<br />
You should not begin pump therapy unless you have attended the<br />
appropriate training course.
About this User Guide<br />
To ensure safe and convenient use of your new <strong>Accu</strong>-<strong>Chek</strong> <strong>Spirit</strong><br />
<strong>Combo</strong> insulin pump, some information in this User Guide requires<br />
particular attention. This information is presented as “Warning”,<br />
“Caution” or “Note”.<br />
jj A “Warning” informs you about risks to your health. Neglecting<br />
this information may even lead to life-threatening situations in<br />
some cases.<br />
jj A “Caution” informs you about risks to your device. Malfunction<br />
or damage may result if you do not follow these instructions.<br />
jj A “Note” contains important information relating the efficient<br />
and smooth operation of your new <strong>Accu</strong>-<strong>Chek</strong> <strong>Spirit</strong> <strong>Combo</strong><br />
insulin pump.
1 Understanding your new system 7<br />
1.1 Overview 7<br />
1.2 Display and sounds 9<br />
1.3 Keys and key combinations 15<br />
1.4 Accessories and disposables 19<br />
1.5 Emergency kit 22<br />
1.6 General safety information 23<br />
2 Getting started 25<br />
2.1 Before you begin 25<br />
2.2 Inserting the battery 25<br />
2.3 Start-up process 29<br />
2.4 Setting the time and date 32<br />
2.5 Your basal rate profile 35<br />
2.6 Connecting the cartridge, adapter and infusion set 42<br />
2.7 Inserting the cartridge 44<br />
2.8 Priming the infusion set 49<br />
2.9 Positioning the infusion set 52<br />
2.10 Starting insulin delivery 55<br />
2.11 Stopping insulin delivery 56<br />
2.12 General safety information 57<br />
3 Using your pump in daily life 61<br />
3.1 Wearing your pump 61<br />
3.2 Interruption of insulin pump therapy 64<br />
3.3 Your insulin pump and water 67<br />
3.4 Changing the infusion set 69<br />
3.5 Changing the cartridge and infusion set 73<br />
3.6 General safety information 76<br />
4 Boluses and Temporary Basal Rates 77<br />
4.1 Understanding boluses 77<br />
4.2 Programming a Standard Bolus 78<br />
4.3 Programming an Extended Bolus 84<br />
4.4 Programming a Multiwave Bolus 89<br />
4.5 Programming a Temporary Basal Rate (TBR) 93<br />
4.6 General safety information 98<br />
5 Personalizing your pump 99<br />
5.1 Introduction 99<br />
5.2 Selecting a user menu 101<br />
5.3 Standard user menu 103<br />
5.4 Viewing your pump data 105<br />
5.5 Transferring your data to a computer 111<br />
5.6 Pump settings 113<br />
5.7 ADVANCED user menu 120<br />
5.8 Basal rate profiles 121<br />
5.9 Setting a Reminder 124<br />
5.10 Therapy settings 126<br />
5.11 CUSTOM user menu 130<br />
5
6 Using the <strong>Accu</strong>-<strong>Chek</strong> <strong>Spirit</strong> <strong>Combo</strong> insulin<br />
pump with the Meter 133<br />
6.1 Meter 133<br />
6.2 Switching Bluetooth ® ON and OFF 135<br />
6.3 Pairing your pump with the Meter 136<br />
6.4 Troubleshooting the Bluetooth ® connection 139<br />
7 Care and Maintenance 143<br />
7.1 Inspecting your pump 143<br />
7.2 Damage to your pump 145<br />
7.3 Your insulin pump and water 146<br />
7.4 Repair of your pump 148<br />
7.5 Maintaining your pump 149<br />
7.6 Storing your pump 150<br />
7.7 Disposing of your pump 150<br />
Appendix A: Technical Data 175<br />
Appendix B: Configuration parameters 189<br />
Appendix C: Sterile products and accessories 192<br />
Appendix D: Abbreviations 194<br />
Appendix E: Beeps and melodies 195<br />
Appendix F: Symbols 201<br />
Appendix G: Warranty 206<br />
Glossary 207<br />
Index 213<br />
Quick reference table for Errors, Warnings and Reminders 218<br />
Reminder 220<br />
My notes 221<br />
Bluetooth ® registration 222<br />
8 Warnings and Errors 151<br />
8.1 Confirming a Warning or Error 152<br />
8.2 List of Warnings 153<br />
8.3 List of Errors 159<br />
8.4 List of Reminders 170<br />
6<br />
9 Troubleshooting 171<br />
9.1 Therapy-related issues 172
1<br />
1 Understanding your new system<br />
1.1 Overview<br />
Your <strong>Accu</strong>-<strong>Chek</strong> <strong>Spirit</strong> <strong>Combo</strong> insulin pump has many helpful<br />
features that help to ensure safe and efficient pump therapy.<br />
Note<br />
In this User Guide the term “Meter” always refers to the<br />
<strong>Accu</strong>-<strong>Chek</strong> Aviva <strong>Combo</strong> Blood Glucose Meter or<br />
<strong>Accu</strong>-<strong>Chek</strong> Performa <strong>Combo</strong> Blood Glucose Meter.<br />
1.1.1 Summary of features<br />
Three user menus<br />
Your <strong>Accu</strong>-<strong>Chek</strong> <strong>Spirit</strong> <strong>Combo</strong> insulin pump has been designed to<br />
adapt to your level of experience in pump therapy – whether you<br />
are a beginner or an experienced pump user. Your pump “grows”<br />
with you!<br />
You can use one of three menus – STANDARD, ADVANCED or<br />
CUSTOM – to access the functions and settings you will need<br />
from day to day.<br />
Interaction with the Meter<br />
The <strong>Accu</strong>-<strong>Chek</strong> <strong>Spirit</strong> <strong>Combo</strong> insulin pump is designed for use<br />
with the Meter. This new product is an intelligent blood glucose<br />
meter that can remote control the pump using Bluetooth ®<br />
wireless technology.<br />
7
STANDARD<br />
ADVANCED<br />
CUSTOM<br />
This is the most basic menu – designed for<br />
simplicity and comfort.<br />
This menu helps you to adjust your therapy<br />
to a wider range of situations.<br />
The CUSTOM menu enables you to<br />
fine-tune your pump according to your<br />
personal needs and skill level.<br />
See chapter 5 Personalizing your pump.<br />
Five basal rate profiles<br />
You can choose from five basal rate profiles, in line with your<br />
different daily routines.<br />
Four bolus types<br />
Your <strong>Accu</strong>-<strong>Chek</strong> <strong>Spirit</strong> <strong>Combo</strong> insulin pump enables you to program<br />
four bolus types, each corresponding to different situations you<br />
may encounter, and this provides you with a lot of flexibility.<br />
Quick Bolus<br />
You can program a Quick Bolus without looking at the display<br />
screen and check that it is correctly programmed by counting the<br />
beeps and vibrations. This is particularly useful when you want<br />
to program the bolus discreetly in public.<br />
Dual signalling of Warnings and Errors<br />
For your safety, Warnings and Errors are signalled using both<br />
audible beeps and vibration of the pump. In addition, the beep<br />
tones are fully adjustable – from silent to loud.<br />
Data transfer<br />
The infrared port on the bottom of your <strong>Accu</strong>-<strong>Chek</strong> <strong>Spirit</strong> <strong>Combo</strong><br />
insulin pump enables you to transfer information between your<br />
pump and a personal computer or handheld device.<br />
Rotating display<br />
Your pump’s display can be rotated through 180 degrees, and<br />
you can also adjust its contrast. Combined with the backlight,<br />
these features make the display easier to read.<br />
8
Reminder<br />
As well as Warnings and Errors, your pump can signal Reminders.<br />
This works like an electronic alarm clock.<br />
Choice of batteries<br />
Your <strong>Accu</strong>-<strong>Chek</strong> <strong>Spirit</strong> <strong>Combo</strong> insulin pump can be powered by<br />
either disposable or rechargeable batteries. (If you decide to use<br />
rechargeable batteries, you will need a battery charger recommended<br />
by the battery manufacturer.)<br />
Keylock<br />
The Keylock feature allows you to lock all four keys on your<br />
pump to prevent the accidental activation of functions. For<br />
example, you can use Keylock while you are asleep or when<br />
playing sports.<br />
1.2 Display and sounds<br />
Your <strong>Accu</strong>-<strong>Chek</strong> <strong>Spirit</strong> <strong>Combo</strong> insulin pump has a Liquid Crystal<br />
Display (LCD) screen. This display, together with the four keys,<br />
enables you to program the pump. It also shows important<br />
information about the status of your pump.<br />
w Warning<br />
Changes in the status of your pump can be life-threatening. If<br />
for any reason you cannot hear the audible signals or feel the<br />
vibrations of your pump, looking at the display is the only way<br />
that you will be aware of changes or malfunctions in your<br />
pump.<br />
1<br />
9
1.2.1 Backlight<br />
The backlight helps you to read the information on the display in<br />
poorly-lit areas. You can turn on the backlight while in RUN or<br />
STOP mode, or when navigating through the menus, by pressing<br />
a.<br />
The backlight turns on automatically when a Reminder, Warning<br />
or Error message is displayed, and turns off automatically after<br />
10 seconds if no further keys are pressed.<br />
Tip: In poorly-lit areas, begin programming with the a.<br />
1.2.2 Rotating display<br />
Your pump’s display can be rotated through 180 degrees. See<br />
section 5.6.4 Display orientation.<br />
Note that when you rotate the display, the s and a key<br />
functions are reversed.<br />
c Caution<br />
If incomplete characters, numbers or symbols appear on the<br />
display, put your pump into STOP mode and remove the<br />
battery for a few seconds. When you reinsert the battery, the<br />
pump will perform a system check. If this does not resolve the<br />
problem, put your pump into STOP mode and contact your<br />
local pump support. For details see inside the back cover.<br />
10
1<br />
1.2.3 Display screens<br />
The screens displayed by your pump relate to one of following<br />
modes:<br />
jj RUN, STOP and Quick Info<br />
jj Information<br />
jj Function<br />
jj Set-up<br />
The Information, Function and Set-up screens are all accessed<br />
from the user menus. See section 5.2 Selecting a user menu.<br />
RUN screen<br />
By default the screen is blank, to save energy, and becomes<br />
blank again after 20 seconds. By pressing any key, the RUN<br />
screen is displayed when the pump is in RUN mode. This means<br />
that insulin is being delivered to your body according to the basal<br />
rate you have programmed.<br />
time<br />
current hourly<br />
basal rate<br />
Note<br />
To save battery life, the screen of your <strong>Accu</strong>-<strong>Chek</strong> <strong>Spirit</strong><br />
<strong>Combo</strong> insulin pump goes blank when you do not press<br />
any key for more than 20 seconds. As long as your pump<br />
is showing a blank screen, you have to press any key<br />
before any other operation can be performed.<br />
Keylock locked<br />
pump timer<br />
cartridge low<br />
battery low<br />
active basal rate profile<br />
The above screen shows all the possible symbols, including the<br />
current time, the current basal rate profile, and the current hourly<br />
basal rate in units per hour.<br />
11
The RUN screen also displays Reminder information (such as<br />
“cartridge low”) and special functions (such as Keylock – locked<br />
or unlocked) in the form of symbols. (See Appendix F: Symbols)<br />
Note<br />
After you program or review information, the pump<br />
returns to the RUN screen.<br />
STOP screen<br />
The STOP screen is displayed when the pump is in STOP mode.<br />
This means that insulin is no longer being delivered to your body.<br />
The STOP screen shows the current time and date, and the STOP<br />
symbol.<br />
time<br />
date<br />
Keylock unlocked<br />
The STOP screen also displays Reminder information (such as<br />
“battery low”) and special functions (such as Keylock – locked or<br />
unlocked) in the form of symbols.<br />
Your pump must be in STOP mode in the following situations:<br />
You are<br />
jj programming specific functions<br />
jj changing the cartridge and / or the infusion set<br />
jj<br />
priming the infusion set<br />
jj<br />
transferring data to or from the pump<br />
jj changing the battery<br />
Quick Info menu<br />
You display the QUICK INFO screen by pressing the f key while<br />
in RUN or STOP mode. The QUICK INFO screen shows the<br />
remaining insulin content of the cartridge in units.<br />
pump timer<br />
cartridge low<br />
battery low<br />
12
1<br />
By pressing f again you enter the BOLUS DATA function. You<br />
can view the last 30 boluses by pressing a or s.<br />
You can leave the Quick Info screen either pressing f again or<br />
pressing no key for 20 seconds.<br />
Information, Function and Set-up screens<br />
You access these screens when you program the pump, perform<br />
a function, change a setting, or store or transfer information. You<br />
can reach these screens from either the RUN or STOP screen.<br />
1.2.4 Navigating through the screens<br />
The following procedure explains how to navigate through<br />
the screens. Think of these screens as menu choices. See<br />
section 1.2.3 Display screens.<br />
1. Press the d key to select a screen of your choice.<br />
2. Press the d key again to see the next available choice in<br />
the menu. (After you reach the last menu choice, you will<br />
return to the first menu choice.)<br />
3. When you reach the screen of your choice, press the<br />
f button.<br />
The next set of screens are called Function screens, and all<br />
relate to the choice you have just made. There may be one or<br />
several Function screens.<br />
4. Press the s or a key to increase or decrease the<br />
displayed value, or press the d key again to move to the<br />
next Function screen to make further changes. (After you<br />
reach the last Function screen, you will return to the first<br />
Function screen.)<br />
5. Press the f button to save your changes.<br />
13
Note<br />
You can move backwards through the menu structure<br />
– or return to menus you have skipped – by pressing the<br />
d key and a key simultaneously. However, if you are<br />
in a Function screen, pressing these buttons simultaneously<br />
moves you up one level without saving the current<br />
changes.<br />
1.2.5 Status messages and alarm signals<br />
Your <strong>Accu</strong>-<strong>Chek</strong> <strong>Spirit</strong> <strong>Combo</strong> insulin pump informs you of the<br />
status of your pump using audible beeps, vibrations and<br />
displayed messages. It is vital that you be able to hear and / or<br />
feel the beeps and vibrations.<br />
You can turn off either beeps or vibrations, but for your safety<br />
you cannot turn off both at the same time for the initial alarm<br />
signal.<br />
See chapter 8 Warnings and Errors for a description of the full<br />
range of Warnings and Errors.<br />
STOP-Warning<br />
The STOP-Warning is triggered when your pump switches from<br />
RUN mode to STOP mode, or when a battery is inserted. The<br />
pump emits two beeps and vibrates once every minute. This<br />
warns you that insulin delivery has been interrupted.<br />
14
1<br />
To turn off the STOP-Warning, press either a or s for three<br />
seconds. You then hear a melody, confirming that the STOP-<br />
Warning has been turned off. If you press the key too briefly, the<br />
STOP-Warning will not be turned off.<br />
Note<br />
For your safety, the volume of the STOP-Warning cannot<br />
be changed. It is independent of the programmed beep<br />
volume.<br />
1.3 Keys and key combinations<br />
You use the four keys on the <strong>Accu</strong>-<strong>Chek</strong> <strong>Spirit</strong> <strong>Combo</strong> insulin<br />
pump to program functions, access information, and set up the<br />
pump. Each time you press a key the pump will beep, unless<br />
the beep tone is set OFF.<br />
f OK key<br />
d Menu key<br />
a Up key<br />
s Down key<br />
15
The following table lists the keys and their functions.<br />
Key Name Function<br />
d Menu jj Move through menus, function screens<br />
and information screens<br />
f OK jj Select a menu<br />
jj Save changes and exit the function and<br />
information screens<br />
jj View the Quick Info screen<br />
a Up jj<br />
Move forward in the information screens<br />
jj Increase a setting<br />
jj Turn on the backlight<br />
jj<br />
Program a Quick Bolus<br />
jj<br />
Cancel a Quick Bolus<br />
jj Turn off the STOP-Warning (press and<br />
hold 3 sec. until you hear a melody)<br />
Key Name Function<br />
s Down jj<br />
Move backward in the information<br />
screens<br />
jj Decrease a setting<br />
jj<br />
Program a Quick Bolus<br />
jj<br />
Cancel a Quick Bolus<br />
jj Turn off the STOP-Warning (press and<br />
hold 3 sec. until you hear a melody)<br />
c Caution<br />
Do not press the keys with a sharp or pointed item such as the<br />
tip of your fingernail, as this could damage the casing of your<br />
<strong>Accu</strong>-<strong>Chek</strong> <strong>Spirit</strong> <strong>Combo</strong> insulin pump. Instead, use the pad of<br />
your fingertip to avoid puncturing the keys.<br />
16
1<br />
1.3.1 Combining keys<br />
You can obtain additional functions by pressing two keys<br />
simultaneously. In the following table, a plus symbol (+) indicates<br />
that both buttons must be pressed at the same time.<br />
w Warning<br />
If the keys on your pump are not functioning properly,<br />
disconnect your pump and contact your local pump support<br />
(see inside back cover).<br />
Combination<br />
d + a<br />
d + s<br />
a + s<br />
Function<br />
jj Exits menus, function<br />
screens and information<br />
screens without saving your<br />
changes.<br />
jj Moves you to a previous<br />
menu.<br />
jj Unlocks the keys. Press and<br />
hold both buttons until you<br />
hear three short beeps (RUN<br />
mode) or three long beeps<br />
(STOP mode).<br />
jj<br />
Copies an hourly basal rate<br />
to the following hour.<br />
17
1.3.2 Scrolling<br />
To enter larger or smaller values, the a and s keys must<br />
sometimes be pressed several times until the desired value is<br />
shown, with each press of the key changing the figure by a small<br />
increment. However, you can also press and hold the key<br />
(scrolling function) to change the value faster. When programming<br />
boluses and hourly basal rates the increment of the value<br />
change increases if you keep the a or s key pressed.<br />
When you begin scrolling, the pump beeps once.<br />
1.3.3 Locking the keys<br />
The Keylock feature enables you to lock all four keys on your<br />
<strong>Accu</strong>-<strong>Chek</strong> <strong>Spirit</strong> <strong>Combo</strong> insulin pump. This is a valuable safety<br />
measure that prevents you from accidentally activating your<br />
pump. For example, you can use Keylock while you are asleep<br />
or when playing sports.<br />
You turn on the Keylock function in the PUMP SETTINGS –<br />
See section 5.6 Pump settings.<br />
18
1<br />
1.4 Accessories and disposables<br />
High-quality sterile disposables and accessories are a vital<br />
part of the <strong>Accu</strong>-<strong>Chek</strong> <strong>Spirit</strong> <strong>Combo</strong> insulin pump system, and<br />
help to ensure safe pump therapy. Always follow the instructions<br />
provided by your doctor or healthcare team – as well as the<br />
printed instructions included with the product – relating to the<br />
use of these items.<br />
w Warning<br />
Your pump has been designed for use with U100 insulin. Only<br />
use sterile disposables and accessories that are designed for<br />
use with your <strong>Accu</strong>-<strong>Chek</strong> <strong>Spirit</strong> <strong>Combo</strong> insulin pump. The<br />
correct functioning of your pump can only be guaranteed if you<br />
use <strong>Accu</strong>-<strong>Chek</strong> brand sterile products and genuine <strong>Accu</strong>-<strong>Chek</strong><br />
<strong>Spirit</strong> <strong>Combo</strong> insulin pump accessories.<br />
Note<br />
Use your insulin pump, sterile disposables and accessories<br />
for the first time in the presence of your doctor or<br />
healthcare team.<br />
1.4.1 Sterile disposables<br />
Each sterile disposable, such as cartridge or infusion set, should<br />
be used only once, as re-using these products could lead to<br />
infection or could damage your pump. Do not use a sterile<br />
product if the package has been damaged or opened.<br />
19
1.4.2 Adapter<br />
vents<br />
Note<br />
It is essential to change the adapter at least every two<br />
months. You must also change the adapter if the seals<br />
become worn, are lost, or if the vents are blocked.<br />
grip<br />
seal<br />
thread<br />
The adapter connects the cartridge to the infusion set, and also<br />
keeps the cartridge compartment watertight with two seals, one<br />
inside and one outside the adapter. It holds the cartridge in place<br />
and prevents the entry of air bubbles. The two small vents on the<br />
adapter allow air pressure to be equalized inside and outside the<br />
cartridge compartment. The adapter will not work properly if the<br />
vents are blocked or dirty, or if the seals are missing.<br />
1.4.3 Battery<br />
Your pump requires one AA 1.5 V battery in order to function. Use<br />
AA high-quality alkaline LR6 or lithium FR6 batteries that have a<br />
minimum capacity of 2500 mAh. Do not use carbon zinc or nickel<br />
cadmium (NiCd) batteries.<br />
If you prefer, you can use rechargeable batteries – in this case,<br />
use AA 1.2 V NiMH HR6 batteries with a minimum capacity of<br />
2500 mAh. Always use a battery charger recommended by the<br />
battery manufacturer. See Appendix A Technical Data p. 176.<br />
20
1<br />
c Caution<br />
Use of batteries other than those recommended may significantly<br />
reduce battery usage time. Such batteries may also<br />
leak and corrode the battery contacts in your pump. Therefore,<br />
the use of batteries not supplied or recommended by Roche<br />
may void the warranty.<br />
Note<br />
Always remember to remove the battery if your<br />
<strong>Accu</strong>-<strong>Chek</strong> <strong>Spirit</strong> <strong>Combo</strong> insulin pump is not going to be<br />
used for a long period, in order to conserve the battery.<br />
Battery cover<br />
The battery cover seals the battery compartment, and must be<br />
changed at least every two months. You must remove and<br />
replace the battery cover using the battery key – do not use<br />
knives, screwdrivers or other sharp objects, as these may<br />
damage your pump.<br />
Battery key<br />
The battery key tightens and loosens the battery cover. It is also<br />
designed to loosen the luer-lock connection between the infusion<br />
set and adapter if it cannot be loosened by hand, by using the<br />
notch on the side. However, never use the battery key to attach<br />
or tighten an infusion set. Using the battery key prevents<br />
possible damage to the battery cover.<br />
If you lose the battery key, or if it becomes cracked or worn, order<br />
a replacement immediately, rather than using makeshift tools.<br />
For a list of recommended accessories and disposables, see<br />
Appendix C.<br />
21
1.5 Emergency kit<br />
It is highly recommended to keep accessories and disposables<br />
with you in case of an emergency. This enables you to change<br />
these items if necessary. Such an emergency kit should contain:<br />
jj An <strong>Accu</strong>-<strong>Chek</strong> infusion set<br />
jj A new AA alkaline or lithium battery<br />
jj An <strong>Accu</strong>-<strong>Chek</strong> <strong>Spirit</strong> 3.15 ml Cartridge System<br />
jj An insulin pen or syringe for alternative therapy<br />
jj A vial of insulin<br />
jj<br />
Treatment for low blood glucose levels<br />
jj Blood glucose monitoring equipment<br />
(such as an <strong>Accu</strong>-<strong>Chek</strong> blood glucose meter)<br />
jj A disinfectant for skin<br />
jj A battery key<br />
jj A battery cover<br />
jj An adapter<br />
w Warning<br />
Make sure that you have an alternative therapy plan, provided<br />
by your healthcare professional. Use this plan whenever you<br />
need to interrupt pump therapy.<br />
22
1<br />
1.6 General safety information<br />
w Warning<br />
Always make sure to accurately program your personal settings<br />
to avoid inappropriate insulin delivery. This phrase means that<br />
either too much or too little insulin is delivered. Too much insulin<br />
can lead to severe hypoglycaemia. Too little insulin can lead to<br />
a life-threatening ketoacidosis.<br />
w Warning<br />
Your insulin pump has not been tested with cardiac pacemakers.<br />
For information about the safe use of your <strong>Accu</strong>-<strong>Chek</strong><br />
<strong>Spirit</strong> <strong>Combo</strong> insulin pump with a cardiac pacemaker, contact<br />
the pacemaker manufacturer. For reference see Appendix A<br />
Tables 201 – 205.<br />
c Caution<br />
If you should drop your pump, immediately inspect it carefully<br />
for damage. Do not use your <strong>Accu</strong>-<strong>Chek</strong> <strong>Spirit</strong> <strong>Combo</strong> insulin<br />
pump if cracks or chips are visible – these may allow water,<br />
dust, insulin or other foreign substances to enter the pump<br />
and lead to malfunction.<br />
23
2<br />
2 Getting started<br />
This chapter explains how to prepare your pump and begin<br />
insulin pump therapy.<br />
2.1 Before you begin<br />
Successful insulin pump therapy requires you to check your<br />
blood glucose levels frequently. It is therefore recommended that<br />
you use an <strong>Accu</strong>-<strong>Chek</strong> blood glucose meter as often as directed<br />
by your doctor or healthcare team (at least four times a day).<br />
Your <strong>Accu</strong>-<strong>Chek</strong> <strong>Spirit</strong> <strong>Combo</strong> insulin pump has been designed<br />
for use with the Meter. This intelligent blood glucose meter<br />
enables communication with your pump using Bluetooth ®<br />
wireless technology.<br />
2.2 Inserting the battery<br />
Your <strong>Accu</strong>-<strong>Chek</strong> <strong>Spirit</strong> <strong>Combo</strong> insulin pump turns on as soon as<br />
you insert the battery. When you remove the battery, your pump<br />
keeps track of the time and date for about one hour. Your insulin<br />
pump settings (such as the hourly basal rates, bolus increment<br />
and active user menu) and the event memory (bolus and alarm<br />
history, history of daily insulin totals and Temporary Basal Rates)<br />
are always saved, regardless of battery condition or the amount<br />
of time your pump has been without a battery. See section<br />
1.4.3 Battery for information on batteries (both disposable and<br />
rechargeable types).<br />
25
Procedure for inserting and changing the battery<br />
1.<br />
Press d to move to the STOP YOUR<br />
PUMP screen.<br />
2.<br />
Remove or disconnect your infusion set<br />
from the infusion site, to ensure that<br />
there is no risk of accidental insulin<br />
delivery.<br />
Press f to select. Your pump is now in<br />
STOP mode and insulin delivery stops.<br />
3.<br />
Remove the battery cover.<br />
Use the battery key to turn the battery<br />
cover anti-clockwise. Make sure that the<br />
opening of the battery compartment and<br />
the seal are clean and undamaged.<br />
Where appropriate, remove the old<br />
battery.<br />
4.<br />
Insert the battery, negative (–) end first,<br />
positive (+) end up, into the compartment.<br />
26
2<br />
5.<br />
6.<br />
Use the battery key to fully tighten the<br />
battery cover. You can verify that the<br />
battery cover is correctly tightened by<br />
checking that it is in line with the pump<br />
casing. Do not over-tighten.<br />
Place the cover on the positive end and<br />
gently push the battery in, while turning<br />
the cover clockwise to partially tighten it.<br />
After inserting the battery, the pump begins its start-up process<br />
(see section below).<br />
In case the Pump pump does not begin the start-up process after<br />
inserting the battery, make sure that the battery is inserted<br />
correctly (negative end first).<br />
27
c Caution<br />
To prevent water from entering the pump casing, only insert or<br />
change the battery in a dry environment. Make sure that the<br />
battery cover seal is not worn or missing, and that the battery<br />
is correctly inserted.<br />
Note<br />
If your pump was in RUN mode before you removed the<br />
battery, the Error E8: POWER INTERRUPT will occur when<br />
the new battery is inserted. Press f twice to confirm<br />
and snooze the Error. Check the time and date and<br />
correct them if necessary. Then put your pump into RUN<br />
mode. See section 2.4 Setting the time and date.<br />
28
2<br />
2.3 Start-up process<br />
Your pump runs a start-up process when you insert a battery or<br />
when you change the cartridge. During this process, your pump<br />
performs a series of internal tests.<br />
When you …<br />
change only the<br />
cartridge<br />
Then …<br />
the start-up process begins at the<br />
SELF-TEST screen.<br />
When you …<br />
change the battery<br />
Then …<br />
the whole start-up process is<br />
performed.<br />
w Warning<br />
Do not interrupt the start-up process by pressing keys or<br />
otherwise handling the insulin pump. Interruption of the<br />
process may lead to malfunction of your pump.<br />
Start-up process sequence<br />
1. 2. 3.<br />
The software version screen appears. The <strong>Accu</strong>-<strong>Chek</strong> logo appears. The SELF-TEST screen appears.<br />
29
4. 5.<br />
w Warning<br />
The BEEP TEST screen appears and your<br />
pump beeps.<br />
Listen for the beeps.<br />
If you cannot hear the beeps from your<br />
<strong>Accu</strong>-<strong>Chek</strong> <strong>Spirit</strong> <strong>Combo</strong> insulin pump,<br />
you may not be notified of changes<br />
within the pump in time to take action.<br />
If you do not hear the beeps, stop<br />
using the pump and contact your local<br />
pump support. (See inside back cover)<br />
The VIBRATION TEST screen appears and<br />
your pump vibrates.<br />
Check the vibrations.<br />
w Warning<br />
If you cannot feel the vibrations, you<br />
may not be notified of changes within<br />
the pump in time to take action. If you<br />
do not feel the vibrations, do stop<br />
using the pump and contact your local<br />
pump support. (See inside back cover)<br />
6. 7.<br />
The display then goes blank. Check that<br />
the display is empty. (The backlight turns<br />
on during this step.)<br />
The display then shows a pattern. Check<br />
that the pattern is even.<br />
30
2<br />
8. 9. 10.<br />
The display turns black. Check that the<br />
display is completely black.<br />
If your pump detects a Warning or an<br />
Error during the start-up process, it<br />
signals the Error or Warning at this point.<br />
See section 8.3 List of Errors.<br />
After the self-test, press a or s to<br />
select the type of battery you inserted.<br />
Press f to save and exit.<br />
11.<br />
The end of the start-up process is<br />
signalled by a melody, and the pump<br />
displays the STOP screen.<br />
The STOP-Warning occurs every minute<br />
– the pump emits two short beeps and<br />
vibrates to remind you that no insulin is<br />
being delivered. To turn the STOP-Warning<br />
off, press a or s until you hear a<br />
melody and / or feel a vibration.<br />
c caution<br />
Make sure that you choose the correct<br />
battery type. Otherwise you may not be<br />
informed about a low battery in time.<br />
31
2.4 Setting the time and date<br />
It is essential to set the time and date correctly, because basal<br />
rates and history information are stored on the basis of the time<br />
and date set in the pump. When you travel across time zones,<br />
make sure that the time and date are re-set correctly.<br />
You can choose between American or European / Military time.<br />
American<br />
12-hour clock<br />
month / day / year<br />
European / Military<br />
24-hour clock<br />
day / month / year<br />
w Warning<br />
Incorrect setting of the time and date can lead to incorrect<br />
basal insulin delivery. Make sure that the time and date of<br />
your pump are set correctly, to ensure correct delivery and<br />
data memory. Do not make therapy decisions based on a<br />
single result in the pump’s memory.<br />
w Warning<br />
In addition, if you, your doctor, or healthcare team are<br />
reviewing your data electronically, it is essential that you<br />
synchronize the time and date of your pump with those of<br />
your blood glucose meter, your personal computer or<br />
handheld device. Otherwise, the resulting data might not be<br />
meaningful. Check these devices regularly to ensure that the<br />
settings remain synchronized.<br />
32
2<br />
Procedure for setting the time and date<br />
1. 2. 3.<br />
Press d to move to the TIME AND DATE<br />
SETTINGS screen.<br />
Press f to select.<br />
The HOUR screen is displayed.<br />
Press a or s to set the hour.<br />
Press d to move to the MINUTE screen.<br />
Press a or s to set the minute.<br />
4. 5. 6.<br />
Press d to move to the YEAR screen.<br />
Press a or s to set the year.<br />
Press d to move to the MONTH screen.<br />
Press a or s to set the month.<br />
Press d to move to the DAY screen.<br />
Press a or s to set the day.<br />
33
7.<br />
8.<br />
Press d to move to the TIME FORMAT<br />
screen.<br />
Press a or s to set the time format.<br />
Press d to move to the DATE FORMAT<br />
screen.<br />
Press a or s to set the date format.<br />
Press f to save and exit.<br />
34
2<br />
2.5 Your basal rate profile<br />
Your <strong>Accu</strong>-<strong>Chek</strong> <strong>Spirit</strong> <strong>Combo</strong> insulin pump must be programmed<br />
with your personal settings before you begin pump therapy. Your<br />
doctor or healthcare team can help you to understand how to use<br />
the pump.<br />
Note<br />
For your safety and convenience during programming,<br />
your <strong>Accu</strong>-<strong>Chek</strong> <strong>Spirit</strong> <strong>Combo</strong> insulin pump switches to<br />
RUN or STOP screen if no key is pressed within 20 seconds.<br />
Any changes you have made before this “time-out”<br />
occurs will not be saved .<br />
2.5.1 Programming your basal rate profile<br />
Your <strong>Accu</strong>-<strong>Chek</strong> <strong>Spirit</strong> <strong>Combo</strong> insulin pump delivers insulin every<br />
3 minutes, in 20 equal doses every hour, 24 hours a day. This<br />
flow of insulin, measured in international units per hour (U / h),<br />
is called the basal rate profile and is calculated to meet your<br />
basic insulin needs.<br />
The pump can store up to five different basal rate profiles to<br />
match your changing insulin needs – for example: Monday to<br />
Friday, Exercise Day or Sleeping Late Day.<br />
An <strong>Accu</strong>-<strong>Chek</strong> <strong>Spirit</strong> <strong>Combo</strong> basal rate profile consists of up to<br />
24 different hourly basal rates. Each hourly rate may be changed<br />
independently. The total of all 24 basal rates in one basal rate<br />
profile is called the (daily) basal rate total.<br />
Example: Basal rate profile for 18 U / 24 hours<br />
Insulin delivery<br />
[U / h] Hourly basal rate<br />
0 1 2 3 4 5 6 7 8 9 10 11 12 13 14 15 16 17 18 19 20 21 22 23 24 Time<br />
35
Your basal rate profile should be reviewed:<br />
jj After any programming changes are made to your pump<br />
jj After a new battery is inserted<br />
jj<br />
After confirming the Error E7: ELECTRONIC ERROR.<br />
Note<br />
Insulin delivery does not stop or pause during basal<br />
rate programming.<br />
Procedure for programming your basal rate profile<br />
1. 2.<br />
3.<br />
Press d to move to the BASAL RATE<br />
PROGRAMMING 1 (2, 3, 4 or 5 accordingly)<br />
screen.<br />
Press f to select.<br />
The daily BASAL RATE TOTAL is displayed.<br />
Press d to move to the first hour.<br />
This is always 00:00 – 01:00<br />
(12 AM – 01 AM if the American time<br />
format is used).<br />
36
2<br />
4. Note The increments shown depend on 5.<br />
the programmed basal rate: it will<br />
be<br />
0.01 U from 0.05 U to 1.00 U,<br />
0.05 U from 1.00 U to 10.0 U and<br />
Press a or s or scroll to set the<br />
hourly basal rate given by your doctor or<br />
healthcare team.<br />
0.1 U from 10.0 U to 50.0 U<br />
Press d to move to the next hour.<br />
6. 7.<br />
Continue using d and a or s to set<br />
the hourly basal rates for the remaining<br />
hours. This allows you to program your<br />
individual basal rate profile on an<br />
hour-by-hour basis. Continue until all<br />
24 hours are programmed.<br />
Press f to confirm.<br />
The new daily BASAL RATE TOTAL is<br />
displayed.<br />
Press f to save the profile and exit.<br />
37
Copying an hourly basal rate<br />
If your basal rate is the same for multiple<br />
hours in a row, you can save time by<br />
copying an hourly basal rate to one or<br />
more hours.<br />
1.<br />
Press d to move to the BASAL RATE<br />
PROGRAMMING 1 (2, 3, 4 or 5 accordingly)<br />
screen.<br />
2.<br />
Press f to select.<br />
The daily BASAL RATE TOTAL is<br />
displayed.<br />
3.<br />
4. 5.<br />
38<br />
Press d to move to the hourly basal<br />
rate you want to copy.<br />
Press a and s simultaneously.<br />
A special beep confirms that you are<br />
pressing the keys correctly. The same<br />
hourly basal rate is copied to the next<br />
hour.<br />
If you want to copy the rate to multiple<br />
hours, press a and s repeatedly or<br />
press and hold a and s (scroll).
2<br />
6.<br />
Note<br />
At any point in the programming of your basal rate, you have the following options<br />
to exit.<br />
Press f to confirm.<br />
Check the new daily BASAL RATE TOTAL.<br />
Press f to save and exit.<br />
If you want to …<br />
save the changes<br />
undo the changes<br />
Then …<br />
j j Press f and check the new daily basal rate total.<br />
j j Press f again. Your pump returns to the RUN screen.<br />
jj Wait for your <strong>Accu</strong>-<strong>Chek</strong> <strong>Spirit</strong> <strong>Combo</strong> insulin pump to return<br />
to the RUN screen, or<br />
j j Press d and a simultaneously (exit feature) to exit the<br />
Function screen.<br />
39
Selecting a basal rate profile<br />
When you have programmed more than<br />
one basal rate profile (ADVANCED or<br />
CUSTOM MENU), you can select the<br />
required profile.<br />
1. 2.<br />
Press d to move to the BASAL RATE<br />
SELECTION screen.<br />
Press f to select.<br />
The SELECT PROFILE for the current<br />
basal rate profile is displayed.<br />
3.<br />
Press a or s to select a basal rate<br />
profile.<br />
The SELECT PROFILE screen and its daily<br />
basal rate total appear accordingly.<br />
4.<br />
Press f to select the displayed profile.<br />
The new basal rate profile is active<br />
immediately.<br />
w Warning<br />
Make sure that you select an appropriately<br />
programmed basal rate profile.<br />
Otherwise there could be inappropriate<br />
insulin delivery.<br />
40
2<br />
Note<br />
When you change your user menu for example from<br />
ADVANCED to STANDARD, your current basal rate profile<br />
may not appear.<br />
If the basal rate profile number(s) you want does not appear:<br />
jj Select the ADVANCED user menu, or<br />
jj Assign the basal rate profile to an available basal rate<br />
profile number<br />
A running Temporary Basal Rate increase or decrease<br />
stays active, even if you change the basal rate profile on<br />
your pump.<br />
Basal rate and bolus<br />
During normal use, your pump is in RUN mode and insulin is<br />
continuously delivered to your body, according to the basal rate<br />
profile you have programmed.<br />
A bolus can be programmed as required. A bolus is the amount<br />
of insulin delivered (in addition to the basal rate) to cover the<br />
intake of food and to correct high blood glucose levels. The bolus<br />
amount is determined by your doctor or healthcare team’s<br />
guidelines and depends on your blood glucose level, your food<br />
intake, and your activity level, as well as stress and illness. See<br />
section 4.1 Understanding boluses.<br />
41
2.6 Connecting the cartridge, adapter<br />
and infusion set<br />
Before you change the cartridge, adapter or infusion set,<br />
check that your pump is in good working order.<br />
See section 7.1.1 Checklist.<br />
Insulin can flow uncontrolled from the cartridge or infusion set if<br />
the cartridge plunger and the piston rod are not properly<br />
connected and the pump is positioned at a higher level than the<br />
infusion site. Prevent leakage of insulin by correctly inserting the<br />
cartridge: move the piston rod to the correct position and twist<br />
the adapter until the cartridge plunger is aligned with the end<br />
plate of the piston rod. (See section 3.5 Changing the cartridge<br />
and infusion set)<br />
Have the following materials ready:<br />
jj A filled <strong>Accu</strong>-<strong>Chek</strong> <strong>Spirit</strong> 3.15 ml Cartridge System with a<br />
luer-lock connection (for filling instructions see the instructions<br />
for use provided with this product)<br />
jj An <strong>Accu</strong>-<strong>Chek</strong> <strong>Spirit</strong> <strong>Combo</strong> insulin pump adapter<br />
jj A new <strong>Accu</strong>-<strong>Chek</strong> infusion set<br />
w Warning<br />
Ensure that the cartridge is at room temperature before use<br />
to prevent from air bubbles.<br />
42
Procedure to connect the cartridge, adapter and infusion set<br />
2<br />
1. 2.<br />
3.<br />
Remove the protective cap from the<br />
cartridge. (Do not touch the cartridge tip.)<br />
Push the adapter all the way onto the<br />
cartridge tip, to the stop.<br />
Carefully prepare a new <strong>Accu</strong>-<strong>Chek</strong><br />
infusion set, following the instructions<br />
supplied for use.<br />
4.<br />
Hold the adapter and twist the infusion<br />
set luer-lock connection by hand,<br />
clockwise into the adapter. Do not<br />
over-tighten.<br />
w Warning<br />
To avoid leakage, tightly attach the infusion set to the<br />
adapter. Turn the infusion set luer-lock connector until it<br />
stops. Do not over-tighten or use any auxiliary tools, as this<br />
may crack the infusion set luer-lock connector and result in<br />
leakage of insulin.<br />
43
2.7 Inserting the cartridge<br />
Have the following materials ready:<br />
jj A filled <strong>Accu</strong>-<strong>Chek</strong> <strong>Spirit</strong> 3.15 ml Cartridge System with a<br />
connected <strong>Accu</strong>-<strong>Chek</strong> <strong>Spirit</strong> <strong>Combo</strong> insulin pump adapter<br />
jj A new <strong>Accu</strong>-<strong>Chek</strong> infusion set<br />
w Warning<br />
Do not use your pump for the delivery of medication other than<br />
U100 short-acting regular human insulin or rapid-acting insulin<br />
analogue.<br />
Procedure for inserting the cartridge<br />
1. 2.<br />
3.<br />
Press d to move to the STOP YOUR<br />
PUMP screen.<br />
Press f to select.<br />
The pump displays the STOP screen, and<br />
insulin delivery stops.<br />
Disconnect the infusion set.<br />
44
2<br />
4.<br />
5.<br />
6.<br />
Remove the cartridge, if necessary.<br />
Unscrew carefully. Do not pull the<br />
cartridge out until it is completely<br />
unscrewed.<br />
Press d to move to the CARTRIDGE<br />
CHANGE screen.<br />
Press f to select.<br />
Make sure your infusion set is disconnected<br />
and the cartridge has been<br />
removed.<br />
Press and hold f for three seconds,<br />
until you hear a melody.<br />
7.<br />
The piston rod begins to return. Do not<br />
touch or otherwise disturb the piston rod<br />
while it is rewinding, as this could result<br />
in damage to your pump.<br />
8.<br />
When the piston rod has returned<br />
completely, the CARTRIDGE VOLUME<br />
screen displays the maximum volume,<br />
315 U.<br />
c Caution<br />
Do not change the cartridge if the<br />
cartridge compartment is not completely<br />
dry. When the piston rod is rewinding,<br />
insulin solution could enter your pump<br />
and lead to malfunction. If necessary,<br />
use a soft cloth to dry the compartment.<br />
45
9.<br />
see step 10<br />
Hold your pump upright. Hold the new<br />
filled cartridge so that the connected<br />
adapter and infusion set points upwards,<br />
parallel, and close to the cartridge<br />
compartment.<br />
10.<br />
see step 11<br />
Make sure that the top edge of the<br />
threaded part of the adapter is level with<br />
the top of the cartridge compartment.<br />
11.<br />
Press a or s to move the piston rod<br />
forward until the end plate of the piston<br />
rod is level with the bottom of the<br />
cartridge plunger.<br />
12.<br />
The CARTRIDGE VOLUME decreases<br />
accordingly on the display.<br />
Tip: To prevent air bubbles move the<br />
piston rod to at least 310 Units.<br />
46
2<br />
13. 14.<br />
Position your insulin pump upright (with<br />
the adapter pointing upwards). Insert the<br />
cartridge into the cartridge compartment.<br />
Twist (do not push) the adapter clockwise<br />
until it is correctly seated against the<br />
cartridge compartment.<br />
It is not necessary to apply pressure.<br />
Do not over-tighten the adapter, otherwise<br />
it will be difficult to remove the<br />
cartridge, adapter and cartridge plunger,<br />
and could cause damage to your pump.<br />
15. 16. 17.<br />
The cartridge is correctly inserted when<br />
the end plate of the piston rod is correctly<br />
seated against the cartridge plunger.<br />
If the end plate of the piston rod is not<br />
correctly aligned with the cartridge<br />
plunger, remove the cartridge from the<br />
cartridge compartment and repeat steps<br />
9. to 14.<br />
Check that the infusion set luer-lock<br />
connector is still correctly connected to<br />
the adapter. Tighten the infusion set<br />
clockwise by hand until it sits tightly in<br />
the adapter.<br />
47
18.<br />
Press f after correctly inserting the<br />
cartridge.<br />
Your pump performs a self-test. See<br />
section 2.3 Start-up process.<br />
19.<br />
When the self-test process is finished,<br />
the Infusion set PRIMING screen is<br />
displayed.<br />
See section 2.8 Priming the infusion set.<br />
Start from step 4 in the Pocedure for<br />
priming the infusion set.<br />
48
2<br />
2.8 Priming the infusion set<br />
w Warning<br />
Never prime an infusion set that is connected to your body as<br />
you risk uncontrolled insulin delivery into your body. Always<br />
follow the instructions for the infusion set you are using.<br />
The <strong>Accu</strong>-<strong>Chek</strong> <strong>Spirit</strong> <strong>Combo</strong> insulin pump stops priming at<br />
25 units of insulin. If no insulin emerges from the needle or there<br />
are air bubbles in the tubing after priming, repeat the priming<br />
function until the infusion set is bubble-free and completely filled<br />
with insulin. When insulin appears at the tip of the needle, press<br />
f to stop priming. The amount of insulin used for priming is<br />
not added to the pump’s history of daily insulin totals.<br />
Your pump should be upright during priming, with the adapter<br />
pointing upwards to help let air bubbles out of the cartridge and<br />
infusion set.<br />
w Warning<br />
Air bubbles in the cartridge and infusion set may result in the<br />
infusion of air instead of insulin. If this happens, your body<br />
will not receive the required amount of insulin. Remove<br />
bubbles while filling the cartridge and priming the infusion<br />
set, and without having the infusion set connected to your<br />
body.<br />
49
Procedure for priming the infusion set<br />
1. 2. 3.<br />
Press d to move to the STOP YOUR<br />
PUMP screen.<br />
Press f to select.<br />
The pump displays the STOP screen, and<br />
insulin delivery stops.<br />
Prepare the tubing or needle for priming<br />
according to the infusion set’s instructions<br />
for use.<br />
4.<br />
5.<br />
6.<br />
50<br />
Press d to move to the Infusion set<br />
PRIMING screen.<br />
Press f to select. The priming amount<br />
of 25 units of insulin is shown on the<br />
display.<br />
Make sure your infusion set is disconnected.<br />
Press and hold f for three seconds,<br />
until you hear a melody. The priming<br />
process begins.<br />
To ensure that any air bubbles are<br />
removed always hold your pump upright<br />
and, gently tap it with the bottom in the<br />
palm of your hand.
2<br />
7.<br />
A count-up is shown on the display. Your<br />
pump stops priming after 25 units.<br />
The infusion set is properly primed when there are no air bubbles<br />
visible in the tubing and a drop of insulin has come out of the<br />
needle. When the priming process is complete, your pump<br />
returns to STOP.<br />
You can stop the priming process at any<br />
time by pressing f.<br />
51
2.9 Positioning the infusion set<br />
Always follow the instructions given to you by your doctor or<br />
healthcare team and the instructions for the infusion set you<br />
are using.<br />
Change your infusion set as frequently as recommended by the<br />
manufacturer.<br />
Have the following materials ready:<br />
jj Your <strong>Accu</strong>-<strong>Chek</strong> <strong>Spirit</strong> <strong>Combo</strong> insulin pump<br />
jj A disinfectant for your skin<br />
jj A new <strong>Accu</strong>-<strong>Chek</strong> infusion set<br />
2.9.1 Preparing the infusion site<br />
Infusion site selection<br />
Your doctor or healthcare team will help you choose your infusion<br />
site areas according to a planned rotation pattern. Avoid your<br />
waistline, bones, scar tissue, recent infusion sites, bruises and<br />
sores. Choose an infusion site at least one inch (2.5 cm) away<br />
from the navel and previous infusion sites.<br />
Infusion site preparation<br />
It is important to prepare the infusion site properly to reduce the<br />
risks of infection. Your doctor or healthcare team will provide you<br />
with infusion site preparation guidelines.<br />
52
2.9.2 Inserting the needle<br />
1.<br />
Make sure that your pump is properly<br />
connected (including cartridge, adapter<br />
and infusion set) and correctly programmed<br />
with your personal settings.<br />
2.<br />
Make sure your pump is in STOP mode.<br />
2<br />
3.<br />
4.<br />
5.<br />
Wash your hands thoroughly.<br />
Disinfect the infusion site and let it dry<br />
completely.<br />
Insert the needle of your <strong>Accu</strong>-<strong>Chek</strong><br />
infusion set according to the instructions.<br />
53
Note<br />
If you use a soft-cannula type infusion set, you must<br />
proceed with a bolus to fill the air space in the needle<br />
after removing the introducer needle, according to the<br />
instructions for the infusion set you are using. Failure to<br />
do so could result in missed insulin dosing. See section<br />
4.2 Programming a Standard Bolus for.<br />
If you have read and followed all instructions, cautions, Warnings<br />
and notes found in this chapter, you should now be ready to<br />
deliver insulin to your body using your <strong>Accu</strong>-<strong>Chek</strong> <strong>Spirit</strong> <strong>Combo</strong><br />
insulin pump.<br />
w Warning<br />
Inspect your infusion site at least twice a day for irritation or<br />
infection. Signs of infection may include, but are not limited<br />
to: pain, lumps, redness, heat, or discharge.<br />
If you see redness or swelling, change your infusion set and<br />
infusion site immediately and contact your doctor or<br />
healthcare team.<br />
Change your infusion headset according to the instructions for<br />
the infusion set you are using and your doctor or healthcare<br />
team’s recommendations.<br />
54
2<br />
2.10 Starting insulin delivery<br />
Procedure for starting insulin delivery<br />
1. 2. 3.<br />
When your pump is in STOP mode.<br />
Press d to move to the START YOUR<br />
PUMP screen.<br />
Press f to select. Your pump shows the<br />
RUN screen.<br />
Insulin delivery begins within 3 minutes.<br />
55
2.11 Stopping insulin delivery<br />
For your safety, you should only perform certain functions and<br />
actions when the pump is in STOP mode. These functions and<br />
actions include:<br />
jj changing the cartridge<br />
jj connecting and disconnecting the adapter and / or infusion set<br />
jj<br />
priming the infusion set<br />
jj data transfer<br />
c Caution<br />
When your <strong>Accu</strong>-<strong>Chek</strong> <strong>Spirit</strong> <strong>Combo</strong> insulin pump is in STOP<br />
mode, no insulin is delivered to your body. You must put your<br />
pump into RUN mode to continue insulin delivery.<br />
Procedure to stop insulin delivery<br />
1. 2.<br />
Press d to move to the STOP YOUR<br />
PUMP screen.<br />
Press f to select. Your pump returns to<br />
the STOP screen.<br />
Your pump is now in STOP mode.<br />
No insulin is being delivered.<br />
56
2<br />
STOP-Warning<br />
The STOP-Warning is triggered when your pump switches from<br />
RUN mode to STOP mode, or when a battery is inserted. The<br />
pump emits two short beeps and vibrates once every minute.<br />
This warns you that insulin delivery has been interrupted.<br />
To turn off the STOP-Warning, press either a or s for three<br />
seconds. You then hear a melody and / or feel a vibration,<br />
confirming that the STOP-Warning has been turned off.<br />
If you press the key too briefly, the STOP-Warning will not be<br />
turned off.<br />
Note<br />
For your safety, the volume of the STOP-Warning cannot<br />
be changed. It is independent of the programmed beep<br />
volume.<br />
2.12 General safety information<br />
w Warning<br />
The cartridge and infusion set are sterile products intended<br />
for single use only. Sterility is guaranteed for unopened<br />
packaging up to the indicated expiry date. Do not use sterile<br />
products if the packaging is damaged.<br />
Do not re-use single-use materials because this might lead to<br />
a malfunction of your <strong>Accu</strong>-<strong>Chek</strong> <strong>Spirit</strong> <strong>Combo</strong> insulin pump,<br />
incorrect insulin delivery and / or infection. Always handle<br />
these items with clean hands. Avoid any contact of the<br />
infusion set and the connecting parts of your insulin pump<br />
with antiseptics, antibiotic creams, soaps, perfumes,<br />
deodorants, body lotions, or any other cosmetics. They may<br />
contaminate these parts.<br />
57
w Warning<br />
Always check your personal settings before using your new<br />
pump, in order to avoid incorrect insulin delivery. Record your<br />
personal settings from your current insulin pump, and ensure<br />
that they are correctly programmed into your new <strong>Accu</strong>-<strong>Chek</strong><br />
<strong>Spirit</strong> <strong>Combo</strong> insulin pump. Incorrect programming of your<br />
pump may cause incorrect insulin delivery.<br />
Do not use the pump without knowing your personal settings.<br />
If you are not sure about your settings or you are inexperienced,<br />
get your doctor or healthcare team to set or check<br />
them. Only change your settings after consulting your doctor<br />
or healthcare team.<br />
w Warning<br />
The support of a doctor or healthcare team is vital when<br />
training on and using your <strong>Accu</strong>-<strong>Chek</strong> <strong>Spirit</strong> <strong>Combo</strong> insulin<br />
pump. Regular visits to your doctor or healthcare team are also<br />
essential during insulin pump therapy. Always carefully follow<br />
instructions from the medical professionals responsible for your<br />
care.<br />
Note<br />
When an Extended Bolus, a Multiwave Bolus and / or a<br />
Temporary Basal Rate (TBR) is / are active and you put<br />
your pump into STOP mode, a Warning W6: TBR CAN-<br />
CELLED and / or a Warning W8: BOLUS CANCELLED<br />
occur(s). Press f twice for each Warning to confirm and<br />
turn them off. See section 8.2 List of Warnings.<br />
58
2<br />
Note<br />
Note<br />
Note<br />
Your pump cannot detect infusion set leakage. If you<br />
detect any loss of insulin and all parts are correctly<br />
tightened, immediately replace the leaking component.<br />
Because insulin delivery has been interrupted, check your<br />
blood glucose level and take appropriate action according<br />
to your doctor’s or healthcare team’s instructions.<br />
If the battery is too low, the start-up process may not be<br />
able to complete. In this case, the pump beeps five tones<br />
and keeps restarting the process until you remove the<br />
battery or until it is empty.<br />
Check the amount of insulin remaining in the cartridge at<br />
least once a day. If you press f from the RUN or STOP<br />
screen, your pump displays the remaining cartridge<br />
content in units.<br />
Before going to sleep, make sure that:<br />
jj the cartridge contains enough insulin to last through<br />
the night<br />
jj the time and date are set correctly<br />
59
3<br />
3 Using your pump in daily life<br />
This chapter provides important guidelines on how to use your<br />
pump safely from day to day.<br />
3.1 Wearing your pump<br />
Attach your pump safely to your body or clothes to prevent<br />
damage. You can use one of our special carrying systems that<br />
enable you to carry your pump on or under your clothes.<br />
Remember to wear your pump under your clothes or directly on<br />
your body in cold or wet weather.<br />
c Caution<br />
When wearing your pump, prevent any contact with objects that<br />
could damage it or accidentally press its keys (e.g. key chains,<br />
keys, pocket knives or coins).<br />
3.1.1 When not to wear your pump<br />
Electromagnetic fields and hazardous areas<br />
w Warning<br />
Do not use your pump near electromagnetic fields such as<br />
radar or antenna installations, high-voltage sources, X-Ray<br />
sources, computer tomography, MRI, CAT scan, and all other<br />
sources of electrical current, as they may cause your pump to<br />
fail. Insulin delivery may stop and an Error E7: ELECTRONIC<br />
ERROR may occur.<br />
Always stop your pump, remove and leave it outside these<br />
areas. See Appendix A: Technical Data for more information<br />
about electromagnetic fields.<br />
61
Your pump has been tested against, and complies with, the<br />
regulations on electromagnetic interference. Security systems in<br />
airports and anti-theft monitoring devices, such as those in<br />
department stores, should not normally affect the functioning of<br />
your pump.<br />
Because there are so many devices, such as cellular phones,<br />
that emit electromagnetic radiation, the effect of such devices on<br />
your pump cannot be ruled out. It is therefore recommended to<br />
keep your pump at least 4 inches (10 cm) away from these<br />
devices while they are active.<br />
Do not use your pump in hyperbaric chambers or in hazardous<br />
areas, such as areas where flammable gases or vapours could<br />
be present. This could cause an explosion.<br />
3.1.2 Sport and exercise<br />
Exercise is an important part of diabetes management. Your<br />
<strong>Accu</strong>-<strong>Chek</strong> <strong>Spirit</strong> <strong>Combo</strong> insulin pump is designed to enable you<br />
to safely perform a range of sporting activities while wearing<br />
your pump. It is important that you protect your pump before you<br />
begin exercise or sporting activities. Do not wear your pump<br />
for sports that involve body contact such as boxing, football or<br />
hockey, since rough contact could damage your pump.<br />
Consult our sterile product brochures and accessories catalogue<br />
for more information about carrying systems or contact your<br />
local pump support (see the inside back cover) for more<br />
information.<br />
Always stop and remove your pump before you enter these<br />
areas. If you have questions, contact your local pump support<br />
(see inside back cover).<br />
Your pump is designed to work in normal barometric conditions<br />
(from 700 to 1060 mbar).<br />
62
3<br />
3.1.3 Travelling with your pump<br />
Ask your doctor or healthcare team about any special steps you<br />
need to take before you travel. Take extra blood glucose testing<br />
and pump supplies with you, and find out where to obtain<br />
supplies while you are travelling.<br />
When you travel across time zones, make sure that the time and<br />
date on your pump are set correctly to the local time.<br />
w Warning<br />
Your <strong>Accu</strong>-<strong>Chek</strong> <strong>Spirit</strong> <strong>Combo</strong> insulin pump has not been<br />
tested at altitudes in excess of 10 000 feet (3000 meters)<br />
above sea level. If your journeys take you to an area in excess<br />
of 10 000 feet (3000 meters) above sea level, stop and<br />
remove your pump. This does not apply to use in aircraft with<br />
pressurized cabins.<br />
If you have questions, contact your local pump support<br />
(see the inside back cover).<br />
w Warning<br />
You must ensure that the Bluetooth ® function is switched off<br />
before boarding an aircraft, as emissions from your pump or<br />
the Meter could interfere with the electronics systems of the<br />
aircraft. See section 6.2 Switching Bluetooth ® ON and OFF<br />
63
3.2 Interruption of insulin pump<br />
therapy<br />
Consult with your doctor or healthcare team about when and for<br />
how long your insulin pump therapy can be interrupted.<br />
Measure your blood glucose level regularly during any insulin<br />
interruption. Use a syringe or insulin pen to inject insulin<br />
according to the instructions of your doctor or healthcare team.<br />
w Warning<br />
Because only fast- or rapid-acting insulin is used for insulin<br />
pump therapy, only a small amount of insulin is stored in the<br />
body. If insulin delivery is interrupted for any reason – such as:<br />
j If you stop the pump<br />
j There is a technical problem with the pump<br />
j The cartridge is leaking and /or the infusion set is leaking<br />
j There is occlusion in the infusion set or in the headset<br />
j The cannula has slipped out of the infusion site –<br />
you must replace the missing insulin immediately.<br />
64
3<br />
3.2.1 Short interruptions<br />
1. 2.<br />
3.<br />
Press d to move to the STOP YOUR<br />
PUMP screen.<br />
Press f to put your pump in STOP<br />
mode.<br />
Remove the infusion set or, when using a<br />
disconnectable infusion set, disconnect<br />
the transfer set from the headset and use<br />
the protective covers that came with it.<br />
Resuming insulin delivery<br />
1. Where appropriate, attach a new<br />
<strong>Accu</strong>-<strong>Chek</strong> infusion set. (See section<br />
3.4 Changing the infusion set)<br />
Reconnect or reinsert your infusion set<br />
and put your pump into RUN mode.<br />
Measure your blood glucose level within<br />
two hours of restarting pump therapy to<br />
check the function of the system and to<br />
ensure insulin delivery.<br />
65
3.2.2 Long interruptions<br />
When you need to interrupt your pump<br />
therapy for more than one day, use the<br />
following procedure.<br />
1.<br />
Put your pump into STOP mode.<br />
2.<br />
Remove the cartridge, adapter, and<br />
infusion set.<br />
3.<br />
4.<br />
Reinsert the adapter.<br />
Remove the battery and reinsert the<br />
battery cover.<br />
66<br />
Store your pump properly.<br />
See section 7.6 Storing your pump.
3<br />
3.3 Your insulin pump and water<br />
c Caution<br />
Before any contact with water, disconnect and take off your<br />
<strong>Accu</strong>-<strong>Chek</strong> <strong>Spirit</strong> <strong>Combo</strong> insulin pump. Check your pump daily<br />
to ensure that it is not chipped, cracked or damaged in any<br />
way, and that the battery cover and the adapter are correctly<br />
closed. Otherwise water, dust, insulin, or other substances<br />
may enter your pump and lead to malfunction.<br />
Disconnect and remove your pump before taking a bath, or going<br />
into a whirlpool, shower or swimming pool. Avoid exposing your<br />
pump to high humidity, such as in a sauna, as this could result in<br />
damage. To make it easy to remove your pump, use disconnectable<br />
<strong>Accu</strong>-<strong>Chek</strong> infusion sets.<br />
3.3.1 Accidental contact with water<br />
Your <strong>Accu</strong>-<strong>Chek</strong> <strong>Spirit</strong> <strong>Combo</strong> insulin pump is protected against<br />
brief accidental contact with water. Examples of accidental water<br />
contact include:<br />
j Rain<br />
j Water splashes while you are cycling, jogging or hiking<br />
j Accidental immersion in the sink, washbasin or bath<br />
67
What to do after any water contact<br />
Put your pump into STOP mode, disconnect the pump from your<br />
body, and inspect it. Use a soft cloth to dry the outside of the<br />
pump, and check the battery compartment and the cartridge<br />
compartment for water. If the battery compartment or cartridge<br />
compartment are wet, turn your pump upside down to let the<br />
water run out and leave it to dry. Do not use warm air such as<br />
a hair dryer to dry the pump, as this could damage the pump’s<br />
housing. Do not reinsert the battery or the cartridge until the<br />
compartments are completely dry. See section 7.5.1 Cleaning<br />
your pump.<br />
c Caution<br />
Avoid any contact between your <strong>Accu</strong>-<strong>Chek</strong> <strong>Spirit</strong> <strong>Combo</strong><br />
insulin pump, the infusion set, and the connecting parts of<br />
your insulin pump with health and beauty products (for example:<br />
antiseptics, antibiotic creams, soaps, perfumes, deodorants,<br />
body lotions, or other cosmetics). These substances could<br />
discolour your pump or fog the display.<br />
Other liquids<br />
You do not need to worry about contact between your pump and<br />
perspiration or saliva. You must however check your pump<br />
immediately after contact with other liquids or chemicals such as:<br />
jj Cleaning solutions<br />
jj Alcohol<br />
jj Beverages<br />
jj Oil or fat<br />
See section 7.5.1 Cleaning your pump.<br />
68
3<br />
3.4 Changing the infusion set<br />
When you change the infusion set, keep the following information<br />
in mind:<br />
jj<br />
Infusion sets are sterile products intended for single use only.<br />
Sterility is guaranteed for unopened packaging up to the<br />
indicated expiry date. Do not use sterile products if the<br />
package is damaged.<br />
jj Correctly tighten the infusion set onto the adapter to avoid<br />
leakage. Turn the infusion set luer-lock connector until it stops.<br />
Do not turn it any further and do not use auxiliary tools, as this<br />
may crack the infusion set luer-lock connector and result in<br />
leakage.<br />
jj<br />
Your pump cannot detect infusion set leakage. You should<br />
inspect all parts of your infusion set at least regularly during<br />
the day and before you go to sleep. If there seems to be any<br />
loss of insulin and all parts are correctly tightened, look for<br />
and immediately replace a leaking component. Check your<br />
blood glucose level immediately, as insulin delivery has been<br />
interrupted. Take appropriate action according to your doctor’s<br />
or healthcare team’s instructions.<br />
Always disconnect your infusion set before changing a<br />
jj<br />
cartridge or priming the infusion set. Otherwise, you risk<br />
uncontrolled insulin delivery into your body. Always follow the<br />
instructions for the infusion set and cartridge system you are<br />
using.<br />
69
Procedure for changing the infusion set<br />
Have the following materials ready:<br />
jj Your <strong>Accu</strong>-<strong>Chek</strong> <strong>Spirit</strong> <strong>Combo</strong> insulin<br />
pump<br />
jj A disinfectant for your skin<br />
jj A new <strong>Accu</strong>-<strong>Chek</strong> infusion set<br />
1.<br />
Make sure your pump is in STOP mode.<br />
2.<br />
Wash your hands thoroughly.<br />
3.<br />
4.<br />
5.<br />
Disconnect the transfer set from the<br />
headset.<br />
Remove the infusion set from the adapter<br />
and dispose of it correctly.<br />
Tip: The battery key has a notch that fits<br />
all <strong>Accu</strong>-<strong>Chek</strong> infusion set luer-lock<br />
connectors. You can use this to loosen<br />
the luer-lock connector from the adapter<br />
if it cannot be loosened by hand.<br />
70
3<br />
6. 7.<br />
8.<br />
Remove the used infusion headset and<br />
dispose of it correctly.<br />
Carefully prepare a new <strong>Accu</strong>-<strong>Chek</strong><br />
infusion set for use.<br />
Screw the <strong>Accu</strong>-<strong>Chek</strong> infusion set<br />
clockwise into the adapter.<br />
Carefully tighten the luer-lock connector<br />
by hand.<br />
9. 10. 11.<br />
Prime the infusion set following the<br />
instructions found in section 2.8 Priming<br />
the infusion set.<br />
Prepare the infusion site and insert a new<br />
infusion set following the instructions in<br />
section 2.9 Positioning the infusion set.<br />
Put the pump in RUN mode. See<br />
section 2.10 Starting insulin delivery.<br />
71
Note<br />
If you use a soft cannula-type infusion set, you must<br />
begin with a bolus to fill the air space in the cannula after<br />
removing the introducer needle, according to the<br />
instructions for the infusion set you are using. Failure to<br />
do so could result in inadequate insulin dosing. See<br />
section 4.2 Programming a Standard Bolus.<br />
w Warning<br />
Inspect your infusion site at least twice each day for irritation<br />
or infection. Signs of infection may include, but are not limited<br />
to: pain, lumps, redness, heat, or discharge. If you see<br />
redness or swelling, change the infusion headset and the<br />
infusion site immediately and contact your doctor or<br />
healthcare team.<br />
Change the headset according to the instructions for the<br />
infusion set you are using and your doctor or healthcare<br />
team’s recommendations.<br />
72
3<br />
3.5 Changing the cartridge and<br />
infusion set<br />
Have the following materials ready:<br />
jj Your <strong>Accu</strong>-<strong>Chek</strong> <strong>Spirit</strong> <strong>Combo</strong> insulin pump<br />
jj A disinfectant for your skin<br />
jj A new <strong>Accu</strong>-<strong>Chek</strong> infusion set<br />
jj A filled <strong>Accu</strong>-<strong>Chek</strong> <strong>Spirit</strong> 3.15 ml Cartridge System<br />
jj A new adapter (this must be changed at least every<br />
two months)<br />
Procedure for changing the cartridge and infusion set<br />
1. 2.<br />
3.<br />
Make sure your pump is in STOP mode.<br />
Wash your hands thoroughly.<br />
Remove the transfer set from the<br />
headset.<br />
73
4 . 5.<br />
Note Pulling the adapter from the pump<br />
casing without completely<br />
unscrewing it may result in the<br />
plunger staying attached to the<br />
piston rod. If this should happen,<br />
please call your local pump<br />
support (see inside back cover).<br />
Hold your <strong>Accu</strong>-<strong>Chek</strong> <strong>Spirit</strong> <strong>Combo</strong> insulin<br />
pump with the adapter pointing downwards.<br />
Remove the adapter and cartridge from<br />
your pump by unscrewing the adapter<br />
from the pump casing.<br />
6.<br />
7.<br />
Remove the transfer set from the adapter<br />
and dispose of it correctly.<br />
Tip: The battery key has a notch that<br />
fits all <strong>Accu</strong>-<strong>Chek</strong> infusion set luer-lock<br />
connectors. You can use the battery<br />
key to loosen the luer-lock connector<br />
between your infusion set and adapter.<br />
Remove the cartridge from the adapter<br />
and dispose of the cartridge properly.<br />
74
3<br />
8.<br />
9.<br />
10.<br />
Hold the adapter up to the light to check<br />
for signs of wear or dirt (especially on the<br />
seals inside and outside of the adapter).<br />
If necessary, clean the adapter using<br />
water and dry it. If it shows signs of wear<br />
or dirt, replace it immediately.<br />
Insert a new cartridge and a new infusion<br />
set. See section 2.7 Inserting the<br />
cartridge.<br />
75
3.6 General safety information<br />
w Warning<br />
Always carry spare sterile products and accessories (infusion<br />
set, insulin cartridge, batteries), an insulin pen/syringe, and<br />
insulin. Without insulin, diabetic ketoacidosis may develop<br />
and may require in-patient hospital treatment.<br />
c Caution<br />
Do not place your insulin pump in direct sunlight. Overheating<br />
of the insulin and the pump must be avoided. Protect your<br />
insulin pump from direct exposure to cold wind and temperatures<br />
over 104 °F (40 °C) and below 41 °F (5 °C). These<br />
conditions may damage the insulin and the housing of your<br />
insulin pump, and could also cause a malfunction of the<br />
battery. See the instructions for the insulin you are using to<br />
determine the acceptable temperature range.<br />
Note<br />
Check the amount of insulin remaining in the cartridge at<br />
least once a day. Press f from the RUN or STOP screen<br />
to display the remaining cartridge content in units. Before<br />
going to sleep, make sure that:<br />
jj The cartridge contains enough insulin to last through<br />
the night<br />
jj The battery level is OK<br />
jj The time and date are set correctly<br />
76
4<br />
4 Boluses and Temporary Basal Rates<br />
4.1 Understanding boluses<br />
Your pump can deliver three types of bolus:<br />
A bolus is the amount of insulin delivered (in addition to the basal<br />
rate) to cover the intake of food and to correct high blood glucose<br />
levels. The bolus type and amount is determined by your doctor<br />
or healthcare team’s guidelines, your blood glucose level, your<br />
food intake, your health condition, and your activity level.<br />
Discuss the timing, the amount and type of bolus you need with<br />
your doctor or healthcare team.<br />
Standard Bolus<br />
Extended Bolus<br />
Multiwave Bolus<br />
fast delivery<br />
delivery over a programmed period<br />
of time<br />
combines fast delivery with delivery<br />
over a programmed period of time<br />
77
4.2 Programming a Standard Bolus<br />
There are two ways to program a Standard Bolus:<br />
Quick Bolus<br />
Using Standard<br />
Bolus menu<br />
Using a and s on your insulin<br />
pump, with bolus increments<br />
determined by the user<br />
Using d and f to enter the menu<br />
and then a and s to program the<br />
amount<br />
The bolus amount per delivery is limited to 50 units using U100<br />
insulin.<br />
After you program a Standard Bolus, there is a delay of 5 seconds<br />
before bolus delivery starts. This delay allows you to cancel the<br />
bolus by pressing the a or s key. The Warning W8: BOLUS<br />
CANCELLED is displayed. Press f twice to confirm and turn off<br />
the alert. See chapter 8 Warning W8: BOLUS CANCELLED.<br />
78
4<br />
4.2.1 Programming a Quick Bolus<br />
The following process uses only the a and s keys. You can<br />
start with either key. The recommended steps below are those<br />
described with the first key appearing without round brackets,<br />
such as a. For the alternative step, press the key in the<br />
parenthesis, such as (s).<br />
Because your pump beeps and vibrates to guide you through the<br />
programming steps, you can program the Quick Bolus without<br />
looking at the pump screen. After the bolus is programmed, you<br />
can count the beeps and vibrations of your pump to check the<br />
correct programming. For safety reason, you should also check<br />
the display as long as you are less experienced with the pump.<br />
The factory setting for the increment of the Quick Bolus is<br />
0.5 units.<br />
Procedure for programming a Quick Bolus<br />
1. 2.<br />
3.<br />
From the RUN screen, press and hold s<br />
(a) until you hear a beep sequence and<br />
feel a vibration.<br />
This activates the Quick Bolus function.<br />
Press a (s) once for each increment<br />
until the required bolus amount is<br />
reached. You must not use the key you<br />
pressed first.<br />
With each pressing of the key, your pump<br />
beeps and vibrates simultaneously; once<br />
for each programmed bolus increment.<br />
79
4.<br />
5.<br />
6.<br />
Five seconds after the last press of a<br />
(s), your pump confirms the total bolus<br />
amount with one beep and vibration for<br />
each bolus increment programmed.<br />
The Standard Bolus symbol blinks for<br />
5 seconds (the bolus delivery start delay).<br />
After the bolus delivery start delay, the<br />
pump beeps three times and vibrates<br />
and then begins to deliver the total bolus<br />
amount programmed. A countdown of<br />
the remaining bolus amount appears on<br />
the display.<br />
w Warning<br />
The bolus increment that can be programmed into your<br />
<strong>Accu</strong>-<strong>Chek</strong> <strong>Spirit</strong> <strong>Combo</strong> insulin pump determines the Quick<br />
Bolus amount using the a and s keys of your insulin<br />
pump.<br />
Incorrect programming of the bolus increment may cause<br />
inappropriate insulin delivery.<br />
See section 5.10.1 Adjusting the bolus increment.<br />
80
4<br />
4.2.2 Cancelling a Quick Bolus<br />
During programming<br />
(the bolus amount<br />
blinks):<br />
During confirmation<br />
(when the beeps and<br />
vibrations occur), or<br />
During start delay<br />
(Standard Bolus symbol<br />
blinks):<br />
Press the s or a key you used to enter the Quick Bolus programming<br />
option. This will reset the bolus amount to 0.0 units. You hear a melody.<br />
If no new bolus is programmed, your pump returns to the RUN screen and<br />
beeps three times and vibrates after five seconds.<br />
Press s or a. You hear a melody. Your pump returns to the RUN screen.<br />
A Warning W8: BOLUS CANCELLED occurs.<br />
Press f twice to confirm and turn off the alert. See chapter 8 Warning W8:<br />
BOLUS CANCELLED.<br />
No bolus is delivered.<br />
No bolus is delivered.<br />
During bolus delivery<br />
(countdown of bolus<br />
amount):<br />
Press and hold s or a for 3 seconds until you hear a melody. A Warning<br />
W8: BOLUS CANCELLED is displayed.<br />
Press f twice to confirm and turn off the alert. See chapter 8 Warning W8:<br />
BOLUS CANCELLED.<br />
You can view the actual bolus amount delivered prior to the cancellation by<br />
looking at the bolus history. See section 5.4.1 Viewing your bolus history.<br />
Bolus delivery is<br />
interrupted.<br />
Note<br />
Make sure that the cancellation was deliberate, and then program a new bolus, if required.<br />
81
4.2.3 Programming a Standard Bolus using Standard<br />
bolus menu<br />
Independent of the bolus increment setting, the bolus increments<br />
for the menu-guided Standard Bolus are fixed at 0.1 unit. You<br />
can program this bolus in the Standard Bolus screen by holding<br />
the a or s key (scrolling) until the bolus amount is displayed.<br />
1.<br />
Press d to move to the Standard Bolus<br />
screen.<br />
2. 3.<br />
4.<br />
Press f to select. The BOLUS AMOUNT<br />
screen appears.<br />
Press or scroll a to increase or s to<br />
decrease the bolus amount.<br />
Press f to confirm the bolus amount.<br />
The Standard Bolus symbol blinks for five<br />
seconds (the bolus delivery start delay).<br />
82
4<br />
After this bolus delivery start delay, your pump beeps three times<br />
and vibrates and begins to deliver the total bolus amount<br />
programmed. The countdown of the remaining bolus amount<br />
appears on the display.<br />
4.2.4 Cancelling a Standard Bolus<br />
During programming<br />
(the bolus amount<br />
blinks):<br />
During the start delay<br />
(Standard Bolus symbol<br />
blinks):<br />
During bolus delivery<br />
(countdown of bolus<br />
amount):<br />
You have three options for cancelling during programming:<br />
j If you do not press any key for 20 seconds after programming the bolus<br />
amount, your pump returns to the RUN screen.<br />
j Exit to the Standard Bolus menu by pressing d + a simultaneously.<br />
j Set the bolus amount to 0.0 units. Press f to exit.<br />
Press s or a. You hear a melody. Your pump returns to the RUN screen.<br />
A Warning W8: BOLUS CANCELLED occurs.<br />
Press f twice to confirm and turn off the alert. See chapter 8 Warning W8:<br />
BOLUS CANCELLED.<br />
Press and hold s or a for 3 seconds until you hear a melody.<br />
You can view the actual bolus amount delivered prior to the cancellation by<br />
looking at the bolus history. See section 5.4.1 Viewing your bolus history.<br />
No bolus is delivered.<br />
No bolus is delivered.<br />
Bolus delivery is<br />
interrupted.<br />
83
Cancellation during the start delay and during the bolus delivery<br />
will cause a WARNING W8: BOLUS CANCELED. Press f twice<br />
to confirm and snooze the Warning. See chapter 8.<br />
Note<br />
Make sure that the cancellation was deliberate and<br />
program a new bolus, if needed.<br />
4.3 Programming an Extended Bolus<br />
The Extended Bolus option enables you to program a bolus to be<br />
delivered over a period of time. This function is helpful during<br />
long meals, dinners, or receptions, or when you have meals that<br />
are digested slowly. The Extended Bolus may also be appropriate<br />
for people who have gastroparesis (delayed digestion).<br />
The duration of bolus delivery can be programmed in 15-minute<br />
intervals up to 12 hours and begins immediately after confirmation.<br />
Throughout the bolus delivery, the remaining time and<br />
amount of the Extended Bolus and the current hourly basal rate<br />
are displayed in the RUN screen.<br />
84
4<br />
Tip: You can add a Standard or Quick Bolus to an ongoing<br />
Extended Bolus. If you cancel the Standard Bolus, the Extended<br />
Bolus continues to run.<br />
During the delivery of an Extended Bolus, the programming of<br />
another Extended Bolus or a Multiwave Bolus is blocked. If you<br />
try to do this, you will receive the Error message: “Bolus<br />
currently running”.<br />
If you want to program a different Extended Bolus, put the pump<br />
in STOP mode to cancel the current bolus and to program a new<br />
one.<br />
Procedure for programming an Extended Bolus<br />
1. 2. 3.<br />
Press d to move to the Extended Bolus<br />
screen.<br />
Press f to select. The BOLUS AMOUNT<br />
screen appears.<br />
Press a to increase or s to decrease<br />
the bolus amount.<br />
The duration of the last Extended Bolus<br />
delivered appears.<br />
85
4. 5.<br />
Tip: Press d to switch between<br />
programming the bolus amount and bolus<br />
duration.<br />
Press d to move to the BOLUS<br />
DURATION screen.<br />
Press a to increase or s to decrease<br />
the bolus duration.<br />
Press f to confirm the bolus amount<br />
and duration. The pump returns to the<br />
RUN screen. The bolus delivery begins<br />
within the next 3 minutes.<br />
Note<br />
If a Temporary Basal Rate is active at the same time as<br />
the Extended Bolus, the remaining time and amount of<br />
the bolus and the amount of the increased or decreased<br />
hourly basal rate are displayed in the RUN screen.<br />
86
4<br />
4.3.1 Cancelling an Extended Bolus<br />
During programming<br />
(the bolus amount or<br />
bolus duration blinks):<br />
During bolus delivery<br />
You can either:<br />
j wait for your pump to return to the RUN screen.<br />
j press d and a simultaneously to exit the Function screen.<br />
j set the bolus amount to 0.0 units and press f.<br />
j If the Extended Bolus delivery has begun, it can be cancelled by putting your<br />
pump into STOP mode. This cancels the bolus delivery and a Warning W8:<br />
BOLUS CANCELLED is displayed. Press f twice to confirm and turn off the<br />
alert. See chapter 8 Warning W8: BOLUS CANCELLED.<br />
The bolus amount delivered up to the cancellation can be reviewed in the<br />
BOLUS HISTORY screen. See section 5.4.1 Viewing your bolus history.<br />
No bolus is delivered.<br />
Bolus delivery is<br />
interrupted.<br />
87
Note<br />
If a Temporary Basal Rate is active at the same time,<br />
it is also cancelled when your pump is put into<br />
STOP mode. A Warning W8: BOLUS CANCELLED and<br />
a Warning W6: TBR CANCELLED are displayed.<br />
Press f twice to confirm and turn off the first<br />
Warning. The second alert appears on the display.<br />
Press f twice to confirm and turn off the second<br />
Warning. Both alerts are recorded in the Warnings<br />
history.<br />
S ee chapter 8 Warning W6: TBR CANCELLED and<br />
Warning W8: BOLUS CANCELLED. Make sure that the<br />
cancellation was deliberate and then program a new<br />
Extended Bolus (and /or Temporary Basal Rate) if<br />
needed.<br />
88
4<br />
4.4 Programming a Multiwave Bolus<br />
The Multiwave Bolus option is available in the ADVANCED user<br />
menu. It is designed to better simulate the body’s insulin<br />
delivery, and combines an immediate bolus delivery followed by<br />
an Extended Bolus delivery. This option can be helpful when you<br />
have meals that include both rapidly and slowly absorbed<br />
carbohydrates.<br />
The duration of bolus delivery can be programmed in 15-minute<br />
intervals for up to 12 hours.<br />
When programming a Multiwave Bolus, make sure that you are<br />
using the ADVANCED user menu and your pump is in RUN mode.<br />
Note<br />
j The Multiwave Bolus is available only in the ADVANCED<br />
user menu.<br />
jj<br />
You can add a Standard Bolus to an ongoing Multiwave<br />
Bolus. If you cancel the Standard Bolus, the Multiwave<br />
Bolus remains running.<br />
jj<br />
During the delivery of a Multiwave Bolus, the programming<br />
of a second Multiwave Bolus or an Extended<br />
Bolus is blocked. If you need a different Multiwave<br />
Bolus, put your pump in STOP mode to cancel the<br />
current bolus and program a new one.<br />
89
Procedure for programming a Multiwave Bolus<br />
1. 2. 3.<br />
Press d to move to the Multiwave Bolus<br />
screen.<br />
Press f to select. The BOLUS AMOUNT<br />
screen appears.<br />
Press a or s to increase or decrease<br />
the total bolus amount.<br />
Note The first time you press a,<br />
the bolus duration of the last<br />
Multiwave Bolus and a default<br />
immediate bolus amount appear.<br />
The latter increases or decreases<br />
proportionally as you increase or<br />
decrease the total bolus amount.<br />
4.<br />
Press d to move to the IMMEDIATE<br />
BOLUS screen.<br />
5.<br />
Press d to move to the BOLUS<br />
DURATION screen.<br />
90<br />
Press a or s to correct and set the<br />
immediate bolus amount.<br />
Press a or s to correct and set the<br />
Extended Bolus duration in increments of<br />
15 minutes for up to 12 hours.
4<br />
Tip: Press d to loop between programming<br />
the total BOLUS AMOUNT, IMMEDI-<br />
ATE BOLUS and BOLUS DURATION.<br />
6.<br />
7.<br />
Check the total and immediate bolus<br />
amounts and the Extended Bolus duration<br />
programmed on the screens.<br />
Press f to confirm both bolus amounts<br />
and the bolus duration. The Multiwave<br />
Bolus symbol blinks for 5 seconds (bolus<br />
delivery start delay).<br />
8.<br />
The pump beeps three times and<br />
vibrates. The immediate bolus delivery<br />
begins. The countdown of the remaining<br />
bolus continues to appear on the display.<br />
Note<br />
If a Temporary Basal Rate is active<br />
at the same time, the remaining<br />
time and amount of the bolus and<br />
the amount of the increased or<br />
decreased hourly basal rate are<br />
displayed on the RUN screen.<br />
91
4.4.1 Cancelling a Multiwave Bolus<br />
During programming<br />
(the bolus amount<br />
blinks):<br />
During the start delay<br />
(Multiwave symbol<br />
blinks):<br />
During immediate<br />
bolus delivery<br />
During extended<br />
delivery<br />
There are three ways to cancel a Multiwave Bolus during programming:<br />
j Do not press any key for 20 seconds. The pump returns to the RUN screen.<br />
j Exit to the Multiwave Bolus screen by pressing d + a simultaneously.<br />
j Set the total bolus amount to 0.0 units and press f.<br />
j Press s or a. The pump beeps and vibrates. The pump returns to the<br />
RUN screen.<br />
j You can cancel immediate delivery by pressing and holding s or a for<br />
3 seconds until you hear a melody. This cancels the whole bolus (immediate<br />
and Extended Bolus delivery).<br />
j You can cancel the extended delivery by putting the pump in STOP mode.<br />
This cancels the Extended Bolus.<br />
No bolus is delivered.<br />
No bolus is delivered.<br />
Bolus delivery is<br />
interrupted.<br />
Bolus delivery is<br />
interrupted.<br />
Cancellation of the bolus during start delay, immediate bolus<br />
delivery and extended delivery will cause a Warning W8 BOLUS<br />
CANCELLED. Press f twice to confirm and turn off the alert.<br />
See chapter 8 Warning W8: BOLUS CANCELLED.<br />
You can review the actual bolus amount delivered before the<br />
cancellation by looking at the bolus history. See section<br />
5.4.1 Viewing your bolus history.<br />
92
Note<br />
If a Temporary Basal Rate is active at the same time, it is<br />
also cancelled when your pump is put in STOP mode. The<br />
Warning W8: BOLUS CANCELLED and a Warning W6: TBR<br />
CANCELLED is displayed.<br />
Press f twice to confirm and turn off the first Warning.<br />
The second Warning appears on the display. Press f<br />
twice to confirm and turn off the second Warning. Both<br />
Warnings are recorded in the alarm history. See chapter<br />
8 Warning W6: TBR CANCELLED and Warning W8: BOLUS<br />
CANCELLED. Make sure the cancellation was intended<br />
and then program a new Multiwave Bolus (and / or<br />
Temporary Basal Rate), if needed.<br />
4.5 Programming a Temporary<br />
Basal Rate (TBR)<br />
Your pump allows you to temporarily increase or decrease your<br />
basal rate. This enables you to match your changing insulin<br />
needs due to increased or decreased activity level, illness, or<br />
stress.<br />
Typically, a basal rate is set to 100 %, but you can:<br />
jj Increase it to 250 % for up to 24 hours<br />
jj Decrease it to 0 % for up to 24 hours<br />
When you increase or decrease your basal rate, each hourly<br />
basal rate for the duration you program is increased or decreased.<br />
The characteristic shape of your basal rate profile<br />
remains and does not become a flat curve, if the change is larger<br />
than 0 %. For 0 % the basal rate profile becomes a flat line and<br />
no insulin (except boluses) is delivered during the programmed<br />
duration.<br />
Discuss programming a Temporary Basal Rate with your doctor<br />
or healthcare team.<br />
4<br />
93
Note<br />
A running Temporary Basal Rate increase or decrease<br />
remains active, even if you have changed the basal rate<br />
profile.<br />
You can only program a Temporary Basal Rate when your pump<br />
is in RUN mode.<br />
Procedure for programming a Temporary Basal Rate<br />
1. 2.<br />
Press d to move to the Temporary<br />
Basal Rate (TBR) screen.<br />
Press f to select. The TBR PERCENTAGE<br />
screen appears.<br />
Note<br />
If no Temporary Basal Rate is<br />
currently active, the percentage is<br />
set to 100 %. If a Temporary Basal<br />
Rate is active, its duration and<br />
percentage appear on the RUN<br />
screen.<br />
94
4<br />
3.<br />
Press a or s to increase or decrease<br />
the basal rate.<br />
Tip: When you increase (or decrease) the<br />
Temporary Basal Rate, the duration of<br />
your previous Temporary Basal Rate<br />
increase (or decrease) appears. However,<br />
when you use your pump for the first<br />
time, a default value appears.<br />
4.<br />
Press d to move to the TBR DURATION<br />
screen.<br />
Press a or s to correct and set the<br />
duration.<br />
Tip: You can switch between programming<br />
the basal rate percentage and<br />
duration by pressing d.<br />
5.<br />
Press f to save and exit.<br />
The new Temporary Basal Rate is<br />
immediately activated.<br />
When a Temporary Basal Rate is active,<br />
the pump emits a beep and vibrates once<br />
every hour.<br />
95
Note<br />
Note<br />
During Temporary Basal Rate delivery, the increase or<br />
decrease in percentage, the increased or decreased<br />
hourly basal rate (hourly basal rate plus TBR percentage),<br />
and the remaining time are displayed in the RUN screen.<br />
An arrow pointing upwards symbolizes a Temporary Basal<br />
Rate increase; an arrow pointing downwards symbolizes a<br />
Temporary Basal Rate decrease.<br />
If an Extended Bolus or a Multiwave Bolus is active at the<br />
same time, the remaining time and amount of the bolus<br />
and the amount of the increased or decreased hourly<br />
basal rate are displayed in the RUN screen.<br />
Example: Extended Bolus running<br />
TBR OVER Alert<br />
At the end of a Temporary Basal Rate, a Warning W7: TBR OVER<br />
is displayed. Press f twice to confirm and turn off the<br />
Warning. See chapter 8 Warning W7: TBR OVER.<br />
Remaining duration<br />
Extended Bolus symbol<br />
96
4<br />
4.5.1 Cancelling a Temporary Basal Rate<br />
During programming:<br />
During delivery:<br />
There are three ways to cancel a Temporary Basal Rate during programming:<br />
j Do not press any key for 20 seconds. The pump returns to the RUN screen.<br />
j Exit to the Temporary Basal Rate (TBR) screen by pressing a + d<br />
simultaneously.<br />
j Set the TBR percentage to 100 %. Press f to save and exit.<br />
There are two ways to cancel a Temporary Basal Rate during delivery:<br />
j Set the TBR percentage to 100 %. Press f to save and exit. A Warning W6:<br />
TBR CANCELLED is displayed.<br />
j Or you can put your pump in STOP mode. The Temporary Basal Rate delivery<br />
is cancelled, as well as any Extended or Multiwave Bolus that is currently<br />
running. A Warning W6: TBR CANCELLED is displayed. Press f twice to<br />
confirm and turn off the alert.<br />
Pump continues to<br />
deliver normal basal<br />
rate.<br />
Pump returns to<br />
normal basal rate.<br />
97
Note<br />
If an Extended Bolus or a Multiwave Bolus is active at the<br />
same time, it is also cancelled when your pump is put into<br />
STOP mode. A Warning W8: BOLUS CANCELLED and a<br />
Warning W6: TBR CANCELLED are displayed.<br />
Press f twice to confirm and turn off the first alert. The<br />
second alert appears on the display. Press f twice to<br />
confirm and turn off the second alert. Both alerts are<br />
recorded in the alarm history. See chapter 8 Warning W6:<br />
TBR CANCELLED and Warning W8: BOLUS CANCELLED.<br />
Make sure that the cancellation was intended and then<br />
program a new Temporary Basal Rate (and /or an<br />
Extended or Multiwave Bolus), if needed.<br />
4.6 General safety information<br />
w Warning<br />
j Incorrect programming of your insulin pump may cause<br />
inappropriate insulin delivery.<br />
j Your insulin pump must be programmed with your personal<br />
settings before starting insulin pump therapy.<br />
j Do not operate your insulin pump without knowing your<br />
personal settings.<br />
j If you are not sure about your personal settings, or you are<br />
less experienced, ask your doctor or healthcare team to<br />
check your personal settings.<br />
j Work with your doctor or healthcare team to determine the<br />
timing, amount, and type of bolus you need to deliver.<br />
j Make sure you know your personal carbohydrate-to-insulin<br />
ratio and your correction factor.<br />
w Warning<br />
When your pump is in STOP mode it does not deliver insulin.<br />
Put the pump in RUN mode to continue insulin delivery.<br />
98
5<br />
5 Personalizing your pump<br />
This chapter explains how to use the available menu options, and<br />
to personalize your pump to match your level of experience with<br />
insulin pump therapy.<br />
5.1 Introduction<br />
Using the four keys on the pump, and their combinations, you<br />
can access the menu options and their relevant screens. This<br />
enables you to, for example:<br />
jj Program the pump<br />
jj Perform a function<br />
jj Change a setting<br />
jj Store information<br />
5.1.1 User menus<br />
Your <strong>Accu</strong>-<strong>Chek</strong> <strong>Spirit</strong> <strong>Combo</strong> insulin pump has been designed to<br />
adapt to your level of experience in pump therapy – whether you<br />
are a beginner or an experienced pump user. Your <strong>Accu</strong>-<strong>Chek</strong><br />
<strong>Spirit</strong> <strong>Combo</strong> insulin pump “grows” with you!<br />
You can use one of three menus – STANDARD, ADVANCED or<br />
CUSTOM – to access the functions and settings you will need<br />
from day to day.<br />
Note<br />
Your <strong>Accu</strong>-<strong>Chek</strong> <strong>Spirit</strong> <strong>Combo</strong> insulin pump has been<br />
designed for use with the Meter. This intelligent blood<br />
glucose meter enables you to communicate with the pump<br />
using Bluetooth ® wireless technology.<br />
99
Standard<br />
ADVANCED<br />
CUSTOM<br />
This menu provides all the basic functions<br />
you need for successful pump therapy. If<br />
you are new to pump therapy, we recommend<br />
that you start with this menu. As you<br />
become more experienced, you may wish<br />
to change to the ADVANCED user menu.<br />
This menu provides the complete range<br />
of the <strong>Accu</strong>-<strong>Chek</strong> <strong>Spirit</strong> <strong>Combo</strong> insulin pump<br />
functions. It includes all the functions from<br />
the STANDARD user menu, plus a wide<br />
range of functions for the more experienced<br />
user.<br />
Because the <strong>Accu</strong>-<strong>Chek</strong> <strong>Spirit</strong> <strong>Combo</strong> insulin<br />
pump has so many features, you may want<br />
to decide which screens are displayed when<br />
you scroll through the menu choices. Using<br />
appropriate PC software, this menu enables<br />
you to hide screens of the ADVANCED user<br />
menu and thereby customize your pump.<br />
At the beginning of this User Guide, you will find fold-out<br />
diagrams of the STANDARD, CUSTOM and ADVANCED user<br />
menus.<br />
Note<br />
For your safety and convenience during programming,<br />
your <strong>Accu</strong>-<strong>Chek</strong> <strong>Spirit</strong> <strong>Combo</strong> insulin pump returns to the<br />
RUN or STOP screen if no key is pressed within 20 seconds.<br />
The changes you made before your pump timed out will<br />
not be saved.<br />
100
5<br />
5.2 Selecting a user menu<br />
Note<br />
For guidance in choosing the most suitable user menu,<br />
see section 5.1.1 User menus. If you are still not sure<br />
which menu to choose, discuss this with your doctor or<br />
healthcare provider.<br />
Procedure for selecting a user menu<br />
1.<br />
2. 3.<br />
Press d to move to the MENU SETTINGS<br />
screen.<br />
Press f to select.<br />
The SELECT USER MENU screen is<br />
displayed.<br />
Press a or s to select a user menu.<br />
Press f to confirm.<br />
The selected basal rate profile and its<br />
daily insulin total appear, or …<br />
101
4.<br />
5.<br />
… if the previous basal rate profile is not<br />
available from the selected user menu,<br />
dashes appear instead.<br />
Press a or s to select a basal rate<br />
profile, if required.<br />
Check the (new) basal rate profile and its<br />
daily insulin total.<br />
Press f to save and exit.<br />
The new user menu and basal rate profile are active immediately.<br />
c Caution<br />
A running increased or decreased Temporary Basal Rate will<br />
remain active, even if you change the basal rate profile. The<br />
Temporary Basal Rate is based on the new basal rate.<br />
102
5<br />
5.3 Standard user menu<br />
The following is a list of menu options from the STANDARD user<br />
menu. To view the order in which they appear on the display,<br />
refer to the menu diagram below:<br />
j j Press d to move towards<br />
jj<br />
Press d + a simultaneously<br />
to move backwards<br />
RUN<br />
STOP<br />
f<br />
f<br />
103
Some of the functions have already been described elsewhere in<br />
this User Guide, as listed below. The remaining functions are<br />
described following the list.<br />
TIME AND DATE SETTINGS<br />
jj<br />
See section 2.4 Setting the time and date.<br />
BASAL RATE PROGRAMMING<br />
jj<br />
See section 2.5.1 Programming your basal rate profile.<br />
CARTRIDGE CHANGE<br />
jj<br />
See section 2.7 Inserting the cartridge.<br />
Infusion set PRIMING<br />
jj<br />
See section 2.8 Priming the infusion set.<br />
START YOUR PUMP<br />
jj<br />
See section 2.10 Starting insulin delivery.<br />
Quick Bolus<br />
jj<br />
See section 4.2.1 Programming a Quick Bolus.<br />
STANDARD BOLUS<br />
jj<br />
See section 4.2 Programming a Standard Bolus.<br />
EXTENDED BOLUS<br />
jj<br />
See section 4.3 Programming an Extended Bolus.<br />
TEMPORARY BASAL RATE (TBR)<br />
j j See section 4.5 Programming a Temporary Basal Rate (TBR).<br />
MENU SETTINGS<br />
jj<br />
See section 5.2 Selecting a user menu earlier in this chapter.<br />
BLUETOOTH SETTINGS<br />
jj<br />
See chapter 6 Using the <strong>Accu</strong>-<strong>Chek</strong> <strong>Spirit</strong> <strong>Combo</strong> insulin pump<br />
with the Meter.<br />
STOP YOUR PUMP<br />
jj<br />
See section 2.11 Stopping insulin delivery.<br />
104
5<br />
5.4 Viewing your pump data<br />
The memory of your <strong>Accu</strong>-<strong>Chek</strong> <strong>Spirit</strong> <strong>Combo</strong> insulin pump stores<br />
all the events (Warnings and Errors, programming operations and<br />
insulin delivery records) up to 4500 events. This data corresponds<br />
to about the last ninety days of use, and can be accessed on a<br />
personal computer using <strong>Accu</strong>-<strong>Chek</strong> software products.<br />
The following data can be reviewed directly on your <strong>Accu</strong>-<strong>Chek</strong><br />
<strong>Spirit</strong> <strong>Combo</strong> insulin pump:<br />
Bolus history<br />
Alarm history<br />
History of daily<br />
insulin totals<br />
Temporary Basal<br />
Rate history<br />
last 30 boluses<br />
last 30 Warnings and Errors<br />
last 30 daily totals of insulin<br />
delivered<br />
last 30 increases and decreases in<br />
basal rate<br />
Pump timer<br />
remaining time in days until the<br />
pump timer expires<br />
105
5.4.1 Viewing your bolus history<br />
The BOLUS DATA screen allows you to view up to the last<br />
30 bolus deliveries, starting with the most recent entry.<br />
Each bolus data screen displays:<br />
jj Bolus type (Standard, Extended or Multiwave Bolus)<br />
jj Bolus duration ( – only displayed if an Extended or<br />
Multiwave Bolus)<br />
jj Time<br />
jj Date<br />
jj Entry number (01 is the most recent) of total entries<br />
(example 01/30) of a delivered bolus<br />
Bolus amount / type<br />
Bolus time<br />
Date<br />
Entry number<br />
Tip: You can enter the BOLUS DATA screen also from the<br />
QUICK INFO screen. See section 1.2.3 Display screens.<br />
Procedure for viewing the bolus history<br />
1. 2. 3.<br />
Press d to move to the MY DATA<br />
screen.<br />
Press f to select.<br />
The BOLUS DATA screen appears,<br />
showing the most recent bolus information.<br />
Press a or s to view the entries.<br />
Press f to exit.<br />
106
5<br />
5.4.2 Viewing the Error and Warning history<br />
The alarm data menu allows you to view up to the last<br />
30 Warnings and Errors, starting with the most recent entry.<br />
Each alarm data screen displays:<br />
jj Number and type of the Warning or Error (for example, W6)<br />
jj Warning or Error (for example, TBR CANCELLED)<br />
jj Time<br />
jj Date<br />
jj Entry number (01 is the most recent) of total entries<br />
(example 01/30) of a Warning or Error<br />
Procedure for viewing the alarm history<br />
1. 2. 3.<br />
Press d to move to the MY DATA<br />
screen.<br />
Press f to select.<br />
Press d to move to the ERROR DATA<br />
screen.<br />
Press a or s to view the entries.<br />
Press f to exit.<br />
107
5.4.3 Viewing the history of daily insulin totals<br />
This function allows you to view up to the last 30 daily totals of<br />
insulin delivered (from midnight to midnight; including basal rate<br />
plus boluses), starting with the most recent entry.<br />
Each screen displays:<br />
jj Daily total of insulin delivered<br />
jj Date<br />
jj Entry number (01 is the most recent) of total entries<br />
(example 01/04) of a daily insulin total<br />
Procedure for viewing the daily insulin totals<br />
1. 2. 3.<br />
Press d to move to the MY DATA<br />
screen.<br />
Press f to select.<br />
Press d to move to the DAILY TOTALS<br />
screen.<br />
Press a or s to view the entries.<br />
Press f to exit.<br />
108
5<br />
5.4.4 Viewing the Temporary Basal Rate history<br />
This option allows you to view up to the last 30 Temporary Basal<br />
Rate (TBR) increases or decreases, starting with the most recent<br />
entry.<br />
Each TBR history screen displays:<br />
jj TBR increase or decrease in percentage<br />
jj TBR duration<br />
jj Time<br />
jj Date<br />
jj Entry number (01 is the most recent) of total entries (example<br />
01/30) of a delivered Temporary Basal Rate<br />
Procedure for viewing the Temporary Basal Rate history<br />
1. 2.<br />
3.<br />
Press d to move to the MY DATA<br />
screen.<br />
Press f to select.<br />
Press d to move to the TBR DATA<br />
screen.<br />
Press a or s to view the entries.<br />
Press f to exit.<br />
109
5.4.5 Viewing the time remaining (pump timer)<br />
Your <strong>Accu</strong>-<strong>Chek</strong> <strong>Spirit</strong> <strong>Combo</strong> insulin pump is a highly reliable<br />
system, designed to provide trouble-free insulin pump therapy<br />
over a long period. To enable optimum performance, a pump<br />
timer limits the operating life of the pump. When you begin using<br />
the pump, the timer starts the countdown of the number of<br />
remaining days.<br />
can arrange to get a new pump in good time. The pump timer<br />
symbol appears in the RUN screen or STOP screen. When the<br />
timer expires, an Error occurs, and your pump goes into STOP<br />
mode. It can no longer be put into RUN mode.<br />
See chapter 8 Warning W5: PUMP TIMER and Error E5: END OF<br />
OPERATION .<br />
Before the pump timer expires, a Warning will remind you that<br />
the operating life of the pump is coming to an end, so that you<br />
Procedure for viewing the time remaining<br />
1. 2.<br />
Note<br />
This setting is country-specific<br />
and may not be visible on your<br />
pump.<br />
Press d to move to the MY DATA<br />
screen.<br />
Press f to select.<br />
Press d to move to the PUMP TIMER<br />
screen.<br />
The number of days remaining until the<br />
pump timer expires is shown.<br />
110<br />
Press f to exit.
5<br />
5.5 Transferring your data to a computer<br />
The built-in infrared interface on the bottom of your <strong>Accu</strong>-<strong>Chek</strong><br />
<strong>Spirit</strong> <strong>Combo</strong> insulin pump enables you to transfer data between<br />
your pump and a PC.<br />
The memory of your <strong>Accu</strong>-<strong>Chek</strong> <strong>Spirit</strong> <strong>Combo</strong> insulin pump<br />
stores all the events (Warnings and Errors, programming operations<br />
and insulin delivery records) up to a total of 4500 events.<br />
This data corresponds to about the last ninety days of use, and<br />
can be accessed on a personal computer using <strong>Accu</strong>-<strong>Chek</strong><br />
information management products (for details see the user<br />
information provided with the software).<br />
For availability of the appropriate software see Appendix C.<br />
Procedure for transferring your data<br />
1. 2. 3.<br />
Put your pump in STOP mode.<br />
Press d to move to the DATA TRANSFER<br />
screen.<br />
Press f to select.<br />
Press f. A melody signals that your<br />
pump is ready to transfer data.<br />
111
4.<br />
Set up your pump with a cartridge, adapter, and a new infusion<br />
set, and put it in RUN mode if necessary.<br />
When the data transfer is complete,<br />
press f to return to the STOP screen.<br />
Note<br />
Your pump will return to STOP mode 15 minutes after the<br />
last data transfer when the DATA TRANSFER screen is<br />
selected.<br />
You can press twice d and a simultaneously to exit<br />
while data is being transferred. The data transfer is<br />
interrupted, and the Error E12: DATA INTERRUPTED<br />
occurs. See chapter 8.<br />
112
5<br />
5.6 Pump settings<br />
These settings relate to the practical use of the pump. For<br />
settings relating to your therapy, see 5.10 Therapy settings later<br />
in this chapter.<br />
5.6.1 Turning Keylock on and off<br />
The Keylock function allows you to lock the four keys of your<br />
<strong>Accu</strong>-<strong>Chek</strong> <strong>Spirit</strong> <strong>Combo</strong> insulin pump. This is an important<br />
safety measure that prevents you from accidentally activating<br />
functions, for example while sleeping or during contact sports.<br />
If the Keylock is turned on and no key is pressed for 10 seconds<br />
after your pump has returned to the RUN screen or STOP screen,<br />
all four keys are locked.<br />
Procedure for turning the Keylock on or off<br />
1. 2.<br />
3.<br />
Press d to move to the PUMP<br />
SETTINGS screen.<br />
Press f to select.<br />
The current Keylock status (ON or OFF)<br />
appears.<br />
Press a or s to turn the Keylock ON<br />
or OFF.<br />
Press f to save and exit.<br />
113
Procedure for unlocking the Keylock<br />
If you press any key while the screen is blank, the Keylock symbol<br />
indicates that the keys are locked.<br />
Note<br />
The Keylock remains unlocked during fast bolus delivery of<br />
Standard or Multiwave Bolus.<br />
1. 2.<br />
after three seconds to confirm that the<br />
Keylock is unlocked.<br />
From the blank screen, press and hold<br />
d and s simultaneously for three<br />
seconds.<br />
You hear three beeps in RUN or STOP<br />
mode when you press the keys and again<br />
If no key is pressed for 10 seconds after<br />
your pump has returned to the RUN or<br />
STOP screen, all four keys are automatically<br />
locked.<br />
114
5<br />
5.6.2 Adjusting the sound volume<br />
Your pump emits different acoustic signals in different handling<br />
situations to facilitate handling e.g. for blind or partially-sighted<br />
users. For details on the meaning of the sound patterns, see the<br />
Appendix “Beeps and melodies”. You can adjust the volume of<br />
the beeps according to your personal preference. There are five<br />
volume levels available: off, low, medium, high and maximum.<br />
Note<br />
The volume of the STOP-Warning is independent of the<br />
programmed beep volume – it always sounds at the<br />
maximum level. If the beeps are turned off, and a Warning<br />
or Error occurs, the beeps become active again to ensure<br />
that you are aware of the Warning or Error. If the Warning<br />
or Error is not cancelled, the beeps gradually increase in<br />
volume until the maximum level is reached.<br />
Procedure for adjusting the sound volume<br />
1. 2.<br />
Press d to move to the PUMP SETTINGS<br />
screen.<br />
Press f to select.<br />
Press d to move to the SOUND<br />
VOLUME screen.<br />
Press a or s to adjust the sound<br />
volume.<br />
Press f to save and exit.<br />
115
5.6.3 Changing signal settings<br />
The <strong>Accu</strong>-<strong>Chek</strong> <strong>Spirit</strong> <strong>Combo</strong> insulin pump enables you to choose<br />
how you want your pump to alert you when a Warning or Error<br />
occurs.<br />
You have three options:<br />
Beep only<br />
Vibrate only<br />
Beep and vibrate<br />
For your safety, if you do not respond to the vibration, the pump<br />
starts beeping after one minute.<br />
Procedure for changing the signal settings<br />
1. 2.<br />
Press d to move to the PUMP<br />
SETTINGS screen.<br />
Press f to select.<br />
Press d to move to the SIGNAL<br />
SETTINGS screen.<br />
Press a or s to set the signals.<br />
116<br />
Press f to save and exit.
5<br />
5.6.4 Display orientation<br />
Your pump allows you to turn the display by 180°, so that you<br />
can view it more easily, depending on how you are wearing the<br />
pump.<br />
Note If you turn the display orientation of your pump by 180°,<br />
the functions of the a or s keys are also reversed.<br />
The functions of the d and f keys remains the same,<br />
whichever screen orientation you choose.<br />
Procedure for setting the display orientation<br />
1. 2. 3.<br />
Press d to move to the PUMP<br />
SETTINGS screen.<br />
Press f to select.<br />
Press d to move to the ORIENTATION<br />
screen.<br />
Press a or s to select the display<br />
orientation.<br />
The current orientation is displayed.<br />
Press f to save and exit.<br />
117
5.6.5 Setting the display contrast<br />
Your pump allows you to adjust the display contrast to suit your<br />
preferences.<br />
Procedure for setting the display contrast<br />
1. 2.<br />
Press d to move to the PUMP<br />
SETTINGS screen.<br />
Press f to select.<br />
Press d to move to the DISPLAY<br />
CONTRAST screen.<br />
Press a or s to select the desired<br />
contrast level.<br />
118<br />
Press f to save and exit.
5<br />
5.6.6 Selecting the language<br />
Your pump can display the information in several languages.<br />
You can chose the language according to your preferences.<br />
Procedure for setting the language<br />
1. 2.<br />
Press d to move to the PUMP<br />
SETTINGS screen.<br />
Press f to select.<br />
Press d to move to the LANGUAGE<br />
screen.<br />
Press a or s to select a language.<br />
Press f to save and exit.<br />
119
5.7 ADVANCED user menu<br />
The following is a list of additional menu options available in the<br />
ADVANCED user menu. To view the order in which they appear<br />
on the display, refer to the menu diagram below:<br />
j j Press d to move towards<br />
jj<br />
Press d + a simultaneously<br />
to move backwards<br />
RUN<br />
STOP<br />
BRP = Basal Rate profile 2 – 4<br />
f<br />
f<br />
120<br />
BRP 4<br />
BRP 3<br />
BRP 2<br />
BRP 4<br />
BRP 3<br />
BRP 2
5<br />
Note<br />
The ADVANCED user menu contains all the options from<br />
the STANDARD user menu.<br />
Some of the functions are described elsewhere in this<br />
User Guide, as listed below. The remaining functions are<br />
described in this chapter following the list.<br />
Multiwave Bolus<br />
See section 4.4 Programming a Multiwave Bolus.<br />
5.8 Basal rate profiles<br />
Your pump has five different basal rate profiles to match your<br />
changing insulin needs (for example, Monday to Friday or<br />
Exercise Day or Sleeping Late Day).<br />
Discuss additional basal rate profiles with your doctor or<br />
healthcare team. Also, consult with your doctor or healthcare<br />
team before changing basal rate profiles, as this may affect how<br />
you use your pump.<br />
5.8.1 Programming additional basal rate profiles<br />
w WARNING<br />
Your <strong>Accu</strong>-<strong>Chek</strong> <strong>Spirit</strong> <strong>Combo</strong> insulin pump must be programmed<br />
with your personal settings prior to starting insulin<br />
pump therapy. Do not operate your pump without knowing<br />
your personal settings. If you are not sure about your personal<br />
settings or you are inexperienced, ask your healthcare<br />
provider to check your personal settings.<br />
121
Procedure for Programming additional basal rate profiles<br />
1. 2.<br />
See section 2.5.1 Programming your<br />
basal rate profile.<br />
Press d to move to the BASAL RATE<br />
PROGRAMMING (2, 3, 4, 5) screen you<br />
wish to program. Press f to select.<br />
The hourly basal rates for each additional<br />
basal rate profile are set in the same way<br />
as for basal rate profile 1.<br />
Note<br />
Only basal rate profiles that are accessible in your current<br />
user menu are available. If the basal rate profile<br />
number(s) do(es) not appear, select the ADVANCED user<br />
menu, or program the basal rate profile to an available<br />
basal rate profile number.<br />
122
5<br />
5.8.2 Selecting a basal rate profile<br />
Procedure for selecting a basal<br />
rate profile<br />
1. 2.<br />
Press d to move to the BASAL RATE<br />
SELECTION screen.<br />
Press f to enter.<br />
Press a or s to select a basal rate<br />
profile. The selected basal rate profile<br />
and its daily insulin total appear.<br />
Press f to select.<br />
The new basal rate profile is active immediately.<br />
Note<br />
Only basal rate profiles that are accessible in your current<br />
user menu are available.<br />
A running Temporary Basal Rate increase or decrease<br />
stays active, even if you change the basal rate profile on<br />
your pump.<br />
123
5.9 Setting a Reminder<br />
You can set both single and multiple Reminders on your pump.<br />
Multiple Reminders are repeated at a set time every day. You can<br />
use this feature to remind you, for example, when you need to<br />
test your blood glucose.<br />
Procedure for setting single or multiple Reminders<br />
1. 2. 3.<br />
Press d to move to the Reminder<br />
SETTINGS screen.<br />
Press f to select. The current Reminder<br />
status and alarm time appear.<br />
Press a or s to change the Reminder<br />
setting to OFF, ONCE or EVERY DAY.<br />
124
5<br />
4.<br />
5.<br />
Press d to move to the HOUR screen.<br />
Press a or s to set the hour.<br />
Press d to move to the MINUTE screen.<br />
Press a or s to set the minute.<br />
Press f to save and exit.<br />
Turning off the Reminder<br />
When the Reminder sounds, the Reminder screen is diplayed.<br />
Press f twice to snooze and confirm and return to RUN or<br />
STOP mode (See also chapter 8 R1).<br />
125
5.10 Therapy settings<br />
These settings relate to the therapeutic use of the pump. For<br />
settings relating to the practical use of the pump, see Pump<br />
settings earlier in this chapter.<br />
your <strong>Accu</strong>-<strong>Chek</strong> <strong>Spirit</strong> <strong>Combo</strong> insulin pump is adjustable. It is<br />
initially set to 0.5 units per key-press, but it can be changed<br />
to 0.1, 0.2, 0.5, 1.0 or 2.0 units.<br />
5.10.1 Adjusting the bolus increment<br />
Designed for those patients who may need large or small<br />
amounts of insulin, the bolus increment for the Quick Bolus of<br />
w Warning<br />
The bolus increment determines the Quick Bolus amount per<br />
key press using the a and s keys. Incorrect programming<br />
of the bolus increment may cause inappropriate insulin<br />
delivery.<br />
Procedure for adjusting the bolus increment<br />
1. 2.<br />
Press d to move to the THERAPY<br />
SETTINGS screen.<br />
Press f to select.<br />
Press d to move to the BOLUS<br />
INCREMENT screen.<br />
Press a or s to select a bolus<br />
increment.<br />
126<br />
Press f to save and exit.
5<br />
5.10.2 Adjusting the prime amount<br />
The prime amount needed to fill an infusion set depends on the<br />
length of the infusion set tubing. The shorter your infusion set<br />
tubing, the less insulin will be required to prime the infusion set.<br />
The default setting for the prime amount is 25 units of U100<br />
insulin.<br />
Note<br />
The amount of insulin used for the priming is not added to<br />
the history of daily insulin totals.<br />
Procedure for adjusting the prime amount<br />
1. 2.<br />
Press d to move to the THERAPY<br />
SETTINGS screen.<br />
Press f to select.<br />
Press d to move to the PRIME AMOUNT<br />
screen.<br />
Press a or s to select a prime<br />
quantity between 0.0 and 50.0 units.<br />
Press f to save and exit.<br />
127
5.10.3 Locking basal rate profiles<br />
Your <strong>Accu</strong>-<strong>Chek</strong> <strong>Spirit</strong> <strong>Combo</strong> insulin pump allows you to adapt<br />
your hourly basal rate profile as needed. You can then lock<br />
your basal rate profiles to provide additional protection against<br />
accidentally changing a basal rate during normal operation. If<br />
the basal rate lock is set to ON, programming of the basal rate<br />
profiles 1, 2, 3, 4 and 5 is blocked.<br />
If you try to program a basal rate while the BASAL RATE LOCK is<br />
turned ON, the key symbol in the BASAL RATE TOTAL screen<br />
indicates that basal rate programming is locked.<br />
The a and s functions are blocked.<br />
However, you can still change between the different basal rate<br />
profiles 1 to 5.<br />
Procedure for locking the basal rate profiles<br />
1. 2.<br />
Press d to move to the THERAPY<br />
SETTINGS screen.<br />
Press f to select.<br />
Press d to move to the BASAL RATE<br />
LOCK screen.<br />
Press a or s to turn the basal rate<br />
lock ON or OFF.<br />
128<br />
Press f to save and exit.
5<br />
5.10.4 Automatic Off<br />
Automatic Off is a safety feature that stops insulin delivery and<br />
triggers Error E3: AUTOMATIC OFF if no keys are pressed within<br />
a programmed time period in RUN mode. This feature can either<br />
be set to OFF or programmed up to 24 hours in 1-hour intervals.<br />
The factory setting is OFF.<br />
Discuss using the Automatic off function with your doctor or<br />
healthcare team.<br />
Procedure for using Automatic Off<br />
1. 2. 3.<br />
Press d to move to the THERAPY<br />
SETTINGS screen.<br />
Press f to select.<br />
Press d to move to the AUTOMATIC<br />
OFF screen.<br />
Press or scroll a to increase or s to<br />
decrease the duration for the Automatic<br />
off in 1-hour intervals.<br />
If you would like to set the Automatic Off<br />
function to off, press s until “0 hours”<br />
and OFF appear on the display.<br />
Press f to save and exit.<br />
129
5.11 CUSTOM user menu<br />
The CUSTOM user menu is designed to adapt your pump to your<br />
special requirements and preferences. It allows you or your<br />
healthcare provider to display or hide screens and thereby<br />
customize the individual user menus.<br />
j j Press d to move towards<br />
jj<br />
Press d + a simultaneously<br />
to move backwards<br />
RUN<br />
f<br />
f<br />
STOP<br />
130
5<br />
Note<br />
By default, the CUSTOM user menu contains all of the<br />
functions available except the following:<br />
jj Multiwave Bolus<br />
jj<br />
Basal rate profiles 3, 4 and 5<br />
To change the CUSTOM user menu, you, your doctor, or your<br />
healthcare provider must use the <strong>Accu</strong>-<strong>Chek</strong> PC configuration<br />
software.<br />
131
132
6<br />
6 Using the <strong>Accu</strong>-<strong>Chek</strong> <strong>Spirit</strong> <strong>Combo</strong> insulin pump with the Meter<br />
This chapter describes how the <strong>Accu</strong>-<strong>Chek</strong> <strong>Spirit</strong> <strong>Combo</strong> insulin<br />
pump works with the Meter, and explains how to pair the two<br />
devices using Bluetooth ® wireless technology.<br />
Note<br />
In this User Guide the term “Meter” always refers to the<br />
<strong>Accu</strong>-<strong>Chek</strong> Aviva <strong>Combo</strong> Blood Glucose Meter or<br />
<strong>Accu</strong>-<strong>Chek</strong> Performa <strong>Combo</strong> Blood Glucose Meter.<br />
6.1 Meter<br />
The Meter – available separately – is both a blood glucose meter<br />
and a remote-control device for your <strong>Accu</strong>-<strong>Chek</strong> <strong>Spirit</strong> <strong>Combo</strong><br />
insulin pump. Using the Meter, you can program your pump<br />
without handling it, and also receive bolus advice and review<br />
history information.<br />
“Pairing” means to set up a connection between the two devices<br />
using Bluetooth ® wireless technology. This is a secure connection,<br />
and there is no risk of your pump receiving signals from any<br />
other device.<br />
Note<br />
Do not leave your Meter unattended as long as it is<br />
connected to your pump. Otherwise your pump could be<br />
manipulated remotely without your control (for example:<br />
children playing with the Meter).<br />
Note<br />
The pump cannot communicate with the Meter using<br />
Bluetooth ® wireless technology when the devices are<br />
more than two meters apart.<br />
133
6.1.1 Tasks that must be performed on the pump<br />
The following tasks cannot be performed remotely using the<br />
Meter:<br />
jj Changing the cartridge<br />
jj<br />
Priming the infusion set<br />
jj Data transfer<br />
®<br />
j j Bluetooth settings<br />
jj Display settings<br />
All the other functions available on the <strong>Accu</strong>-<strong>Chek</strong> <strong>Spirit</strong> <strong>Combo</strong><br />
insulin pump can be performed using the Meter.<br />
Before using your pump together with the Meter you must read<br />
the documentation (Owners booklet) provided with this product.<br />
134
6<br />
6.2 Switching Bluetooth ® ON and OFF<br />
w Warning<br />
You must ensure that Bluetooth ® is switched off on both<br />
devices before boarding an aircraft, as emissions from your<br />
pump or the Meter could interfere with the electronics<br />
systems of the aircraft.<br />
To prolong the battery life and avoid accidental changes on your<br />
pump, you should switch off Bluetooth ® wireless technology,<br />
if the Meter is lost, stolen or, you plan not to carry it with you for<br />
a longer period of time.<br />
Procedure for switching Bluetooth ® ON and OFF<br />
1. 2.<br />
Press d to move to the BLUETOOTH<br />
SETTINGS screen.<br />
Press f to select to the ON / OFF screen.<br />
Press a or s to switch on the<br />
Bluetooth ® function.<br />
Press f to save and exit.<br />
135
6.3 Pairing your pump with the Meter<br />
If you have already acquired the Meter together with the<br />
<strong>Accu</strong>-<strong>Chek</strong> <strong>Spirit</strong> <strong>Combo</strong> insulin pump, the two devices will<br />
already have been paired.<br />
When pairing your <strong>Accu</strong>-<strong>Chek</strong> <strong>Spirit</strong> <strong>Combo</strong> insulin pump with<br />
the Meter, place both devices on a table or desk, so that you can<br />
see the displays of both devices clearly.<br />
You should not perform the pairing process in crowded areas,<br />
since the emissions of other electronic devices could interfere with<br />
the connection.<br />
Procedure for Pairing<br />
1. 2. 3.<br />
Press d to move to the BLUETOOTH<br />
SETTINGS screen.<br />
Press f to select to the ON / OFF screen.<br />
Press a or s to switch on the<br />
Bluetooth ® function.<br />
Press d to display the PAIRED DEVICE<br />
screen.<br />
136
6<br />
Note<br />
When Bluetooth ® is turned off,<br />
you cannot access the Paired<br />
Device menu.<br />
4.<br />
Pump screen<br />
If the pump screen indicates that no<br />
paired device is available, turn on the<br />
Meter in pairing mode by holding down<br />
* and simultaneously pressing +.<br />
Pair with Pump<br />
To start Pairing, turn off Meter,<br />
hold backlight button down and<br />
then turn Meter on<br />
Not Paired<br />
Meter screen<br />
5.<br />
6.<br />
The pump begins searching and detects<br />
the Meter, displaying its serial number<br />
(This process may take several minutes).<br />
Press the d key on the pump to see the<br />
ADD DEVICE screen, and press f to<br />
initiate pairing.<br />
Pump screen<br />
Press a or s to select the number,<br />
which is also shown on your Meter<br />
screen.<br />
Press f on the pump to confirm that<br />
you want to pair the Meter.<br />
Meter screen<br />
137
7.<br />
Pump screen<br />
Pair with Pump<br />
Enter PIN shown on<br />
Pump display<br />
The pump begins the pairing process and<br />
shows a 10-digit code. Enter the code on<br />
the Meter display, using x and z and<br />
then = to move to the next digit.<br />
Confirm the complete code with ..<br />
8.<br />
Meter screen<br />
Pair with Pump<br />
Pairing completed for<br />
PUMP12345678<br />
METER12345678<br />
Turn Meter off<br />
1<br />
Cancel<br />
Meter screen<br />
After the pairing is completed press * to<br />
turn off the Meter.<br />
9.<br />
10.<br />
If the pairing is not successful in a first<br />
attempt, wait a few minutes before you<br />
repeat the procedure in a safe or less<br />
crowded environment.<br />
The pump now shows the DEVICE PAIRED<br />
screen. Press f to confirm the pairing.<br />
The pump displays the PAIRED DEVICE<br />
screen. You can return to the RUN screen<br />
by pressing f.<br />
138
6<br />
6.4 Troubleshooting the Bluetooth ®<br />
connection<br />
In this case of problems with the Buetooth connection or after<br />
the appearance of the W10: BLUETOOTH FAULT, you have<br />
to repeat the pairing procedure described in section 6.3 Pairing<br />
your pump with the Meter.<br />
Since only one Meter at a time can be paired with your pump,<br />
you must delete the pairing before you can pair your pump with a<br />
new Meter.<br />
1. 2. 3.<br />
Press d to move to the BLUETOOTH<br />
SETTINGS screen.<br />
Press f to enter the BLUETOOTH<br />
ON / OFF screen.<br />
Press d to move to the PAIRED DEVICE<br />
screen.<br />
139
4.<br />
Press d to move to the DELETE DEVICE<br />
screen.<br />
Press f once to delete the pairing and<br />
a second time to confirm.<br />
6.4.1 Handling Warnings and Errors<br />
The <strong>Accu</strong>-<strong>Chek</strong> <strong>Spirit</strong> <strong>Combo</strong> insulin pump and Meter behave in<br />
the following ways when Warnings and Errors occur.<br />
jj If both devices are switched on and paired you can enter the<br />
Meter’s Pump menu and snooze and confirm the Warning or<br />
Error through the Meter.<br />
jj If the Meter is switched off, and you switch it on in response to<br />
a Warning, Error or Reminder on the pump, the Meter switches<br />
immediately to the Pump menu. All the functions available on<br />
the pump are performed from the Pump menu of the Meter.<br />
Note The above points do not apply in the case of E7:<br />
ELECTRONIC ERROR.<br />
Then repeat the pairing procedure described in section 6.3 Pairing<br />
your pump with the Meter.<br />
If the pairing is still not successful, contact local pump support<br />
(details on inside back cover).<br />
140
6<br />
6.4.2 Use in aircraft<br />
w Warning<br />
You must ensure that Bluetooth ® is switched off on both<br />
devices before boarding an aircraft, as emissions from your<br />
pump or the Meter could interfere with the electronics<br />
systems of the aircraft.<br />
141
142
7<br />
7 Care and Maintenance<br />
This chapter explains how to take care of your pump and keep it<br />
properly maintained.<br />
Guarantee<br />
Roche Diagnostics guarantees that your pump functions<br />
according to its specifications only where all servicing of your<br />
pump is carried out and / or authorized by Roche Diagnostics.<br />
c Caution<br />
Do not perform any servicing or repair on your <strong>Accu</strong>-<strong>Chek</strong><br />
<strong>Spirit</strong> <strong>Combo</strong> insulin pump. For servicing or repair, contact<br />
your local pump support (see inside back cover).<br />
7.1 Inspecting your pump<br />
Your pump must be properly maintained to guarantee accurate<br />
insulin delivery.<br />
Check the pump display regularly during the day and before you<br />
go to sleep, and especially if for any reason you might not be<br />
able to hear the beeps or feel the vibrations.<br />
Accessories<br />
Use only <strong>Accu</strong>-<strong>Chek</strong> sterile products and accessories designed<br />
to be used with your pump. Replace and discard these items<br />
according to your doctor’s or healthcare team’s recommendations<br />
and the instructions that come with these items.<br />
143
7.1.1 Checklist<br />
Check your pump daily, and make sure that:<br />
jj The pump casing, the display, and the cartridge are not<br />
chipped or cracked and that the display does not show<br />
incomplete or abnormal letters or symbols.<br />
jj You carefully inspect the cartridge. Make sure that the actual<br />
amount of insulin in the cartridge equals the displayed<br />
cartridge amount on the Quick Info screen.<br />
jj You inspect all parts of your pump and infusion set regularly<br />
during the day and before you go to sleep. If you detect any<br />
loss of insulin, immediately replace the leaking component.<br />
jj The battery cover is correctly tightened and positioned, in line<br />
with the pump casing.<br />
jj The adapter is correctly attached.<br />
jj Your infusion set is primed, free of air bubbles, and tightly<br />
connected to the adapter.<br />
jj Your infusion set is inserted according to the instructions for<br />
its use.<br />
jj Your infusion site is secure, comfortable, and free of irritation<br />
or infection.<br />
jj The cartridge is free of air bubbles.<br />
jj Your pump is in RUN mode.<br />
jj The basal rates are set correctly according to your doctor’s or<br />
healthcare team’s recommendations.<br />
jj The time and date are set correctly.<br />
jj The Temporary Basal Rate changes are set according to your<br />
doctor’s or healthcare team’s recommendations.<br />
jj The beeps and / or vibrations are set.<br />
jj<br />
You have your personal emergency kit with you.<br />
(See section 1.5 Emergency kit)<br />
144
7<br />
7.2 Damage to your pump<br />
7.2.1 What to do if you drop your pump<br />
If the pump is dropped it could be damaged, as well as the seal<br />
that protects it against water. So be careful not to drop your<br />
pump! Use the specially designed pump carrying system to help<br />
avoid dropping your pump. See Roche Diagnostics sterile<br />
products and accessories catalogues and brochures for more<br />
information, or contact your local pump support (details on inside<br />
back cover).<br />
If you drop your pump:<br />
jj Check that all the connections in your infusion set are still<br />
tight, and if they are not, reconnect or tighten them<br />
jj<br />
Check your pump, its sterile products, and accessories for<br />
chips and cracks<br />
jj Change the cartridge if it is damaged<br />
Put your pump in STOP mode, and take out and reinsert the<br />
battery, so that the self-test is started.<br />
Note<br />
If a Temporary Basal Rate, an Extended Bolus or a<br />
Multiwave Bolus is active at the same time, it is cancelled<br />
when your pump is put into STOP mode. A Warning W8:<br />
BOLUS CANCELLED or a Warning W6: TBR CANCELLED is<br />
displayed.<br />
Press f twice to confirm and turn off the alert. The<br />
alerts are recorded in the alarm history.<br />
See chapter 8 Warning W6: TBR CANCELLED and<br />
Warning W8: BOLUS CANCELLED.<br />
Make sure that the cancellation was deliberate and then<br />
program a new Temporary Basal Rate (and / or an<br />
Extended or Multiwave Bolus), if needed.<br />
145
7.3 Your insulin pump and water<br />
c Caution<br />
Immediately inspect your pump if it is dropped. Do not use<br />
your <strong>Accu</strong>-<strong>Chek</strong> <strong>Spirit</strong> <strong>Combo</strong> insulin pump if chips, cracks<br />
or other damages are visible. Otherwise water, dust, insulin<br />
or other foreign substances may enter your pump and could<br />
result in a malfunction.<br />
If you have questions or are not sure whether your pump has<br />
been damaged, contact your local pump support (details on<br />
inside back cover).<br />
c Caution<br />
Avoid contact with water. Check daily that your <strong>Accu</strong>-<strong>Chek</strong><br />
<strong>Spirit</strong> <strong>Combo</strong> insulin pump is not chipped, cracked or damaged<br />
in any way, and that the battery cover and the adapter are<br />
correctly closed. If the pump is chipped or cracked, water,<br />
dust, insulin, or other substances may enter your pump and<br />
lead to malfunction. Before any contact with water, disconnect<br />
and take off your pump.<br />
Disconnect and remove your pump before taking a bath, or<br />
going into a whirlpool, shower, or swimming pool. Avoid<br />
exposing your pump to high humidity, such as in a sauna, as<br />
this could result in damage. To make it easy to remove your<br />
pump, use disconnectable <strong>Accu</strong>-<strong>Chek</strong> infusion sets.<br />
146
7<br />
7.3.1 Accidental contact with water<br />
Your <strong>Accu</strong>-<strong>Chek</strong> <strong>Spirit</strong> <strong>Combo</strong> insulin pump is IPX8 waterproof<br />
when leaving the factory site. However hair-line cracks could<br />
appear during use. Therefore we may only guarantee protection<br />
against brief accidental water contact such as:<br />
jj Rain<br />
jj Water splashes while you are cycling, jogging or hiking<br />
jj Accidental immersion in the sink, washbasin or bath<br />
What to do after any water contact<br />
Put your pump into STOP mode, disconnect the pump from your<br />
body, and inspect it. Use a soft dry cloth to dry the outside of the<br />
pump, and check the battery compartment and the cartridge<br />
compartment for water. If the battery compartment or cartridge<br />
compartment are wet, turn your pump upside down to let the<br />
water run out and let it air dry. Do not use warm air such as a<br />
hair dryer to dry the pump, as this could damage the pump’s<br />
housing. Do not reinsert the battery or the cartridge until the<br />
compartments are completely dry. See section 7.5.1 Cleaning<br />
your pump.<br />
Other liquids<br />
You do not have to worry about contact between your pump and<br />
perspiration or saliva. You must however check your pump<br />
immediately after contact with other liquids or chemicals such as:<br />
jj Cleaning solutions<br />
jj Alcohol<br />
jj Beverages<br />
jj Oil or Fat<br />
In case of contact with these substances, clean your pump<br />
immediately. See section 7.5.1 Cleaning your pump.<br />
c Caution<br />
Avoid any contact between your <strong>Accu</strong>-<strong>Chek</strong> <strong>Spirit</strong> <strong>Combo</strong><br />
insulin pump, the infusion set, and the connecting parts of<br />
your insulin pump with health and beauty items (for example:<br />
antiseptics, antibiotic creams, soaps, perfumes, deodorants,<br />
body lotions, or any other cosmetics). These substances<br />
could discolour your pump or fog the display.<br />
147
7.4 Repair of your pump<br />
c Caution<br />
Do not perform any servicing or repair on your pump. Do not<br />
use any lubricants on the pump mechanism. If you have<br />
questions, contact your local pump support (details on inside<br />
back cover).<br />
If you have problems with your pump, contact your local pump<br />
support (details on inside back cover). Your local pump support<br />
can answer many questions and resolve many problems over the<br />
telephone. You may be requested to return your pump to Roche<br />
Diagnostics for repair. For example, you may need to return your<br />
pump if a Warning or Error could not be cleared by following the<br />
procedures described in chapter 8 Warnings and Errors.<br />
When you return your pump, include the following:<br />
jj a description of the reason for returning your pump<br />
jj your name and address<br />
jj your daytime phone number<br />
jj the serial number of your pump<br />
jj any RMA (Return Material Authorization) number received from<br />
your local pump support.<br />
By returning your pump to Roche Diagnostics, you authorize<br />
Roche Diagnostics to undertake any testing on your infusion<br />
pump that is needed for a proper inspection, and understand<br />
that your pump may not be returned to you.<br />
(For the address, see inside the back cover.)<br />
If you have to ship your pump, carefully pack the pump and the<br />
used cartridge, battery, battery cover, adapter, and infusion set<br />
to avoid damage during transportation. Place your pump back in<br />
the shipping case and put the case in a package that will not rip<br />
or tear. It is recommended to ship your pump using a company<br />
that tracks the shipment for you.<br />
148
7<br />
7.5 Maintaining your pump<br />
7.5.1 Cleaning your pump<br />
The best time to clean your pump is when you change the<br />
cartridge. Use a soft cloth to clean the outside of the pump. If<br />
necessary, use a damp clean cotton cloth with water or, even<br />
a damp soapy water cloth. If these measures are not successful,<br />
contact your local pump support (details on inside back cover)<br />
for more instructions. Also see section 7.3.1 Accidental contact<br />
with water.<br />
c Caution<br />
Always remove the cartridge and adapter, and put your pump<br />
in STOP mode while cleaning. Avoid pressing the keys of your<br />
<strong>Accu</strong>-<strong>Chek</strong> <strong>Spirit</strong> <strong>Combo</strong> insulin pump during cleaning, as this<br />
may accidentally change your settings. Do not use alcohol,<br />
solvents, strong detergents, bleaching agents, scouring pads<br />
or sharp instruments for cleaning, as they may damage the<br />
pump.<br />
7.5.2 Batteries<br />
It is important to change your battery regularly and to keep spare<br />
batteries available. The life of any battery is affected by how you<br />
use your <strong>Accu</strong>-<strong>Chek</strong> <strong>Spirit</strong> <strong>Combo</strong> insulin pump, your personal<br />
settings, delivery rates, temperature, and other factors.<br />
For details about the battery lifetime see Appendix A for lifetime<br />
of battery.<br />
See section 1.4 Accessories and disposables or Appendix C for<br />
more information on recommended batteries.<br />
See section 2.2 Inserting the battery for instructions on how to<br />
change your battery.<br />
149
7.6 Storing your pump<br />
c Caution<br />
When your pump will not be in use for a long period of time, it<br />
must be properly stored to prevent any subsequent malfunction.<br />
To store your pump, place it in STOP mode, then:<br />
jj Remove the battery to preserve the battery life<br />
jj Remove the cartridge<br />
jj Insert the battery cover and the adapter<br />
jj Store your pump in its packaging<br />
7.7 Disposing of your pump<br />
Since your <strong>Accu</strong>-<strong>Chek</strong> <strong>Spirit</strong> <strong>Combo</strong> insulin pump may come into<br />
contact with blood during use, it may carry a risk of infection.<br />
Therefore it falls outside the scope of the European Directive<br />
2002 / 96 / EC and may not be disposed of with other electronic<br />
devices. If you need to dispose of your <strong>Accu</strong>-<strong>Chek</strong> <strong>Spirit</strong> <strong>Combo</strong><br />
insulin pump, return it to Roche Diagnostics (address inside the<br />
back cover) for professional disposal.<br />
Battery<br />
Correctly dispose of empty batteries, recycling them wherever<br />
possible.<br />
Storage conditions<br />
Temperature<br />
Air humidity<br />
Barometric pressure<br />
41 °F to 113 °F (+5 °C to +45 °C)<br />
5 to 85 % relative air humidity<br />
700 to 1060 mbar<br />
Cartridge, Infusion set, Adapter, and Accessories<br />
Dispose of these items in your normal household waste or, for<br />
the batteries, at the usual recycling point. Remember to dispose<br />
of the introducer needle safely (using the needle container).<br />
To prevent injury to others, replace the needle protective cap<br />
or insert the needle of the infusion set into a disposable object,<br />
or put it in a hard-shell container.<br />
150
8<br />
8 Warnings and Errors<br />
A safety system monitors and controls the function of your<br />
<strong>Accu</strong>-<strong>Chek</strong> <strong>Spirit</strong> <strong>Combo</strong> insulin pump. This safety system<br />
performs more than 9 million safety checks every day. If it<br />
detects a change from the pump’s normal state, it will trigger a<br />
Warning or an Error message. Beeps, vibrations, and messages<br />
on the pump screen indicate the cause of a Warning or Error.<br />
Warnings and Errors are the only way you can be quickly notified<br />
of any changes in your pump.<br />
c Caution<br />
Check the pump display regularly during the day, and before<br />
you go to sleep, and especially if you might not be able to<br />
hear the beeps or feel the vibrations for any reason.<br />
Your pump signals Warnings and Errors using beeps and<br />
vibrations. You can turn off either the beeps or the vibrations, but<br />
for your safety you cannot turn off both at the same time for the<br />
initial alarm signal.<br />
If you do not confirm a Warning or Error within 60 seconds, it will<br />
be signalled again. Even when the beep is turned off or programmed<br />
at lower than maximum volume, the beep volume will<br />
rise to the loudest volume level if not confirmed. Both the beep<br />
and vibration will then continue at this level until confirmed.<br />
Note<br />
j The volume of the STOP-Warning is separate from the<br />
programmed beep volume and cannot be changed.<br />
It always occurs at the maximum level.<br />
jj Keylock is unlocked by the system each time a Warning<br />
or Error occurs.<br />
151
8.1 Confirming a Warning or Error<br />
When you confirm:<br />
W1: CARTRIDGE LOW<br />
E1: CARTRIDGE EMPTY<br />
W2: BATTERY LOW<br />
E2: BATTERY EMPTY<br />
W5: PUMP TIMER<br />
E5: END OF OPERATION,<br />
the symbol for that Warning or Error stays in the RUN screen or<br />
STOP screen as a Reminder.<br />
Battery low symbol<br />
Cartridge low symbol<br />
Pump timer symbol<br />
Key lock symbol<br />
For other Warnings or Errors, alarm information is cleared from<br />
the display but stays in the alarm history and the event memory.<br />
When a Warning or an Error occurs:<br />
jj<br />
Press f to turn off the beeps and vibrations. The Warning or<br />
Error code stays on the display.<br />
jj As soon as you understand the reason for the Warning or Error,<br />
confirm by pressing f again.<br />
jj Take appropriate action, as necessary.<br />
jj If more than one Warning and /or Error occurs simultaneously,<br />
press f twice for each Warning or Error to confirm them and<br />
turn them off.<br />
jj After a Warning or Error, make sure that you switch your pump<br />
is back to RUN mode where appropriate.<br />
Note<br />
When you use your pump together with the Meter you can<br />
also snooze and confirm an incoming Warning or Error<br />
with the Meter. For further information see the Meter user<br />
information.<br />
152
8<br />
8.2 List of Warnings<br />
w Warning<br />
After a Warning occurs, your <strong>Accu</strong>-<strong>Chek</strong> <strong>Spirit</strong> <strong>Combo</strong> insulin<br />
pump may be in STOP mode and insulin delivery may be<br />
interrupted. In order to maintain insulin delivery, you must act<br />
immediately according to the instructions given for each Error<br />
code, or put your <strong>Accu</strong>-<strong>Chek</strong> <strong>Spirit</strong> <strong>Combo</strong> insulin pump in<br />
RUN mode to continue the insulin delivery.<br />
Warning W1: CARTRIDGE LOW<br />
The contents of the insulin cartridge have dropped to 20 units of<br />
insulin. Be prepared to replace the cartridge as soon as possible.<br />
The “cartridge low” symbol appears in the RUN or STOP screen<br />
as a Reminder until you change the cartridge.<br />
jj<br />
Press f twice to snooze and to confirm the Warning. Change<br />
the cartridge before it is empty.<br />
jj If necessary, put your pump in RUN mode.<br />
See section 3.5 Changing the cartridge and infusion set.<br />
153
Warning W2: BATTERY LOW<br />
The battery power is low. Be prepared for a battery change as<br />
soon as possible. The battery low symbol appears in the RUN or<br />
STOP screen as a Reminder until you change the battery.<br />
jj<br />
Press f twice to snooze and to confirm the Warning.<br />
Warning W3: REVIEW TIME<br />
The pump has been without power for more than one hour. The<br />
pump settings and history data are saved in memory regardless<br />
of power loss. However, it may be necessary to set the time and<br />
date again.<br />
jj<br />
Press f twice to snooze and to confirm the Warning.<br />
jj Replace the battery as soon as possible. Failure to change the<br />
battery within a few hours of receiving the Warning could<br />
result in additional Error messages.<br />
jj If necessary, put your pump in RUN mode.<br />
See section 1.4 Accessories and disposables on recommended<br />
batteries. See section 2.2 Inserting the battery for instructions on<br />
how to change the battery.<br />
jj Review the time and date and correct them, if they are wrong.<br />
jj If necessary, put your pump in RUN mode.<br />
See section 2.4 Setting the time and date.<br />
154
8<br />
Warning W4: LIFETIME WARNING<br />
The pump is coming to the end of its lifetime. Contact your local<br />
pump support (see inside back cover).<br />
jj<br />
Press f twice to snooze and to confirm the Warning.<br />
Warning W5: PUMP TIMER (backup pumps only)<br />
Your pump’s operating time will expire soon. It is recommended<br />
that you replace your pump after a period of four years of<br />
running time. When the Warning W5: PUMP TIMER occurs, the<br />
pump will display the symbol to remind you to check the timer.<br />
jj<br />
Press f twice to snooze and to confirm the Warning.<br />
jj Put your pump in RUN mode if necessary.<br />
jj Put your pump in RUN mode.<br />
jj Go to the MY DATA menu on your pump.<br />
<br />
155
jj Move to the PUMP TIMER screen. The days until the pump<br />
timer expires are shown.<br />
Warning W6: TBR CANCELLED (Temporary Basal Rate<br />
Cancelled)<br />
A temporary increase or decrease in the basal rate has been<br />
cancelled.<br />
jj<br />
Press f twice snooze and to confirm the Warning.<br />
When the PUMP TIMER reaches zero, the pump will change to<br />
STOP mode and will no longer operate. An Error, E5: END OF<br />
OPERATION, will appear on the display. Contact your local pump<br />
support (details on inside back cover) to discuss the options for<br />
further use of your <strong>Accu</strong>-<strong>Chek</strong> <strong>Spirit</strong> <strong>Combo</strong> insulin pump.<br />
Note<br />
The Warning W5: PUMP TIMER and the Error E5: END OF<br />
OPERATION are based on running time (the total time the<br />
pump is in RUN mode), and not on calendar years.<br />
See section 5.4.5 Viewing the time remaining.<br />
jj If necessary, put your pump in RUN mode.<br />
jj Make sure that the cancellation was intended and then<br />
program a new Temporary Basal Rate if necessary.<br />
156
8<br />
Warning W7: TBR OVER (Temporary Basal Rate Over)<br />
A Temporary Basal Rate has ended. The original basal rate<br />
(100 %) will resume automatically once the Warning has<br />
occurred.<br />
jj<br />
Press f twice to snooze and confirm the Warning.<br />
Warning W8: BOLUS CANCELLED<br />
A bolus was cancelled during the start delay or after delivery<br />
began.<br />
jj<br />
Press f twice to snooze and to confirm the Warning.<br />
jj<br />
Decide whether a further Temporary Basal Rate change is<br />
required. If necessary, program a new Temporary Basal Rate.<br />
jj If necessary, put your pump in RUN mode.<br />
jj Make sure that the cancellation was intended and then<br />
program a new bolus if needed.<br />
Note<br />
The actual bolus amount that was delivered before the<br />
cancellation can be reviewed in the bolus history. See<br />
section 5.4.1 Viewing your bolus history.<br />
157
Warning W9: LOANTIME WARNING (loan pumps only)<br />
The pump is coming to the end of its loan period. In the MY DATA<br />
menu, check the remaining loan time in the PUMP TIMER menu.<br />
Make sure that you arrange for the replacement of the pump<br />
within the scheduled loan time.<br />
Warning W10: BLUETOOTH FAULT<br />
You need to re-do the pairing procedure for the <strong>Accu</strong>-<strong>Chek</strong><br />
<strong>Spirit</strong> <strong>Combo</strong> insulin pump and Meter.<br />
See section 6.3 Pairing your pump with the Meter.<br />
jj<br />
Press f twice to snooze and to confirm the Warning.<br />
jj Put your pump in RUN mode if necessary.<br />
jj Put your pump in RUN mode if necessary.<br />
jj Go to the MY DATA menu on your pump.<br />
jj Move to the PUMP TIMER screen. The days until the loantime<br />
expires are shown.<br />
158
8<br />
8.3 List of Errors<br />
w Warning<br />
After the occurrence of an Error, your <strong>Accu</strong>-<strong>Chek</strong> <strong>Spirit</strong> <strong>Combo</strong><br />
insulin pump is in STOP mode and insulin delivery is interrupted.<br />
In order to maintain insulin delivery, you must act<br />
immediately according to the instructions given for each<br />
Error.<br />
Error E1: CARTRIDGE EMPTY<br />
The insulin cartridge is empty. You must change it immediately.<br />
jj<br />
Press f twice to snooze and to confirm the Error.<br />
jj Disconnect or remove the infusion set from the infusion site.<br />
jj Change the cartridge and prime the infusion set.<br />
jj Reconnect the infusion set at your infusion site.<br />
jj Put your pump in RUN mode.<br />
See section 3.5 Changing the cartridge and infusion set.<br />
Error E2: BATTERY EMPTY<br />
The battery is empty. You must replace it immediately.<br />
w Warning<br />
After inserting a new battery, always check that the time and<br />
date of your <strong>Accu</strong>-<strong>Chek</strong> <strong>Spirit</strong> <strong>Combo</strong> insulin pump are set<br />
correctly. Incorrect programming of the time and /or date may<br />
cause incorrect insulin delivery. If you, your doctor or<br />
healthcare team store and analyse your therapy data<br />
electronically and the time and date of the devices used are<br />
not set identically, the resulting data might not be meaningful.<br />
159
jj<br />
Press f twice to snooze and to confirm the Error.<br />
Error E3: AUTOMATIC OFF<br />
Automatic Off is a safety feature that stops insulin delivery and<br />
triggers an Error E3: AUTOMATIC OFF if no keys are pressed<br />
within a programmed time period in RUN mode.<br />
jj<br />
Press f twice to snooze and to confirm the Error.<br />
jj Replace the battery.<br />
jj Put your pump in RUN mode.<br />
Note<br />
Your pump stores the settings you saved before the<br />
battery power ran out. If your pump is without power for<br />
more than one hour, check that the time and date are<br />
still correct.<br />
See section 1.4 Accessories and disposables on recommended<br />
batteries. See section 2.2 Inserting the battery<br />
for instructions on how to change your battery.<br />
jj Put your pump in RUN mode.<br />
160
8<br />
Error E4: OCCLUSION<br />
w Warning<br />
If the Error E4: OCCLUSION occurs, immediately check your<br />
blood glucose level, and then check again about two hours<br />
later, as insulin delivery has been interrupted. If your blood<br />
glucose level is high, take appropriate action according to<br />
your doctor’s or healthcare team’s instructions.<br />
Insulin was not delivered. This may be due to:<br />
jj a blocked infusion set<br />
jj a damaged cartridge<br />
jj a dirty or damaged piston rod<br />
If an Error E4: OCCLUSION (blockage) occurs, follow the<br />
steps listed below:<br />
jj<br />
Press f twice to turn off and to confirm the Error.<br />
jj Disconnect or remove the infusion set from your infusion site.<br />
jj<br />
Change the infusion set and prime it, as explained in chapter 2.<br />
jj Reconnect the infusion set at your infusion site.<br />
jj Put your pump in RUN mode.<br />
161
In rare cases, the cartridge itself can be the cause of the<br />
occlusion. If an Error E4: OCCLUSION occurs again, you<br />
must change the cartridge. Follow the steps listed below:<br />
jj<br />
Press f twice to turn off and to confirm the Error.<br />
jj Disconnect or remove the infusion set from your infusion site.<br />
jj Change the cartridge and prime the infusion set, as explained<br />
in chapter 2.<br />
jj Reconnect or insert a new infusion set at your infusion site.<br />
jj Put your pump in RUN mode.<br />
If the Error E4: OCCLUSION occurs again, prime your pump<br />
without a cartridge. Follow the steps listed below:<br />
jj<br />
Press f twice to turn off and to confirm the Error.<br />
jj Disconnect or remove the infusion set from your infusion site.<br />
jj Remove the cartridge, adapter and infusion set from your pump.<br />
jj Carry out the PRIME THE Infusion set function (See section<br />
2.8 Priming the infusion set) without the cartridge, adapter,<br />
and infusion<br />
set inserted.<br />
jj Insert a new cartridge with the adapter and infusion set<br />
connected.<br />
jj Prime the infusion set.<br />
jj Reconnect the or insert a new infusion set at your infusion<br />
site.<br />
jj Put your pump in RUN mode.<br />
If the Error E4: OCCLUSION continues to occur, use the<br />
alternative therapy plan provided by your doctor or<br />
healthcare team. Contact your local pump support (details<br />
on inside back cover) for more assistance.<br />
162
8<br />
Error E5: END OF OPERATION (backup pumps only)<br />
Your pump timer has reached zero. The pump changes to STOP<br />
mode and will no longer operate. An Error E5: END OF OPERA-<br />
TION appears on the display. Before this Error occurs, a Warning<br />
W5: PUMP TIMER will remind you to replace your pump soon. If<br />
necessary, use the alternative therapy plan provided by your<br />
doctor or healthcare team.<br />
Note<br />
The Warning W5: PUMP TIMER and the Error E5: END OF<br />
OPERATION are based on running time (the total time<br />
the pump is in RUN mode) and not on calendar years.<br />
However, the warranty is based on the date the pump<br />
was purchased.<br />
jj<br />
Press f twice to snooze and to confirm the Error.<br />
jj Contact your local pump support (see inside back cover)<br />
to discuss the options for further use of the <strong>Accu</strong>-<strong>Chek</strong><br />
<strong>Spirit</strong> <strong>Combo</strong> insulin pump.<br />
163
Error E6: MECHANICAL ERROR<br />
A mechanical Error has been discovered during a routine<br />
automatic system check and insulin delivery has stopped.<br />
jj<br />
Press f twice to snooze and to confirm the Error.<br />
jj Reconnect the infusion set at your infusion site.<br />
jj Put your pump in RUN mode.<br />
If the Error E6: MECHANICAL ERROR occurs again, use the<br />
alternative therapy plan provided by your doctor or healthcare<br />
team. Contact your local pump support (details on inside back<br />
cover) for more assistance.<br />
jj Remove or disconnect the infusion set from your infusion site.<br />
jj Remove the cartridge, adapter, infusion set, and battery from<br />
your pump. Insert a new battery.<br />
jj Install a new cartridge and infusion set (See section<br />
2.7 Inserting the cartridge). Prime the infusion set<br />
(See section 2.8 Priming the infusion set).<br />
Error E7: ELECTRONIC ERROR<br />
An electronic Error has been discovered during a routine<br />
automatic system check and insulin delivery has stopped.<br />
Note<br />
You cannot turn off and confirm an Error E7: ELECTRONIC<br />
ERROR by pressing f. You must remove the battery<br />
instead.<br />
164
8<br />
jj Remove or disconnect the infusion set from your infusion site.<br />
jj<br />
Replace the battery in the pump (See section 2.2 Inserting the<br />
battery).<br />
jj Prime the infusion set.<br />
jj Reconnect the infusion set at your infusion site.<br />
jj Put your pump in RUN mode.<br />
After an Error E7: ELECTRONIC ERROR always check your<br />
settings like e.g. basal rate profile, time and date.<br />
If the Error E7: ELECTRONIC ERROR occurs again, contact your<br />
local pump support (details on inside back cover) for assistance.<br />
Use the alternative therapy plan provided by your doctor or<br />
healthcare team.<br />
Error E8: POWER INTERRUPT<br />
A power interrupt Error occurs when you insert a new battery<br />
without first placing the pump in STOP mode. See section<br />
2.2 Inserting the battery for instructions on how to change the<br />
battery. The Error can also occur if the pump has been dropped.<br />
In this case, see section 7.2.1 What to do if you drop your pump.<br />
jj<br />
Press f twice to snooze and to confirm the Error.<br />
jj Your pump goes into STOP mode.<br />
jj Check the time and date and correct them if they are wrong.<br />
See section 2.4 Setting the time and date.<br />
jj Put your pump in RUN mode. Program a new bolus and /or<br />
Temporary Basal Rate if necessary. See chapter 4 Boluses and<br />
Temporary Basal Rates.<br />
If an Error E8: POWER INTERRUPT occurs during programming,<br />
check your settings.<br />
165
Error E9: END OF OPERATION (loan pumps only)<br />
Your pump timer has reached zero. The pump changes to STOP<br />
mode and will no longer operate. An Error E9: END OF OPERA-<br />
TION appears on the display. Before this Error occurs, a Warning<br />
W9: LOANTIME WARNING will remind you to replace your pump<br />
soon. If necessary, use the alternative therapy plan provided by<br />
your doctor or healthcare team.<br />
jj<br />
Press f twice to snooze and to confirm the Error.<br />
Note The Warning W9: LOANTIME WARNING and the Error E9:<br />
END OF OPERATION are based on running time (the total<br />
time the pump is in RUN mode) and not on calendar<br />
years.<br />
Error E10: CARTRIDGE ERROR<br />
The CARTRIDGE CHANGE function was not correctly performed.<br />
jj<br />
Press f twice to snooze and to confirm the Error.<br />
jj Contact your local pump support (details on inside back cover)<br />
to discuss the options for further use of the <strong>Accu</strong>-<strong>Chek</strong> <strong>Spirit</strong><br />
<strong>Combo</strong> insulin pump.<br />
jj Remove or disconnect the infusion set from your infusion site.<br />
jj Remove the cartridge.<br />
jj<br />
Reinsert the cartridge. (See section 2.7 Inserting the cartridge)<br />
166
8<br />
jj Prime the infusion set.<br />
jj Reconnect the infusion set at your infusion site.<br />
jj Put your pump into RUN mode.<br />
jj If the Error E10: CARTRIDGE ERROR occurs during the<br />
rewinding of the piston rod, insert a new battery in the pump<br />
and repeat the procedure.<br />
Error E11: SET NOT PRIMED<br />
The cartridge has been changed but the infusion set has not<br />
been primed. The Error will be displayed when you try to put your<br />
pump in RUN mode.<br />
See sections 3.5 Changing the cartridge and infusion set and<br />
2.8 Priming the infusion set.<br />
w Warning<br />
Never prime an infusion set that is connected to your body.<br />
You risk uncontrolled insulin delivery into your body. Always<br />
follow the instructions provided with your infusion set.<br />
jj<br />
Press f twice to snooze and to confirm the Error.<br />
jj Remove or disconnect the infusion set from your infusion site.<br />
jj<br />
Prime the infusion set. (See section 2.8 Priming the infusion set)<br />
jj Reconnect the infusion set at your infusion site.<br />
jj Put your pump in RUN mode.<br />
167
Error E12: DATA INTERRUPTED<br />
jj<br />
Press f twice to snooze and to confirm the Error.<br />
c Caution<br />
If infrared data transfer between your pump and a compatible<br />
device is disrupted in any way, the configuration may be<br />
incomplete and the Error E12: DATA INTERRUPTED will occur.<br />
The data transfer must be successfully completed before you<br />
can put your <strong>Accu</strong>-<strong>Chek</strong> <strong>Spirit</strong> <strong>Combo</strong> insulin pump into RUN<br />
mode.<br />
Data transfer between your pump and the PC was interrupted<br />
before it was completed.<br />
jj Restart the data transfer.<br />
Before you can put your pump in RUN mode, the data transfer<br />
must have been successfully performed.<br />
See section 5.5 Transferring your data to a computer.<br />
168
8<br />
Error E13: LANGUAGE ERROR<br />
The language setting needs to be checked.<br />
jj<br />
Press f twice to snooze and to confirm the Error.<br />
jj<br />
Follow the steps in section 5.6 Pump settings to change the<br />
language.<br />
jj Put your pump in RUN mode.<br />
169
8.4 List of Reminders<br />
Reminder R1: Reminder<br />
A Reminder has been programmed on the pump.<br />
jj<br />
Press f twice to snooze and to confirm the Reminder.<br />
Reminder R2: LIFETIME<br />
The pump is coming to the end of its lifetime. Contact your local<br />
pump support (see inside back cover).<br />
jj<br />
Press f twice to snooze and to confirm the Reminder.<br />
jj If necessary, put your pump in RUN mode.<br />
jj Put your pump in RUN mode if necessary.<br />
Note<br />
If you have set the Reminder occurrence to EVERY DAY,<br />
the same Reminder occurs every 24 hours. Turn the<br />
Reminder function OFF if you do not want the alarm to go<br />
off again at that same time every day.<br />
See section 5.9 Setting a Reminder.<br />
170
9<br />
9 Troubleshooting<br />
This chapter describes problems that may occur when using<br />
your <strong>Accu</strong>-<strong>Chek</strong> <strong>Spirit</strong> <strong>Combo</strong> insulin pump. Any problems that<br />
generate a Warning or Error are described in chapter 8.<br />
Note<br />
The solutions provided in this chapter will normally enable<br />
you to resolve the problem and continue with your pump<br />
therapy. However, if the recommended action does not<br />
resolve the problem, or if you have any concerns, do not<br />
hesitate to contact your doctor or healthcare team.<br />
Note Troubleshooting information relating to the Bluetooth ®<br />
connection between the Meter and the <strong>Accu</strong>-<strong>Chek</strong> <strong>Spirit</strong><br />
<strong>Combo</strong> insulin pump is included in chapter 6 Using the<br />
<strong>Accu</strong>-<strong>Chek</strong> <strong>Spirit</strong> <strong>Combo</strong> insulin pump with the Meter.<br />
Also refer to the documentation (Owners booklet) coming<br />
with the Meter.<br />
Although your pump has an internal security check system, it<br />
cannot for example detect if your infusion set is leaking or if the<br />
insulin you are using has lost its efficacity. These problems can<br />
result in a rapid rise in your blood glucose level. Therefore, it is<br />
essential to check your pump and blood glucose level during the<br />
day.<br />
171
9.1 Therapy-related issues<br />
Many factors – such as alcohol consumption, medication, decreased activity, illness and stress – can affect your blood glucose level.<br />
Contact your doctor or healthcare team for advice on how to manage these, or any other, therapy-related issues.<br />
Problem<br />
Individual characters, numbers, or symbols on the display<br />
are shown incompletely or not at all.<br />
Your <strong>Accu</strong>-<strong>Chek</strong> <strong>Spirit</strong> <strong>Combo</strong> insulin pump does not beep<br />
or vibrate.<br />
The self-test is not completed correctly (after an Error E7:<br />
ELECTRONIC ERROR).<br />
Insulin delivery is incorrect due to inaccurate time setting.<br />
Insulin delivery is incorrect due to incorrect basal rate<br />
programming.<br />
Recommended Action<br />
Contact your local pump support (details on inside back cover).<br />
Check that the beep volume and alarm signals are turned on. Check the<br />
battery and change it if necessary. If the pump still does not beep or<br />
vibrate, contact your local pump support (details on inside back cover).<br />
Remove the battery, wait a few seconds, and insert it again. If the<br />
self-test is still not completed correctly, contact your local pump<br />
support (details on inside back cover).<br />
If the time setting is inaccurate, the correct hourly basal rate cannot be<br />
delivered. Check and reset the time if necessary. Perform the same<br />
check whenever you change the battery.<br />
Review any changes that you have made to your basal rate programming,<br />
to ensure that you are using the correct basal rate profile.<br />
172
9<br />
Problem<br />
There are air bubbles in the cartridge and /or infusion set.<br />
Recommended Action<br />
Check your blood glucose level.<br />
In the cartridge: Disconnect the infusion set from the headset and<br />
re-prime the infusion set. If the air bubbles remain, replace the<br />
cartridge. Always fill the cartridge with insulin that is at room temperature.<br />
In the infusion set: Disconnect from the headset and prime your infusion<br />
set. Reconnect the headset and ensure that all connections are tight and<br />
secure.<br />
The cartridge is empty.<br />
Replace the cartridge. (Cartridges are for single use only.)<br />
The infusion set is disconnected or dislodged.<br />
Check your blood glucose level. Make sure that all the connections are<br />
tight. Inspect the connections for leaking insulin. Change your infusion<br />
set and infusion site.<br />
173
Problem<br />
There is a leak in the system.<br />
There is an occlusion (blockage) in the system.<br />
Priming was not completed (E11 or air bubbles in infusion<br />
set).<br />
Recommended Action<br />
Check your blood glucose level. Check for leaking insulin at all the<br />
connection points and on the skin. Change the infusion set, the infusion<br />
site, the cartridge and the adapter.<br />
Check your blood glucose level. Follow the instructions in chapter<br />
8 Error E4: OCCLUSION.<br />
Re-prime the infusion set. Always prime until a bubble-free insulin flow<br />
emerges from the tip of the needle. Ensure that the tubing is free of air.<br />
174
Appendix A: Technical Data<br />
A<br />
General Technical Data<br />
Maximum dimensions<br />
(without adapter)<br />
Weight<br />
Pump casing<br />
Approx. 82.5 × 56 × 21 mm<br />
(3.2 × 2.2 × 0.8 inches)<br />
jj an empty insulin pump: approx. 80 g (2.8 ounces)<br />
jj insulin pump inclusive battery, full plastic cartridge and infusion set:<br />
approx. 110 g (3.9 ounces)<br />
Shock- and scratch-resistant plastic, resistant to pharmaceuticals, all edges rounded<br />
Temperature ranges*<br />
Air humidity<br />
During operation: +5 to +40 °C (+41 to +104 °F)<br />
Storage in its shipping case: +5 to +45 °C (+41 to +113 °F)<br />
During Transport: –20 to 50 °C (–4 to +122 °F)<br />
During operation: 20 to 90 % relative humidity<br />
Storage in its shipping case: 5 to 85 % relative humidity<br />
During Transport: 5 to 95 % relative humidity<br />
175
General Technical Data<br />
Barometric pressure<br />
During operation or storage in its shipping case: 70 to 106 kPA (700 to 1060 mbar) (do not<br />
exceed 3000 meters [10 000 feet] above sea level)<br />
During Transport: 50 to 106 kPA (500 to 1060 mbar)<br />
Power supply<br />
One 1.5 volt AA Alkaline (LR6) or Lithium (FR6) battery or one 1.2 volt rechargeable NiMH<br />
AA (HR6) battery. Batteries should have a minimum capacity of 2500 mAh. Use only a<br />
battery charger officially recommended by the battery manufacturer.<br />
Lifetime of battery If used in a typical usage pattern (50 U / day using U100 insulin; operating temperature 23 °C<br />
±2 °C [73 °F ±4 °F]) the battery life is approximately:<br />
Alkaline: 30 days for Bluetooth ® off; 15 days for Bluetooth ® on<br />
Lithium: 50 days for Bluetooth ® off; 25 days for Bluetooth ® on<br />
NiMH: 20 days for Bluetooth ® off; 10 days for Bluetooth ® on<br />
Data storage time<br />
The time and date are safely stored in the memory for about 1 hour after the battery has<br />
been removed. Other insulin pump settings (the hourly basal rates, remaining cartridge<br />
content, bolus increments and active user menu) and the event memory (bolus history,<br />
history of daily insulin totals, Temporary Basal Rate history, alarm history) are saved,<br />
regardless of battery voltage and the time your insulin pump has been without a battery.<br />
176
A<br />
General Technical Data<br />
Delivery<br />
1 / 20 of the current hourly basal rate in 3 minute intervals.<br />
Basal rate Min. 0.05 U / h, max. 50 U / h. There are 24 hourly basal rates adjustable in 0.01<br />
(up to 1.00 U / h, 0.05 (up to 10.0 U / h) and 0.1 (up to 50.0 U / h) unit increments.<br />
Bolus<br />
Temporary Basal Rate<br />
The max. bolus amount per delivery is 50 insulin units. The bolus amount for the Quick<br />
Bolus is adjustable in increments of 0.1, 0.2, 0.5, 1.0 and 2.0 units. For the Standard Bolus,<br />
Extended Bolus and Multiwave Bolus, the amount is adjustable in fixed increments of<br />
0.1 units. The duration of the Extended Bolus and the Multiwave Bolus is adjustable in<br />
intervals of 15 minutes (15 minutes up to 12 hours).<br />
Adjustable in 10 % increments, 0 – 90 % for decreases, 110 – 500 % for increases. The<br />
duration is adjustable in 15 minute intervals, up to a maximum of 12 hours. The last<br />
programmed duration is given by default for the next Temporary Basal Rate change<br />
programmed.<br />
177
General Technical Data<br />
Maximum time for an Error<br />
E4: OCCLUSION**<br />
Maximum volume before Error<br />
E4: OCCLUSION**<br />
Maximum pressure<br />
Flow (delivery rate)<br />
Plastic cartridges:<br />
jj at medium basal rate 1.0 U / h: ≤ 2 h<br />
jj at minimum basal rate 0.05 U / h: ≤ 24 h<br />
Aventis Insuman Infusat glass cartridges***:<br />
jj at medium basal rate 1.0 U / h: ≤ 8 h<br />
jj at minimum basal rate 0.05 U / h: ≤ 120 h<br />
Plastic cartridges: ≤ 1.5 U.<br />
Aventis Insuman Infusat glass cartridges***: ≤ 5.0 U<br />
400 kPa (4.0 bar), for plastic and Aventis Insuman Infusat glass cartridges***and infusion<br />
sets.<br />
During infusion set priming and bolus 0.2 U / sec.<br />
Maximum quantity delivered at<br />
a single fault condition<br />
Cartridge<br />
≤ 1.0 U<br />
<strong>Accu</strong>-<strong>Chek</strong> <strong>Spirit</strong> 3.15 ml Cartridge System and <strong>Accu</strong>-<strong>Chek</strong> 3.15 ml Plastic Cartridge with a<br />
luer connection. Aventis Insuman Infusat cartridges*** have been evaluated and approved<br />
for use with the <strong>Accu</strong>-<strong>Chek</strong> <strong>Spirit</strong> <strong>Combo</strong> insulin pump.<br />
178
A<br />
General Technical Data<br />
Infusion sets<br />
Data transfer<br />
<strong>Accu</strong>-<strong>Chek</strong> infusion sets with a luer-lock connector.<br />
<strong>Accu</strong>-<strong>Chek</strong> Infusion sets are PCV and latex free.<br />
Infrared interface<br />
Safety system<br />
IPX8<br />
Alert system, beeps, information on the display, vibrations, dual microprocessors. Your<br />
insulin pump is controlled by two microprocessors. The safety concept is based on one<br />
processor (supervisor processor) supervising the other (main processor). Whenever a defect<br />
or fault occurs in the main processor, it is identified by the supervisor processor. The motor<br />
is immediately switched off and an Error E7: ELECTRONIC ERROR occurs. Conversely, the<br />
main processor can also determine at any time whether the supervisor is working correctly.<br />
The motor also constitutes an important safety component, as the combination of the main<br />
and supervisor processor and brushless motor provides the best possible reliability and<br />
accuracy in insulin delivery.<br />
Protected against the effects of temporary immersion in water under standardized conditions<br />
(up to 60 minutes and 2.5 meters [8 feet]).<br />
* See the instructions for use of the insulin you are using for information on the acceptable temperature range for storage and handling.<br />
** Determined using measurement methods according to IEC 60601-2-24-1998.<br />
*** Insuman ® Infusat produced by Aventis Pharma Deutschland GmbH is a registered trademark of the sanofi-aventis group.<br />
179
Technical standards<br />
Table 201: Electromagnetic emission<br />
Guidance and manufacturer’s declaration – electromagnetic emissions<br />
The <strong>Accu</strong>-<strong>Chek</strong> <strong>Spirit</strong> <strong>Combo</strong> is intended for use in the electromagnetic environment specified below. The customer or the user of the<br />
<strong>Accu</strong>-<strong>Chek</strong> <strong>Spirit</strong> <strong>Combo</strong> should ensure that it is used in such an environment.<br />
Emission test Compliance Electromagnetic environment – guidance<br />
RF emissions<br />
CISPR 11<br />
RF emissions<br />
CISPR 11<br />
Harmonic emissions<br />
IEC 61000-3-2<br />
Voltage fluctuations / flicker<br />
emissions<br />
IEC 61000-3-3<br />
Group 2<br />
Class B<br />
Not applicable –<br />
Not applicable –<br />
The <strong>Accu</strong>-<strong>Chek</strong> <strong>Spirit</strong> <strong>Combo</strong> must emit electromagnetic energy in<br />
order to perform its intended function. Nearby electronic equipment<br />
may be affected.<br />
The <strong>Accu</strong>-<strong>Chek</strong> <strong>Spirit</strong> <strong>Combo</strong> is suitable for use in all establishments,<br />
including domestic establishments and those directly<br />
connected to the public low-voltage power supply network that<br />
supplies buildings used for domestic purposes.<br />
180
A<br />
Table 202: Electrostatic discharge (ESD) and power frequency magnetic fields (all devices)<br />
Guidance and manufacturer’s declaration – electromagnetic immunity<br />
The <strong>Accu</strong>-<strong>Chek</strong> <strong>Spirit</strong> <strong>Combo</strong> is intended for use in the electromagnetic environment specified below. The customer or the user of<br />
<strong>Accu</strong>-<strong>Chek</strong> <strong>Spirit</strong> <strong>Combo</strong> should assure that it is used in such an environment.<br />
Immunity test standard IEC 60601 test level * Compliance level Electromagnetic environment – guidance<br />
Electrostatic<br />
discharge (ESD)<br />
IEC 61000-4-2<br />
± 8 kV contact<br />
± 15 kV air<br />
± 8 kV contact<br />
± 15 kV air<br />
Floors should be wood, concrete or ceramic tile. If floors<br />
are covered with synthetic material, the relative humidity<br />
should be at least 30 %.<br />
Electrical fast<br />
transient / burst<br />
IEC 61000-4-4<br />
± 2 kV for power<br />
supply lines<br />
Not applicable<br />
Surge<br />
IEC 61000-4-5<br />
± 1 kV line to line<br />
± 2 kV line to earth<br />
Not applicable<br />
181
Immunity test standard IEC 60601 test level * Compliance level Electromagnetic environment – guidance<br />
Voltage dips, short<br />
interruptions and voltage<br />
variations on power<br />
supply lines<br />
IEC 61000-4-11<br />
< 5 % UT (0,5 cycle)<br />
40 % UT (5 cycles)<br />
70 % UT (25 cycles)<br />
< 5 % UT for 5s<br />
Not applicable<br />
Note<br />
UT is the A.C. mains voltage prior to application of the test level.<br />
Immunity test standard IEC 60601 test level * Compliance level Electromagnetic environment – guidance<br />
Power frequency<br />
(50 / 60 Hz)<br />
magnetic field<br />
IEC 61000-4-8<br />
400 A / m 400 A / m Power frequency magnetic fields should be at levels<br />
characteristic of a typical location in a typical commercial<br />
or hospital environment.<br />
* Test levels acc. to IEC / EN 60601-2-24<br />
182
A<br />
Table 203: Immunity electromagnetic fields (life-supporting devices)<br />
Guidance and manufacturer’s declaration – electromagnetic immunity<br />
The <strong>Accu</strong>-<strong>Chek</strong> <strong>Spirit</strong> <strong>Combo</strong> is intended for use in the electromagnetic environment specified below. The customer or the user of the<br />
<strong>Accu</strong>-<strong>Chek</strong> <strong>Spirit</strong> <strong>Combo</strong> should assure that it is used in such an environment.<br />
Electromagnetic environment – guidance<br />
Portable and mobile RF communications equipment should be used no closer to any part of the <strong>Accu</strong>-<strong>Chek</strong> <strong>Spirit</strong> <strong>Combo</strong>, including<br />
cables, than the recommended separation distance calculated from the equation applicable to the frequency of the transmitter.<br />
Immunity test standard IEC 60601 test level Compliance level Recommended separation distance c)<br />
Conducted RF<br />
IEC 61000-4-6<br />
Radiated RF<br />
IEC 61000-4-3<br />
Radiated RF<br />
IEC 61000-4-3<br />
3 Vrms<br />
150 kHz to 80 MHz<br />
10 V / m<br />
80 MHz to 800 MHz<br />
10 V / m<br />
800 MHz to 2,5 GHz<br />
V1 = 10 Vrms<br />
150 kHz to 80 MHz d = 1.2 P 150 kHz to 80 MHz<br />
E1 = 10 V / m<br />
80 MHz to 800 MHz d = 1.2 P 80 MHz to 800 MHz<br />
d)<br />
E2a = 2 V / m for<br />
2.3 GHz to 2.5 GHz<br />
e)<br />
E2b = 10 V / m for<br />
800 MHz to 2.3 GHz<br />
and 2.5 to 2.7<br />
da = 11.7 P<br />
db = 2.3 P<br />
2.3 GHz to 2.5 GHz<br />
800 MHz to 2.3 GHz and<br />
2.5 GHz to 2.7 GHz<br />
183
Guidance and manufacturer’s declaration – electromagnetic immunity<br />
Where P is the maximum output power rating of the transmitter in watts (W) according to the transmitter manufacturer and d is the<br />
recommended separation distance in metres (m).<br />
Field strengths from fixed RF transmitters. as determined by an electromagnetic site survey, a) should be less than the compliance<br />
level in each frequency range. b)<br />
Interference may occur in the vicinity of equipment marked with the following symbol:<br />
Note<br />
Note<br />
At 80 MHz and 800 MHz, the higher frequency range applies.<br />
These guidelines may not apply in all situations. Electromagnetic propagation is affected by absorption and reflection from<br />
structures, objects and people.<br />
a )<br />
Field strengths from fixed transmitters, such as base stations for radio (cellular / cordless) telephones and land mobile radios, amateur radio, AM and FM radio<br />
broadcast and TV broadcast cannot be predicted theoretically with accuracy. To assess the electromagnetic environment due to fixed RF transmitters, an<br />
electromagnetic site survey should be considered. If the measured field strength in the location in which the <strong>Accu</strong>-<strong>Chek</strong> <strong>Spirit</strong> <strong>Combo</strong> is used exceeds the<br />
applicable RF compliance level above, the <strong>Accu</strong>-<strong>Chek</strong> <strong>Spirit</strong> <strong>Combo</strong> or the device, which contains it should be observed to verify normal operation. If abnormal<br />
performance is observed, additional measures may be necessary, such as re-orienting or relocating the device containing the <strong>Accu</strong>-<strong>Chek</strong> <strong>Spirit</strong> <strong>Combo</strong>.<br />
b ) Over the frequency range 150 kHz to 80 MHz, field strengths should be less than 10 V / m.<br />
c )<br />
d )<br />
e )<br />
Possible shorter distances outside ISM bands are not considered to have a better applicability of this table.<br />
Exclusion band for Bluetooth ® ISM 2.4 GHz communication channel<br />
Compliance band for the system equipment<br />
184
A<br />
Table 205: Recommended separation distances (life-supporting devices)<br />
Recommended separation distances between portable and mobile RF communications equipment and the<br />
<strong>Accu</strong>-<strong>Chek</strong> <strong>Spirit</strong> <strong>Combo</strong>.<br />
The <strong>Accu</strong>-<strong>Chek</strong> <strong>Spirit</strong> <strong>Combo</strong> is intended for use in the electromagnetic environment in which radiated RF disturbances are controlled.<br />
The customer or the user of the <strong>Accu</strong>-<strong>Chek</strong> <strong>Spirit</strong> <strong>Combo</strong> can help prevent electromagnetic interference by maintaining a minimum<br />
distance between portable and mobile RF communications equipment (transmitters) and the <strong>Accu</strong>-<strong>Chek</strong> <strong>Spirit</strong> <strong>Combo</strong> as recommended<br />
below, according to the maximum output power of the communication equipment.<br />
Rated maximum output<br />
power of transmitter<br />
(W)<br />
Separation distance according to frequency of transmitter (m)<br />
150 kHz to 80 MHz<br />
d = 1.2 P<br />
80 MHz to 800 MHz<br />
d = 1.2 P<br />
800 MHz to 2.3 GHz<br />
db = 2.3 P<br />
0.01 12 cm 12 cm 23 cm 118 cm<br />
0.1 38 cm 38 cm 73 cm 373 cm<br />
1 1.2 m 1.2 m 2.3 m 11.8 m<br />
10 3.8 m 3.8 m 7.3 m 37.3 m<br />
100 12 m 12 m 23 m 118 m<br />
2.3 GHz to 2.5 GHz<br />
da = 11.7 P<br />
For transmitters rated at a maximum output power not listed above, the recommended separation distance d in metres (m) can be estimated using the equation<br />
applicable to the frequency of the transmitter, where P is the maximum output power rating of the transmitter in watts (W) according to the transmitter manufacturer.<br />
185
Note<br />
Note<br />
Note<br />
At 80 MHz and 800 MHz, the separation distance for the<br />
higher frequency range applies.<br />
These guidelines may not apply in all situations. Electromagnetic<br />
propagation is affected by absorption and<br />
reflection from structures, objects and people.<br />
An additional factor of 10 / 3 is used in calculating the<br />
recommended separation distance to decrease the<br />
likelihood that mobile / portable communications equipment<br />
could cause interference if it is inadvertenly<br />
brought into the vicinity of the user.<br />
186
A<br />
<strong>Accu</strong>racy of flow rate for both<br />
<strong>Accu</strong>-<strong>Chek</strong> 3.15 ml Plastic Cartridges<br />
and <strong>Accu</strong>-<strong>Chek</strong> <strong>Spirit</strong> 3.15 ml Cartridge<br />
System<br />
Trumpet curve plotted from data after the end of the<br />
stabilization period<br />
The trumpet curve shows the accuracy of the delivery rate in<br />
relation to the observation period.<br />
20<br />
minimum measured variation<br />
maximum measured variation<br />
overall percentage Error<br />
15<br />
percentage Error of flow (%)<br />
10<br />
5<br />
0<br />
–5<br />
–10<br />
3.81<br />
0.82 0.22<br />
–0.18<br />
A= –1.38<br />
–3.17 –2.58 –2.18<br />
–8.17<br />
–0.81<br />
–1.97<br />
1.02<br />
1.79<br />
–15<br />
–20<br />
0 60 120 180 240 300 360 420 480 840 600 660 720 780 840 900 960<br />
observation window duration (min)<br />
The maximum deviation of the delivered amount (overall mean<br />
percentage flow Error) for U100 insulin is ≤ ± 5 %*. * The measurements were made at a medium basal rate of 1.0 U / h<br />
according to IEC 60601-2-24:1998 with an <strong>Accu</strong>-<strong>Chek</strong> FlexLink infusion set<br />
PC 16 / 110 at room temperature.<br />
187
Start-up graph over the stabilization period<br />
The start-up graph shows changes in the flow rate over the<br />
stabilization time.<br />
0.012<br />
real flow<br />
target flow<br />
0.010<br />
flow rate (ml / h)<br />
0.008<br />
0.006<br />
0.004<br />
0.002<br />
0.01 ml is equivalent<br />
to 1IU (U100 insulin)<br />
0.000<br />
0 120 240 360 480 600 720 840 960 1080 1200 1320 1440<br />
time (min)<br />
188<br />
Influence of height on delivery accuracy<br />
The maximum deviation of the delivered amount (overall mean<br />
percentage flow Error) for U100 insulin is ≤ ± 10 %* where your<br />
<strong>Accu</strong>-<strong>Chek</strong> <strong>Spirit</strong> <strong>Combo</strong> insulin pump is located ≤ 1 m (3.3 feet)<br />
above / below the infusion site.<br />
Bolus<br />
For U100 insulin the maximum deviation of a maximum bolus is<br />
≤ ± 5 % and the maximum deviation of a minimum bolus is<br />
≤ ± 30 %**.<br />
* The measurements were made at a medium basal rate of 1.0 U / h<br />
according to IEC 60601-2-24:1998 with an <strong>Accu</strong>-<strong>Chek</strong> FlexLink infusion set<br />
PC 16 / 110 at room temperature.<br />
** The measurements were made according to IEC 60601-2-24:1998 with a<br />
<strong>Accu</strong>-<strong>Chek</strong> FlexLink infusion set PC 16 / 110 at room temperature.
Appendix B: Configuration parameters<br />
B<br />
Basal rate<br />
Hourly basal rate + max. TBR<br />
(hourly basal rate combined with temporary<br />
basal rate, max. increase)<br />
Hourly basal rates increment<br />
Typical range available on<br />
the pump and standard<br />
parameter settings*<br />
Maximum parameter<br />
range adjustable with the<br />
<strong>Accu</strong>-<strong>Chek</strong> PC Configuration<br />
Software<br />
62.5 U / h max. amount: 0 – 250.0 U / h<br />
0.01 (up to 1.00 U / h),<br />
0.05 (up to 10.0 U / h) and<br />
0.1 (up to 50.0 U / h) 0.0, 0.05 U / h– 50.0 U / h<br />
Hourly basal rates 25.0 U / h max. amount: 0 – 50.0 U / h<br />
Temporary Basal Rate<br />
TBR increases or decrease in increments of<br />
TBR duration<br />
TBR duration increments<br />
Basal rate profiles available<br />
Basal rate lock<br />
0 – 250 %<br />
10 %<br />
max. 24 h<br />
15 min<br />
5<br />
off<br />
0 – 500 %<br />
10 %<br />
15 min – 50 h<br />
15 min, 30 min, 1 h<br />
1 – 5<br />
on or off<br />
* Note: These factory settings may vary in some countries and depend on the<br />
changes you, your doctor or healthcare team make using your insulin pump or<br />
pump programming software for healthcare professionals.<br />
189
Typical range available on<br />
the pump and standard<br />
parameter settings*<br />
Maximum parameter<br />
range adjustable with the<br />
<strong>Accu</strong>-<strong>Chek</strong> PC Configuration<br />
Software<br />
Bolus<br />
Bolus amount per bolus delivery 25.0 U max. amount: 0 – 50.0 U<br />
bolus amount increments for Quick Bolus<br />
bolus amount increments for Standard Bolus<br />
bolus duration (Extended Bolus, Multiwave Bolus)<br />
bolus duration increments<br />
0.5 U<br />
0.1 U<br />
max. 12 h<br />
15 min<br />
0.1, 0.2, 0.5, 1.0 or 2.0 U<br />
15 min – 50 h<br />
15 min, 30 min, 1 h<br />
Prime volume 25.0 U max. amount: 0 – 50.0 U<br />
Display orientation<br />
Display contrast<br />
User menus<br />
Volumes (for beeps)<br />
Alarm signals turned on<br />
standard or inverted<br />
7 steps<br />
3 (STANDARD, ADVANCED or<br />
CUSTOM)<br />
off, 4 steps<br />
beeps, vibrations or both<br />
190
B<br />
Battery type<br />
Keylock<br />
Typical range available on<br />
the pump and standard<br />
parameter settings*<br />
AA (LR6) ALKALINE, AA (FR6)<br />
LITHIUM or AA (HR6) NiMH<br />
rechargeable battery<br />
turned on or off<br />
Automatic off turned on (1 – 24 h) or off (0 h)<br />
Reminder<br />
Time format<br />
Date format<br />
Bluetooth<br />
turned on or off<br />
when on: once or every day’s<br />
occurrence<br />
European (24 h) or<br />
American (12 h, am / pm)<br />
European (dd.mm.yy) or<br />
American (mm / dd / yy)<br />
on or off<br />
Maximum parameter<br />
range adjustable with the<br />
<strong>Accu</strong>-<strong>Chek</strong> PC Configuration<br />
Software<br />
* Note: These factory settings may vary in some countries and depend on the<br />
changes you, your doctor or healthcare team make using your insulin pump or<br />
pump programming software for healthcare professionals.<br />
191
Appendix C: Sterile products and accessories<br />
Cartridges<br />
<strong>Accu</strong>-<strong>Chek</strong> infusion sets<br />
Name<br />
<strong>Accu</strong>-<strong>Chek</strong> <strong>Spirit</strong> 3.15 ml<br />
Cartridge System<br />
<strong>Accu</strong>-<strong>Chek</strong> 3.15 ml Plastic<br />
Cartridge<br />
Aventis Insuman Infusat<br />
Prefilled 3.15 ml Glass<br />
Cartridges* (U100)<br />
Comments<br />
Plastic cartridges are single-use<br />
items only. Do not re-use cart ridges.<br />
Refer to the instructions for use<br />
of the insulin you are using for<br />
information on the acceptable<br />
temperature range for storage and<br />
handling.<br />
* Insuman ® Infusat produced by Aventis Pharma Deutschland GmbH, a member<br />
and brand of the sanofi-aventis group.<br />
Name<br />
<strong>Accu</strong>-<strong>Chek</strong> RapidLink<br />
<strong>Accu</strong>-<strong>Chek</strong> TenderLink<br />
<strong>Accu</strong>-<strong>Chek</strong> FlexLink<br />
<strong>Accu</strong>-<strong>Chek</strong> Rapid-D Link<br />
Comments<br />
All <strong>Accu</strong>-<strong>Chek</strong> infusion sets are<br />
available in various tubing and<br />
needle lengths. Discuss with your<br />
doctor and /or healthcare team to<br />
find the infusion set that fits you<br />
best.<br />
For recommendations on how long<br />
you may use the same infusion set<br />
see the information material<br />
provided with this product.<br />
192
C<br />
Accessories<br />
Name<br />
Comments<br />
Name<br />
Comments<br />
Adapter<br />
Batteries<br />
One 1.5 volt AA (LR6)<br />
Alkaline or AA (FR6)<br />
Lithium battery with a<br />
minimum capacity of<br />
2500 mAh.<br />
Rechargeable Batteries<br />
One 1.2 volt AA (HR6)<br />
NiMH rechergeable battery<br />
with a minimum capacity<br />
of 2500 mAh.<br />
Replace your adapter every<br />
two months.<br />
For battery lifetime see p. 176<br />
Lifetime of battery<br />
For battery lifetime see p. 176<br />
Lifetime of battery<br />
Rechargeable batteries are not<br />
provided by Roche Diagnostics.<br />
Use only a battery charger<br />
officially recommended by the<br />
battery manufacturer.<br />
Carrying Systems<br />
<strong>Accu</strong>-<strong>Chek</strong> PC<br />
Configuration Software<br />
Quick Reference Guide<br />
Roche Diagnostics offers a wide<br />
range of carrying system solutions<br />
to best fit your lifestyle.<br />
Check with your local pump<br />
support for the availability of<br />
appropriate pump programming<br />
software.<br />
This is a convenient pocket size<br />
reference that you may take with<br />
you to assist with your insulin<br />
pump questions.<br />
Battery Cover<br />
Replace your battery cover<br />
every two months.<br />
193
Appendix D: Abbreviations<br />
Abbreviation<br />
Meaning<br />
Abbreviation<br />
Meaning<br />
approx.<br />
BR<br />
BRP<br />
h<br />
IEC<br />
incl.<br />
IR<br />
Approximately<br />
Basal Rate<br />
Basal rate profile<br />
Hour (s)<br />
International Electrotechnical Commission<br />
Inclusive or including<br />
Infrared<br />
NiMH<br />
rel.<br />
sec.<br />
TBR<br />
U<br />
U / h<br />
Nickel Metal Hydrid (used with rechargeable<br />
batteries)<br />
Relative<br />
Seconds<br />
Temporary Basal Rate<br />
See I.U.<br />
Amount of International Units of insulin<br />
delivered per hour<br />
I.U., U<br />
kPa<br />
LCD<br />
LED<br />
International Units in context with biological<br />
effectiveness of certain insulin amount<br />
Kilo pascals<br />
Liquid Crystal Display<br />
Light Emitting Diode for infrared communication<br />
with e.g. a PC<br />
U100<br />
dd.mm.yy<br />
mm.dd.yy<br />
This is the insulin concentration. Each<br />
millilitre of liquid contains 100 International<br />
Units of insulin<br />
European date format:<br />
day.month.year<br />
American date format:<br />
month.day.year<br />
194
Appendix E: Beeps and melodies<br />
E<br />
Acoustic Signals<br />
All of the functions of the <strong>Accu</strong>-<strong>Chek</strong> <strong>Spirit</strong> <strong>Combo</strong> insulin pump<br />
are supported by acoustic signals. The acoustic signals are<br />
beeps.<br />
Sound<br />
Function<br />
Duration for very short sound = 31.25 ms ±20 %<br />
Duration for short sound = 62.5 ms ±20 %<br />
Duration for medium sound = 93.75 ms ±20 %<br />
Duration for long sound = 125.0 ms ±20 %<br />
Duration for short pause = 125.0 ms ±20 %<br />
Duration for medium pause = 218.75 ms ±20 %<br />
Duration for long pause = 500.0 ms ±20 %<br />
UP KEY<br />
Frequency: 3131 Hz ±5 %<br />
Duration: Short sound<br />
Sound<br />
Function<br />
DOWN KEY<br />
Frequency: 2486 Hz ±5 %<br />
Duration: Short sound<br />
MENU KEY<br />
Frequency: 2820 Hz ±5 %<br />
Duration: Short sound<br />
NAVIGATION BACKWARDS<br />
(MENU + UP KEY)<br />
Frequency: 2763 Hz ±5 %<br />
Duration: Short sound<br />
EXECUTE FUNCTION (CHECK KEY)<br />
Frequency: 2090 Hz ±5 %, 2486 Hz ±5 %<br />
Duration: 2 × short sound<br />
CANCEL FUNCTION<br />
Frequency: 2486 Hz ±5 %, 2090 Hz ±5 %<br />
Duration: 2 × short sound<br />
195
Sound<br />
Function<br />
Sound<br />
Function<br />
BASE STATE RUN (KEYS UNLOCKED)<br />
Frequency: 2789 Hz ±5 %<br />
Duration: Short sound, short pause,<br />
short sound, short pause,<br />
short sound<br />
BASE STATE RUN (KEYS LOCKED)<br />
Frequency: 2763 Hz ±5 %<br />
Duration: Short sound, short pause,<br />
short sound, short pause,<br />
short sound<br />
BASE STATE STOP (KEYS UNLOCKED)<br />
Frequency: 2789 Hz ±5 %<br />
Duration: Long sound, short pause,<br />
long sound, short pause,<br />
long sound<br />
BASE STATE STOP (KEYS LOCKED)<br />
Frequency: 2763 Hz ±5 %<br />
Duration: Long sound, short pause,<br />
long sound, short pause,<br />
long sound<br />
+<br />
+<br />
CARTRIDGE CONTENT
E<br />
Sound<br />
Function<br />
Sound<br />
Function<br />
+<br />
+<br />
50 U < CARTRIDGE CONTENT
Sound<br />
Function<br />
Sound<br />
Function<br />
Reminder (REPEATING SEQUENCE)<br />
Frequency: f1 = 1043 Hz ±5 %,<br />
f2 = 1850 Hz ±5 %<br />
Duration: f1 medium sound, short<br />
pause, f2 medium sound,<br />
short pause, f1 medium<br />
sound, medium pause,<br />
f2 medium sound<br />
Repeating<br />
Interval: 3000.0 ms ±20 %<br />
WARNING (REPEATING SEQUENCE)<br />
Frequency: f1 = 1043 Hz ±5 %,<br />
f2 = 1850 Hz ±5 %<br />
Duration: f1 medium sound, short<br />
pause, f2 medium sound,<br />
short pause, f1 medium<br />
sound, medium pause,<br />
f2 medium sound, short<br />
pause, f2 medium sound<br />
Repeating<br />
Interval: 3000.0 ms ±20 %<br />
ERROR (REPEATING SEQUENCE)<br />
Frequency: f1 = 1043 Hz ±5 %,<br />
f2 = 1850 Hz ±5 %<br />
Duration: f1 medium sound, short<br />
pause, f2 medium sound,<br />
short pause, f1 medium<br />
sound, medium pause,<br />
f2 medium sound, short<br />
pause, f2 medium sound,<br />
short pause, f2 medium sound<br />
Repeating<br />
Interval: 3000.0 ms ±20 %<br />
UPPER LIMIT REACHED<br />
Frequency: 2486 Hz ±5 %, 3131 Hz ±5 %,<br />
2486 Hz ±5 %, 3131 Hz ±5 %<br />
Duration: 4 × short sound<br />
LOWER LIMIT REACHED<br />
Frequency: 2090 Hz ±5 %, 2486 Hz ±5 %,<br />
2090 Hz ±5 %, 2486 Hz ±5 %<br />
Duration: 4 × short sound<br />
198
E<br />
Sound<br />
Function<br />
Sound<br />
Function<br />
+<br />
+<br />
+<br />
+<br />
CONFIRMATION KEY PRESSED<br />
Frequency: 2789 Hz ±5 %<br />
Duration: Short sound<br />
CHANGED TO BASE STATE RUN BY CHECK<br />
KEY (KEYS UNLOCKED)<br />
Sequence: A12, long pause, A14<br />
CHANGED TO BASE STATE RUN BY CHECK<br />
KEY (KEYS LOCKED)<br />
Sequence: A12, long pause, A15<br />
CHANGED TO BASE STATE STOP BY CHECK<br />
KEY (KEYS UNLOCKED)<br />
Sequence: A12, long pause, A16<br />
CHANGED TO BASE STATE STOP BY CHECK<br />
KEY (KEYS LOCKED)<br />
Sequence: A12, long pause, A17<br />
INITIAL POINT (SUBMENU, VALUE)<br />
Frequency: 2820 Hz ±5 %<br />
Duration: Short sound, short pause,<br />
short sound<br />
SUPERVISOR SEQUENCE (GENERATED BY<br />
SUPERVISOR)<br />
Frequency: 2630 Hz ±10 %, 95 ms ±10 %<br />
Pause: 95 ms ±10 %<br />
Frequency: 2630 Hz ±10 %, 95 ms ±10 %<br />
Pause: 95 ms ±10 %<br />
Frequency: 2630 Hz ±10 %, 95 ms ±10 %<br />
Pause: 200 ms ±10 %<br />
Frequency: 2630 Hz ±10 %, 95 ms ±10 %<br />
Pause: 95 ms ±10 %<br />
Frequency: 2630 Hz ±10 %, 95 ms ±10 %<br />
+<br />
CHANGED TO BASE STATE STOP BY<br />
CANCELLATION OF FUNCTION<br />
Sequence: A13, long pause, A16<br />
199
Tactile Signals<br />
Dedicated functions of the <strong>Accu</strong>-<strong>Chek</strong> <strong>Spirit</strong> <strong>Combo</strong> insulin pump<br />
are supported by tactile signals additionally. The tactile signals<br />
are vibrations which are generated by a vibra motor.<br />
Signal<br />
Function<br />
Signal<br />
Function<br />
SHORT VIBRATION<br />
Duration short vibration =<br />
109.375 ms ±5 %<br />
MEDIUM VIBRATION<br />
Duration medium vibration =<br />
203.125 ms ±5 %<br />
LONG VIBRATION<br />
Duration long vibration = 281.25 ms ±5 %<br />
WARNING AND Reminder<br />
(REPEATING SEQUENCE)<br />
Duration vibration = 1062.5 ms ±5 %<br />
Duration pause = 2125.0 ms ±5 %<br />
(Repeating interval = 3187.5 ms ±5 %)<br />
ERROR (REPEATING SEQUENCE)<br />
Duration vibration = 531.25 ms ±5 %<br />
Duration pause = 1062.5 ms ±5 %<br />
(Repeating interval = 1593.75 ms ±5 %)<br />
200
Appendix F: Symbols<br />
F<br />
Display Symbols<br />
Icon<br />
Meaning<br />
Icon<br />
Meaning<br />
Basal Lock OFF<br />
Bluetooth ® ON<br />
Basal Lock ON<br />
Bluetooth ® Settings<br />
Basal Rate<br />
Bluetooth ® in Remote control<br />
mode<br />
Basal Rate Total<br />
Beep Test<br />
Battery Empty<br />
Cartridge Empty<br />
Battery Low<br />
Cartridge Full<br />
Beep Volume<br />
Cartridge Low<br />
Bluetooth ® OFF<br />
OK<br />
201
Icon<br />
Meaning<br />
Icon<br />
Meaning<br />
Clock<br />
Key Lock ON<br />
Data Transfer menu<br />
Pump timer (Call for update)<br />
Data Transfer (to start screen)<br />
Menu Settings<br />
Data Transfer running<br />
Multiwave Bolus<br />
Date<br />
Multiwave Bolus Immediate<br />
Date Format EU<br />
My Data<br />
Date Format US<br />
Pairing Failed<br />
Display contrast<br />
Pairing Successful<br />
Extended Bolus<br />
Priming<br />
Key Lock OFF<br />
Progress Bar<br />
202
F<br />
Icon<br />
Meaning<br />
Icon<br />
Meaning<br />
Pump Settings<br />
Stop<br />
Reminder<br />
Total<br />
Reminder Everyday<br />
Temporary Basal Rate<br />
Reminder OFF<br />
Therapy Settings<br />
Reminder Settings<br />
Time and Date Settings<br />
Reminder Single<br />
Units<br />
Screen Orientation<br />
Units per hour<br />
Beep<br />
Vibrations<br />
Beep and Vibration<br />
Error<br />
Standard Bolus<br />
Warning<br />
203
General Symbols<br />
Icon<br />
Meaning<br />
Icon<br />
Meaning<br />
Caution. Please refer to safetyrelated<br />
notes in the manual<br />
accompanying this device.<br />
Expiry date<br />
Consult instructions for use<br />
Catalogue number<br />
Sterilized using ethylene oxide<br />
Serial number<br />
Sterilized using radiation<br />
Admissible temperature range<br />
during operation<br />
Sterilized using antiseptics<br />
Store at<br />
Year of manufacture<br />
Admissible humidity range<br />
Lot number<br />
Admissible air pressure range<br />
204
F<br />
Icon<br />
Meaning<br />
Icon<br />
Meaning<br />
Fragile – handle with care<br />
Do not use if the package is<br />
damaged<br />
Protect against moisture<br />
Flammable<br />
Protect from heat and sunlight<br />
Bluetooth ® wireless technology<br />
For single use only<br />
Does not contain pyrogen<br />
Does not contain PVC<br />
Recycling<br />
IPX8<br />
Electronic device of type BF<br />
according the standard<br />
IEC 60601-1. Protection against<br />
electrical shock.<br />
Symbol for protection against the<br />
effect of temporary immersion of<br />
water (up to 60 minutes and<br />
2.5 meters [8 feet]), according to<br />
IEC 60529.<br />
Do not throw away<br />
205
Icon<br />
FCC ID<br />
Meaning<br />
Federal Communications<br />
Commission, part 15 on radio<br />
frequency devices.<br />
Marking of conformity according to<br />
the European Medical Device<br />
Directive MDD 93 / 42 / EEC with the<br />
number of the notified body.<br />
Includes also RTTE DIRECTIVE<br />
1999 / 5 / EC.<br />
Federal law (USA) restricts this<br />
device to sale by or on the order<br />
of a physician.<br />
Appendix G: Warranty<br />
Any changes or modification to the devices not expressly<br />
approved by Roche Diagnostics could void your operating<br />
warranty for the <strong>Accu</strong>-<strong>Chek</strong> <strong>Spirit</strong> <strong>Combo</strong> insulin pump.<br />
Manufacturer<br />
Non-ionizing radiation<br />
Recommended battery<br />
206
Glossary<br />
<strong>Accu</strong>-<strong>Chek</strong> Aviva <strong>Combo</strong> or Performa <strong>Combo</strong><br />
This is an intelligent diabetes management device that enables<br />
you to measure your blood glucose level, manage your blood<br />
glucose data, and get bolus advice. It also enables remote<br />
control of your <strong>Accu</strong>-<strong>Chek</strong> <strong>Spirit</strong> <strong>Combo</strong> insulin pump, using<br />
Bluetooth ® wireless technology.<br />
Adapter<br />
The adapter connects the cartridge and infusion set. It has two<br />
seals and forms an efficient seal for the cartridge compartment<br />
of your <strong>Accu</strong>-<strong>Chek</strong> <strong>Spirit</strong> <strong>Combo</strong> insulin pump. The two small<br />
vents on the adapter allow the equalization air pressure.<br />
Automatic Off<br />
Automatic Off is a safety feature that stops insulin delivery and<br />
triggers an Error if no keys are pressed within a programmed<br />
time period in RUN mode. See the entry in chapter 5 Personalizing<br />
your pump.<br />
Basal rate<br />
This is the amount of insulin delivered per hour that is required<br />
to cover your basic insulin needs. In insulin pump therapy, your<br />
basal rate is determined together with your doctor or healthcare<br />
team and can be adjusted to meet your individual physiological<br />
needs throughout the day. Your basal rate is delivered by your<br />
<strong>Accu</strong>-<strong>Chek</strong> <strong>Spirit</strong> <strong>Combo</strong> insulin pump according to the curve of<br />
your personal basal rate profile or profiles.<br />
Basal rate profile<br />
Your <strong>Accu</strong>-<strong>Chek</strong> <strong>Spirit</strong> <strong>Combo</strong> insulin pump offers you the option<br />
of delivering up to five different basal rate profiles in order to<br />
easily meet your changing insulin needs (for example during the<br />
week rather than at the weekend). A basal rate profile consists of<br />
24 programmed hourly basal rates.<br />
Basal rate total<br />
The sum of all 24 hourly basal rates in one basal rate profile is<br />
called the (daily) basal rate total.<br />
207
Bluetooth ® wireless technology<br />
The term “Bluetooth” refers to a wireless technology that allows<br />
digital devices to transfer data at high speed. This technology is<br />
common in many portable devices such as portable PCs, Personal<br />
Digital Assistants and mobile telephones.<br />
Bolus<br />
The amount of insulin delivered (in addition to the basal rate) to<br />
cover the intake of food and to correct high blood glucose levels.<br />
The bolus amount is determined by your doctor or healthcare<br />
team’s guidelines, your blood glucose level, your food intake and<br />
your activity level.<br />
Carrying system<br />
A wide variety of carrying systems made of different materials<br />
are specially designed to suit your individual needs while wearing<br />
your <strong>Accu</strong>-<strong>Chek</strong> <strong>Spirit</strong> <strong>Combo</strong> insulin pump.<br />
Cartridge<br />
The insulin reservoir of your <strong>Accu</strong>-<strong>Chek</strong> <strong>Spirit</strong> <strong>Combo</strong> insulin<br />
pump. It holds 3.15 ml (315 U) of short acting insulin or fast<br />
acting insulin analogue.<br />
Cartridge compartment<br />
The chamber in your <strong>Accu</strong>-<strong>Chek</strong> <strong>Spirit</strong> <strong>Combo</strong> insulin pump for<br />
the cartridge.<br />
Daily insulin total<br />
The total amount of insulin delivered (basal rate plus boluses)<br />
delivered in a 24-hour day, beginning at midnight. This amount<br />
does not include any insulin needed for the priming of infusion<br />
sets.<br />
Factory settings<br />
Your <strong>Accu</strong>-<strong>Chek</strong> <strong>Spirit</strong> <strong>Combo</strong> insulin pump is provided by Roche<br />
Diagnostics with a standard configuration (factory settings).<br />
These settings can be adapted to your individual needs directly<br />
on your <strong>Accu</strong>-<strong>Chek</strong> <strong>Spirit</strong> <strong>Combo</strong> insulin pump or by using the<br />
<strong>Accu</strong>-<strong>Chek</strong> Insulin Pump Configuration Software.<br />
Hourly basal rate<br />
An hourly basal rate is the amount of insulin delivered by your<br />
<strong>Accu</strong>-<strong>Chek</strong> <strong>Spirit</strong> <strong>Combo</strong> insulin pump in three-minute intervals<br />
for each hour.<br />
208
Infusion set<br />
Infusion sets connect your <strong>Accu</strong>-<strong>Chek</strong> <strong>Spirit</strong> <strong>Combo</strong> insulin pump<br />
to your body. The insulin is delivered from the cartridge through the<br />
infusion set tubing and cannula or needle into your subcutaneous<br />
tissue. Infusion sets can be disconnectable or non-disconnectable.<br />
Infusion site<br />
The place where the infusion set cannula or needle is inserted<br />
into your subcutaneous tissue to deliver insulin.<br />
Insulin<br />
A hormone that helps cells transform glucose into energy. Insulin<br />
is produced in the beta cells of the pancreas (also called islets of<br />
Langerhans).<br />
Insulin analogue (rapid-acting)<br />
A type of insulin created using recombinant DNA technology.<br />
The onset time of insulin analogue is shorter than the onset time<br />
of regular insulin.<br />
IPX8 according to IEC 60529<br />
Protection against the effects of temporary immersion in water.<br />
Ingress of water in quantities causing damage is not possible<br />
when the device is temporarily immersed in water under<br />
standardized conditions (maximal 60 minutes a day and<br />
2.5 meters [8 feet]).<br />
Luer-lock connector<br />
A standardized fitting at the end of the infusion set which allows<br />
to tightly connect the infusion set and cartridge through the<br />
adapter.<br />
Meter<br />
See <strong>Accu</strong>-<strong>Chek</strong> Aviva <strong>Combo</strong> or Performa <strong>Combo</strong>.<br />
Occlusion<br />
An occlusion is a blockage which prevents the insulin from<br />
flowing correctly from the insulin pump into the body.<br />
Insulin, regular (short-acting or fast-acting)<br />
Insulin that has the same chemical structure as insulin produced<br />
by the human pancreas. The onset time of regular insulin is 30 to<br />
45 minutes.<br />
209
210<br />
Personal settings<br />
Your <strong>Accu</strong>-<strong>Chek</strong> <strong>Spirit</strong> <strong>Combo</strong> insulin pump must be programmed<br />
with your personal settings prior to starting insulin pump therapy.<br />
Personal settings include the basal rate profile(s), the correct<br />
time and date and all other variable values which can be tailored<br />
to your individual needs on your <strong>Accu</strong>-<strong>Chek</strong> <strong>Spirit</strong> <strong>Combo</strong> insulin<br />
pump or using <strong>Accu</strong>-<strong>Chek</strong> Insulin Pump Configuration Software.<br />
Rapid-acting Insulin analogue<br />
See Insulin analogue (rapid acting).<br />
Regular insulin (short-acting or fast-acting)<br />
See Insulin, regular (short-acting or fast-acting).<br />
RUN<br />
During normal use, your <strong>Accu</strong>-<strong>Chek</strong> <strong>Spirit</strong> <strong>Combo</strong> insulin pump<br />
is in RUN mode and insulin is continuously delivered. Boluses,<br />
Temporary Basal Rates and almost all functions can be programmed<br />
from RUN mode.<br />
RUN screen<br />
The RUN screen is the starting point for all functions which can<br />
be accessed while your <strong>Accu</strong>-<strong>Chek</strong> <strong>Spirit</strong> <strong>Combo</strong> insulin pump<br />
delivers insulin. Your <strong>Accu</strong>-<strong>Chek</strong> <strong>Spirit</strong> <strong>Combo</strong> insulin pump<br />
displays the RUN screen during normal use when no programming<br />
is being performed. The time, current hourly basal rate, selected<br />
basal rate profile and all currently activated functions appear on<br />
the RUN screen.<br />
Settings<br />
Settings are individually programmable values and parameters<br />
that affect the way your <strong>Accu</strong>-<strong>Chek</strong> <strong>Spirit</strong> <strong>Combo</strong> insulin pump<br />
works.<br />
Scrolling<br />
Scrolling allows a fast and easy programming of a range of<br />
values.<br />
STOP<br />
When your <strong>Accu</strong>-<strong>Chek</strong> <strong>Spirit</strong> <strong>Combo</strong> insulin pump is in STOP, it<br />
does not deliver any insulin. The insulin delivery is only stopped<br />
if an Error occurs or if your <strong>Accu</strong>-<strong>Chek</strong> <strong>Spirit</strong> <strong>Combo</strong> insulin pump<br />
is put into a necessary STOP, (e.g. when changing the cartridge,<br />
adapter or infusion set or for data transfer). Functions such as<br />
Extended Bolus or Temporary Basal Rate are interrupted by<br />
putting your <strong>Accu</strong>-<strong>Chek</strong> <strong>Spirit</strong> <strong>Combo</strong> insulin pump into STOP.
STOP screen<br />
The STOP screen is the starting point for all functions that<br />
require that your <strong>Accu</strong>-<strong>Chek</strong> <strong>Spirit</strong> <strong>Combo</strong> insulin pump does<br />
not deliver insulin.<br />
Temporary Basal Rate<br />
Temporary increase or decrease of your basal rate profile in<br />
percentages (from 0 – 500 %) to match changing insulin needs<br />
due to increased or decreased activity level, illness or stress.<br />
U100<br />
This is the insulin concentration. Each millilitre of liquid contains<br />
100 International Units of insulin. Your insulin pump has been<br />
developed exclusively for delivery of U100 short-acting insulin or<br />
rapid-acting insulin analogue.<br />
211
212
Index<br />
A<br />
Abbreviations . . . . . . . . . . . . . . . . . . . . . . . . . . . . . . . . . . . . 194<br />
Accessories . . . . . . . . . . . . . . . . . . . . . . . . . . . . . . . . . . . . 1, 19<br />
<strong>Accu</strong>-<strong>Chek</strong> Aviva <strong>Combo</strong> .......................... 7, 133<br />
<strong>Accu</strong>-<strong>Chek</strong> Performa <strong>Combo</strong> ....................... 7, 133<br />
Adapter ................................ 1, 20, 150, 193<br />
ADVANCED user menu . . . . . . . . . . . . . . . . . . . . . . . . . 100, 120<br />
Air bubbles ....................... 20, 42, 46, 49, 50, 173<br />
Aircraft .................................. 63, 135, 141<br />
Alarm data menu . . . . . . . . . . . . . . . . . . . . . . . . . . . . . . . . . 107<br />
Alarm signals . . . . . . . . . . . . . . . . . . . . . . . . . . . . . 14, 116, 172<br />
Automatic Off . . . . . . . . . . . . . . . . . . . . . . . . . . . . . . . . 129, 160<br />
B<br />
Basal rate profile . . . . . . . . . . . . . . . . . . . . . 121, 131, 189, 194<br />
Battery ................. 1, 20, 26, 154, 176, 191, 193, 201<br />
Battery cover . . . . . . . . . . . . . . . . . . . . . . . . . 1, 21, 26, 66, 193<br />
Battery key ..................................... 1, 26<br />
Beeps and melodies ............................... 195<br />
Beep volume ....................... 15, 57, 115, 151, 172<br />
Blood glucose levels ....................... 22, 25, 41, 77<br />
Bluetooth ® connection . . . . . . . . . . . . . . . . . . . . . . . . . . . . . 171<br />
Bluetooth ® function . . . . . . . . . . . . . . . . . . . . . . . . 63, 135, 136<br />
Bolus . . . . . . . . . . . . . . . . . . . . . . . . . . . . . . . . . . . . . . . . . . . 77<br />
Bolus history .................... 81, 83, 92, 106, 157, 176<br />
Buttons ....................................... 14, 17<br />
C<br />
Cartridge . . . . . . . . . . . . . . . . . . . . . . . . . . . . . . . . . . 42, 44, 73<br />
Cleaning your pump . . . . . . . . . . . . . . . . . . . . . . . . . . . . . . . 149<br />
Configuration parameters ........................... 189<br />
Contact with water . . . . . . . . . . . . . . . . . . . . . . . . . 67, 146, 147<br />
CUSTOM user menu . . . . . . . . . . . . . . . . . . . . . . . . . . . 130, 131<br />
D<br />
Damage to your pump . . . . . . . . . . . . . . . . . . . . . . . . . . . 45, 47<br />
Display contrast . . . . . . . . . . . . . . . . . . . . . . . . . . . . . . . . . . 118<br />
Display orientation . . . . . . . . . . . . . . . . . . . . . . . . . . . . . . . . 117<br />
Display screens<br />
Function screens . . . . . . . . . . . . . . . . . . . . . . . . . . . . . . . . 13<br />
Information screens ........................... 16, 17<br />
navigating through ............................... 10<br />
QUICK INFO screen ........................... 12, 106<br />
RUN screen . . . . . . . . . . . . . . . . . . . . . . . . . . . . . . . . . . . . 11<br />
STOP screen . . . . . . . . . . . . . . . . . . . . . . . . . . . . . . . . . . . 12<br />
Disposing of your pump . . . . . . . . . . . . . . . . . . . . . . . . . . . . 150<br />
213
214<br />
E<br />
Electromagnetic immunity . . . . . . . . . . . . . . . . . . . . . . . . . . 183<br />
Electromagnetic radiation ............................ 62<br />
Emergency kit ................................. 22, 144<br />
Errors .......................................... 159<br />
Exercise . . . . . . . . . . . . . . . . . . . . . . . . . . . . . . . . . . 35, 62, 121<br />
Extended Bolus ......... 77, 84, 85, 87, 88, 98, 177, 190, 202<br />
F<br />
Features .................................... 7, 8, 100<br />
H<br />
History of daily insulin totals ........... 25, 49, 108, 127, 176<br />
Hourly basal rate. . . . . . . . . . 11, 17, 37, 38, 172, 177, 189, 208<br />
I<br />
Infection ..................... 19, 52, 54, 57, 72, 144, 150<br />
Infusion set ..................... 12, 48, 49, 50, 52, 56, 69<br />
Inspecting your pump .............................. 143<br />
Insulin delivery<br />
starting . . . . . . . . . . . . . . . . . . . . . . . . . . . . . . . . . . . 55, 104<br />
stopping ................................... 56, 104<br />
K<br />
Keylock ............................ 9, 18, 113, 114, 191<br />
Keys<br />
combining . . . . . . . . . . . . . . . . . . . . . . . . . . . . . . . . . . . . . 17<br />
locking ....................................... 128<br />
L<br />
Language<br />
selecting . . . . . . . . . . . . . . . . . . . . . . . . . . . . . . . . . 101, 123<br />
Leakage ................................ 42, 43, 59, 69<br />
Luer-lock connector . . . . . . . . . . . . . 43, 47, 69, 70, 71, 74, 179<br />
M<br />
Maintaining your pump ............................. 149<br />
Meter<br />
interaction with . . . . . . . . . . . . . . . . . . . . . . . . . . . . . . . . . . 7<br />
pairing your pump . . . . . . . . . . . . . . . . . . . . . . . . . . . . . . 136<br />
Multiwave Bolus ....... 77, 89, 90, 92, 98, 121, 177, 190, 202<br />
P<br />
Personalizing your pump ........................... 8, 99<br />
Personal settings . . . . . . . . . . . . . . 23, 35, 53, 58, 98, 121, 149<br />
Prime amount .................................... 127<br />
Priming ....................... 49, 50, 127, 134, 174, 202<br />
Pump data . . . . . . . . . . . . . . . . . . . . . . . . . . . . . . . . . . . . . . 105<br />
Pump settings ............................. 25, 154, 176
Pump therapy<br />
interruption of . . . . . . . . . . . . . . . . . . . . . . . . . . . . . . . . . . 64<br />
Q<br />
Quick Bolus . . . . . . . . . 8, 16, 78, 79, 80, 81, 85, 126, 177, 190<br />
R<br />
Reminders<br />
list of . . . . . . . . . . . . . . . . . . . . . . . . . . . . . . . . . . . . . . . . 21<br />
Reminder Settings . . . . . . . . . . . . . . . . . . . . . . . . . . . . 124, 203<br />
Repair of your pump ............................... 148<br />
Rotating display . . . . . . . . . . . . . . . . . . . . . . . . . . . . . . . . . 8, 10<br />
S<br />
Safety system .................................... 151<br />
Scrolling ...................................... 18, 82<br />
Sport . . . . . . . . . . . . . . . . . . . . . . . . . . . . . . . . . . . . . . . . . . . 62<br />
Standard Bolus ... 77, 78, 80, 81, 82, 83, 85, 89, 177, 190, 203<br />
Start-up process ................................... 29<br />
Status messages . . . . . . . . . . . . . . . . . . . . . . . . . . . . . . . . . . 14<br />
Status of your pump .............................. 9, 14<br />
Sterile disposables . . . . . . . . . . . . . . . . . . . . . . . . . . . . . . . . . 19<br />
Sterile products . . . . . . . . . . . . . . . . . . 19, 57, 69, 76, 143, 145<br />
STOP-Warning<br />
confirming ............................... 15, 36, 57<br />
turning off . . . . . . . . . . . . . . . . . . . . . . . . . . . . . . . . . . . . 125<br />
Storing your pump . . . . . . . . . . . . . . . . . . . . . . . . . . . . . . . . 150<br />
Swimming . . . . . . . . . . . . . . . . . . . . . . . . . . . . . . . . . . . 67, 146<br />
Symbols<br />
Display Symbols. . . . . . . . . . . . . . . . . . . . . . . . . . . . . . . . 201<br />
General Symbols . . . . . . . . . . . . . . . . . . . . . . . . . . . . . . . 201<br />
T<br />
Tactile signals .................................... 200<br />
Technical Data . . . . . . . . . . . . . . . . . . . . . . . . . . . . . . . . 61, 175<br />
Temporary Basal Rate. 93, 94, 95, 96, 97, 98, 156, 157, 177, 189,<br />
194, 203, 219<br />
Temporary Basal Rate history<br />
viewing . . . . . . . . . . . . . . . . . . . . . . . . . . . . . . . . . . . . . . 109<br />
Therapy settings .............................. 113, 126<br />
Time and Date<br />
Settings ................................ 32, 33, 219<br />
Time remaining (pump timer) . . . . . . . . . . . . . . . . . . . . . . . . 110<br />
Transferring . . . . . . . . . . . . . . . . . . . . . . . . . . . . . . . . . . 12, 111<br />
Travelling . . . . . . . . . . . . . . . . . . . . . . . . . . . . . . . . . . . . . . . . 63<br />
Troubleshooting<br />
therapy-related issues ........................... 172<br />
U<br />
Unlocking ....................................... 114<br />
User menu<br />
selecting . . . . . . . . . . . . . . . . . . . . . . . . . . . . . . . . . . . . . 101<br />
215
216<br />
W<br />
Warning history<br />
viewing . . . . . . . . . . . . . . . . . . . . . . . . . . . . . . . . . . . . . . 107<br />
Warnings<br />
list of 153, 159, 170<br />
Warnings and Errors ............................... 151<br />
confirming .................................... 152<br />
handling ...................................... 140<br />
Warranty ................................. 21, 163, 206<br />
Wearing your pump<br />
carrying systems . . . . . . . . . . . . . . . . . . . . . . . . . . . . . 61, 62<br />
in hazardous areas ............................... 62
217
Quick reference table for Errors, Warnings and Reminders<br />
Errors<br />
No Error What you have to do<br />
E1 CARTRIDGE EMPTY Change the cartridge.<br />
E2 BATTERY EMPTY Change the battery.<br />
E3 AUTOMATIC OFF Put your <strong>Accu</strong>-<strong>Chek</strong> <strong>Spirit</strong><br />
<strong>Combo</strong> insulin pump into RUN if<br />
necessary.<br />
E4 OCCLUSION Change the cartridge and<br />
infusion set. See section 2.6 to<br />
2.9.<br />
E5 END OF OPERATION Arrange for immediate replacement<br />
of your <strong>Accu</strong>-<strong>Chek</strong> <strong>Spirit</strong><br />
<strong>Combo</strong> insulin pump. Contact<br />
your healthcare professional for<br />
alternative insulin therapy<br />
options.<br />
No Error What you have to do<br />
E6 MECHANICAL ERROR See chapter 8.<br />
E7 ELECTRONIC ERROR See chapter 8.<br />
E8 POWER INTERRUPT See chapter 8.<br />
E9 END OF OPERATION Arrange for immediate replacement<br />
of your <strong>Accu</strong>-<strong>Chek</strong><br />
<strong>Spirit</strong> <strong>Combo</strong> insulin pump.<br />
Contact your healthcare<br />
professional for alternative<br />
insulin therapy options.<br />
E10 CARTRIDGE ERROR See chapter 8.<br />
E11 SET NOT PRIMED Prime your infusion set.<br />
E12 DATA INTERRUPTED Restart the data transfer.<br />
E13 LANGUAGE ERROR See chapter 8.<br />
218
Warnings<br />
No Warning What you have to do<br />
W1 CARTRIDGE LOW Change cartridge before it is<br />
completely empty.<br />
W2 BATTERY LOW Replace the battery as soon as<br />
possible.<br />
W3 REVIEW TIME Set the time and date.<br />
W4 CALL FOR UPDATE Contact your local pump<br />
support.<br />
W5 PUMP TIMER In the MY DATA menu check for<br />
the remaining operation time<br />
under the menu PUMP TIMER.<br />
Arrange for re-placement of<br />
pump within the scheduled<br />
pump operation time.<br />
No Warning What you have to do<br />
W6 TBR CANCELLED Put your <strong>Accu</strong>-<strong>Chek</strong> <strong>Spirit</strong><br />
<strong>Combo</strong> insulin pump into RUN if<br />
necessary. Ensure the cancellation<br />
was intended and program<br />
a new Temporary Basal Rate if<br />
necessary.<br />
W7 TBR OVER Decide whether a further<br />
Temporary Basal Rate change is<br />
appropriate and program one if<br />
necessary.<br />
W8 BOLUS CANCELLED Put your <strong>Accu</strong>-<strong>Chek</strong> <strong>Spirit</strong><br />
<strong>Combo</strong> insulin pump into RUN<br />
if necessary. Ensure that the<br />
cancellation was intended and<br />
program a new bolus if<br />
necessary.<br />
219
Reminder<br />
No Warning What you have to do<br />
W9 LOANTIME WARNING In the MY DATA menu, check for<br />
the remaining insulin pump loan<br />
time under the menu PUMP<br />
TIMER. Arrange for replacement<br />
of pump within the scheduled<br />
pump loan time.<br />
W10 BLUETOOTH FAULT Re-do pairing procedure for<br />
insulin pump and Meter. See<br />
section 6.4 Troubleshooting the<br />
Bluetooth ® connection in the<br />
User Guide for detailed<br />
information.<br />
No Reminder What you have to do<br />
Reminder<br />
END OF WARRANTY<br />
Put your <strong>Accu</strong>-<strong>Chek</strong> <strong>Spirit</strong><br />
<strong>Combo</strong> insulin pump into RUN if<br />
necessary.<br />
Contact your local pump<br />
support.<br />
Some Reminders and Warnings are country specific and may<br />
never occur on your pump.<br />
220
My notes<br />
221
Bluetooth ® registration<br />
Please note that in Italy and France Bluetooth ® wireless<br />
technology is for indoor use only.<br />
FCC ID RAH3<br />
This device complies with part 15 of the FCC Rules. Operation is<br />
subject to the following two conditions: (1) This device may not<br />
cause harmful interference, and (2) this device must accept any<br />
interference received, including interference that may cause<br />
undesired operation.<br />
Note: This equipment has been tested and found to comply with<br />
the limits for a Class B digital device, pursuant to part 15 of the<br />
FCC Rules. These limits are designed to provide reasonable<br />
protection against harmful interference in a residential installation.<br />
This equipment generates, uses and can radiate radio<br />
frequency energy and, if not installed and used in accordance<br />
with the instructions, may cause harmful interference to radio<br />
communications. However, there is no guarantee that interference<br />
will not occur in a particular installation. If this equipment<br />
does cause harmful interference to radio or television reception,<br />
which can be determined by turning the equipment off and on,<br />
the user is encouraged to try to correct the interference by one<br />
or more of the following measures: Reorient or relocate the<br />
receiving antenna. Increase the separation between the equipment<br />
and receiver. Connect the equipment into an outlet on a<br />
circuit different from that to which the receiver is connected.<br />
Consult the dealer or an experienced radio / TV technician for<br />
help.<br />
222
223
224
Your contact for assistance with and/or additional information about<br />
your <strong>Accu</strong>-<strong>Chek</strong> <strong>Spirit</strong> <strong>Combo</strong> insulin pump:<br />
United Kingdom:<br />
Roche Diagnostics Ltd.<br />
Charles Avenue<br />
Burgess Hill<br />
West Sussex, RH15 9 RY<br />
United Kingdom<br />
Phone +44 1444 256 000<br />
lewes.insulinpumps@roche.com<br />
www.accu-chek.co.uk<br />
Australia:<br />
Roche Diagnostics Australia Pty. Ltd.<br />
31 Victoria Avenue<br />
Castle Hill, NSW 2154<br />
Australia<br />
Phone +61 2 9846 0100 (Techn. Support)<br />
1800 802 409 (Orders)<br />
Fax 1800 066 598 (Orders)<br />
sydney.accu-chekextra@roche.com<br />
www.rochediagnostics.com.au<br />
New Zealand:<br />
Roche Diagnostics N.Z. Ltd.<br />
P.O. Box 62-089<br />
15 Rakino Way<br />
Mt. Wellington, Auckland<br />
New Zealand<br />
<strong>Accu</strong>-<strong>Chek</strong> Enquiry Line: 0800 80 22 99<br />
Phone +64 9 276 4157<br />
Fax +64 9 276 8917<br />
info@accu-chek.co.nz<br />
www.accuchek.co.nz<br />
South Africa:<br />
Roche Products (Pty) Ltd.<br />
Diagnostics Division<br />
P.O. Box 1927, Randburg 2125<br />
9 Will Scarlet Road<br />
Randburg<br />
South Africa<br />
Phone +27 11 504 4600<br />
Fax +27 11 781 0269<br />
www.diabetes.co.za
The Bluetooth ® word mark and logos are registered<br />
trademarks owned by Bluetooth SIG, Inc. and any use of such<br />
marks by ACCU-CHEK is under license. Other trademarks and<br />
trade names are those of their respective owners.<br />
ACCU-CHEK, ACCU-CHEK SPIRIT COMBO, ACCU-CHEK AVIVA<br />
COMBO, PERFORMA COMBO, ACCU-CHEK TENDERLINK,<br />
ACCU-CHEK FLEXLINK, ACCU-CHEK RAPID D-LINK and<br />
DISETRONIC are trademarks of Roche.<br />
USA:<br />
Manufactured for and distributed by:<br />
Disetronic Medical Systems Inc.<br />
Fishers, IN 46037, USA<br />
Toll free 1-800-280-7801<br />
Disetronic Medical Systems AG<br />
3401 Burgdorf, Switzerland<br />
www.accu-chek.com<br />
Swiss made<br />
05184843001/B