Stone Installation Instructions
Stone Installation Instructions
Stone Installation Instructions

You also want an ePaper? Increase the reach of your titles
YUMPU automatically turns print PDFs into web optimized ePapers that Google loves.
<strong>Stone</strong> <strong>Installation</strong> <strong>Instructions</strong><br />
ESR-3111<br />
Step 1: Preparing the Surface<br />
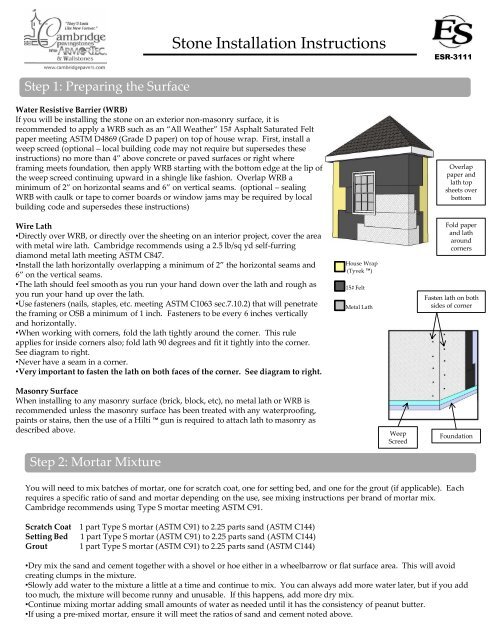
Water Resistive Barrier (WRB)<br />
If you will be installing the stone on an exterior non-masonry surface, it is<br />
recommended to apply a WRB such as an “All Weather” 15# Asphalt Saturated Felt<br />
paper meeting ASTM D4869 (Grade D paper) on top of house wrap. First, install a<br />
weep screed (optional – local building code may not require but supersedes these<br />
instructions) no more than 4” above concrete or paved surfaces or right where<br />
framing meets foundation, then apply WRB starting with the bottom edge at the lip of<br />
the weep screed continuing upward in a shingle like fashion. Overlap WRB a<br />
minimum of 2” on horizontal seams and 6” on vertical seams. (optional – sealing<br />
WRB with caulk or tape to corner boards or window jams may be required by local<br />
building code and supersedes these instructions)<br />
Wire Lath<br />
•Directly over WRB, or directly over the sheeting on an interior project, cover the area<br />
with metal wire lath. Cambridge recommends using a 2.5 lb/sq yd self-furring<br />
diamond metal lath meeting ASTM C847.<br />
•Install the lath horizontally overlapping a minimum of 2” the horizontal seams and<br />
6” on the vertical seams.<br />
•The lath should feel smooth as you run your hand down over the lath and rough as<br />
you run your hand up over the lath.<br />
•Use fasteners (nails, staples, etc. meeting ASTM C1063 sec.7.10.2) that will penetrate<br />
the framing or OSB a minimum of 1 inch. Fasteners to be every 6 inches vertically<br />
and horizontally.<br />
•When working with corners, fold the lath tightly around the corner. This rule<br />
applies for inside corners also; fold lath 90 degrees and fit it tightly into the corner.<br />
See diagram to right.<br />
•Never have a seam in a corner.<br />
•Very important to fasten the lath on both faces of the corner. See diagram to right.<br />
House Wrap<br />
(Tyvek )<br />
15# Felt<br />
Metal Lath<br />
Overlap<br />
paper and<br />
lath top<br />
sheets over<br />
bottom<br />
Fold paper<br />
and lath<br />
around<br />
corners<br />
Fasten lath on both<br />
sides of corner<br />
Masonry Surface<br />
When installing to any masonry surface (brick, block, etc), no metal lath or WRB is<br />
recommended unless the masonry surface has been treated with any waterproofing,<br />
paints or stains, then the use of a Hilti gun is required to attach lath to masonry as<br />
described above.<br />
Step 2: Mortar Mixture<br />
Weep<br />
Screed<br />
Foundation<br />
You will need to mix batches of mortar, one for scratch coat, one for setting bed, and one for the grout (if applicable). Each<br />
requires a specific ratio of sand and mortar depending on the use, see mixing instructions per brand of mortar mix.<br />
Cambridge recommends using Type S mortar meeting ASTM C91.<br />
Scratch Coat 1 part Type S mortar (ASTM C91) to 2.25 parts sand (ASTM C144)<br />
Setting Bed 1 part Type S mortar (ASTM C91) to 2.25 parts sand (ASTM C144)<br />
Grout 1 part Type S mortar (ASTM C91) to 2.25 parts sand (ASTM C144)<br />
•Dry mix the sand and cement together with a shovel or hoe either in a wheelbarrow or flat surface area. This will avoid<br />
creating clumps in the mixture.<br />
•Slowly add water to the mixture a little at a time and continue to mix. You can always add more water later, but if you add<br />
too much, the mixture will become runny and unusable. If this happens, add more dry mix.<br />
•Continue mixing mortar adding small amounts of water as needed until it has the consistency of peanut butter.<br />
•If using a pre-mixed mortar, ensure it will meet the ratios of sand and cement noted above.
<strong>Stone</strong> <strong>Installation</strong> <strong>Instructions</strong><br />
ESR-3111<br />
Step 3: Scratch Coat<br />
•Use a masonry trowel to work the mortar into and over lath. Cover the<br />
entire area of lath with the mortar mixture.<br />
•While the mortar is slightly wet, use a medium bristle brush to rough up<br />
the scratch coat. Tip: use a trowel and level to mark horizontal lines that<br />
will be used as guides to apply your stone veneer.<br />
•Cambridge recommends the application of stone before the scratch coat<br />
is fully cured. This results in a “wet joint” for better adhesion.<br />
•If the scratch coat has become sufficiently cured, this area shall be<br />
dampened with water prior to applying the stone. There should be no<br />
collecting water on the surface when stone is applied.<br />
Step 4: Applying <strong>Stone</strong><br />
Apply the<br />
scratch coat<br />
over the lath<br />
using a trowel<br />
Use a medium<br />
bristle brush to<br />
rough up the<br />
scratch coat<br />
Mix Mortar<br />
Mix the setting bed mortar as described in section 2.<br />
Layout the stone<br />
Before you apply any stone, lay out several pieces of stone for your project. This will<br />
give you a sense for the variety of shapes and colors you’ll be working with. Arrange the<br />
stones so they fit and look natural next to each other, and try to avoid putting the same<br />
color of stones all together in one area.<br />
Install corners first<br />
Start at the corners and work toward the center of the wall. Be sure to alternate the long<br />
and short returns on corner pieces.<br />
Size the stone<br />
It’s always a good idea to size the stone up before you apply any mortar or to avoid<br />
having to chisel any of the stone to make a proper fit.<br />
Moisten surfaces<br />
Thoroughly wet a cured scratch coat surface with water prior to applying setting mortar<br />
and stone. It may be necessary to also wet the back of stone prior to applying the setting<br />
bed in very dry conditions.<br />
Apply the stone<br />
The back of each stone should be entirely buttered to a nominal ½” thickness. Firmly<br />
work the stone onto the scratch coat with a slight back and forth or rotating motion to set<br />
the stone. Mortar should ooze or squeeze out around the edges of the stone during this<br />
process. Once the stone begins to take hold, no other movement should occur.<br />
Inside corners<br />
For a professional look, interlock or “weave” the inside corner by alternating the flat<br />
stone “killing” into the opposite wall. This will avoid a straight vertical joint on inside<br />
corners and provide a professional look.<br />
Cutting the stone<br />
Any grinder with a masonry blade will work. Cutting stone is very dusty, so be sure to<br />
wear safety glasses and a dust mask and perform all cutting outdoors. Sometimes you<br />
may want to cut stone with a masonry hammer for a more natural look. Cambridge<br />
recommends skimming a thin layer of mortar to cut or broken edges to conceal any<br />
exposed aggregate in stone. **DO NOT USE ACID TO CLEAN STONE**<br />
•Apply corners first<br />
•Alternate long and<br />
short returns on corners