
You also want an ePaper? Increase the reach of your titles
YUMPU automatically turns print PDFs into web optimized ePapers that Google loves.
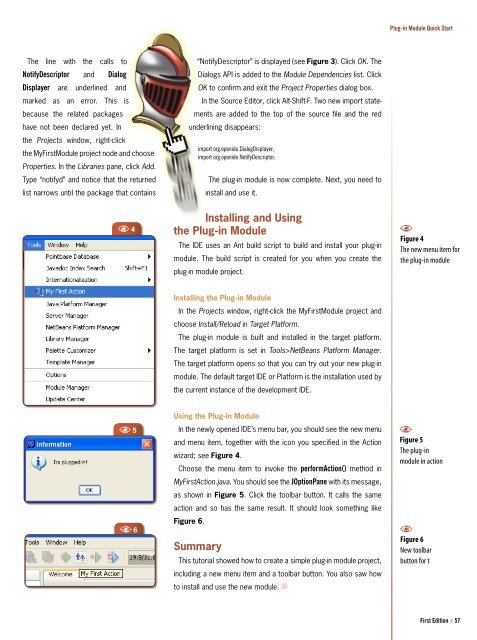
<strong>Plug</strong>-<strong>in</strong> Module Quick Start<br />
The l<strong>in</strong>e with the calls to<br />
NotifyDescriptor and Dialog<br />
Displayer are underl<strong>in</strong>ed and<br />
marked as an error. This is<br />
because the related packages<br />
have not been declared yet. In<br />
the Projects w<strong>in</strong>dow, right-click<br />
the MyFirstModule project node and choose<br />
Properties. In the Libraries pane, click Add.<br />
Type “notifyd” and notice that the returned<br />
list narrows until the package that conta<strong>in</strong>s<br />
“NotifyDescriptor” is displayed (see Figure 3). Click OK. The<br />
Dialogs API is added to the Module Dependencies list. Click<br />
OK to confirm and exit the Project Properties dialog box.<br />
In the Source Editor, click Alt-Shift-F. Two new import statements<br />
are added to the top of the source file and the red<br />
underl<strong>in</strong><strong>in</strong>g disappears:<br />
import org.openide.DialogDisplayer;<br />
import org.openide.NotifyDescriptor;<br />
The plug-<strong>in</strong> module is now complete. Next, you need to<br />
<strong>in</strong>stall and use it.<br />
A 4<br />
Install<strong>in</strong>g and Us<strong>in</strong>g<br />
the <strong>Plug</strong>-<strong>in</strong> Module<br />
The IDE uses an Ant build script to build and <strong>in</strong>stall your plug-<strong>in</strong><br />
module. The build script is created for you when you create the<br />
plug-<strong>in</strong> module project.<br />
A<br />
Figure 4<br />
The new menu item for<br />
the plug-<strong>in</strong> module<br />
Install<strong>in</strong>g the <strong>Plug</strong>-<strong>in</strong> Module<br />
In the Projects w<strong>in</strong>dow, right-click the MyFirstModule project and<br />
choose Install/Reload <strong>in</strong> Target Platform.<br />
The plug-<strong>in</strong> module is built and <strong>in</strong>stalled <strong>in</strong> the target platform.<br />
The target platform is set <strong>in</strong> Tools><strong>NetBeans</strong> Platform Manager.<br />
The target platform opens so that you can try out your new plug-<strong>in</strong><br />
module. The default target IDE or Platform is the <strong>in</strong>stallation used by<br />
the current <strong>in</strong>stance of the development IDE.<br />
A 5<br />
A 6<br />
Us<strong>in</strong>g the <strong>Plug</strong>-<strong>in</strong> Module<br />
In the newly opened IDE’s menu bar, you should see the new menu<br />
and menu item, together with the icon you specified <strong>in</strong> the Action<br />
wizard; see Figure 4.<br />
Choose the menu item to <strong>in</strong>voke the performAction() method <strong>in</strong><br />
MyFirstAction.java. You should see the JOptionPane with its message,<br />
as shown <strong>in</strong> Figure 5. Click the toolbar button. It calls the same<br />
action and so has the same result. It should look someth<strong>in</strong>g like<br />
Figure 6.<br />
Summary<br />
This tutorial showed how to create a simple plug-<strong>in</strong> module project,<br />
<strong>in</strong>clud<strong>in</strong>g a new menu item and a toolbar button. You also saw how<br />
to <strong>in</strong>stall and use the new module. N<br />
A<br />
Figure 5<br />
The plug-<strong>in</strong><br />
module <strong>in</strong> action<br />
A<br />
Figure 6<br />
New toolbar<br />
button for t<br />
First Edition N 57