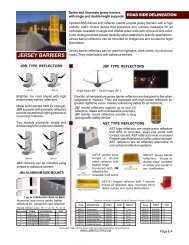
information - US Reflector
information - US Reflector
information - US Reflector

Create successful ePaper yourself
Turn your PDF publications into a flip-book with our unique Google optimized e-Paper software.
<strong>US</strong><br />
Illumination - Safety Products - Innovation<br />
TM<br />
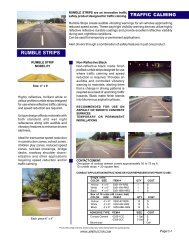
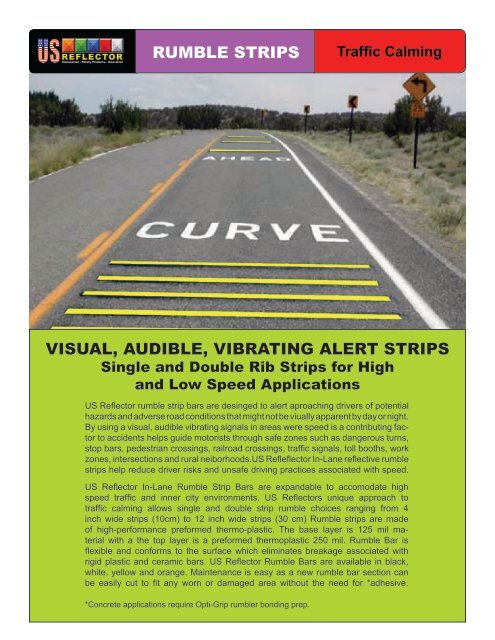
RUMBLE STRIPS<br />
Traffic Calming<br />
VISUAL, AUDIBLE, VIBRATING ALERT STRIPS<br />
Single and Double Rib Strips for High<br />
and Low Speed Applications<br />
<strong>US</strong> <strong>Reflector</strong> rumble strip bars are desinged to alert aproaching drivers of potential<br />
hazards and adverse road conditions that might not be viually apparent by day or night.<br />
By using a visual, audible vibrating signals in areas were speed is a contributing factor<br />
to accidents helps guide motorists through safe zones such as dangerous turns,<br />
stop bars, pedestrian crossings, railroad crossings, traffic signals, toll booths, work<br />
zones, intersections and rural neiborhoods.<strong>US</strong> Refleflector In-Lane reflective rumble<br />
strips help reduce driver risks and unsafe driving practices associated with speed.<br />
<strong>US</strong> <strong>Reflector</strong> In-Lane Rumble Strip Bars are expandable to accomodate high<br />
speed traffic and inner city environments. <strong>US</strong> <strong>Reflector</strong>s unique approach to<br />
traffic calming allows single and double strip rumble choices ranging from 4<br />
inch wide strips (10cm) to 12 inch wide strips (30 cm) Rumble strips are made<br />
of high-performance preformed thermo-plastic. The base layer is 125 mil material<br />
with a the top layer is a preformed thermoplastic 250 mil. Rumble Bar is<br />
flexible and conforms to the surface which eliminates breakage associated with<br />
rigid plastic and ceramic bars. <strong>US</strong> <strong>Reflector</strong> Rumble Bars are available in black,<br />
white, yellow and orange. Maintenance is easy as a new rumble bar section can<br />
be easily cut to fit any worn or damaged area without the need for *adhesive.<br />
*Concrete applications require Opti-Grip rumbler bonding prep.
<strong>US</strong> <strong>Reflector</strong> preformed thermoplastic<br />
Rumblers are durable, convenient to use,<br />
easy to apply, and looks great.<br />
Best of all no *adhesive required<br />
ENHANCED DURABILITY<br />
• Engineered as a heavy-duty intersection grade pavement<br />
marking, <strong>US</strong> <strong>Reflector</strong> Rumblers provide optimum wear in<br />
adverse conditions.<br />
PROPER INSTALLATION<br />
• <strong>US</strong> <strong>Reflector</strong> Rumblers do not require preheating of the<br />
pavement to a specific temperature prior to application. And<br />
with no road or air temperature requirements, you can install<br />
it anytime of year. However, salt, chemical and deicing<br />
compounds should be pressure washed or allow 2-3 rainfalls<br />
cleansings before applying pavement markings.<br />
• A recommended sealer is required when using <strong>US</strong> <strong>Reflector</strong><br />
Rumblers on concrete surfaces. The sealer enhances the<br />
bond strength by preventing moisture from penetrating up<br />
through the concrete.<br />
• Installing <strong>US</strong> <strong>Reflector</strong> Rumblers is fast, safe and costeffective<br />
with an industrial propane heat torch such as the<br />
5000FX.<br />
IMPERVIO<strong>US</strong> TO OIL AND GAS<br />
• <strong>US</strong> <strong>Reflector</strong> Rumblers are oil and gas impervious, yet<br />
compatible with all asphalt surfaces. Rumblers can be inlaid<br />
or applied on fresh asphalt as soon as the road surface sets.<br />
WORKER AND ENVIRONMENTAL SAFETY<br />
• With no lead chromate or heavy metal compounds, <strong>US</strong><br />
<strong>Reflector</strong> Rumblers are non-hazardous, either during application<br />
or removal.<br />
MANUFACTURING CONTROL<br />
• All <strong>US</strong> <strong>Reflector</strong> Rumblers are preformed thermoplastic<br />
materials under ISO 9001:2000 certified for design, development<br />
and manufacturing.<br />
Description<br />
Size<br />
Imperial<br />
Item<br />
Number<br />
Rumble Bar White 2” x 3’ TCR-23W<br />
Rumble Bar Black 2” x 3’ TCR-23BK<br />
Rumble Bar Yellow 2” x 3’ TCR-23Y<br />
Rumble Bar Orange 2” x 3’ TCR-23O<br />
Base White 4” x 3’ TCR-4BW<br />
Base White 6” x 3’ TCR-6BW<br />
Base White 8” x 3’ TCR-8BW<br />
Base Black 4” x 3’ TCR-4BBK<br />
Base Black 6” x 3’ TCR-6BBK<br />
Base Black 8” x 3’ TCR-8BBK<br />
Base Yellow 4” x 3’ TCR-4BY<br />
Base Yellow 6” x 3’ TCR-6BY<br />
Base Yellow 8” x 3’ TCR-8BY<br />
Base Orange 4” x 3’ TCR-4BOR<br />
Base Orange 6” x 3’ TCR-6BOR<br />
Base Orange 8” x 3’ TCR-8BOR<br />
Heat<br />
Apply Base<br />
Apply Rummbler<br />
4'6"<br />
90'<br />
6'<br />
ENHANCED DURABILITY<br />
4” Rumbler Bar<br />
125 mil 4” base / 250 mil 2” bar<br />
1” 2” 1”<br />
Section 2 (35 MPH)<br />
10 rows of rumble bars;<br />
4” base with 2” bar;<br />
12’ width (4- 3’ bars);<br />
Distance between rows of bars: 4’6”<br />
Rumbler bar spacing is variable and<br />
adaptable to the roadway hazard area<br />
or slow zone. It is effective to have more<br />
than one field of bars providing advanced<br />
warning with a rumble that can be heard<br />
and felt when crossing over Sections.<br />
Example (as shown in the diagram)<br />
1. Driver is alerted to road condition<br />
change with Rumblers<br />
2. Driver increases alertness to Stop<br />
Ahead and slow own accordingly.<br />
A word message such as “STOP AHEAD”,<br />
“SIGNAL AHEAD”, or “SLOW 35 MPH”<br />
can be applied either before traffic meets<br />
the rumble bars or between the two sets<br />
of bars.<br />
Traffic<br />
Section 1 (55 MPH)<br />
10 rows of rumble bars;<br />
8” base with 2” bar;<br />
12’ width (4- 3’ bars);<br />
Distance between rows of bars: 6’<br />
8” Rumbler Bar<br />
125 mil 8” base / 250 mil 2” bar<br />
.5” 2” 3” 2” .5 ”<br />
<strong>US</strong>Illumination - Safety Products - Innovation<br />
*Concrete applications require Opti-Grip rumbler bonding prep.<br />
TM
<strong>US</strong><br />
Illumination - Safety Products - Innovation<br />
TM<br />
RUMBLE STRIPS<br />
INSTALLATION<br />
Rumbler Bars<br />
Installation Instructions<br />
PREFORMED THERMOPLASTIC PAVEMENT MARKINGS.<br />
After surface preparation is complete: (Mark and measure areas, according to rumbler layout pattern)<br />
1. Position the base material.<br />
2. Heat a 3 ft. section of the base material until all of the indents have closed completely and the material is molten.<br />
3. Immediately position the rumbler bars along the base material in the 3 ft. section which is molten, maintaining the<br />
proper distance from the edges as illustrated below.<br />
4. Press the bars into the 3 ft. section of molten base material.<br />
5. Carefully reheat until the edges of the rumble bar section just installed start to become molten. The flame from the<br />
<strong>US</strong>R 5000FX should be directed at the edges of the rumble bars. This should be done with the nozzle parallel with the<br />
path of the material to avoid overheating the rumble bars. The edges of the bars will appear glossy when they begin to<br />
melt. The edges have been reheated sufficiently when they have sealed with the base material. There should be no<br />
visible gaps between the two materials.<br />
6. Repeat steps 2, 3, 4, and 5 until all of the rumble bars are installed.<br />
7. Inspect the recently applied base material to ensure that complete bonding has occurred over the entire area.<br />
After the base material has cooled to near ambient temperature, try to lift an edge, or cut an area in the interior<br />
of the material with a chisel. Try to lift a portion of the material, if the material can be lifted without evidence<br />
of asphalt on the underside, insufficient heat has been applied. If possible, reapply heat until adequate bonding<br />
has occurred. Note: Do not leave the project until sufficient bond has been established. Attempts to reheat at a<br />
later date will be unsuccessful due to trapped moisture beneath the base material.<br />
8. After it cools, chisel test the area that has the most defined edge between the base and a bar. This is done by<br />
driving a cold chisel, or putty knife, through the bar, and attempting to pry the bar off of the base material.<br />
Verify that the two materials have fused together. If the bar comes loose from the base material and is shiny<br />
underneath repeat step 5 as necessary.<br />
SAFETY PRECAUTIONS:<br />
Protective clothing, consisting of leather boots, or work shoes, long pants, gloves, and either safety goggles or a face<br />
shield, and a safety vest should be worn while applying <strong>US</strong> <strong>Reflector</strong> Rumblers<br />
Avoid all contact with the molten Rumbler strips and bars incuding thermal surface heating equipment such as<br />
the 5000 FX heat torch flame.<br />
If you do get molten material on your skin, flush the area immediately with plenty of water and then seek medi<br />
cal attention. Do not attempt to pull the molten material off of your skin. In the event of accidental skin contact<br />
with the sealer wash contaminated skin with soap and water and remove contaminated clothes immediately. In<br />
the event of accidental sealer contact with the eyes, immediately flush eyes with plenty of water for at least 15<br />
minutes; remove contact lenses; call a physician.<br />
Manufacturer’s Torch Advisory<br />
It is recommended that <strong>US</strong> <strong>Reflector</strong> Rumbler Bars be installed using a <strong>US</strong>R 5000FX propane heat torch. The<br />
<strong>US</strong>R 5000FX has a fan shaped nozzle that allows for better control of the heat being applied to the material.<br />
The fan shaped nozzle design will assist the installer in not overheating the material, which can result in a loss<br />
of bar height.<br />
For proper surface preparation, and material handling instructions, refer to:<br />
“Rumbler Installation Instructions”