Adobe InDesign
Adobe InDesign
Adobe InDesign

Create successful ePaper yourself
Turn your PDF publications into a flip-book with our unique Google optimized e-Paper software.
<strong>Adobe</strong><br />
<strong>InDesign</strong><br />
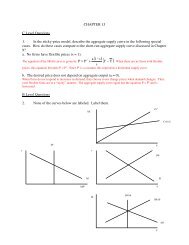
Objectives<br />
Upon completion of these guidelines, you will be able to:<br />
• Understand the uses and benefits of <strong>InDesign</strong><br />
• Create a basic layout using <strong>InDesign</strong> and its various functions<br />
• Start working on your master plan<br />
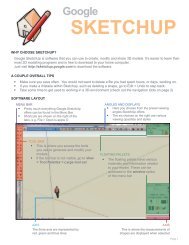
Why Choose <strong>InDesign</strong><br />
<strong>Adobe</strong> <strong>InDesign</strong> is a page layout program used to create booklets, brochures, newsletters and any<br />
printable document containing large amounts of text. It offers a wide range of tools to construct complex<br />
documents consisting of text and graphics. <strong>InDesign</strong> works closely with other <strong>Adobe</strong> products (such as<br />
Photoshop and Illustrator) making it easy to use the various software, depending on the task.<br />
Folder Structures<br />
It is a good idea to set up your folder organization beforehand. Create a folder on your Desktop or wherever<br />
you desire. All of the objects you place in your design, such as your images, need to be saved in this folder.<br />
I recommend creating another folder within your main folder and calling it images. This will help with the<br />
missing links trap later on.<br />
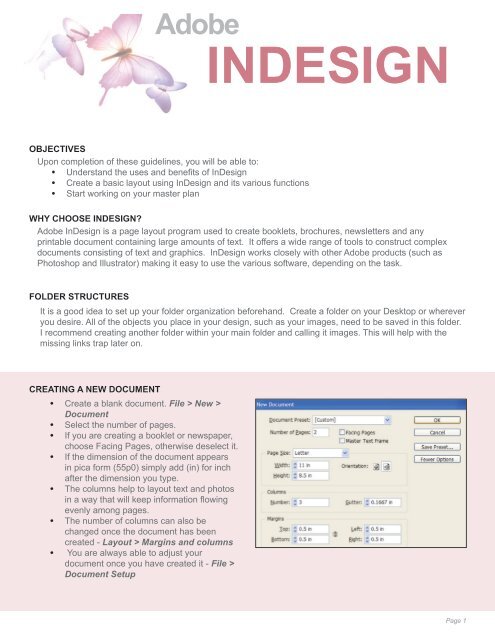
Creating a New Document<br />
• Create a blank document. File > New ><br />
Document<br />
• Select the number of pages.<br />
• If you are creating a booklet or newspaper,<br />
choose Facing Pages, otherwise deselect it.<br />
• If the dimension of the document appears<br />
in pica form (55p0) simply add (in) for inch<br />
after the dimension you type.<br />
• The columns help to layout text and photos<br />
in a way that will keep information flowing<br />
evenly among pages.<br />
• The number of columns can also be<br />
changed once the document has been<br />
created - Layout > Margins and columns<br />
• You are always able to adjust your<br />
document once you have created it - File ><br />
Document Setup<br />
Page 1
Software layout<br />
<strong>Adobe</strong>INDESIGN<br />
Menu Bar<br />
• Pretty much everything <strong>InDesign</strong><br />
offers can be found in the Menu Bar.<br />
• Shortcuts are shown on the right of<br />
the tabs, e.g. File > Open is apple O<br />
Properties Panel<br />
• Each tool you select from the tool<br />
bar has its own properties.<br />
- The text tool, for example,<br />
allows you to select a font family,<br />
alignment, etc.<br />
Tool Bar<br />
• This is where you access the tools you use to<br />
generate and modify content on your pages.<br />
• If the tool has an arrow on the bottom right it<br />
means there is more than one option. Hold<br />
the mouse down over the tool to choose.<br />
Rulers and Guides<br />
• The rulers and guides ensure everything<br />
is the correct size and is properly aligned.<br />
• Guides can be accessed by clicking on<br />
either the x or y axis ruler and dragging<br />
it. They will not appear on the final print.<br />
• You can hide or show your rulers, guides<br />
and frame edges by going to the View<br />
tab in the menu bar.<br />
Floating pallets<br />
• The floating pallets have various styles<br />
and information about objects related to<br />
your document.<br />
• You can access all the pallets through<br />
the window menu in the menu bar.<br />
• Pallets can be detached by grabbing the<br />
top bar and moving it.<br />
• All pallets have a menu option in the top<br />
right corner, giving you more options.<br />
Menu Button<br />
Page 2
<strong>Adobe</strong>INDESIGN<br />
The Tool Bar<br />
• The tool bar is located on the left hand side of the screen. If it is not visible, go to window > tools<br />
• Some of the tools have small arrows at the bottom right corner. This indicates there are more than one<br />
to select from. Hold the mouse over the tool and the others will be displayed.<br />
• Each tool has its own shortcut, e.g. the pen tool’s shortcut is the letter P. Make sure you are not using<br />
the text tool when attempting to use shortcuts, otherwise it will be added to the text box selected.<br />
Selection Tool (V)<br />
Select an image or text box<br />
and drag to move.<br />
Direct Selection Tool (A)<br />
Move image within bounding<br />
box. Also select and<br />
maneuver anchor points.<br />
Pen Tool (P)<br />
Draw a binding box to create<br />
odd shapes and precise<br />
illustrations<br />
Text Tool (T)<br />
Type text and get options<br />
for font families, paragraph<br />
settings and text alignment.<br />
Rectangle Tool (M)<br />
Draw a binding box to create<br />
odd shapes and precise<br />
illustrations<br />
Scale Tool (S)<br />
Change the size of images<br />
and bounding boxes<br />
Eye Dropper Tool (I)<br />
Use the eye dropper<br />
to select a color from a<br />
photograph or other object<br />
Stroke/Fill (X)<br />
Place a stroke or fill color<br />
on your text, image or<br />
bounding box<br />
Line Tool (\)<br />
Well... Draw a line<br />
Rotate Tool (R)<br />
Rotate an image or text box<br />
Gradient Tool (G)<br />
Place a color gradient on an<br />
object<br />
Zoom Tool (Z)<br />
Zoom in and out of your<br />
document. An easier shortcut<br />
is to hold Ctrl (apple on macs)<br />
and use the + or - button<br />
Document View<br />
This gives a choice of several<br />
preview options for your<br />
document. Hold down the<br />
mouse to choose more<br />
Page 3
<strong>Adobe</strong>INDESIGN<br />
Adding Text<br />
• Select the Type Tool<br />
- The Type Tool is the second tool on the right<br />
• Draw A Box<br />
-You must draw a box to be able to add text. Once you have a text box you can type normally right<br />
in to it. If your box is not big enough for all the text then you will see a red plus sign in the right<br />
corner of the text box. Make the text box larger the text will show up.<br />
• In the properties panel at the top of the screen, select a font family, size, alignment, etc.<br />
Properties Panel while text tool is selected<br />
Master Pages<br />
There is a page menu that allows you to see all the pages in your document and navigate between<br />
them. The master page allows you to set up a template for the entire document, for example you<br />
can add headings and page numbers to every page.<br />
Select A-Master Located on the bottom left corner of the<br />
screen. Any text or imagery your place in the master page will<br />
appear on every page in the document.<br />
Adding Page Numbers<br />
• Open the master page and draw a text box in<br />
the area you want your page number.<br />
• Go to Type > Insert Special Character ><br />
Markers > Current Page Number<br />
Changing Measurement Units<br />
To change unit measurements from picas to inches:<br />
• Go to Edit > Preferences > Units and<br />
increment<br />
• Change from picas to inches<br />
If you have a previous version of <strong>InDesign</strong>, page<br />
numbering might be found in this location<br />
Page 2
Importing Text<br />
<strong>Adobe</strong>INDESIGN<br />
<strong>InDesign</strong> also allows you to import text from existing files,<br />
which is helpful and ensures you do not lose any information<br />
as you may by cutting and pasting.<br />
• Click outside of the workspace. We need to make<br />
sure none of the boxes on the page are selected, if<br />
any are selected the text will be place inside it.<br />
• Go To File > Place.<br />
• Locate the text file (such as a word document, not<br />
including images) and click on open.<br />
• Your cursor will preview a thumbnail of your file.<br />
• Click and drag the mouse to draw your<br />
text box. If there is a red plus in the<br />
corner, this means there is more text to<br />
be placed.<br />
• Click on the red plus sign.<br />
• You will notice that your cursor will fill up<br />
with text again and look similar to when we placed<br />
the original file. Once again will click and drag to<br />
draw another text box and the remainder text will<br />
flow.<br />
Importing Images<br />
Importing photos is done the same way as text, only an<br />
image is selected rather then a text document:<br />
• Click outside of the workspace<br />
- We need to make sure none of the objects<br />
on the page are selected. So the image is not<br />
placed into another object.<br />
• Go to File > Place<br />
• Select the picture file and click open<br />
• You will notice your cursor is filled with the<br />
image. Click anywhere on the page to place the<br />
image into your document<br />
Page 3
<strong>Adobe</strong>INDESIGN<br />
Resizing<br />
• Select the Scale tool<br />
located on the tool bar.<br />
• Hold down the shift key on the keyboard. This<br />
is to keep the image in the correct proportion.<br />
• Click on the edge of the image and hold down<br />
the mouse. Move the mouse to change the size<br />
of the image.<br />
Cropping<br />
There are many ways to edit an image (or text box) to fit<br />
well into your document:<br />
• Choose the Selection tool (black arrow)<br />
- By using the selection arrow you can change<br />
the size of the box that the picture was placed in.<br />
• Select the Direct Selection tool (white arrow)<br />
- By using the direct selection arrow you can<br />
move the picture around within the picture frame.<br />
• Click and Hold directly on the image<br />
- As you begin moving the image you will notice<br />
it gives a preview of the remaining image outside<br />
the bounding box.<br />
Links<br />
Links are extremely important and without them you would not<br />
be able to print images at full quality.<br />
• To see if all your links are correct we need to bring up<br />
the links window (right)<br />
• Go to Window > Links<br />
This will bring up your links window. Your links window will<br />
show you many things including:<br />
• The file name<br />
• Whether the link is missing or has been modified<br />
• The page the image is located in<br />
Page 4
Text Wrap<br />
<strong>Adobe</strong>INDESIGN<br />
Once you have text and pictures you can use the text wrap option. To allow your text to wrap around<br />
selected objects:<br />
• Select the image you would like to add the text wrap to.<br />
- You will know it is selected when it has a blue<br />
box around it.<br />
• Go to Window > Type & Tables > Text Wrap<br />
- This will bring up a window which will have many<br />
text wrap options.<br />
• Choose a text wrap style at the top and customize the size<br />
of the margins on each side.<br />
Depending on the version of <strong>InDesign</strong> you have, you might get an<br />
option to link the margins. If a number is entered in one box it will<br />
be applied to all sides. To remove it just click on the image of the<br />
chain link in the center of the margins panel.<br />
Text Wrap<br />
Style<br />
Margins<br />
Rotating Objects<br />
<strong>InDesign</strong> allows you to rotate objects by using the rotate tool, located in the tool bar:<br />
• Select the object you would like to rotate<br />
• Select the rotate tool from the tool bar<br />
- You will notice your cursor is a cross.<br />
• Grab the edge of the object and begin moving your mouse.<br />
- The image you selected will begin to rotate. The blue<br />
dotted line shows what the rotated image will look like.<br />
Adding Color<br />
Adding color can bring life to your document. The easiest way to<br />
add a touch of color is through the swatches pallet.<br />
• Select text, an image or whatever object you would like<br />
to add color to.<br />
• On the Swatches tool bar, select the fill color on the top<br />
left corner.<br />
- You might need to open the swatches pallet from<br />
window > swatches if you don’t see it<br />
• The fill color will add color to the inside of your object<br />
while the stroke is the outline of your object.<br />
• After selecting the fill or stroke you simply Select the<br />
color from the swatches.<br />
• If you want to edit a color you can double click the color<br />
from the swatches. If you want to sample a color from a<br />
corresponding photograph you can select the eye drop<br />
tool and click on the desired color.<br />
Fill Color<br />
Stroke Color<br />
Page 5
Adding Shapes<br />
<strong>Adobe</strong>INDESIGN<br />
You can create various shapes in <strong>InDesign</strong> by using the shape tool and pen tool. Remember you can<br />
create rectangles, circles and polygons by holding down the mouse on the shape tool:<br />
• Select one of the shape tools. Click and drag to draw the shape.<br />
- If you hold down the shift key it will keep the<br />
correct proportions.<br />
• To draw a free form shape select the pen tool and click<br />
different areas to insert anchor points.<br />
- To draw curves hold down the mouse and move it<br />
around. It takes a bit of practice.<br />
Adding Gradients<br />
• Select or draw a new object such as a shape<br />
• Go to Window > Gradient<br />
- If you have <strong>InDesign</strong> CS3, grab the top of the gradient<br />
window and detach it from the rest of the group.<br />
• Open the swatches window and grab a color, dragging it down<br />
to the gradient window.<br />
- Add as many colors as you need and set your gradient<br />
type (The Gradient palette offers two effects, radial and linear).<br />
• Now grab the gradient box in the upper left section of the window and drag it back into the<br />
swatches window. You can now apply it to any object.<br />
Saving and Exporting<br />
It is important to save often when working with <strong>InDesign</strong> - you don’t<br />
want to lose everything!<br />
• Go to File > Save and determine where you want it saved<br />
(preferably with your images folder in the root folder). Click<br />
Save.<br />
• If you plan to have your document professionally printed it is<br />
best to save it as a PDF. To do this go to File > Export. Select<br />
<strong>Adobe</strong> PDF from the file types, name it and press save.<br />
-It is always best to check with the printer for their desired<br />
file type before you are scheduled to print.<br />
Extra Help<br />
For more help with <strong>InDesign</strong> I recommend first looking in Help and typing a keyword in the search<br />
box. Most problems can be solved by looking in this area.<br />
If you are still stuck you can reach me by e-mail at sterlingriber@gmail.com or by phone at<br />
360-715-2033.<br />
Another great resource on campus is the Student Technology Center located in Haggard Hall 121.<br />
Stop in to ask a question if you are stuck and are in the area.<br />
Reach them by phone at 360-650-4300.<br />
Page 6