Instruction Manual for Portable Basketball Stand
Instruction Manual for Portable Basketball Stand
Instruction Manual for Portable Basketball Stand

You also want an ePaper? Increase the reach of your titles
YUMPU automatically turns print PDFs into web optimized ePapers that Google loves.
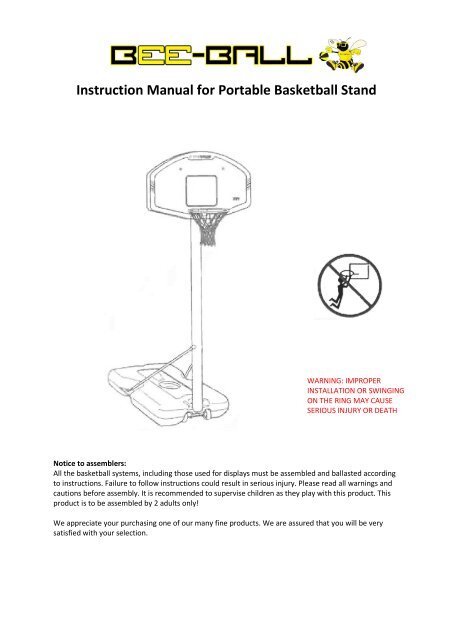
<strong>Instruction</strong> <strong>Manual</strong> <strong>for</strong> <strong>Portable</strong> <strong>Basketball</strong> <strong>Stand</strong><br />
WARNING: IMPROPER<br />
INSTALLATION OR SWINGING<br />
ON THE RING MAY CAUSE<br />
SERIOUS INJURY OR DEATH<br />
Notice to assemblers:<br />
All the basketball systems, including those used <strong>for</strong> displays must be assembled and ballasted according<br />
to instructions. Failure to follow instructions could result in serious injury. Please read all warnings and<br />
cautions be<strong>for</strong>e assembly. It is recommended to supervise children as they play with this product. This<br />
product is to be assembled by 2 adults only!<br />
We appreciate your purchasing one of our many fine products. We are assured that you will be very<br />
satisfied with your selection.
Parts List:<br />
Item Quantity Description<br />
1 1 Base<br />
2 1 Wheel Axle (29.5cm long)<br />
3 2 Wheels<br />
4 1 Top Pole<br />
5/6 1 Bottom and Middle Pole (middle<br />
pole already inserted)<br />
7 1 Rod (11.5cm)<br />
8 1 Eye Bolt<br />
9 1 Wheel Bracket<br />
10 2 Tank Support Strut<br />
11 1 Rim<br />
12 2 Backboard<br />
13 1 Net<br />
14 1 Cap <strong>for</strong> the top pole<br />
15 1 Tie down stake<br />
16 1 <strong>Instruction</strong>s<br />
17 1 T-Strap<br />
18 1 Tank Cap (already in place)<br />
19 2 19mm Bolt to fix support struts to<br />
base<br />
20 2 84mm Bolt to fix support struts to<br />
pole<br />
21 4 55mm Bolt to fix Rim to Backboard<br />
22 2 80mm Bolt to fix Backboard to Top<br />
Pole<br />
23 1 75mm Bolt to fix the top, middle<br />
and bottom poles<br />
24 11 Lock Nut with nylon insert<br />
25 2 Spacer <strong>for</strong> the Wheel Axle<br />
26 6 16mm Small Washers<br />
27 15 23mm Large Washers<br />
28 1 Nut (no nylon insert)
Wheel Axle #2 (29.5cm)<br />
Wheel #3<br />
Eye Bolt #8<br />
Wheel Bracket #9<br />
**Please note the middle (5) section is already<br />
located inside the bottom pole(6)**<br />
Rim #11<br />
Rod #7 (11.5cm)<br />
Backboard<br />
Backboard Bracket #12<br />
Net #13<br />
Struts # 10
19mm Bolt #19 x 2<br />
Pole end<br />
cap #14<br />
Tie down stake<br />
and T-strap #15<br />
& 17<br />
84mm Bolt #20 x 1<br />
55mm Bolt #21 x 4<br />
80mm Bolt #22 x 2 Spacer #25 x 2<br />
75mm Bolt #23 x 1<br />
Locking Nut #24 Nut #28<br />
23mm Washer #27 16mm Washer #26<br />
Assembly:<br />
Put the small pole (7) through the first hole in the bottom pole (6) then through the eyebolt (8) then<br />
through the other hole in the bottom pole (6). Using the long pole (2) slide the bracket (9) to the middle<br />
of the pole then put a wheel on each end of the pole. To secure the wheels on put one of spacers (25)<br />
on each side. Put the completed wheel set at the bottom of the base then put the screw (8) through the<br />
hole then put a nut (28) on the screw at the bottom to secure the bottom pole and wheel set. Note: two<br />
people recommended. The bottom pole (6) has a small pipe <strong>for</strong> a bolt to go through. It should be facing<br />
towards the base.
The middle pole (5) is already inside the bottom pole (6) when you turn the<br />
handle the middle pole will raise out of the bottom pole.<br />
Attach parts (10) to the Bottom pole using a bolt (20), two washers (27) and a nut (24). Attach parts (10)<br />
to the base using bolts (19) with four washers (27) and nuts (24). Completely tighten all base and pole<br />
brace hardware.<br />
Attach the ring (11) to the backboard and the braces (12) using four bolts (21) eight washers (27) and<br />
four nuts (24). Lay the stand down then put the pole cap (14) on. Note: if the fit is very tight use a drop<br />
of fairy liquid around the edge to help put the cap into the pole. Put the braces around the top pole and<br />
secure using bolts (22) and washers (26) and nuts (24). (Please note holes are pre-drilled on backboard)
Attach the net (13) to the ring (11) as shown below. <strong>Stand</strong> the unit up, recommended two people to lift<br />
it upright. Attach the instructions and warning stickers (16) to the middle pole.
Fill the tank with 114 litres of water or 165-170kgs of sand. Put the tank cap (18) in place. Insert the T-<br />
strap (17) through the slot on the back of the base as shown below. Secure the unit to the ground by<br />
twisting the tie down stake (15) into the ground and hooking the T-strap (17) onto the tie down stake<br />
(15).<br />
SAFTEY INSTRUCTIONS<br />
To ensure safety, do not attempt to assemble this system without following the instructions carefully.<br />
Check the entire box and inside all packing material <strong>for</strong> parts and/or additional instruction materials.<br />
Be<strong>for</strong>e beginning assembly, read the instructions and identify the parts using the hardware identifier<br />
and parts list in this document. Proper, complete assembly, use and supervision are essential <strong>for</strong> the<br />
proper operation and will reduce the risk of accident or injury. A high probability of serious injury exists<br />
if this system is not installed, maintained and operated properly.<br />
• If using a ladder during assembly, use extreme caution.<br />
• Two (2) capable adults are recommended <strong>for</strong> this operation<br />
• Check base regularly <strong>for</strong> leakage. Slow leaks could cause the system to tip over unexpectedly.<br />
• Seat the pole sections properly (if applicable). Failures to do so could allow the pole sections to<br />
separate during play and/or transport of the system.<br />
• Climate, corrosion, or misuse could result in system failure.<br />
• Minimum operational height is 6’6” (1.98m) to the bottom of the backboard<br />
• This equipment is intended <strong>for</strong> home recreational use only and NOT excessive competitive play.<br />
• Read and understand the warning label affixed to the pole.<br />
• The life of your basketball pole depends on many conditions. The climates, placement of the pole,<br />
location of the pole, exposure to corrosives such as pesticides, herbicides, or salts are all important.<br />
• Adult supervision is recommended when adjusting height.
Warning!<br />
Owner must ensure that all players know and follow these rules <strong>for</strong> the safe operation of the system.<br />
• DO NOT HANG on the rim or any part of the system including backboard, support braces or net.<br />
• During play, especially when per<strong>for</strong>ming dunk type activities, keep the player’s face away from the<br />
backboard, rim and net.<br />
Serious injury could occur if teeth/face come into contact with the backboard rim or net<br />
• Do not slide, climb shake or play on the base and/or pole.<br />
• After assembly is complete, fill the system completely with water or sand. Never leave the system in<br />
an upright position without filling the base with weight, as system may tip over causing injuries<br />
• When adjusting the height or moving the system, keep hands and fingers away from the moving<br />
parts.<br />
• Do not allow children to move or adjust the system<br />
• During play, do not wear jewellery (rings, watches, necklaces, etc) Objects may become entangled in<br />
the net.<br />
• The surface beneath the base must be smooth and free of gravel or other sharp objects. Punctures<br />
cause leakage and could cause the system to tip over.<br />
• Keep organic material away from the pole base. Grass, litter, etc could cause corrosion and/or<br />
deterioration.<br />
• Check the pole system <strong>for</strong> signs of corrosion (rust, pitting, chipping) and repaint with exterior<br />
enamel paint. If rust has penetrated through the steel anywhere, replace the pole immediately.<br />
• Check the system be<strong>for</strong>e each use <strong>for</strong> proper ballast, loose hardware, excessive wear and signs of<br />
corrosion and repair be<strong>for</strong>e use.<br />
• Check the system be<strong>for</strong>e each use <strong>for</strong> instability<br />
• Do not use the system during windy and/or severe weather conditions; the system may tip over.<br />
Place the system in the storage position and/or in an area protected from the wind and free from<br />
personal property and/or overhead wires.<br />
• Never play on damaged equipment<br />
• When moving the system, use caution to keep the mechanism from shifting<br />
• Keep the pole top covered with the cap at all times.<br />
• Do not allow the water in the tank to freeze. During sub-freezing weather add 2 gallons of non-toxic<br />
antifreeze, sand or empty the tank completely and store. (do not use salt)<br />
• While moving the system, do not allow anyone to stand or sit on the base or have added ballasting<br />
on the base.<br />
• Do not leave the system unsupervised or play on the system when the wheels are engaged <strong>for</strong><br />
moving<br />
• Use caution when moving the system across uneven surfaces as the system may tip over<br />
• Use extreme caution if placing the system on a sloped surface as the system m ay tip over more<br />
easily<br />
• See the instruction manual <strong>for</strong> proper installation and maintenance<br />
Height Adjustment<br />
To lower or raise the ring you need to wind the handle which is fixed to the middle pole.
Moving the System<br />
1. Adjust the basketball backboard height to the lowest position.<br />
2. While holding the pole rotate the basketball system <strong>for</strong>ward until the wheels<br />
engage with the ground<br />
3. Move the basketball system to the desired location<br />
4. Carefully rotate the basketball system upright<br />
5. Check the system <strong>for</strong> stability<br />
Garden Games Ltd, Holly House, Pinewoods Road, Longworth, Ox<strong>for</strong>dshire, OX13 5HG<br />
Tel: 01865 391060 Fax: 01865 392800<br />
Please retain assembly and installation instructions <strong>for</strong> further reference