An R107 back from the dead - VMARSmanuals
An R107 back from the dead - VMARSmanuals
An R107 back from the dead - VMARSmanuals

Create successful ePaper yourself
Turn your PDF publications into a flip-book with our unique Google optimized e-Paper software.
Issue 18<br />
On closer examination it was obvious that <strong>the</strong><br />
Perspex front had been cracked down <strong>the</strong> centre<br />
but after cleaning it looked reasonable and I<br />
decided to leave that in place. The dial however<br />
was almost bent into a banana shape and I<br />
carefully removed <strong>the</strong> small nuts and bolts to lift<br />
off <strong>the</strong> panel. If anyone knows of a way of<br />
straightening a panel that is approx. 60-year-old<br />
plastic and has delicate coloured dial motifs<br />
attached without damage I would be pleased to<br />
hear. First thing I did was carefully clean off <strong>the</strong><br />
worst of <strong>the</strong> filth that had accumulated with cotton<br />
wool and lukewarm water – no detergent as that<br />
seems to damage lettering for some reason – and<br />
<strong>the</strong>n spray <strong>the</strong> printed side with a plastic coating<br />
so that at least <strong>the</strong>re would be some protection.<br />
Ra<strong>the</strong>r than risk total destruction I kept <strong>the</strong> panel<br />
in a warm airing cupboard under some weights for<br />
quite a while but that didn’t work. In <strong>the</strong> end I<br />
replaced <strong>the</strong> <strong>back</strong>ing sheet <strong>from</strong> <strong>the</strong> dial with<br />
white plastic and <strong>the</strong>n re-fitted <strong>the</strong> original bolts<br />
with washers to pull <strong>the</strong> dial sheet <strong>back</strong> into place.<br />
This had <strong>the</strong> effect of limiting fur<strong>the</strong>r damage, as<br />
<strong>the</strong> plastic is quite brittle and kept <strong>the</strong> dial flat.<br />
The wiring was fur<strong>the</strong>r checked out in <strong>the</strong> unit, I<br />
cleaned off as much surface rust as possible<br />
without damaging anything else and checked <strong>the</strong><br />
valve bases for cracks and pin damage. These<br />
seemed to be OK as did <strong>the</strong> underneath<br />
components. There are a number of oddities with<br />
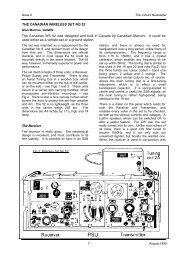
<strong>the</strong> <strong>R107</strong> in that <strong>the</strong> units are modular and <strong>the</strong><br />
only real way of gaining access to <strong>the</strong> valve bases<br />
on <strong>the</strong> RF and PSU unit is by removal of <strong>the</strong><br />
whole module and side plates even <strong>the</strong>n <strong>the</strong>re is<br />
very little room to move.<br />
There is evidence of corrosion around earth tags<br />
and joints but mainly <strong>the</strong> set was as you would<br />
expect <strong>from</strong> a receiver of this age being badly<br />
stored. All <strong>the</strong> decoupling capacitors are of <strong>the</strong><br />
waxed paper variety but to replace <strong>the</strong>m would be<br />
a major exercise. I replaced <strong>the</strong> RF unit <strong>back</strong> in<br />
<strong>the</strong> chassis, rewired <strong>the</strong> valve caps, re-installed<br />
<strong>the</strong> dial lights and reconnected <strong>the</strong> wiring at <strong>the</strong><br />
rear.<br />
Power on at last<br />
One of <strong>the</strong> areas that concerned me also was <strong>the</strong><br />
PSU as I would not have been surprised if that<br />
had been faulty but again it was complete and<br />
some one in <strong>the</strong> last 25 years had replaced <strong>the</strong><br />
8+8mmF smoothing capacitor with a modern<br />
equivalent. So with all <strong>the</strong> valves removed and<br />
<strong>the</strong> transformer isolated I attached a Variac to <strong>the</strong><br />
input and very slowly increased <strong>the</strong> mains input to<br />
about 80% of normal mains input. The<br />
transformer didn’t flinch as this was happening<br />
and I kept a very careful watch on <strong>the</strong> current and<br />
The VMARS Newsletter<br />
voltage output just in case something unpleasant<br />
was about to happen.<br />
No bangs were heard or any unpleasant burning<br />
smells so I took <strong>the</strong> risk and started to check all<br />
<strong>the</strong> voltages out <strong>from</strong> <strong>the</strong> transformer. There were<br />
no problems so <strong>the</strong> next stage was to replace <strong>the</strong><br />
6X5G rectifier and test <strong>the</strong> DC voltage that is<br />
available on <strong>the</strong> <strong>back</strong> panel of <strong>the</strong> PSU unit.<br />
In between time I was trying very hard to get a<br />
manual and thanks to Radio Bygones for <strong>the</strong>ir<br />
mailbox but mainly to Colin Guy for <strong>the</strong> VMARS<br />
copy of <strong>the</strong> whole manual being available on <strong>the</strong><br />
web page – now I was really ready. Incidentally<br />
be aware that sometimes you end up with <strong>the</strong><br />
manual for an HRO variant if you specify <strong>R107</strong><br />
<strong>from</strong> some manual suppliers.<br />
I managed to source a 6K7G to replace <strong>the</strong><br />
missing EF39 and with a full compliment of valves<br />
I repeated <strong>the</strong> voltage check on <strong>the</strong> PSU. It never<br />
ceases to amaze me just how well built some of<br />
this kit is given <strong>the</strong> pressures that people were<br />
under and <strong>the</strong> urgency for developing <strong>the</strong>se sets<br />
yet few short cuts were taken. All <strong>the</strong> voltages<br />
were correct within reasonable levels and that<br />
made me decide to carry on now and finish <strong>the</strong><br />
electrical restoration even if cosmetically <strong>the</strong><br />
receiver looked tatty.<br />
Certainly <strong>the</strong> VFO worked first time even with <strong>the</strong><br />
unknown state of <strong>the</strong> de-couplers and a strong<br />
note was heard on my monitor receiver (TS940 –<br />
even I have some modern (12 years old) kit) and<br />
<strong>the</strong> frequency was close enough for an initial<br />
check. I traced a signal through <strong>the</strong> chain and<br />
apart <strong>from</strong> a possible issue with <strong>the</strong> AF filter<br />
attenuating <strong>the</strong> signal it basically was working.<br />
There was no audio <strong>from</strong> <strong>the</strong> speaker and this was<br />
traced to faulty LS on/off connector, corroded<br />
switch and damaged speaker.<br />
There was plenty of audio through <strong>the</strong> Tel. output<br />
socket and once I replaced <strong>the</strong> speaker that also<br />
worked. What I need now is to find an original<br />
replacement for <strong>the</strong> speaker but at present it is<br />
working. One thing I have noticed is that <strong>the</strong><br />
aerial tuning control, a small 50pF capacitor, will<br />
cause <strong>the</strong> set to oscillate in certain positions quite<br />
badly and I am not sure whe<strong>the</strong>r that is a fault or<br />
is a design issue – any ideas The next steps are<br />
to get <strong>the</strong> knobs off <strong>the</strong> set or find replacements,<br />
run through <strong>the</strong> performance and bring it <strong>back</strong> to<br />
original specification and <strong>the</strong>n tidy up <strong>the</strong><br />
cosmetics.<br />
So despite many years of serious neglect and<br />
damage this <strong>R107</strong> is now working and pulls in<br />
reasonable signals, as did my old one, I’d love to<br />
partner this with a Type 12 sender but <strong>the</strong>n I would<br />
need to move!!<br />
15 August 2001