Installation and Operation Manual For Hunter Ceiling ... - Hunter Fan
Installation and Operation Manual For Hunter Ceiling ... - Hunter Fan
Installation and Operation Manual For Hunter Ceiling ... - Hunter Fan

Create successful ePaper yourself
Turn your PDF publications into a flip-book with our unique Google optimized e-Paper software.
®<br />
26<br />
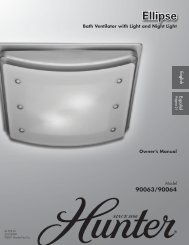
STEP 11 - INSTALLING LIGHT FIXTURE<br />
Your fan may include a light fixture.<br />
Information for wiring <strong>and</strong> installing<br />
all included <strong>Hunter</strong> light fixtures follows.<br />
Note: If you purchased a fan without<br />
a light fixture, you may purchase<br />
an accessory light kit separately. <strong>For</strong><br />
best performance <strong>and</strong> beauty, use<br />
only <strong>Hunter</strong>-br<strong>and</strong> light kits, Type A-<br />
Z. <strong>Hunter</strong> light kits are designed,<br />
tested, <strong>and</strong> UL approved for all<br />
<strong>Hunter</strong> fans, <strong>and</strong> are available at<br />
most <strong>Hunter</strong> dealers. To install the<br />
light kit, follow the instructions included<br />
with the kit.<br />
If you are not installing a light fixture,<br />
turn to OPERATING YOUR<br />
HUNTER FAN for additional instructions.<br />
WARNING<br />
• To avoid possible electrical<br />
shock, before installing<br />
light fixtures, disconnect<br />
power by turning off the<br />
circuit breakers both to the<br />
outlet box <strong>and</strong> to its associated<br />
wall switch location.<br />
If you cannot lock the circuit<br />
breakers in the off position,<br />
securely fasten a<br />
prominent warning device,<br />
such as a tag, to the service<br />
panel.<br />
• Connect house wiring to<br />
the fan before attaching<br />
the light fixture to the fan.<br />
• All wiring must be in accordance<br />
with national <strong>and</strong> local<br />
electrical codes <strong>and</strong><br />
ANSI/NFPA 70. If you are<br />
unfamiliar with wiring, you<br />
should use a qualified electrician.<br />
INSTALLING INCLUDED ACCES-<br />
SORY LIGHT KIT<br />
1. Remove the plug <strong>and</strong> switch<br />
housing caps from the lower<br />
switch housing. Refer to Figure<br />
11a.<br />
Note: Do not discard the caps.<br />
You will need this if you remove<br />
the light fixture in the future.<br />
2. Locate the white wire <strong>and</strong> the<br />
black wire coming from the light<br />
fixture.<br />
3. Thread the two wires from the<br />
light fixture through the center<br />
hole in the lower switch housing.<br />
Be sure to thread the black wire<br />
with the larger connector head<br />
through first <strong>and</strong> then thread the<br />
white wire with the smaller connector<br />
head through.<br />
41457-01 7/2000