Handheld meter Oxi 330i/340i - Fagerberg
Handheld meter Oxi 330i/340i - Fagerberg
Handheld meter Oxi 330i/340i - Fagerberg

You also want an ePaper? Increase the reach of your titles
YUMPU automatically turns print PDFs into web optimized ePapers that Google loves.
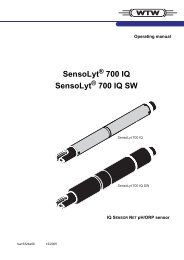
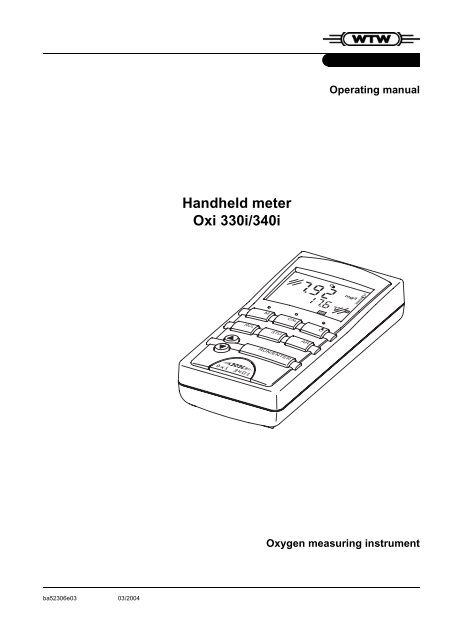
Operating manual<br />
<strong>Handheld</strong> <strong>meter</strong><br />
<strong>Oxi</strong> <strong>330i</strong>/<strong>340i</strong><br />
O<br />
7 9 2<br />
M<br />
1 7 6<br />
ARng<br />
°C<br />
TP<br />
mg/l<br />
CAL<br />
RCL<br />
STO<br />
O<br />
AR<br />
Oxygen measuring instrument<br />
ba52306e03 03/2004
Accuracy when<br />
going to press<br />
The use of advanced technology and the high quality standard of our<br />
instruments are the result of continuous development. This may result<br />
in differences between this operating manual and your instrument. Also,<br />
we cannot guarantee that there are absolutely no errors in this manual.<br />
Therefore, we are sure you will understand that we cannot accept<br />
any legal claims resulting from the data, figures or descriptions.<br />
Warranty<br />
We guarantee the instrument described for 3 years from the date of<br />
purchase.<br />
The instrument warranty covers manufacturing faults that are discovered<br />
within the warranty period. The warranty does not cover components<br />
that are replaced during maintenance work, e.g. batteries.<br />
The warranty claim extends to restoring the instrument to readiness for<br />
use but not, however, to any further claim for damages. Improper handling<br />
or unauthorized opening of the instrument invalidates any warranty<br />
claim.<br />
To ascertain the warranty liability, return the instrument and proof of<br />
purchase together with the date of purchase freight paid or prepaid.<br />
Copyright<br />
© Weilheim 2004 WTW GmbH<br />
Reproduction in whole - or even in part - is prohibited without the express<br />
written permission of WTW GmbH, Weilheim.<br />
Printed in Germany.
<strong>Oxi</strong> <strong>330i</strong>/<strong>340i</strong><br />
List of contents<br />
1 Overview . . . . . . . . . . . . . . . . . . . . . . . . . . . . . . . . . . . . . 5<br />
1.1 SETs of equipment . . . . . . . . . . . . . . . . . . . . . . . . . . . . . . 6<br />
1.2 Keypad . . . . . . . . . . . . . . . . . . . . . . . . . . . . . . . . . . . . . . . 7<br />
1.3 Display . . . . . . . . . . . . . . . . . . . . . . . . . . . . . . . . . . . . . . . 8<br />
1.4 Jack field . . . . . . . . . . . . . . . . . . . . . . . . . . . . . . . . . . . . . 8<br />
2 Safety . . . . . . . . . . . . . . . . . . . . . . . . . . . . . . . . . . . . . . . . 9<br />
2.1 Authorized use . . . . . . . . . . . . . . . . . . . . . . . . . . . . . . . . . 9<br />
2.2 General safety instructions . . . . . . . . . . . . . . . . . . . . . . . 10<br />
3 Commissioning . . . . . . . . . . . . . . . . . . . . . . . . . . . . . . . 11<br />
3.1 Scope of delivery . . . . . . . . . . . . . . . . . . . . . . . . . . . . . . 11<br />
3.2 Initial commissioning . . . . . . . . . . . . . . . . . . . . . . . . . . . 11<br />
4 Operation . . . . . . . . . . . . . . . . . . . . . . . . . . . . . . . . . . . . 13<br />
4.1 Switching on the measuring instrument . . . . . . . . . . . . . 13<br />
4.2 Measuring . . . . . . . . . . . . . . . . . . . . . . . . . . . . . . . . . . . 14<br />
4.2.1 General information . . . . . . . . . . . . . . . . . . . . . . 14<br />
4.2.2 Measuring the D. O. concentration . . . . . . . . . . 15<br />
4.2.3 Measuring the D. O. saturation . . . . . . . . . . . . . 16<br />
4.2.4 Measuring the D. O. partial pressure . . . . . . . . 16<br />
4.2.5 Selecting the measuring range, AutoRange . . . 17<br />
4.2.6 AutoRead AR (drift control) . . . . . . . . . . . . . . . . 18<br />
4.3 Calibrating . . . . . . . . . . . . . . . . . . . . . . . . . . . . . . . . . . . 19<br />
4.3.1 Calibrating with the air calibration vessel . . . . . 21<br />
4.3.2 Calibrating via a comparison measurement . . . 23<br />
4.3.3 Entering the salt content (salinity) . . . . . . . . . . . 25<br />
4.4 Saving . . . . . . . . . . . . . . . . . . . . . . . . . . . . . . . . . . . . . . 26<br />
4.4.1 Saving manually . . . . . . . . . . . . . . . . . . . . . . . . 26<br />
4.4.2 Saving automatically . . . . . . . . . . . . . . . . . . . . . 28<br />
4.4.3 Outputting the data storage . . . . . . . . . . . . . . . . 30<br />
4.4.4 Clearing the memory . . . . . . . . . . . . . . . . . . . . . 34<br />
4.5 Transmitting data (only <strong>Oxi</strong> <strong>340i</strong>) . . . . . . . . . . . . . . . . . . 35<br />
4.5.1 Data transmission interval (Int 2, <strong>Oxi</strong> <strong>340i</strong>) . . . . 35<br />
4.5.2 Recorder (analog output, <strong>Oxi</strong> <strong>340i</strong>) . . . . . . . . . . 37<br />
4.5.3 PC/external printer (RS 232 interface, <strong>Oxi</strong> <strong>340i</strong>) 38<br />
4.5.4 Remote control (<strong>Oxi</strong> <strong>340i</strong>) . . . . . . . . . . . . . . . . . 38<br />
4.6 Configuration . . . . . . . . . . . . . . . . . . . . . . . . . . . . . . . . . 39<br />
4.7 Reset . . . . . . . . . . . . . . . . . . . . . . . . . . . . . . . . . . . . . . . 42<br />
5 Maintenance, cleaning, disposal . . . . . . . . . . . . . . . . . 45<br />
5.1 Maintenance . . . . . . . . . . . . . . . . . . . . . . . . . . . . . . . . . . 45<br />
5.2 Cleaning . . . . . . . . . . . . . . . . . . . . . . . . . . . . . . . . . . . . . 46<br />
5.3 Disposal . . . . . . . . . . . . . . . . . . . . . . . . . . . . . . . . . . . . . 46<br />
3
List of contents<br />
<strong>Oxi</strong> <strong>330i</strong>/<strong>340i</strong><br />
6 What to do if... . . . . . . . . . . . . . . . . . . . . . . . . . . . . . . . . 47<br />
7 Technical data . . . . . . . . . . . . . . . . . . . . . . . . . . . . . . . . 51<br />
8 Lists . . . . . . . . . . . . . . . . . . . . . . . . . . . . . . . . . . . . . . . . 57<br />
4
<strong>Oxi</strong> <strong>330i</strong>/<strong>340i</strong><br />
Overview<br />
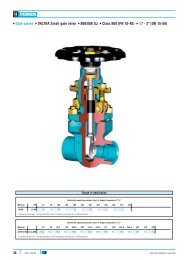
1 Overview<br />
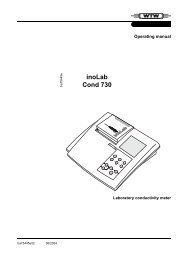
The compact precision handheld <strong>meter</strong> <strong>Oxi</strong> <strong>330i</strong>/<strong>340i</strong> enables you to<br />
carry out oxygen (D. O.) measurements rapidly and reliably.<br />
The <strong>Oxi</strong><strong>330i</strong>/<strong>340i</strong> handheld <strong>meter</strong> provides the maximum degree of operating<br />
comfort, reliability and measuring certainty for all applications.<br />
The proven <strong>Oxi</strong>Cal ® calibration procedure and the special AutoRead<br />
function support you in your work with the <strong>Oxi</strong> handheld <strong>meter</strong>.<br />
3<br />
M<br />
7 9 2<br />
1 7 6<br />
ARng<br />
O<br />
°C<br />
mg/l<br />
TP<br />
2<br />
STO<br />
CAL<br />
RCL<br />
AR<br />
O<br />
1<br />
1 Keypad<br />
2 Sample display<br />
3 Jack field<br />
Note<br />
If you need further information or application notes, you can obtain the<br />
following material from WTW:<br />
Application reports<br />
Primers<br />
Safety datasheets.<br />
You will find information on available literature in the WTW catalog or<br />
via the Internet.<br />
5
Overview<br />
<strong>Oxi</strong> <strong>330i</strong>/<strong>340i</strong><br />
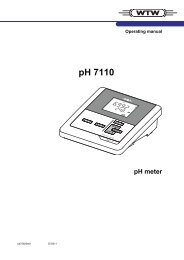
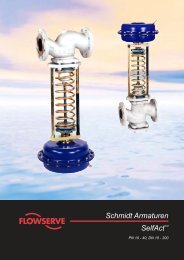
1.1 SETs of equipment<br />
The measuring instrument is also available as part of individual SETs<br />
of equipment. You will find additional information on this and other accessories<br />
in the WTW catalog or via the Internet.<br />
5<br />
4<br />
1<br />
3<br />
Set (sample configuration):<br />
2<br />
1 Measuring instrument, <strong>Oxi</strong> <strong>330i</strong>/<strong>340i</strong><br />
2 Stand<br />
3 – 50 ml ELY/G electrolyte solution for D.O. probes<br />
– 50 ml RL/G cleaning solution for D.O. probes<br />
– 3 WP 90/3 exchange membrane heads<br />
– SF300 abrasive film for D.O. probes<br />
4 CellOx 325 D.O. probe with calibration vessel<br />
5 Plug-in power supply, optional (<strong>340i</strong> only)<br />
6
<strong>Oxi</strong> <strong>330i</strong>/<strong>340i</strong><br />
Overview<br />
1.2 Keypad<br />
M<br />
STO<br />
CAL<br />
RCL<br />
AR<br />
RUN/ENTER<br />
Key functions<br />
M<br />
STO<br />
Select the measuring mode :<br />
– D. O. concentration<br />
– D. O. saturation<br />
– D. O. partial pressure<br />
Save a measured value<br />
<br />
Switch measuring instrument on/off<br />
<br />
CAL<br />
RCL<br />
AR<br />
Calibration; Select the calibration procedure<br />
<br />
Display/transmit measured values<br />
<br />
Activate/deactivate the AutoRead function<br />
<br />
RUN/ENTER<br />
Switch on the salt content correction,<br />
Increase values, scroll<br />
<br />
Switch off the salt content correction,<br />
Decrease values, scroll<br />
<br />
Confirm entries, start AutoRead<br />
<br />
7
Overview<br />
<strong>Oxi</strong> <strong>330i</strong>/<strong>340i</strong><br />
1.3 Display<br />
Status display<br />
S<br />
1Time<br />
Day.Month<br />
Year<br />
TDS UpHO<br />
Sal<br />
mV/pH<br />
% mg/l<br />
8 8 8<br />
mS/<br />
cm<br />
mbar M cm<br />
Baud<br />
1/cmSal<br />
No.<br />
° TP<br />
Ident<br />
88<br />
.8<br />
C<br />
°F % / K<br />
Tref25 Tref20 AutoCal DIN Auto Store<br />
LoBat nLF Lin Cal AutoCal TEC ARng AR<br />
RCL<br />
Sensor symbol<br />
Meas. value display<br />
Function and<br />
temperature display<br />
1.4 Jack field<br />
3<br />
1 2<br />
1 D. O. probe<br />
2 Plug-in power supply (optional) - <strong>Oxi</strong> <strong>340i</strong> only<br />
3 Serial interface RS 232 / analog output (recorder) ,<br />
<strong>Oxi</strong> <strong>340i</strong> only<br />
Warning<br />
Only connect probes to the measuring instrument that cannot return<br />
any voltages or currents that are not allowed<br />
(> SELV and > current circuit with current limiting).<br />
Nearly all probes - especially WTW probes - fulfill these conditions.<br />
8
<strong>Oxi</strong> <strong>330i</strong>/<strong>340i</strong><br />
Safety<br />
2 Safety<br />
This operating manual contains basic instructions that you must follow<br />
during the commissioning, operation and maintenance of the measuring<br />
instrument. Consequently, all responsible personnel must read this<br />
operating manual before working with the measuring system. The operating<br />
manual must always be available within the vicinity of the measuring<br />
system.<br />
Target group<br />
The measuring instrument was developed for work in the field and in<br />
the laboratory.<br />
We assume that, as a result of their professional training and experience,<br />
the operators will know the necessary safety precautions to take<br />
when handling chemicals.<br />
Safety<br />
instructions<br />
The individual chapters of this operating manual use safety instructions<br />
such as the label shown below to indicate various hazards or dangers:<br />
Warning<br />
indicates instructions that must be followed precisely in order to avoid<br />
the possibility of slight injuries or damage to the instrument or the environment.<br />
Further notes<br />
Note<br />
indicates notes that draw your attention to special features.<br />
Note<br />
indicates cross-references to other documents, e.g. operating manuals.<br />
2.1 Authorized use<br />
The authorized use of the measuring instrument consists exclusively of<br />
the measurement of the dissolved oxygen (D. O.) content of liquid media<br />
in the field and laboratory.<br />
The technical specifications as given in chapter 7 TECHNICAL DATA must<br />
be observed. Only the operation and running of the measuring instrument<br />
according to the instructions given in this operating manual is authorized.<br />
Any other use is considered to be unauthorized.<br />
9
Safety<br />
<strong>Oxi</strong> <strong>330i</strong>/<strong>340i</strong><br />
2.2 General safety instructions<br />
This instrument is built and inspected according to the relevant guidelines<br />
and norms for electronic measuring instruments (see chapter 7<br />
TECHNICAL DATA).<br />
It left the factory in a safe and secure technical condition.<br />
Function and operating<br />
safety<br />
The smooth functioning and operational safety of the measuring instrument<br />
can only be guaranteed if the generally applicable safety measures<br />
and the specific safety instructions in this operating manual are<br />
followed during operation.<br />
The smooth functioning and operational safety of the measuring instrument<br />
can only be guaranteed under the environmental conditions that<br />
are specified in chapter 7 TECHNICAL DATA.<br />
If the instrument was transported from a cold environment to a warm<br />
environment, the formation of condensate can lead to the faulty functioning<br />
of the instrument. In this event, wait until the temperature of the<br />
instrument reaches room temperature before putting the instrument<br />
back into operation.<br />
Safe operation<br />
If safe operation is no longer possible, the instrument must be taken out<br />
of service and secured against inadvertent operation!<br />
Safe operation is no longer possible if the measuring instrument:<br />
has been damaged in transport<br />
has been stored under adverse conditions for a lengthy period of<br />
time<br />
is visibly damaged<br />
no longer operates as described in this manual.<br />
If you are in any doubt, please contact the supplier of the instrument.<br />
Obligations of the<br />
purchaser<br />
The purchaser of the measuring instrument must ensure that the following<br />
laws and guidelines are observed when using dangerous substances:<br />
EEC directives for protective labor legislation<br />
National protective labor legislation<br />
Safety regulations<br />
Safety datasheets of the chemical manufacturers.<br />
10
<strong>Oxi</strong> <strong>330i</strong>/<strong>340i</strong><br />
Commissioning<br />
3 Commissioning<br />
3.1 Scope of delivery<br />
<strong>Handheld</strong> <strong>meter</strong>, <strong>Oxi</strong> <strong>330i</strong> or <strong>340i</strong><br />
Plug-in power supply, optional (<strong>340i</strong> only)<br />
Operating manual and short operating manual<br />
4 batteries, 1.5 V Mignon type AA (in the instrument)<br />
3.2 Initial commissioning<br />
Perform the following activities:<br />
Set the date and time<br />
Connect the plug-in power supply, optional (<strong>340i</strong> only)<br />
Setting the date and<br />
time<br />
1 Press the key and hold it down.<br />
2 Press the key.<br />
The display test appears briefly on the display.<br />
3 Press the key repeatedly until the date appears<br />
on the display.<br />
4 Set the date of the current day with .<br />
5 Confirm with .<br />
The date (month) flashes in the display.<br />
6 Set the current month with .<br />
7 Confirm with .<br />
The year appears on the display.<br />
8 Set the current year with .<br />
9 Confirm with .<br />
The hours flash on the display.<br />
10 Set the current time with .<br />
11 Confirm with .<br />
The minutes flash on the display.<br />
12 Set the current time with .<br />
13 Confirm with .<br />
The instrument switches to the measuring mode, the sensor<br />
symbol flashes.<br />
14 Switch the instrument off using .<br />
11
Commissioning<br />
<strong>Oxi</strong> <strong>330i</strong>/<strong>340i</strong><br />
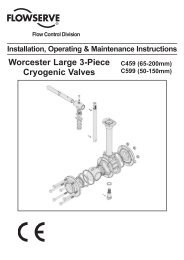
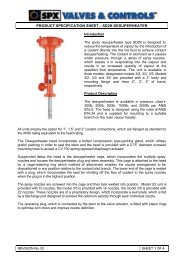
Connecting the plug-in<br />
power supply<br />
(<strong>340i</strong>)<br />
You can either operate the measuring instrument with batteries or with<br />
the plug-in power supply. The plug-in power supply supplies the oxygen<br />
measuring instrument <strong>340i</strong> with low voltage (12 V DC). This saves<br />
the batteries.<br />
Warning<br />
The line voltage at the operating site must lie within the input voltage<br />
range of the original plug-in power supply (see<br />
chapter 7 TECHNICAL DATA).<br />
Warning<br />
Use original plug-in power supplies only (see<br />
chapter 7 TECHNICAL DATA).<br />
2<br />
3<br />
1<br />
1 Plug the jack (1) into the socket (2) of the measuring instrument.<br />
2 Connect the original WTW plug-in power supply (3) to an easily<br />
accessible mains socket.<br />
Note<br />
You can also measure without the plug-in power supply. The functions<br />
of a connected stirrer, however, can only be used when the plug-in<br />
power supply is connected.<br />
12
<strong>Oxi</strong> <strong>330i</strong>/<strong>340i</strong><br />
Operation<br />
4 Operation<br />
4.1 Switching on the measuring instrument<br />
1 Connect the D. O. probe to the measuring instrument.<br />
2 Press the key.<br />
The display test appears briefly on the display.<br />
The relative slope for the probe type that was just connected<br />
subsequently appears for approx. one second.<br />
The measuring instrument then automatically switches to the<br />
measuring mode that was last selected. The display shows the<br />
relevant measured value.<br />
Note<br />
The measuring instrument has an energy saving feature to avoid unnecessary<br />
battery depletion. The energy saving feature switches the<br />
measuring instrument off if no key has been pressed for an hour. The<br />
energy saving feature is not active when the AutoStore function is active.<br />
Measuring instrument<br />
<strong>340i</strong><br />
The energy saving feature is also not active<br />
if the power is supplied by the plug-in power supply,<br />
if the communication cable and a PC with a running communication<br />
program are connected,<br />
if the recorder cable is connected,<br />
if the printer cable is connected (for external printers).<br />
13
Operation<br />
<strong>Oxi</strong> <strong>330i</strong>/<strong>340i</strong><br />
4.2 Measuring<br />
4.2.1 General information<br />
You can measure the following variables:<br />
D. O. concentration<br />
D. O. saturation<br />
D. O. partial pressure<br />
The measuring instrument is supplied with the following functions:<br />
AutoRange (automatic measurement range selection),<br />
The AutoRead function (drift control) for checking the stability of the<br />
measurement signal. This ensures the reproducibility of the measuring<br />
signal. For details of how to switch the AutoRead function on/off,<br />
see section 4.2.6.<br />
Preparatory activities<br />
Perform the following preparatory activities when you want to measure:<br />
1 Connect the D. O. probe to the measuring instrument.<br />
2 In conjunction with the D. O. probe, check or calibrate the measuring<br />
instument. How to calibrate is described in section 4.3.<br />
3 Select the measuring mode with .<br />
Note<br />
Incorrect calibration of D. O. probes will result in incorrect measured<br />
values. Calibrate at regular intervals.<br />
Note<br />
The <strong>Oxi</strong> <strong>340i</strong> handheld oxygen <strong>meter</strong> automatically recognizes the type<br />
of D.O. sensor that is connected (CellOx 325 or DurOx 325).<br />
Temperature sensor<br />
The D. O. probe has an integrated temperature sensor that always<br />
measures the current temperature of the test sample.<br />
Warning<br />
When connecting an earthed PC/printer, measurements cannot be performed<br />
in earthed media as incorrect values would result. The RS 232<br />
interface is not galvanically isolated.<br />
14
<strong>Oxi</strong> <strong>330i</strong>/<strong>340i</strong><br />
Operation<br />
4.2.2 Measuring the D. O. concentration<br />
Note<br />
When measuring the concentration of test samples with a salt content<br />
of more than 1 g/l, a salinity correction is required. For this, you have to<br />
measure and input the salinity of the measured medium first. This is described<br />
in section 4.3.3 ENTERING THE SALT CONTENT (SALINITY).<br />
Before measuring the oxygen, you have to switch on the salt content<br />
correction (see below).<br />
You can measure the oxygen content without a salt content correction<br />
as follows:<br />
1 Perform the preparatory activities according to section 4.2.1.<br />
2 Immerse the D. O. probe in the test sample.<br />
3 Press the key repeatedly until the D. O. concentration in<br />
mg/l appears on the display.<br />
S<br />
1<br />
TDS UpHO<br />
Sal<br />
mV/pH<br />
% mg/l<br />
7 9 2<br />
mS/<br />
cm<br />
mbar M cm<br />
Baud<br />
1/cmSal<br />
No.<br />
% /K TP<br />
Ident<br />
8 1 7 °F<br />
°C<br />
Time<br />
Day.Month<br />
Year<br />
6<br />
Tref25 Tref20 AutoCal DIN Auto Store<br />
LoBat nLF Lin Cal AutoCal TEC ARng AR<br />
RCL<br />
Switching on/off the salt<br />
content correction<br />
Proceed as follows to switch on the salt content correction:<br />
1 In the D. O. concentration measuring mode, switch on the salt<br />
content correction with . The SAL display indicator appears<br />
on the display. The value that was entered is taken into<br />
consideration during the measurement (see section 4.3.3).<br />
S<br />
1<br />
TDS UpHO<br />
Sal<br />
mV/pH<br />
% mg/l<br />
5 4 2<br />
mS/ cm<br />
mbar M cm<br />
Baud<br />
1/cmSal<br />
No.<br />
% /K TP<br />
Ident<br />
8 1 7 °F<br />
°C<br />
Time<br />
Day.Month<br />
Year<br />
6<br />
Tref25 Tref20 AutoCal DIN Auto Store<br />
LoBat nLF Lin Cal AutoCal TEC ARng AR<br />
RCL<br />
15
Operation<br />
<strong>Oxi</strong> <strong>330i</strong>/<strong>340i</strong><br />
2 Switch the salt content correction off with . The SAL display<br />
indicator is no longer displayed.<br />
4.2.3 Measuring the D. O. saturation<br />
You can measure the D. O. saturation as follows:<br />
1 Perform the preparatory activities according to section 4.2.1.<br />
2 Immerse the D. O. probe in the test sample.<br />
3 Press the key repeatedly until the saturation in % appears<br />
on the display.<br />
S<br />
1<br />
TDS UpHO<br />
Sal<br />
mV/pH<br />
% mg/l<br />
8 9 2<br />
mS/<br />
cm<br />
mbar M cm<br />
Baud<br />
1/cmSal<br />
°C<br />
Time<br />
Day.Month No.<br />
% /K TP<br />
Year Ident<br />
8 1 7 6°F<br />
Tref25 Tref20 AutoCal DIN Auto Store<br />
LoBat nLF Lin Cal AutoCal TEC ARng AR RCL<br />
4.2.4 Measuring the D. O. partial pressure<br />
You can measure the D. O. partial pressure as follows:<br />
1 Perform the preparatory activities according to section 4.2.1.<br />
2 Immerse the D. O. probe in the test sample.<br />
3 Press the key repeatedly until the partial pressure in mbar<br />
appears on the display.<br />
16
<strong>Oxi</strong> <strong>330i</strong>/<strong>340i</strong><br />
Operation<br />
4.2.5 Selecting the measuring range, AutoRange<br />
Sensors<br />
AutoRange<br />
You can use the DurOx 325 or CellOx 325 sensors. If the automatic<br />
recognition function recognizes the DurOx 325 sensor, the measurement<br />
is carried out at a lower resolution. The CellOx 325 sensor measures<br />
with a resolution that is a factor of 10 higher.<br />
Each of the measuring para<strong>meter</strong>s has 2 measuring ranges available.<br />
AutoRange causes the measuring instrument to change to measuring<br />
range II if measuring range I is exceeded, and also vice versa.<br />
To switch the automatic measurement range selection on/off, see section<br />
4.6 CONFIGURATION. When the AutoRange function is switched on,<br />
ARng appears on the display.<br />
S<br />
1<br />
TDS UpHO<br />
Sal<br />
mV/pH<br />
% mg/l<br />
7 9 2<br />
mS/<br />
cm<br />
mbar M cm<br />
Baud<br />
1/cmSal<br />
No.<br />
% /K TP<br />
Ident<br />
8 1 7 °F<br />
°C<br />
Time<br />
Day.Month<br />
Year<br />
6<br />
Tref25 Tref20 AutoCal DIN Auto Store<br />
LoBat nLF Lin Cal AutoCal TEC ARng AR<br />
RCL<br />
Measuring ranges/<br />
resolutions with<br />
CellOx 325 D. O. probe<br />
Measuring range I<br />
Resolution<br />
mg/l % mbar<br />
0 ... 19.99<br />
0.01<br />
0 ... 199.9<br />
0.1<br />
0 ... 199.9<br />
0.1<br />
Measuring range II<br />
Resolution<br />
0 ... 90.0<br />
0.1<br />
0 ... 600<br />
1<br />
0 ... 1250<br />
1<br />
Measuring ranges/<br />
resolutions with<br />
DurOx 325 D. O. probe<br />
Measuring range I<br />
Resolution<br />
mg/l % mbar<br />
0 ... 19.9<br />
0.1<br />
0 ... 199<br />
1<br />
0 ... 199<br />
1<br />
Measuring range II<br />
Resolution<br />
0 ... 90<br />
1<br />
0 ... 600<br />
1<br />
0 ... 1250<br />
1<br />
17
Operation<br />
<strong>Oxi</strong> <strong>330i</strong>/<strong>340i</strong><br />
4.2.6 AutoRead AR (drift control)<br />
The AutoRead function (drift control) checks the stability of the measurement<br />
signal. The stability has a considerable effect on the reproducibility<br />
of the measured value.<br />
1 Select the measuring mode with .<br />
2 Activate the AutoRead function with . The current measured<br />
value is frozen (hold function).<br />
3 Start AutoRead with .<br />
The AR display indicator flashes until a stable measured value<br />
is reached.<br />
S<br />
1<br />
LoBat<br />
TDS UpHO<br />
Sal<br />
mV/pH<br />
% mg/l<br />
7 0<br />
mS/<br />
cm<br />
mbar M cm<br />
1/cmSal<br />
No.<br />
% /K TP<br />
Ident<br />
8 1 7 °F<br />
°C<br />
7Baud<br />
Time<br />
Day.Month<br />
Year<br />
6<br />
Tref25 Tref20<br />
nLF Lin Cal<br />
AutoCal DIN<br />
AutoCal TEC<br />
Auto Store<br />
ARng AR<br />
RCL<br />
4 If necessary, start the next AutoRead measurement with<br />
.<br />
5 To terminate the AutoRead function: Press the key.<br />
Criteria<br />
With identical measurement conditions, the following applies:<br />
Para<strong>meter</strong> Reproducibility Response time<br />
D. O. concentration better than 0.05 mg/l > 10 seconds<br />
D. O. saturation index better than 0.6 % > 10 seconds<br />
D. O. partial pressure better than 0.6 mbar > 10 seconds<br />
18
<strong>Oxi</strong> <strong>330i</strong>/<strong>340i</strong><br />
Operation<br />
4.3 Calibrating<br />
Why calibrate<br />
Separate calibration of<br />
CellOx 325 and<br />
DurOx 325<br />
Calibration procedures<br />
When to calibrate<br />
D. O. probes age. This changes the slope of the D. O. probe. Calibration<br />
determines the current slope of the probe and stores this value in<br />
the instrument.<br />
Thus, you should calibrate at regular intervals.<br />
The <strong>Oxi</strong> <strong>330i</strong>/<strong>340i</strong> handheld <strong>meter</strong> enables the two sensor types,<br />
CellOx 325 and DurOx 325, to be calibrated separately from one another.<br />
The calibration of a specific sensor type does not affect the calibration<br />
of the other sensor type. When connecting a sensor, the<br />
calibration data stored for the respective sensor type are automatically<br />
used.<br />
The <strong>Oxi</strong> <strong>330i</strong>/<strong>340i</strong> provides 2 calibration procedures:<br />
Calibration in water vapor-saturated air.<br />
To calibrate the CellOx 325, use the <strong>Oxi</strong>Cal ® -SL air calibration vessel<br />
(accessory), to calibrate the DurOx 325, use the <strong>Oxi</strong>Cal ® -D air<br />
calibration vessel (contained in the scope of delivery of the sensor).<br />
Calibration via a comparison measurement (e. g. Winkler titration<br />
according to DIN EN 25813 or ISO 5813). At the same time, the relative<br />
slope is adapted to the comparison measurement by a correction<br />
factor.<br />
After connecting another D. O. probe<br />
If the sensor symbol flashes, i. e. after the calibration interval has expired<br />
TDS UpHO<br />
Sal<br />
mV/pH<br />
% mg/l<br />
7 9 2<br />
cm<br />
cm<br />
Sal<br />
1 S m S/<br />
mbar M<br />
Time Baud<br />
1/cm<br />
Day.Month No.<br />
% /K<br />
Year Ident<br />
8 1 7 6°F<br />
°C<br />
Tref25 Tref20<br />
Auto Store<br />
LoBat Lin Cal<br />
ARng AR RCL<br />
nLF<br />
AutoCal DIN<br />
AutoCal TEC<br />
TP<br />
Setting the<br />
calibration interval<br />
The calibration interval (Int 3) is set to 14 days in the factory. You can<br />
select the interval in the range of 1 ... 999 days.<br />
Printing the calibration<br />
record (<strong>340i</strong>)<br />
The calibration protocol contains the calibration data of the current calibration.<br />
You can transmit the calibration protocol to a printer via the serial<br />
interface (see page 33).<br />
19
Operation<br />
<strong>Oxi</strong> <strong>330i</strong>/<strong>340i</strong><br />
Note<br />
You can automatically print a calibration protocol after the calibration.<br />
To do so, connect a printer to the interface according to section 4.5.3<br />
before calibrating. After a valid calibration, the record is printed.<br />
Sample printout:<br />
CALIBRATION PROTOCOL<br />
02.03.99 14:19<br />
Device No.: 12345678<br />
CALIBRATION 02<br />
Cal time: 02.03.99 / 14:19<br />
Cal interval: 14d<br />
<strong>Oxi</strong>Cal Tauto AR<br />
Relative Slope: 0,88<br />
Probe: +++<br />
Sensor evaluation<br />
After the calibration, the measuring instrument evaluates the current<br />
status of the sensor against the relative slope. The evaluation appears<br />
on the display. The relative slope has no effect on the measuring accuracy.<br />
Low values indicate that the electrolytic filling will soon be depleted<br />
and the probe has to be regenerated.<br />
Display<br />
Relative slope<br />
S = 0.8 ... 1.25<br />
S = 0.7 ... 0.8<br />
S = 0.6 ... 0.7<br />
E3<br />
Eliminate the error according to<br />
chapter 6 WHAT TO DO IF...<br />
S < 0.6 or S > 1.25<br />
20
<strong>Oxi</strong> <strong>330i</strong>/<strong>340i</strong><br />
Operation<br />
4.3.1 Calibrating with the air calibration vessel<br />
Proceed as follows to calibrate the instrument:<br />
1 Connect the D. O. probe to the measuring instrument.<br />
2 Keep an air calibration vessel ready for use.<br />
Note<br />
The sponge in the air calibration vessel must be moist (not wet). Follow<br />
the instructions in the <strong>Oxi</strong>Cal ® -SL or DurOx 325 operating manual.<br />
3 Put the D. O. probe into the air calibration vessel.<br />
4 Press the key repeatedly until O 2 CAL appears.<br />
TDS UpHO<br />
Sal<br />
mV/pH<br />
% mg/l<br />
cm<br />
cm<br />
C A L<br />
1 S m S/<br />
mbar M<br />
Time Baud<br />
1/cmSal<br />
Day.Month No.<br />
% /K<br />
Year Ident<br />
8 1 7 6°F<br />
°C TP<br />
Tref25 Tref20 AutoCal DIN Auto Store<br />
LoBat nLF Lin Cal AutoCal TEC ARng AR RCL<br />
5 Press the key. AutoRead is active, AR flashes.<br />
S<br />
1Time<br />
Day.Month No.<br />
Year<br />
LoBat<br />
TDS UpHO<br />
Sal<br />
mV/pH<br />
% mg/l<br />
0 8 8<br />
mS/<br />
cm<br />
mbar M cm<br />
Baud<br />
1/cmSal<br />
Ident<br />
Tref25 Tref20<br />
nLF Lin Cal<br />
8 1 7 6<br />
AutoCal DIN<br />
AutoCal TEC<br />
°F<br />
Auto Store<br />
ARng AR<br />
°C<br />
% /K TP<br />
RCL<br />
6 As soon as a stable value is reached, the AR display indicator<br />
stops flashing. This indicates that the calibration is complete;<br />
the sensor symbol shows the relative slope that was determined<br />
and the sensor evaluation (see page 20).<br />
21
Operation<br />
<strong>Oxi</strong> <strong>330i</strong>/<strong>340i</strong><br />
S<br />
1Time<br />
Day.Month No.<br />
Year<br />
LoBat<br />
TDS UpHO<br />
Sal<br />
mV/pH<br />
% mg/l<br />
0 8 8<br />
mS/<br />
cm<br />
mbar M cm<br />
Baud<br />
1/cmSal<br />
Ident<br />
Tref25 Tref20<br />
nLF Lin Cal<br />
8 1 7 6<br />
AutoCal DIN<br />
AutoCal TEC<br />
°F<br />
Auto Store<br />
ARng AR<br />
°C<br />
% /K TP<br />
RCL<br />
7 Switch to the measuring mode with .<br />
Note<br />
In chapter 6 WHAT TO DO IF... , you will find the measures to take for error<br />
elimination.<br />
22
<strong>Oxi</strong> <strong>330i</strong>/<strong>340i</strong><br />
Operation<br />
4.3.2 Calibrating via a comparison measurement<br />
Proceed as follows to calibrate the instrument:<br />
1 Connect the D. O. probe to the measuring instrument.<br />
2 Press the key repeatedly until O 2 FAC appears.<br />
3 Immerse the D. O. probe in the calibrating solution.<br />
4 Press the key.<br />
The AutoRead measurement begins. If the measured value is<br />
stable, the instrument displays the determined measured value<br />
and the correction factor of the relative slope (initial value =<br />
1.000).<br />
5 Remove the D. O. probe from the calibrating solution.<br />
6 Perform a comparison measurement, e. g. Winkler titration,<br />
with the calibrating solution (determine the nominal value).<br />
Leave the measuring instrument switched on until the nominal<br />
value is determined.<br />
7 Set the displayed value on the measuring instrument to the<br />
nominal value with . This changes the related correction<br />
factor of the relative slope.<br />
23
Operation<br />
<strong>Oxi</strong> <strong>330i</strong>/<strong>340i</strong><br />
8 Switch to the measuring mode with or .<br />
Note<br />
If the correction factor deviates from 1.000, the display of the measured<br />
value unit flashes.<br />
24
<strong>Oxi</strong> <strong>330i</strong>/<strong>340i</strong><br />
Operation<br />
4.3.3 Entering the salt content (salinity)<br />
A salt content correction is required in the oxygen concentration measurement<br />
of test samples with a salt content of more than 1 g/l. For this,<br />
you have to enter the salinity equivalent (the measured salinity) of the<br />
test sample (range 0.0 - 70.0) and to switch on the salinity correction.<br />
Para<strong>meter</strong><br />
Value range<br />
Salinity 0.0 ... 70.0 in steps of 0.1<br />
Entering the<br />
salt content<br />
1 Determining the salinity of the test sample (any method).<br />
2 Press the key repeatedly until Sal appears on the display.<br />
3 Enter the salt content with .<br />
4 Switch to the measuring mode with .<br />
Note<br />
How to switch on the salt content correction is described on page 15.<br />
25
Operation<br />
<strong>Oxi</strong> <strong>330i</strong>/<strong>340i</strong><br />
4.4 Saving<br />
The measuring instrument has an internal data memory. It can store up<br />
to 800 data records.<br />
A complete data record consists of:<br />
Storage location<br />
Date/time<br />
Measured value<br />
Temperature<br />
Temperature measuring procedure<br />
ID number<br />
You can transmit measured values (data records) to the data storage<br />
in two ways:<br />
Save manually<br />
Switch on AutoStore (Int 1).<br />
4.4.1 Saving manually<br />
You can transmit a measured value to the data storage as follows:<br />
1 Press the key.<br />
The current number (location number No.) of the next free storage<br />
location appears under the current measured value on the<br />
display.<br />
TDS<br />
UpHO<br />
8 3 7<br />
Sal<br />
mV/pH<br />
% mg/l<br />
S/cm<br />
cm<br />
1 S m<br />
mbar M<br />
Time Baud<br />
1/cmSal<br />
Day.Month No.<br />
TP<br />
Year Ident<br />
8 1 7<br />
°C<br />
% /K<br />
4°F<br />
Tref25 Tref20<br />
Auto Store<br />
LoBat Lin Cal<br />
ARng AR RCL<br />
nLF<br />
AutoCal DIN<br />
AutoCal TEC<br />
2 Confirm with .<br />
The display switches to entering the ID number.<br />
26
<strong>Oxi</strong> <strong>330i</strong>/<strong>340i</strong><br />
Operation<br />
TDS<br />
UpHO<br />
8 3 7<br />
Sal<br />
mV/pH<br />
% mg/l<br />
S/cm<br />
cm<br />
1 S m<br />
mbar M<br />
Time Baud<br />
1/cmSal<br />
Day.Month No.<br />
TP<br />
Year<br />
8<br />
°C<br />
% /K<br />
Ident<br />
1 7 4°F<br />
Tref25 Tref20<br />
Auto Store<br />
LoBat Lin Cal<br />
ARng AR RCL<br />
nLF<br />
AutoCal DIN<br />
AutoCal TEC<br />
3 Using , enter the required ID number<br />
(1 ... 999).<br />
4 Confirm with .<br />
The instrument changes to the measuring mode.<br />
Message StoFull<br />
This message appears when all of the 800 storage locations are occupied.<br />
You have the following options:<br />
Saving the current measured value.<br />
The oldest measured value (storage<br />
location 1) will be overwritten by this<br />
Returning to the measuring mode without<br />
saving<br />
Outputting the data storage<br />
Clearing the memory<br />
Press<br />
.<br />
press any key<br />
see<br />
section 4.4.3<br />
see<br />
section 4.4.4<br />
27
Operation<br />
<strong>Oxi</strong> <strong>330i</strong>/<strong>340i</strong><br />
4.4.2 Saving automatically<br />
The save interval (Int 1) determines the chronological interval between<br />
automatic save processes.<br />
After the fixed interval has expired, the current data record is transmitted<br />
to the storage and to the interface.<br />
Setting the save<br />
interval<br />
The default setting for the save interval (Int 1) is OFF.<br />
By this, the AutoStore function is switched off.<br />
To switch the function on, set an interval (5 s, 10 s, 30 s, 1 min, 5 min,<br />
10 min, 15 min, 30 min, 60 min):<br />
1 Press the key and hold it down.<br />
2 Press the key. Int 1 appears on the display.<br />
S<br />
LoBat<br />
TDS<br />
Tref25 Tref20<br />
nLF Lin Cal<br />
UpHO<br />
1 n t 1<br />
Time Baud<br />
Day.Month No.<br />
Year Ident<br />
8 O F F<br />
AutoCal DIN<br />
AutoCal TEC<br />
Sal<br />
mV/pH<br />
% mg/l<br />
mS/cm<br />
mbarM<br />
cm<br />
1/cmSal<br />
° % /K TP<br />
°F<br />
C<br />
Auto Store<br />
ARng AR<br />
RCL<br />
3 Set the required interval between the saving procedures with<br />
.<br />
4 Confirm with .<br />
The number of free memory locations appears on the display.<br />
28
<strong>Oxi</strong> <strong>330i</strong>/<strong>340i</strong><br />
Operation<br />
5 As soon as all of the 800 storage locations are occupied,<br />
AutoStore is terminated (Int 1 = OFF).<br />
If there are not enough storage locations available for your<br />
measurements:<br />
– Output and backup the data storage (see page 30) and<br />
– clear the memory (see page 34).<br />
6 Confirm with .<br />
The prompt for the ID number appears on the display.<br />
S<br />
1<br />
LoBat<br />
TDS<br />
Time Baud<br />
Day.Month No.<br />
Year<br />
9 9 9<br />
Ident<br />
F r<br />
Tref25 Tref20<br />
nLF Lin Cal<br />
UpHO<br />
e<br />
AutoCal DIN<br />
AutoCal TEC<br />
Sal<br />
mV/pH<br />
% mg/l<br />
mS/cm<br />
mbarM<br />
cm<br />
1/cmSal<br />
° % /K TP<br />
1°FC<br />
Auto Store<br />
ARng AR RCL<br />
7 Set the required ID number with .<br />
8 Confirm with .<br />
The instrument switches to the <strong>Oxi</strong> measuring mode and starts<br />
the measuring and saving process.<br />
AutoStore flashes on the display.<br />
Note<br />
The AutoStore function is interrupted if you start other functions, e.g.<br />
output the data storage.<br />
After the function is finished, the AutoStore function is continued. By<br />
this, however, temporal gaps in the recording of the measured values<br />
will occur.<br />
Switching off AutoStore<br />
Switch AutoStore off by:<br />
setting the save interval (Int 1) to OFF, or<br />
switching the measuring instrument off and then on again.<br />
29
Operation<br />
<strong>Oxi</strong> <strong>330i</strong>/<strong>340i</strong><br />
4.4.3 Outputting the data storage<br />
You can output the contents of the data storage:<br />
Stored data on the display<br />
Calibration data on the display<br />
Stored data on the serial interface (only <strong>Oxi</strong> <strong>340i</strong>)<br />
Calibration protocol to the interface (only <strong>Oxi</strong> <strong>340i</strong>)<br />
Outputting stored data<br />
on the display<br />
1 Press the key repeatedly until StO dISP appears on the<br />
display.<br />
S<br />
1<br />
LoBat<br />
TDS<br />
Ident<br />
Tref25 Tref20<br />
nLF Lin Cal<br />
UpHO<br />
S T O<br />
Time Baud<br />
Day.Month No.<br />
Year<br />
d I s p<br />
AutoCal DIN<br />
AutoCal TEC<br />
Sal<br />
mV/pH<br />
% mg/l<br />
mS/cm<br />
mbarM<br />
cm<br />
1/cmSal<br />
° % /K TP<br />
°F<br />
Auto<br />
ARng<br />
C<br />
Store<br />
AR<br />
RCL<br />
2 Press the key.<br />
A measured value appears on the display.<br />
The storage location of the data record is displayed for approx.<br />
2 s, then the respective temperature appears.<br />
TDS<br />
UpHO<br />
6 0 3<br />
Sal<br />
% mV/pH<br />
mg/l<br />
mS/cm<br />
cm<br />
1/cmSal<br />
1 S mbar M<br />
Time Baud<br />
Day.Month No.<br />
Year Ident<br />
8 2 5 0°F<br />
Tref25 Tref20<br />
Auto<br />
LoBat Lin Cal<br />
ARng AR<br />
nLF<br />
AutoCal DIN<br />
AutoCal TEC<br />
°C<br />
% /K<br />
Store<br />
TP<br />
RCL<br />
You can perform the following activities:<br />
Display further elements of the data record<br />
(ID number, date, time, storage location)<br />
Advance one data record (storage location)<br />
Go back one data record (storage location)<br />
Press<br />
<br />
Press <br />
Press <br />
30
<strong>Oxi</strong> <strong>330i</strong>/<strong>340i</strong><br />
Operation<br />
Note<br />
If you want to search for a certain element (e.g. date), proceed as follows:<br />
1 Using , select the element (e.g. date).<br />
2 Press or repeatedly until the required date appears<br />
on the display.<br />
After approx. 2 s the temperature of the displayed measured<br />
value appears.<br />
Outputting stored data<br />
to the interface (only <strong>Oxi</strong><br />
<strong>340i</strong>)<br />
1 Press the key repeatedly until Sto SEr appears on the<br />
display.<br />
S<br />
1<br />
S t o<br />
Time Baud<br />
Day.Month No.<br />
Year Ident<br />
LoBat<br />
TDS<br />
Tref25 Tref20<br />
nLF Lin Cal<br />
UpHO<br />
S E<br />
AutoCal DIN<br />
AutoCal TEC<br />
Sal<br />
mV/pH<br />
% mg/l<br />
mS/cm<br />
mbarM<br />
cm<br />
1/cmSal<br />
° % /K TP<br />
R<br />
°F<br />
Auto<br />
ARng<br />
C<br />
Store<br />
AR RCL<br />
2 Press the key.<br />
The complete storage content is transmitted to the interface;<br />
during the data transmission the numbers of the currently<br />
transmitted storage locations run through. After the data transmission,<br />
the measuring instrument automatically switches to<br />
the measuring mode.<br />
Note<br />
You can cancel the transmission with or .<br />
After the instrument number, the printout contains the complete storage<br />
contents in ascending order of the storage location numbers.<br />
31
Operation<br />
<strong>Oxi</strong> <strong>330i</strong>/<strong>340i</strong><br />
Sample printout:<br />
Device No.: 99990000<br />
No. 1:<br />
09.03.99 17:10<br />
101.7 % 17.6° C<br />
Tauto<br />
AR<br />
Ident : 10<br />
No. 2:<br />
09.03.99 17:11<br />
7.11 mbar 17.6° C<br />
Tauto<br />
AR<br />
Ident : 10<br />
No. 3:<br />
09.03.99 17:12<br />
7.88 mg/l 17.6° C<br />
Tauto<br />
Ident : 10<br />
No. 4:<br />
09.03.99 17:15<br />
7.11 mg/l 17.8° C<br />
Tauto<br />
SAL = 17.9<br />
Ident : 7<br />
...<br />
Outputting the<br />
calibration data<br />
on the display<br />
1 Press the key repeatedly until CAL dISP appears on<br />
the display.<br />
Time<br />
Day.Month No.<br />
Year Ident<br />
LoBat<br />
ISE<br />
UpH<br />
0 C A L<br />
Baud<br />
mol/L<br />
mV/pH<br />
% ppm<br />
1 S mg/L<br />
°F<br />
d i s p<br />
AutoCal DIN Auto Store<br />
AutoCal TEC ConCal<br />
%<br />
°C<br />
TP<br />
CalError TempError<br />
ARng AR RCL<br />
2 Press the key.<br />
The relative slope appears on the display:<br />
32
<strong>Oxi</strong> <strong>330i</strong>/<strong>340i</strong><br />
Operation<br />
3 Using or , you can switch back to the<br />
measuring mode.<br />
Outputting the calibration<br />
protocol on the<br />
interface (only <strong>Oxi</strong> <strong>340i</strong>)<br />
1 Press the key repeatedly until CAL appears on the display.<br />
Time<br />
Day.Month No.<br />
Year Ident<br />
LoBat<br />
ISE<br />
UpH<br />
0 C A L<br />
Baud<br />
1 S mg/L<br />
°F<br />
d s e r<br />
AutoCal DIN Auto Store<br />
AutoCal TEC ConCal<br />
mol/L<br />
mV/pH<br />
% ppm<br />
%<br />
°C<br />
TP<br />
CalError TempError<br />
ARng AR RCL<br />
2 Press the key.<br />
The calibration protocol is transmitted to the interface.<br />
After the data transmission, the measuring instrument automatically<br />
switches to the measuring mode.<br />
Note<br />
You will find a sample calibration protocol in PRINTING THE CALIBRATION<br />
RECORD (340I), page 19.<br />
33
Operation<br />
<strong>Oxi</strong> <strong>330i</strong>/<strong>340i</strong><br />
4.4.4 Clearing the memory<br />
With this function, you can delete stored data records. 800 storage locations<br />
will then be available again.<br />
Note<br />
The Clear memory function only appears when there are data records<br />
stored in the memory. Otherwise, the measuring instrument automatically<br />
switches to the measuring mode.<br />
Proceed as follows to clear all data records:<br />
1 Switch off the measuring instrument.<br />
2 Press the key and hold it down.<br />
3 Press the key.<br />
The display test appears briefly on the display.<br />
Subsequently, Sto clr appears.<br />
S<br />
1<br />
S t o<br />
Time Baud<br />
Day.Month No.<br />
Year Ident<br />
LoBat<br />
TDS<br />
Tref25 Tref20<br />
nLF Lin Cal<br />
UpHO<br />
d c l<br />
AutoCal DIN<br />
AutoCal TEC<br />
Sal<br />
mV/pH<br />
% mg/l<br />
mS/cm<br />
mbarM<br />
cm<br />
1/cmSal<br />
° % /K TP<br />
r<br />
°F<br />
C<br />
Auto Store<br />
ARng AR<br />
RCL<br />
4 Confirm the clearing process with .<br />
Pressing any other key prevents the clearing, the data records<br />
will remain stored.<br />
Note<br />
The calibration data remain stored and can be called up.<br />
34
<strong>Oxi</strong> <strong>330i</strong>/<strong>340i</strong><br />
Operation<br />
4.5 Transmitting data (only <strong>Oxi</strong> <strong>340i</strong>)<br />
You have the following possibilities of transmitting data:<br />
One of the following options:<br />
– With the AutoStore function (page 28), measured values are<br />
periodically saved internally (save interval Int 1) and output on the<br />
interface.<br />
– With the Data transmission interval function (Int 2), measured<br />
values are periodically output on the interface (see below).<br />
With the Output data storage function (page 30), calibration data or<br />
saved measured values are output on the interface.<br />
Via the analog recorder output (page 37), measured values are output<br />
as voltage values.<br />
With the KOM pilot communication kit (accessory), data can be<br />
transmitted bidirectionally (page 38).<br />
Note<br />
If you connect a recorder (analog output), the output on the digital interface<br />
is switched off.<br />
4.5.1 Data transmission interval (Int 2, <strong>Oxi</strong> <strong>340i</strong>)<br />
The interval to the data transmission (Int 2) determines the chronological<br />
interval between automatic data transmissions. After the selected<br />
interval expires, the current data record is transmitted to the interface.<br />
Note<br />
When the AutoStore function is active, the data transmission is performed<br />
according to the setting of the save interval (Int 1). Set the save<br />
interval (Int 1) to OFF to activate the Data transmission interval (Int 2).<br />
35
Operation<br />
<strong>Oxi</strong> <strong>330i</strong>/<strong>340i</strong><br />
Setting the<br />
Data transmission<br />
interval<br />
The default setting for the interval is OFF.<br />
To start the data transmission, set an interval (5 s, 10 s, 30 s, 1 min,<br />
5 min, 10 min, 15 min, 30 min, 60 min):<br />
1 Press the key and hold it down.<br />
2 Press the key. Int 2 appears on the display.<br />
S<br />
LoBat<br />
TDS<br />
Tref25 Tref20<br />
nLF Lin Cal<br />
UpHO<br />
1 n t 2<br />
Time Baud<br />
Day.Month No.<br />
Year Ident<br />
8 O F F<br />
AutoCal DIN<br />
AutoCal TEC<br />
Sal<br />
mV/pH<br />
% mg/l<br />
mS/cm<br />
mbarM<br />
cm<br />
1/cmSal<br />
° % /K TP<br />
°F<br />
Auto<br />
ARng<br />
C<br />
Store<br />
AR<br />
RCL<br />
3 Set the required interval between the saving procedures with<br />
.<br />
4 Confirm with .<br />
The measuring instrument automatically switches to the measuring<br />
mode.<br />
36
<strong>Oxi</strong> <strong>330i</strong>/<strong>340i</strong><br />
Operation<br />
4.5.2 Recorder (analog output, <strong>Oxi</strong> <strong>340i</strong>)<br />
You can transmit data to a recorder via the analog output. Connect the<br />
analog output to the recorder via the AK323 interface cable.<br />
The data output automatically switches to Recorder output.<br />
Socket assignment<br />
4<br />
1 2<br />
3<br />
RS 232<br />
REC<br />
1 free<br />
2 Plug coding<br />
3 Ground<br />
4 Analog output<br />
(internal resistance < 5 Ohm)<br />
Note<br />
The analog output is activated automatically in the cable by connecting<br />
2 and 3.<br />
The signal range of the analog output depends on the measured variable<br />
and the measuring range:<br />
Concentration<br />
Measuring range Voltage Resolution<br />
0 ... 19.99 mg/l 0 ... 1999 mV 0.01 mg/l per 1 mV<br />
0 ... 90.0 mg/l 0 ... 900 mV 0.1 mg/l per 1 mV<br />
Saturation<br />
Measuring range Voltage Resolution<br />
0 ... 199.9 0 ... 1999 mV 0.1 % per 1 mV<br />
0 ... 600 % 0 ... 600 mV 1 % per 1 mV<br />
D. O. partial pressure<br />
Measuring range Voltage Resolution<br />
0 ... 199.9 mbar 0 ... 1999 mV 0.1 mbar per 1 mV<br />
0 ... 1250 mbar 0 ... 1250 mV 1 mbar per 1 mV<br />
37
Operation<br />
<strong>Oxi</strong> <strong>330i</strong>/<strong>340i</strong><br />
4.5.3 PC/external printer (RS 232 interface, <strong>Oxi</strong> <strong>340i</strong>)<br />
Via the RS 232 interface, you can transmit the data to a PC or an external<br />
printer.<br />
Use the AK340/B (PC) or AK325/S (ext. printer) cable to connect the<br />
interface to the instruments.<br />
The data output automatically switches to the RS 232 interface.<br />
Warning<br />
The RS 232 interface is not galvanically isolated.<br />
When connecting an earthed PC/printer, measurements cannot be performed<br />
in earthed media as incorrect values would result.<br />
Set up the following transmission data on the PC/printer:<br />
Baud rate selectable between: 1200, 2400, 4800, 9600<br />
Handshake<br />
Parity<br />
RTS/CTS + Xon/Xoff<br />
none<br />
Data bits 8<br />
Stop bits 1<br />
Socket assignment<br />
4<br />
1 2<br />
3<br />
RS 232<br />
REC<br />
1 CTS<br />
2 RxD<br />
3 Ground<br />
4TxD<br />
4.5.4 Remote control (<strong>Oxi</strong> <strong>340i</strong>)<br />
The measuring instrument can be remotely controlled from a PC. This<br />
requires the KOM pilot communication kit. It is available as an accessory.<br />
The instrument is then controlled via commands that simulate keystrokes<br />
and request the current display contents.<br />
Note<br />
A more detailed description is provided within the scope of delivery of<br />
the communication kit.<br />
38
<strong>Oxi</strong> <strong>330i</strong>/<strong>340i</strong><br />
Operation<br />
4.6 Configuration<br />
You can adapt the measuring instrument to your individual requirements.<br />
To do this, the following para<strong>meter</strong>s can be changed (the status<br />
on delivery is marked in bold):<br />
Baud rate 1200, 2400, 4800, 9600<br />
Air pressure display<br />
Calibration interval (Int 3)<br />
AutoRange ARng<br />
Date/time<br />
Current value in mbar<br />
(no input possible)<br />
1 ... 14 ... 999 d<br />
On or off<br />
Any<br />
Note<br />
You can leave the configuration menu at any time with . The para<strong>meter</strong>s<br />
that have already been changed are stored.<br />
1 Switch off the measuring instrument.<br />
2 Press the key and hold it down.<br />
3 Press the key.<br />
The display test appears briefly on the display. The measuring<br />
instrument then switches automatically to the setting of the<br />
baud rate.<br />
Baud rate (<strong>Oxi</strong> <strong>340i</strong>)<br />
S<br />
1 n t 2<br />
m<br />
mbar M<br />
Time Baud<br />
Day.Month No.<br />
Year Ident<br />
0<br />
LoBat<br />
TDS<br />
Tref25 Tref20<br />
nLF Lin Cal<br />
UpHO<br />
4 8 0<br />
AutoCal DIN<br />
AutoCal TEC<br />
Sal<br />
mV/pH<br />
% mg/l<br />
S/cm<br />
cm<br />
1/cmSal<br />
° % /K TP<br />
°F<br />
Auto<br />
ARng<br />
C<br />
Store<br />
AR<br />
RCL<br />
4 Select the required Baud rate with .<br />
5 Confirm with . The current air pressure in mbar<br />
appears on the display.<br />
39
Operation<br />
<strong>Oxi</strong> <strong>330i</strong>/<strong>340i</strong><br />
Displaying the air<br />
pressure<br />
TDS UpHO<br />
Sal<br />
mV/pH<br />
S<br />
% mg/l<br />
1 n t P<br />
m<br />
mbar<br />
S/cm<br />
M cm<br />
1/cmSal<br />
° % /K TP<br />
4 9 4<br />
Time Baud<br />
Day.Month No.<br />
Year Ident<br />
9<br />
LoBat<br />
Tref25 Tref20<br />
nLF Lin Cal<br />
AutoCal DIN<br />
AutoCal TEC<br />
°F<br />
Auto<br />
ARng<br />
C<br />
Store<br />
AR<br />
RCL<br />
6 Confirm with . Int 3 appears on the display.<br />
Calibration interval<br />
S<br />
1Time<br />
Day.Month No.<br />
Year<br />
LoBat<br />
TDS UpHO<br />
Sal<br />
mV/pH<br />
% mg/l<br />
n t 3<br />
mS/<br />
cm<br />
mbar M cm<br />
Baud<br />
1/cmSal<br />
Ident<br />
d<br />
Tref25 Tref20<br />
nLF Lin Cal<br />
°C<br />
% /K TP<br />
1 °F<br />
1 4<br />
AutoCal DIN<br />
AutoCal TEC<br />
Auto<br />
ARng<br />
Store<br />
AR<br />
RCL<br />
7 Set the required interval in days with .<br />
8 Confirm with .<br />
ARng appears on the display.<br />
AutoRange (automatic<br />
selection of the measurement<br />
range)<br />
Sal<br />
mV/pH<br />
% mg/l<br />
mS/cm<br />
mbar cm<br />
1/cmSal<br />
1 S M<br />
Time Baud<br />
Day.Month No.<br />
Year Ident<br />
LoBat<br />
TDS<br />
A r<br />
Tref25 Tref20<br />
nLF Lin Cal<br />
UpHO<br />
n<br />
4 Y E S<br />
AutoCal DIN<br />
AutoCal TEC<br />
Auto<br />
ARng<br />
°F ° C<br />
% TP<br />
Store<br />
AR<br />
/K<br />
RCL<br />
9 Using , switch between no and YES.<br />
YES: Switch on AutoRange.<br />
no: Switch off AutoRange.<br />
10 Confirm with .<br />
on the display.<br />
40
<strong>Oxi</strong> <strong>330i</strong>/<strong>340i</strong><br />
Operation<br />
Date and time<br />
TDS UpHO<br />
Sal<br />
mV/pH<br />
S<br />
% mg/l<br />
1 D i s<br />
mS/cm<br />
mbarM<br />
cm<br />
Time Baud<br />
1/cmSal<br />
Day.Month No.<br />
° % /K TP<br />
Year Ident<br />
4<br />
LoBat<br />
Tref25 Tref20<br />
nLF Lin Cal<br />
0 9 0<br />
AutoCal DIN<br />
AutoCal TEC<br />
°F<br />
Auto<br />
ARng<br />
C<br />
Store<br />
AR<br />
11 Set the date of the current day with .<br />
12 Confirm with .<br />
The date (month) flashes in the display.<br />
13 Set the current month with .<br />
14 Confirm with .<br />
The year appears on the display.<br />
15 Set the current year with .<br />
16 Confirm with .<br />
The hours flash on the display.<br />
17 Set the current time with .<br />
18 Confirm with .<br />
The minutes flash on the display.<br />
19 Set the current time with .<br />
20 Confirm with .<br />
The measuring instrument automatically switches to the measuring<br />
mode.<br />
41
Operation<br />
<strong>Oxi</strong> <strong>330i</strong>/<strong>340i</strong><br />
4.7 Reset<br />
You can reset (initialize) the measurement para<strong>meter</strong>s and the configuration<br />
para<strong>meter</strong>s separately from one another.<br />
Measurement<br />
para<strong>meter</strong>s<br />
The following measured para<strong>meter</strong>s (O 2 InI) are reset to the default<br />
condition:<br />
Measuring mode<br />
AutoRange automatic measurement<br />
range selection<br />
D. O. concentration<br />
On (YES)<br />
Relative slope 1.00<br />
Correction factor of the relative<br />
slope<br />
1.000<br />
Salinity equivalent 0.0<br />
Salt content correction<br />
off<br />
Note<br />
The calibration data gets lost when the measuring para<strong>meter</strong>s are reset.<br />
Recalibrate after performing a reset.<br />
Configuration<br />
para<strong>meter</strong>s<br />
The following configuration para<strong>meter</strong>s (InI) are reset to the delivery<br />
status:<br />
Baud rate 4800<br />
Interval 1<br />
(automatic save)<br />
Interval 2<br />
(for data transmission)<br />
OFF<br />
OFF<br />
Resetting the<br />
measuring para<strong>meter</strong>s<br />
1 Press the key and hold it down.<br />
2 Press the key.<br />
42
<strong>Oxi</strong> <strong>330i</strong>/<strong>340i</strong><br />
Operation<br />
UpHO<br />
4 Y n o<br />
Sal<br />
mV/pH<br />
% mg/l<br />
mS/cm<br />
mbar cm<br />
1/cmSal<br />
1 S M<br />
Time Baud<br />
Day.Month No.<br />
Year Ident<br />
LoBat<br />
TDS<br />
I n I<br />
Tref25 Tref20<br />
nLF Lin Cal<br />
AutoCal DIN<br />
AutoCal TEC<br />
°F ° C<br />
Auto Store<br />
ARng AR<br />
% TP<br />
/K<br />
RCL<br />
3 Using , switch between no and YES.<br />
YES: Resetting the measuring para<strong>meter</strong>s<br />
no: Retaining settings.<br />
4 Confirm with .<br />
The measuring instrument switches to the configuration para<strong>meter</strong>s.<br />
Resetting the configuration<br />
para<strong>meter</strong>s<br />
UpHO<br />
4 Y n o<br />
Sal<br />
mV/pH<br />
% mg/l<br />
mS/cm<br />
mbar cm<br />
1/cmSal<br />
1 S M<br />
Time Baud<br />
Day.Month No.<br />
Year<br />
LoBat<br />
TDS<br />
I n I<br />
Ident<br />
Tref25 Tref20<br />
nLF Lin Cal<br />
AutoCal DIN<br />
AutoCal TEC<br />
°F ° C<br />
Auto Store<br />
ARng AR<br />
% TP<br />
/K<br />
RCL<br />
5 Using , switch between no and YES.<br />
YES: Resetting the configuration para<strong>meter</strong>s<br />
no: Retaining settings.<br />
6 Confirm with .<br />
The measuring instrument automatically switches to the measuring<br />
mode.<br />
43
Operation<br />
<strong>Oxi</strong> <strong>330i</strong>/<strong>340i</strong><br />
44
<strong>Oxi</strong> <strong>330i</strong>/<strong>340i</strong><br />
Maintenance, cleaning, disposal<br />
5 Maintenance, cleaning, disposal<br />
5.1 Maintenance<br />
The measuring instrument is almost maintenance-free.<br />
The only maintenance task is replacing the batteries.<br />
LoBat indicates that the batteries should be changed. The batteries are<br />
then largely depleted.<br />
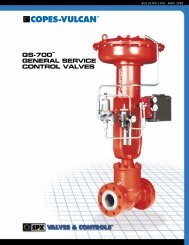
Replacing the batteries<br />
2<br />
1<br />
1 Open the housing after the instrument has been switched off:<br />
– Undo the four screws on the underside of the instrument<br />
– Pull down the lower cover (1).<br />
2 If necessary, take the four depleted batteries (2) out of the battery<br />
compartment.<br />
3 Place four new batteries (type Mignon AA) in the battery compartment.<br />
4 Close the lower cover (1).<br />
Warning<br />
Make sure that the poles of the batteries are the right way round.<br />
The ± signs on the batteries must correspond to the ± signs in the battery<br />
compartment.<br />
Only use leakproof alkaline manganese batteries.<br />
45
Maintenance, cleaning, disposal<br />
<strong>Oxi</strong> <strong>330i</strong>/<strong>340i</strong><br />
Note<br />
For the maintenance of the sensors, follow the corresponding operating<br />
manual.<br />
5.2 Cleaning<br />
Occasionally wipe the outside of the measuring instrument with a<br />
damp, lint-free cloth. Disinfect the housing with isopropanol as required.<br />
Warning<br />
The housing is made of a synthetic material (ABS). Thus, avoid contact<br />
with acetone and similar detergents that contain solvents. Remove any<br />
splashes immediately.<br />
5.3 Disposal<br />
Packing<br />
This measuring instrument is sent out in a protective transport packing.<br />
We recommend: Keep the packing material. The original packing protects<br />
the instrument against damage during transport.<br />
Batteries<br />
This note refers to the battery regulation that applies in the Federal Republic<br />
of Germany. We would ask end-consumers in other countries to<br />
follow their local statutory provisions.<br />
Note<br />
This instrument contains batteries. Batteries that have been removed<br />
must only be disposed of at the recycling facility set up for this purpose<br />
or via the retail outlet.<br />
It is illegal to dispose of them in household refuse.<br />
Measuring instrument<br />
Dispose of the measuring instrument as electronic waste at an appropriate<br />
collection point. It is illegal to dispose of the instrument in household<br />
refuse.<br />
46
<strong>Oxi</strong> <strong>330i</strong>/<strong>340i</strong><br />
What to do if...<br />
6 What to do if...<br />
LoBat display<br />
Cause<br />
Remedy<br />
– Batteries almost empty – Replace batteries<br />
(see section 5.1 MAINTENANCE)<br />
Instrument does not<br />
react to keystroke<br />
Cause<br />
– Operating condition<br />
undefined or EMC load<br />
unallowed<br />
Remedy<br />
– Processor reset:<br />
Press the and<br />
keys at the same<br />
time and release them again.<br />
The software version is<br />
displayed.<br />
Error message 0FL<br />
Cause<br />
Display range exceeded<br />
D. O. probe:<br />
Remedy<br />
– Not connected – Connect the probe<br />
– Cable broken – Replace probe<br />
– Depleted – Replace probe<br />
– Short-circuit between gold<br />
and lead electrode<br />
– Clean probe and replace it if<br />
necessary<br />
Error message E3<br />
Cause<br />
Invalid calibration<br />
D. O. probe:<br />
Remedy<br />
– Electrolyte solution depleted – Regenerate probe<br />
– Membrane contaminated – Clean membrane<br />
– Electrode system poisoned – Regenerate probe<br />
– Worn out – Replace probe<br />
– broken – Replace probe<br />
47
What to do if...<br />
<strong>Oxi</strong> <strong>330i</strong>/<strong>340i</strong><br />
Error message E7<br />
Cause<br />
Membrane damaged<br />
Remedy<br />
– Membrane damaged – Regenerate probe<br />
– Membrane head not screwed<br />
on tight enough<br />
– Screw membrane head tight<br />
AR flashes<br />
continuously<br />
Cause<br />
No stable measured value<br />
Remedy<br />
– Membrane contaminated – Clean membrane<br />
Measured value too low<br />
Cause<br />
– Insufficient<br />
flow<br />
Remedy<br />
– Provide flow to the probe<br />
Measured value too<br />
high<br />
Cause<br />
– High amount of dissolved<br />
substances<br />
– Air bubbles bump on the<br />
membrane with high velocity<br />
– The carbon dioxide pressure<br />
is too high (> 1 bar)<br />
Remedy<br />
– Correct solubility function using<br />
the salinity equivalent<br />
– Avoid direct flow to the<br />
membrane<br />
– Measuring not possible<br />
Display to<br />
to<br />
Cause<br />
Remedy<br />
– Time-out of the interface – Check the instrument that is<br />
connected<br />
Probe symbol flashes<br />
Cause<br />
Remedy<br />
– Calibration interval expired – Recalibrate the measuring<br />
system<br />
48
<strong>Oxi</strong> <strong>330i</strong>/<strong>340i</strong><br />
What to do if...<br />
Message StoFull<br />
Cause<br />
Remedy<br />
– All memory locations are full – Output data storage and clear<br />
data storage<br />
You would like to know<br />
which software version<br />
is in the instrument<br />
Cause<br />
– e.g. question of the WTW<br />
service department<br />
Remedy<br />
– Press the a key and switch<br />
on instrument. The software<br />
version is displayed.<br />
49
What to do if...<br />
<strong>Oxi</strong> <strong>330i</strong>/<strong>340i</strong><br />
50
<strong>Oxi</strong> <strong>330i</strong>/<strong>340i</strong><br />
Technical data<br />
7 Technical data<br />
Dimensions and weight<br />
Length [mm] 172<br />
Width [mm] 80<br />
Height [mm] 37<br />
Weight [kg] Approx. 0.3<br />
Mechanical structure<br />
Type of protection IP 66<br />
Electrical safety<br />
Protective class<br />
III<br />
Test certificates<br />
cETLus, CE<br />
Ambient<br />
conditions<br />
Storage - 25 °C ... + 65 °C<br />
Operation -10 °C ... + 55 °C<br />
Climatic class 2<br />
Measuring ranges/<br />
resolutions with<br />
CellOx 325 D. O. probe<br />
Measuring range I<br />
Resolution<br />
Measuring range II<br />
Resolution<br />
mg/l % mbar<br />
0 ... 19.99<br />
0.01<br />
0 ... 90.0<br />
0.1<br />
0 ... 199.9<br />
0.1<br />
0 ... 600<br />
1<br />
0 ... 199.9<br />
0.1<br />
0 ... 1250<br />
1<br />
Measuring ranges/<br />
resolutions with<br />
DurOx 325 D. O. probe<br />
Measuring range I<br />
Resolution<br />
mg/l % mbar<br />
0 ... 19.9<br />
0.1<br />
0 ... 199<br />
1<br />
0 ... 199<br />
1<br />
Measuring range II<br />
Resolution<br />
0 ... 90<br />
1<br />
0 ... 600<br />
1<br />
0 ... 1250<br />
1<br />
Measuring range/resolution<br />
of temperature<br />
Measuring range (Resolution) 0 ... 50.0 (0.1)<br />
°C<br />
51
Technical data<br />
<strong>Oxi</strong> <strong>330i</strong>/<strong>340i</strong><br />
Accuracy<br />
(± 1 digit)<br />
mg/l<br />
Concentration<br />
%<br />
Saturation<br />
mbar<br />
Partial pressure<br />
Temperature<br />
compensation<br />
± 0.5 % of the measured value<br />
at an ambient temperature of 5 °C ... 30 °C<br />
± 0.5 % of the measured value<br />
when measuring in the range of<br />
± 10 K around the calibration temperature<br />
± 0.5 % of the measured value<br />
at an ambient temperature of 5 °C ... 30 °C<br />
< 2 % at 0 ... 40 °C<br />
T [°C] ± 0.1<br />
Correction functions<br />
Salinity correction<br />
Air pressure correction<br />
0 ... 70.0 SAL<br />
Automatic through installation of pressure<br />
sensor in the range 500 ... 1100 mbar<br />
Analog output<br />
(only <strong>Oxi</strong> <strong>340i</strong>)<br />
Automatic switchover when the recorder is connected by the cable,<br />
AK 323.<br />
Concentration Voltage Resolution<br />
0 ... 19.99 mg/l 0 ... 1999 mV 0.01 mg/l per 1 mV<br />
0 ... 90.0 mg/l 0 ... 900 mV 0.1 mg/l per 1 mV<br />
Saturation Voltage Resolution<br />
0 ... 199.9 0 ... 1999 mV 0.1 % per 1 mV<br />
0 ... 600 % 0 ... 600 mV 1 % per 1 mV<br />
D. O. partial pressure Voltage Resolution<br />
0 ... 199.9 mbar 0 ... 1999 mV 0.1 mbar per 1 mV<br />
0 ... 1250 mbar 0 ... 1250 mV 1 mbar per 1 mV<br />
52
<strong>Oxi</strong> <strong>330i</strong>/<strong>340i</strong><br />
Technical data<br />
Accuracy<br />
Internal resistance<br />
± 0.5 % of display value ± 0.1 (% saturation)<br />
or<br />
± 0.5 % of the display value ± 0.01 mg/l<br />
< 5 Ohm (current limited to max. 0.2 mA output<br />
current)<br />
Serial interface (only<br />
<strong>Oxi</strong> <strong>340i</strong>)<br />
Automatic switchover when a PC or a printer is connected via the cable,<br />
AK 340/B or AK 325/S.<br />
Type<br />
Baud rate<br />
RS 232, data output<br />
Selectable 1200, 2400, 4800, 9600 baud<br />
Data bits 8<br />
Stop bit 2<br />
Parity<br />
Handshake<br />
Cable length<br />
None<br />
RTS/CTS + Xon/Xoff<br />
Max. 15m<br />
Power supply<br />
Batteries<br />
Operational life<br />
4x1.5V alkali-manganese batteries, Type AA<br />
Approx. 3000 operating hours<br />
53
Technical data<br />
<strong>Oxi</strong> <strong>330i</strong>/<strong>340i</strong><br />
Batteries<br />
Mains (only <strong>Oxi</strong> <strong>340i</strong>)<br />
4x1.5V alkali-manganese batteries, Type AA<br />
The following specifications apply to all plugin<br />
power supplies: Connection max. Overvoltage<br />
category II<br />
Plug-in power supply unit<br />
(Euro, US , UK, Australian plug)<br />
FRIWO FW7555M/09, 15.1432<br />
Friwo Part. No. 1822089<br />
Input: 100 ... 240 V ~ / 50 ... 60 Hz / 400 mA<br />
Output: 9 V = / 1,5 A<br />
Plug-in power supply with Euro plug:<br />
FRIWO FW1199, 11.7864<br />
Friwo Part. No. 1762613<br />
Input: 230 V ~ / 50 Hz / 5.6 VA<br />
Output: 12 V = / 130 mA / 1.56 VA<br />
Plug-in power supply with US plug:<br />
FRIWO FW1199, 11.7880<br />
Friwo Part. No. 1794043<br />
Input: 120 V ~ / 60 Hz / 6 VA<br />
Output: 12 V = / 150 mA<br />
Plug-in power supply with UK plug:<br />
FRIWO FW1199, 11.7872<br />
Friwo Part No. 1816491<br />
Input: 230V ~ / 50 Hz / 5.6 VA<br />
Output: 12 V = / 130 mA / 1.56 VA<br />
Guidelines<br />
and norms used<br />
EMC<br />
E.C. guideline 89/336/EEC<br />
EN 61326-1:1997<br />
EN 61000-3-2 A14:2000<br />
EN 61000-3-3:1995<br />
FCC Class A<br />
Instrument safety E.C. guideline 73/23/EEC<br />
EN 61010-1 A2:1995<br />
Climatic class VDI/VDE 3540<br />
Type of protection EN 60529:1991<br />
54
<strong>Oxi</strong> <strong>330i</strong>/<strong>340i</strong><br />
Technical data<br />
FCC Class A Equipment Statement<br />
Note: This equipment has been tested and found to comply with<br />
the limits for a Class A digital device, pursuant to Part 15 of the<br />
FCC Rules. These limits are designed to provide reasonable<br />
protection against harmful interference when the equipment is<br />
operated in a commercial environment. This equipment<br />
generates, uses, and can radiate radio frequency energy and, if<br />
not installed and used in accordance with the instruction manual,<br />
may cause harmful interference to radio communications.<br />
Operation of this equipment in a residential area is likely to cause<br />
harmful interference in which case the user will be required to<br />
correct the interference at his own expense.<br />
55
Technical data<br />
<strong>Oxi</strong> <strong>330i</strong>/<strong>340i</strong><br />
56
<strong>Oxi</strong> <strong>330i</strong>/<strong>340i</strong><br />
Lists<br />
8 Lists<br />
This chapter provides additional information and orientation aids.<br />
Abbreviations<br />
The list of abbreviations explains the indicators and the abbreviations<br />
that appear on the display and in the manual.<br />
Specialist terms<br />
The glossary briefly explains the meaning of the specialist terms. However,<br />
terms that should already be familiar to the target group are not<br />
described here.<br />
Index<br />
The index will help you to find the topics that you are looking for.<br />
57
Lists<br />
<strong>Oxi</strong> <strong>330i</strong>/<strong>340i</strong><br />
Abbreviations<br />
AR<br />
ARng<br />
AutoRead (drift control)<br />
Automatic range switching<br />
Measuring instrument measures with highest resolution<br />
°C Temperature unit, degrees Celsius<br />
Cal<br />
Calibration<br />
D. O. Dissolved Oxygen<br />
E3<br />
InI<br />
LoBat<br />
OFL<br />
<strong>Oxi</strong>Cal<br />
SAL<br />
SELV<br />
Error message<br />
see chapter 6 WHAT TO DO IF...<br />
Initialization<br />
Resets individual basic functions to the status they<br />
had on delivery<br />
Batteries almost empty (Low Battery)<br />
Display range exceeded (Overflow)<br />
Automatic calibration for D. O. measurements<br />
Salinity<br />
Safety Extra Low Voltage<br />
TP<br />
Temperature measurement active (Temperature<br />
Probe)<br />
58
<strong>Oxi</strong> <strong>330i</strong>/<strong>340i</strong><br />
Lists<br />
Glossary<br />
Adjusting<br />
Amperometry<br />
AutoRange<br />
AutoRead<br />
Calibration<br />
To manipulate a measuring system so that the relevant value (e. g. the<br />
displayed value) differs as little as possible from the correct value or<br />
a value that is regarded as correct, or that the difference remains within<br />
the tolerance.<br />
Name of a measuring technique. The signal (depending on the measured<br />
para<strong>meter</strong>) of the probe is the electric current. The electrical<br />
voltage remains constant.<br />
Name of the automatic selection of the measuring range.<br />
WTW name for a function to check the stability of the measured value.<br />
Comparing the value from a measuring system (e. g. the displayed<br />
value) to the correct value or a value that is regarded as correct. Often,<br />
this expression is also used when the measuring system is adjusted<br />
at the same time (see adjusting).<br />
D. O. partial pressure Pressure caused by the oxygen in a gas mixture or liquid.<br />
D. O. saturation Short name for the relative D. O. saturation.<br />
Note: The D. O. saturation value of air-saturated water and the D. O.<br />
saturation value of oxygen-saturated water are different.<br />
Measured para<strong>meter</strong><br />
Measured value<br />
Measuring system<br />
Molality<br />
<strong>Oxi</strong>Cal ®<br />
Reset<br />
Resolution<br />
The measured para<strong>meter</strong> is the physical dimension determined by<br />
measuring, e. g. pH, conductivity or D. O. concentration.<br />
The measured value is the special value of a measured para<strong>meter</strong> to<br />
be determined. It is given as a combination of the numerical value and<br />
unit (e. g. 3 m; 0.5 s; 5.2 A; 373.15 K).<br />
The measuring system comprises all the devices used for measuring,<br />
e. g. measuring instrument and probe. In addition, there is the cable<br />
and possibly an amplifier, terminal strip and armature.<br />
Molality is the quantity (in Mol) of a dissolved substance in 1000 g solvent.<br />
WTW name for a procedure to calibrate D. O. measuring systems in<br />
water vapor saturated air.<br />
Restoring the original condition of all settings of a measuring system.<br />
Smallest difference between two measured values that can be displayed<br />
by a measuring instrument.<br />
59
Lists<br />
<strong>Oxi</strong> <strong>330i</strong>/<strong>340i</strong><br />
Salinity<br />
Salt content<br />
Slope<br />
Slope (relative)<br />
Standard solution<br />
Test sample<br />
The absolute salinity S A of seawater corresponds to the relationship<br />
of the mass of dissolved salts to the mass of the solution (in g/Kg). In<br />
practice, this dimension cannot be measured directly. Therefore, the<br />
practical salinity is used for oceanographic monitoring. It is determined<br />
by measuring the electrical conductivity.<br />
General designation for the quantity of salt dissolved in water.<br />
The slope of a linear calibration function.<br />
Designation used by WTW in the D. O. measuring technique. It expresses<br />
the relationship of the slope value to the value of a theoretical<br />
reference probe of the same type of construction.<br />
The standard solution is a solution where the measured value is<br />
known by definition. It is used to calibrate a measuring system.<br />
Designation of the sample ready to be measured. Normally, a test<br />
sample is made by processing the original sample. The test sample<br />
and original sample are identical if the test sample was not processed.<br />
60
<strong>Oxi</strong> <strong>330i</strong>/<strong>340i</strong><br />
Index<br />
Index<br />
A<br />
Analog output 37<br />
Authorized use 9<br />
AutoRange 17<br />
AutoRead 18<br />
Criteria 18<br />
C<br />
Calibrating 19<br />
Calibration<br />
start 21<br />
Calibration protocol (<strong>340i</strong>) 19<br />
Connecting a printer 38<br />
Connecting the plug-in power<br />
supply 12<br />
D<br />
Data record 26<br />
Data transmission (interval)<br />
36<br />
Default condition 42<br />
Display 8<br />
Drift control 18<br />
E<br />
Electrode evaluation 20<br />
Energy saving feature 13<br />
Error messages 47<br />
I<br />
Initial commissioning 11<br />
Initialization 42<br />
Interval<br />
data transmission 35<br />
save 28<br />
K<br />
Keys 7<br />
L<br />
LoBat 47<br />
Measuring ranges with<br />
CellOx325 51<br />
Measuring ranges with<br />
DurOx 52<br />
Measuring ranges with<br />
DurOx325 51<br />
Measuring the D. O.<br />
concentration 15<br />
Measuring the D. O.<br />
saturation 16<br />
O<br />
Operating safety 10<br />
P<br />
Printing<br />
calibration protocol 19<br />
R<br />
Remote control 38<br />
Replacing the batteries 45<br />
Reset 42<br />
RS232 interface 38<br />
S<br />
Safety 9<br />
Safety precautions 9<br />
Salt content correction<br />
entering the salinity 25<br />
switching on 15<br />
Save interval 28<br />
Scope of delivery 11<br />
Selecting the measuring<br />
range 17<br />
Setting the baud rate 39<br />
Setting the date 11, 41<br />
Setting the time 11, 41<br />
Slope 19<br />
T<br />
Temperature sensor 14<br />
M<br />
Measuring ranges 17<br />
61
Index<br />
<strong>Oxi</strong> <strong>330i</strong>/<strong>340i</strong><br />
62