
Create successful ePaper yourself
Turn your PDF publications into a flip-book with our unique Google optimized e-Paper software.
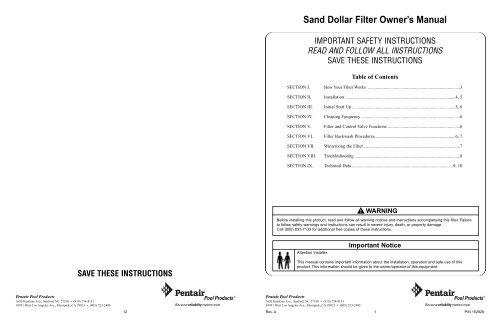
<strong>Sand</strong> <strong>Dollar</strong> Filter Owner’s Manual<br />
IMPORTANT SAFETY INSTRUCTIONS<br />
READ AND FOLLOW ALL INSTRUCTIONS<br />
SAVE THESE INSTRUCTIONS<br />
Table of Contents<br />
SECTION I. How Your Filter Works ..................................................................................3<br />
SECTION II. Installation ..................................................................................................4, 5<br />
SECTION III. Initial Start Up ............................................................................................5, 6<br />
SECTION IV. Cleaning Frequency ........................................................................................6<br />
SECTION V. Filter and Control Valve Functions ................................................................6<br />
SECTION VI. Filter Backwash Procedures........................................................................6, 7<br />
SECTION VII.<br />
Winterizing the Filter......................................................................................7<br />
SECTION VIII. Troubleshooting ..............................................................................................8<br />
SECTION IX. Technical Data ..........................................................................................9, 10<br />
▲!<br />
WARNING<br />
Before installing this product, read and follow all warning notices and instructions accompanying this filter. Failure<br />
to follow safety warnings and instructions can result in severe injury, death, or property damage.<br />
Call (800) 831-7133 for additional free copies of these instructions.<br />
Attention Installer.<br />
Important Notice<br />
SAVE THESE INSTRUCTIONS<br />
This manual contains important information about the installation, operation and safe use of this<br />
product. This information should be given to the owner/operator of this equipment.<br />
<strong>Pentair</strong> Pool Products<br />
1620 Hawkins Ave., Sanford, NC 27330 • (919) 774-4151<br />
10951 West Los Angeles Ave., Moorpark, CA 93021 • (805) 523-2400<br />
P/N 99223000 12 Rev. E 2-22-02<br />
®<br />
<strong>Pentair</strong> Pool Products<br />
1620 Hawkins Ave., Sanford, NC 27330 • (919) 774-4151<br />
10951 West Los Angeles Ave., Moorpark, CA 93021 • (805) 523-2400<br />
Rev. A 1 P/N 152926<br />
®
<strong>Pentair</strong> Pool Products<br />
1620 Hawkins Ave., Sanford, NC 27330 • (919) 774-4151<br />
10951 West Los Angeles Ave., Moorpark, CA 93021 • (805) 523-2400<br />
P/N 99223000 2 Rev. E 2-22-02<br />
<strong>Pentair</strong> Pool Products<br />
1620 Hawkins Ave., Sanford, NC 27330 • (919) 774-4151<br />
10951 West Los Angeles Ave., Moorpark, CA 93021 • (805) 523-2400<br />
Rev. A 11 P/N 152926
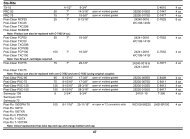
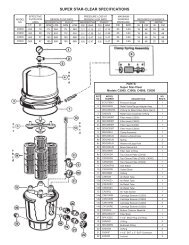
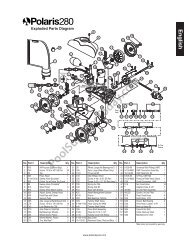
Section IX. Technical Data<br />
Replacement Parts System<br />
Item No. Part No. Description<br />
1 272531 Valve<br />
2 152165 Clamp Assmy<br />
3 155050 Gauge<br />
4 272541 O-Ring<br />
5 150055 Drain Assmy, complete<br />
6 152229 Standpipe Assmy SD35<br />
6 152228 Standpipe Assmy SD40<br />
6 152227 Standpipe Assmy SD60<br />
6 152226 Standpipe Assmy SD80<br />
7 150084 Lateral (SD35, SD40)<br />
7 150085 Lateral, Xlong (SD60, SD80)<br />
8 154526 Base, (SD35)<br />
8 154520 Base, Large (SD40, 60, 80)<br />
9 145339 SD 35, Tank Almd<br />
9 145340 SD 35, Tank Gray<br />
9 145345 SD 35, Tank Black<br />
9 145341 SD 40, Tank Almd<br />
9 145342 SD 40, Tank Gray<br />
9 145346 SD 40, Tank Black<br />
9 145343 SD 60, Tank Almd<br />
9 145344 SD 60, Tank Gray<br />
9 145347 SD 60, Tank Black<br />
9 145334 SD 80, Tank Almd<br />
10 155051 <strong>Sand</strong> Guide<br />
Clamp Assmy includes 2 halfs of clamp, 2 screws & 2 nuts<br />
Section I. How Your Filter Works.<br />
Your high rate sand filter is designed to produce clear,<br />
sparkling water and operate for years with a minimum<br />
of maintenance when installed, operated and maintained<br />
in accordance with these instructions.<br />
Your filter uses special filter sand to remove dirt particles<br />
from the water. Dirt is collected in the filter by<br />
the sand bed as water flows through the filter. Water<br />
enters the filter through the valve on top of the filter<br />
and is distributed evenly downward across the sand<br />
bed. The dirt is removed by the sand and the clean<br />
water flows through the piping (laterals) at the bottom<br />
of the filter, up through the standpipe, back to the<br />
valve on top of the filter, where the clean water is<br />
returned to the pool through the piping or hoses.<br />
▲!<br />
WARNING<br />
This filter operates under high pressure. When any part of<br />
the circulating system (e.g., clamp, pump, filter, valves,<br />
etc.) is serviced, air can enter the system and become pressurized.<br />
Pressurized air can cause the lid or control valve to<br />
blow off which can result in severe injury, death, or property<br />
damage. To avoid this potential hazard, follow these<br />
instructions.<br />
1. Before repositioning valves and before beginning the<br />
assembly, disassembly, or adjustment of the clamp or<br />
any other service of the circulating system: (a) Turn the<br />
pump off and shut off any automatic controls to ensure<br />
the system is not inadvertently started during the servicing;<br />
(b) Open manual air relief valve; (c) Wait until all<br />
pressure is relieved, pressure gauge must read zero (0).<br />
2. Whenever installing the filter clamp, follow the filter lid<br />
and clamp installation instructions exactly.<br />
3. Once service on the circulating system is complete,<br />
follow system restart instructions exactly.<br />
After a period of time, dirt will accumulate in the filter<br />
causing a resistance to the flow of water through<br />
the filter. This resistance results in a diminished flow<br />
of water and a rise in the pressure of the filter.<br />
Eventually the filter sand will have removed so much<br />
dirt and the filter pressure risen to such a point that it<br />
will be necessary to clean (backwash) your filter.<br />
By setting the valve on top of the filter to the backwash<br />
position, the flow of water is automatically<br />
reversed through the filter so that the flow of water is<br />
directed to the bottom of the filter, up through the sand<br />
bed flushing, the dirt and debris out through the waste<br />
line. Once the backwash procedure is complete, the<br />
valve is manually returned to its filter position to<br />
resume normal filtration.<br />
The filter’s function is to remove suspended matter<br />
from the water. It does not sanitize the water. For<br />
sparkling clear water the water must be sanitized as<br />
well as balanced. Pool chemistry is a specialized area,<br />
and you should consult your local pool service specialist<br />
for specific details. In general, proper pool sanitation<br />
requires a free chlorine level of 1 to 2 PPM and<br />
a PH range of 7.2 to 7.6.<br />
▲!<br />
WARNING<br />
Failure to operate your filter system or inadequate filtration<br />
can cause poor water clarity obstructing visibility in your<br />
pool. Poor water clarity may obscure objects in the water<br />
which while swimming and diving could cause severe<br />
personal injury or death. Never swim in a pool with poor<br />
water clarity.<br />
Your filtration system should be designed to meet<br />
your local health codes. As a minimum, you must be<br />
sure that your system will turnover the total volume of<br />
water in your pool at least twice in a twenty-four hour<br />
period.<br />
Model<br />
SD35<br />
SD40<br />
SD60<br />
SD80<br />
Filter Area<br />
Sq. Ft.<br />
1.23<br />
1.9<br />
2.3<br />
3.4<br />
Lbs. Of <strong>Sand</strong><br />
Required<br />
100<br />
150<br />
200<br />
350<br />
Max. Working<br />
Pressure<br />
30<br />
35<br />
40<br />
50<br />
Vrtl Clearance<br />
Required<br />
45<br />
49<br />
55<br />
60<br />
Design Flow<br />
Rate GPM<br />
35<br />
40<br />
60<br />
75<br />
Max Water<br />
Temp.<br />
95 F<br />
95 F<br />
95 F<br />
95 F<br />
4. Maintain circulation system properly. Replace worn or<br />
damaged parts immediately (e.g., clamp, pressure gauge,<br />
relief valve, o-rings, etc.).<br />
5. Be sure that the filter is properly mounted and positioned<br />
according to instructions provided.<br />
▲!<br />
WARNING<br />
Failure to operate your filter system or inadequate filtration<br />
can cause poor water clarity obstructing visibility in your<br />
pool and can allow diving into or on top of obscured<br />
objects, which can cause serious personal injury or<br />
drowning.<br />
P/N 99223000 10 Rev. E 2-22-02<br />
P/N 99223000 3 Rev. E 2-22-02
Section II. Installation.<br />
1. Read and understand all instructions before<br />
attempting to install, operate or maintain your<br />
pump and filter system. Due to the different models<br />
some instructions may not apply to your specific<br />
system or certain instructions may be duplicated<br />
in other component manuals.<br />
2. Provide space and lighting for routine maintenance<br />
access. Locate the system close to the pool.<br />
Do not mount electrical controls over the filter. One<br />
needs to be able to stand clear of the filter when starting<br />
the pump.<br />
3. Remove all individual components from carton and<br />
inspect for any visible damage. If carton or parts<br />
are damaged contact seller or freight company.<br />
▲!<br />
WARNING<br />
Blockage of suction fittings can cause severe or fatal injury<br />
due to drowning. Small children using pool/spa equipment<br />
must always have close adult supervision. To reduce the risk<br />
of injury, do not permit children to use this product unless<br />
they are closely supervised at all times.<br />
6. Install the sand guide in the top of the filter and fill<br />
the tank about half full with water. Pour the sand<br />
into the top of the filter at a slow rate so that the<br />
weight of the sand does not damage the laterals.<br />
After filling to the proper level, remove and discard<br />
the sand guide. Wash away all sand around<br />
the opening at the top of the tank.<br />
7. Be sure top of filter is free of any sand or debris and<br />
valve o-ring is in place on valve body. Install valve<br />
so that the port locations are in the desired final position.<br />
Valve ports are labeled with the location of<br />
where they should be connected i.e. pump port<br />
must go to pump discharge, waste port must go to<br />
the waste line and return port must go to the pool<br />
return.<br />
8. Insure that the valve is firmly pushed into the top<br />
of the tank and that the flange of the tank and the<br />
flange of the valve are contacting each other. See<br />
Diagram D.<br />
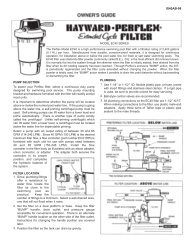
Section IX. Technical Data<br />
Replacement Parts List - 6 Way Valve<br />
Item Part No. Description Qty.<br />
1 27-2520 Handle 1<br />
2 27-2505 Washer-Plastic 2<br />
3 27-2405 Screw-Handle 1<br />
4 27-2527 Valve Top - Black 1<br />
5 27-2511 O-Ring-Diverter Shaft 1<br />
6 35-4053 O-Ring 1<br />
7 27-2535 Spring - 100 Lb. - 1 3/8 O.D. SS 1<br />
8 27-2512 Diverter W/Gasket 1<br />
9 35-4541 Screw #10-24 Hex Pan HD 6<br />
10 27-2555 Washer 9/16 SS 6<br />
11 27-2554 Nut - #10-24 Serrated Flange SS 6<br />
12 27-2530 Valve Body W/Differ - Clamp Style 1<br />
13 27-3512 Air Bleeder W/O-Ring 1<br />
14 27-2541 O-Ring - 3/16” x 4 5/8” I.D. 1<br />
15 15-2165 Clamp Assembly (See Note 2) 1<br />
16 15-5050 Pressure Gauge 1<br />
NOTE:<br />
1. Valve Top Assembly P/N 27-2531 consists of items 1 thru 8 and valve<br />
instructions 27-2517.<br />
2. Clamp halves, nuts and bolts sold only in Assembly 15-2165.<br />
4. At this point you need to move the filter into its<br />
final position. The system must be placed on level<br />
solid earth. The filter filled with sand and water<br />
can weigh several hundred pounds.<br />
5. Be certain to install the precise amount of filter sand<br />
listed on your filter nameplate. You must use only<br />
No. 20 standard silica sand having a uniformity<br />
coefficient of 1.75 or less. No. 20 silica sand has a<br />
particle size of .018-.022 inches (.45 to .55 mm).<br />
Before pouring the sand into the filter, look inside<br />
and check the lower underdrain for broken or loose<br />
laterals (or fingers), which may have been accidentally<br />
damaged by rough handling during shipment.<br />
Replace any broken parts if necessary.<br />
9. The plastic clamp can now be installed. Place the<br />
clamp half over the valve flange and the tank flange<br />
as shown in diagram D. Insert the clamp screws and<br />
nuts into the clamp making sure that the nuts are<br />
located in the special hexagonal retainer slots on the<br />
clamps.<br />
P/N 99223000 4 Rev. E 2-22-02 P/N 99223000 9 Rev. E 2-22-02
Section VIII. Troubleshooting.<br />
Problem Cause Remedy<br />
Pool water not 1. Pool chemistry not adequate to Maintain pool chemistry or consult pool service technician.<br />
sufficiently clean.<br />
inhibit algae growth.<br />
2. Too frequent a backwash cycle Allow pressure to build to 10 PSI above clean filter<br />
condition before backwashing.<br />
3. Improper amount or Check sand bed depth and sand size or consult<br />
wrong sand size.<br />
pool service technician.<br />
4. Inadequate turnover rate. Run system for longer time or consult dealer or pool<br />
service technician.<br />
Higher filter pressure. 1. Insufficient backwashing. Backwash until effluent runs clear.<br />
2. <strong>Sand</strong> bed plugged with mineral deposits. Chemically clean filter.<br />
3. Partially closed valve or restriction. Open valve or remove obstruction in return line.<br />
Short filter cycles. 1. Improper backwashing. Backwash until effluent runs clear.<br />
2. Pool chemistry not adequate to Maintain pool chemistry or consult pool service technician.<br />
inhibit algae growth.<br />
3. Plugged sand bed. Manually remove top 1” surface of sand bed and<br />
chemically clean as required.<br />
4. Flow rate too high. Restrict flow to capacity of filter.<br />
Return flow to pool diminished, 1. Obstruction in the pump hair Clean basket in strainer.<br />
low filter pressure.<br />
and lint pot.<br />
2. Obstruction in pump. Disassemble and clean pump.<br />
3. Obstruction in suction line to pump. Clean skimmer basket. Remove obstruction in lines.<br />
Open valves in suction line.<br />
<strong>Sand</strong> returning to pool. 1. Broken underdrain lateral. Replace broken or damaged laterals.<br />
2. Backwash rate too high. Reduce backwash flow rate.<br />
10. Tighten clamp screws firmly and visually check<br />
the valve tank and clamp assembly to insure that<br />
the joint is correctly assembled.<br />
▲!<br />
WARNING<br />
Improper tank valve assembly could cause the valve to blow off<br />
and cause severe injury and/or property damage.<br />
11. The filter unit has a maximum operating pressure listed<br />
on the filter name plate. DO NOT OPERATE<br />
this unit above the maximum operating pressure<br />
of the valve or the filter. Never connect the filter and<br />
valve unit to a pump which can generate a pressure<br />
that exceeds the operating pressure of the filter or<br />
valve.<br />
12. Use sealant on all tapered male connections of pipe<br />
and fittings. Use only sealant compounds suited for<br />
plastic pipe. Support pipe to prevent strains on filter,<br />
pump or valve. DO NOT USE PETROLEUM<br />
BASED PRODUCTS. NOTICE: All valve<br />
Internal threads are tapered except the air bleeder<br />
connection. Do not over tighten tapered thread<br />
connections.<br />
13. Install pressure gauge in 1/4” NPT port directly<br />
across from the pump port of the valve.<br />
14. Never store pool chemicals within 10 feet of your<br />
pool filter, pump or valve. Pool chemicals should<br />
always be stored in a cool, dry, well ventilated area.<br />
▲!<br />
WARNING<br />
Chemical fumes and/or spills can cause severe corrosive attack<br />
to the filter and pump structural components. Structurally<br />
weakened components can cause filter, pump or valve attachments<br />
to blow off and could cause severe bodily injury or<br />
property damage.<br />
▲!<br />
WARNING<br />
The system's centrifugal pump operates with electrical voltage,<br />
and can generate both vacuum and pressure in the<br />
water system. When properly wired and plumbed, this pump<br />
will operate in a safe manner.<br />
▲!<br />
WARNING<br />
Hazardous voltage - can cause severe or fatal injury. Always<br />
install a suitable GFCI at the power source of this unit as an<br />
added safety precaution. Article 680-31 of the NEC requires<br />
that a GFCI be used if this pump is used with storable pools.<br />
15. Avoid over tightening the pipe threads when connecting<br />
fittings to the pump or valve. Proper procedure is<br />
to apply a pipe sealant to the thread and then install<br />
hand tight plus 1 turn. DO NOT OVER TIGHTEN.<br />
Section III. Initial Start Up.<br />
1. Be sure the correct amount of Silica filter sand<br />
is in the tank and that all connections have been made<br />
and are secure.<br />
2. Check that the backwash is open so that water<br />
is free to flow from the pool and out the backwash<br />
line. Set the control valve to Backwash position.<br />
▲!<br />
WARNING<br />
This filter operates under pressure. With the<br />
valve clamped properly and operated without air<br />
in the system, this filter will operate in a safe<br />
manner. Air entering the filter and the valve not<br />
clamped correctly can cause the valve to be<br />
blown off, which could cause severe personal<br />
injury and/or property damage.<br />
▲!<br />
CAUTION<br />
Always turn pump off before changing valve positions.<br />
Changing valve positions while the pump is running can<br />
damage the control valve, which may cause personal<br />
injury or property damage.<br />
3. Stand clear of the filter. Prime and start pump<br />
according to the pump instructions allowing the filter<br />
tank to fill with water. Once the water flow is steady<br />
out of the waste line, run the pump for at least two<br />
minutes. This initial backwashing of the filter is recommended<br />
to remove any impurities of fine sand particles<br />
in the Silica sand media.<br />
4. Turn the pump off and set valve to rinse position.<br />
Ensure that all pool suction and return lines are<br />
open so that the water is free to flow from the pool to<br />
waste. Stand clear of filter and start the pump.<br />
P/N 99223000 8 Rev. E 2-22-02 P/N 99223000 5 Rev. E 2-22-02
5. Run the pump for at least two minutes.<br />
6. Turn the pump off and set valve to filter position.<br />
Ensure that all pool suction and return lines are<br />
open so that water is free to flow from and to the pool.<br />
Stand clear of filter and start the pump.<br />
7. Your filter has now started its filtering cycle.<br />
You should check that water is returning to the pool<br />
and take note of the operating pressure. My original<br />
starting pressure is ____________________ PSI with<br />
the filter clean.<br />
▲!<br />
CAUTION<br />
To prevent damage to the pump and filter and for proper<br />
operation of the system, clean pump strainer and skimmer<br />
baskets regularly.<br />
8. Check the system for water leaks. If a leak is<br />
found, shut pump off before correcting the leak.<br />
9. As the filter removes dirt and impurities from the<br />
pool water, the accumulation will cause the filter pressure<br />
to rise and flow to diminish. When the pressure<br />
gauge reading is 10 PSI higher than the clean filter<br />
reading noted above, it is time to backwash the filter.<br />
Section IV. Cleaning Frequency.<br />
1. Cleaning frequency will vary from pool to<br />
pool and with other factors such as weather condition,<br />
heavy rains, dust, pollen, bather load, and water chemistry.<br />
Check the pressure gauge reading on a regular<br />
basis and when the pressure gauge reading increases<br />
10 PSI over the initial clean filter reading, it is time to<br />
backwash your filter.<br />
2. It is important NOT to backwash the filter<br />
solely on a timed basis such as every two days. It is<br />
also important to note that backwashing too frequently<br />
actually causes poor filtration.<br />
BACKWASH -<br />
RINSE -<br />
From pump, through valve down<br />
through center pipe, up through filter<br />
sand to valve, and out waste<br />
port. This position is used for<br />
cleaning filter by reversing flow.<br />
From pump through valve downward<br />
through filter sand, up<br />
through center pipe to valve and<br />
out waste port. This position is<br />
used for start up cleaning and<br />
resettling filter bed after backwashing.<br />
WASTE - From pump, through valve<br />
(bypasses filter) and goes to waste<br />
port. This position is for vacuuming<br />
directly to waste, lowering<br />
pool level, or draining pool.<br />
CLOSED - NO FLOW IN THIS POSITION –<br />
DO NOT USE THIS SETTING<br />
WITH PUMP OPERATING.<br />
RECIRCULATE - From pump, through valve,<br />
bypasses filter and goes to return<br />
port and back to pool. This position<br />
is for circulating water without<br />
going through filter.<br />
WINTERIZING - Valve position for a winterized filter,<br />
see page 10.<br />
Section VI. Filter Backwash Procedures.<br />
▲!<br />
1. Turn off pump.<br />
WARNING<br />
Failure to operate your filter system or inadequate filtration<br />
can cause poor water clarity obstructing visibility in your<br />
pool. Poor water clarity may obscure objects in the water<br />
which while swimming and diving could cause severe personal<br />
injury or death. Never swim in a pool with poor water<br />
clarity.<br />
4. Backwash filter for approximately 3-5 minutes<br />
or until backwash water is clean.<br />
5. Turn off pump. Set control valve back to rinse<br />
position.<br />
6. Stand clear of the filter and start pump.<br />
7. Rinse filter for approximately 3-5 minutes.<br />
8. Turn off pump. Set control valve back to filter<br />
position.<br />
9. Stand clear of the filter and start pump.<br />
10. The filter has now started its filtering cycle.<br />
Check that water is returning to the pool and take note<br />
of the filter pressure.<br />
11. The filter pressure in step 10 above should not<br />
exceed the pressure originally observed on the filter<br />
when it was initially started. If after backwashing the<br />
pressure is 4-6 PSI above the start condition, it may be<br />
necessary to change the sand in the filter.<br />
Section VII. Winterizing the Filter.<br />
1. In areas that have freezing winter temperatures,<br />
the pool equipment must be winterized to protect<br />
it from damage.<br />
2. Backwash the filter. Shut off the pump and set<br />
the control valve to the winterize position.<br />
3. Remove the drain port cap at the bottom of the<br />
filter.<br />
IMPORTANT NOTE<br />
Remove drain port cap only for draining water from filter. Removing<br />
the entire fitting will allow sand to drain also. The filter will drain slowly.<br />
Leave the drain port cap off and store it during the time the system<br />
is shut down.<br />
▲!<br />
CAUTION<br />
The control valve should be left in the winterize position during<br />
the shutdown season so that the rubber seal of the valve<br />
diverter has no pressure on it. Failure to do so can damage<br />
the valve diverter seal which can cause property damage<br />
from leaking water.<br />
4. Drain all appropriate system piping.<br />
5. It is recommended that the pump and filter be<br />
covered with a tarpaulin or plastic sheet to inhibit<br />
deterioration from the weather. DO NOT wrap pump<br />
motor with plastic.<br />
Section V. Filter and Control Valve Functions.<br />
FILTER - From pump, through valve, downward<br />
through filter sand bed, up<br />
through center pipe to valve return<br />
port, and back to the pool for normal<br />
filter action and vacuuming<br />
pool through filter.<br />
2. Ensure that suction and backwash lines are<br />
open so that water is free to come from the pool and<br />
flow out the backwash line. Set the control valve to<br />
backwash position.<br />
3. Stand clear of the filter and start pump.<br />
P/N 99223000 6 Rev. E 2-22-02 P/N 99223000 7 Rev. E 2-22-02