
You also want an ePaper? Increase the reach of your titles
YUMPU automatically turns print PDFs into web optimized ePapers that Google loves.
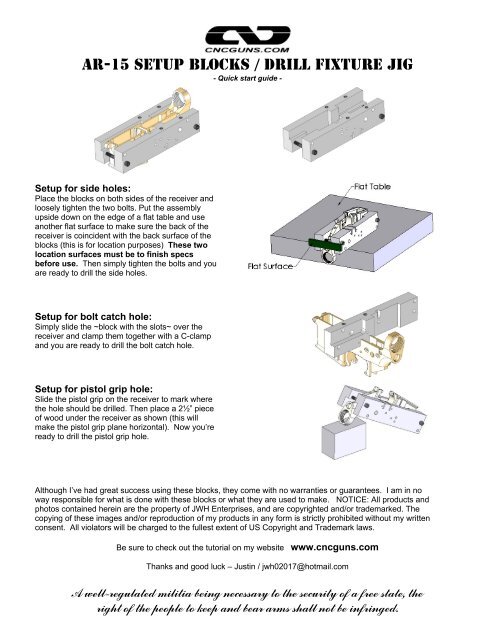
<strong>AR</strong>-<strong>15</strong> <strong>Setup</strong> <strong>Blocks</strong> / <strong>Drill</strong> <strong>Fixture</strong> <strong>Jig</strong><br />
- Quick start guide -<br />
<strong>Setup</strong> for side holes:<br />
Place the blocks on both sides of the receiver and<br />
loosely tighten the two bolts. Put the assembly<br />
upside down on the edge of a flat table and use<br />
another flat surface to make sure the back of the<br />
receiver is coincident with the back surface of the<br />
blocks (this is for location purposes) These two<br />
location surfaces must be to finish specs<br />
before use. Then simply tighten the bolts and you<br />
are ready to drill the side holes.<br />
<strong>Setup</strong> for bolt catch hole:<br />
Simply slide the ~block with the slots~ over the<br />
receiver and clamp them together with a C-clamp<br />
and you are ready to drill the bolt catch hole.<br />
<strong>Setup</strong> for pistol grip hole:<br />
Slide the pistol grip on the receiver to mark where<br />
the hole should be drilled. Then place a 2½” piece<br />
of wood under the receiver as shown (this will<br />
make the pistol grip plane horizontal). Now you’re<br />
ready to drill the pistol grip hole.<br />
Although I’ve had great success using these blocks, they come with no warranties or guarantees. I am in no<br />
way responsible for what is done with these blocks or what they are used to make. NOTICE: All products and<br />
photos contained herein are the property of JWH Enterprises, and are copyrighted and/or trademarked. The<br />
copying of these images and/or reproduction of my products in any form is strictly prohibited without my written<br />
consent. All violators will be charged to the fullest extent of US Copyright and Trademark laws.<br />
Be sure to check out the tutorial on my website www.cncguns.com<br />
Thanks and good luck – Justin / jwh02017@hotmail.com<br />
A well-regulated militia being necessary to the security of a free state, the<br />
right of the people to keep and bear arms shall not be infringed.
- Optional -<br />
<strong>AR</strong>-<strong>15</strong> <strong>Setup</strong> <strong>Blocks</strong> / Milling jig Adapter<br />
<strong>Setup</strong> drilling adapter plate:<br />
Follow the previous steps for setting up the <strong>AR</strong><strong>15</strong> lower<br />
receiver in the drilling jig. Then bolt the drilling adapter<br />
plate to top of drill jig. Insure the distance from the front<br />
of the drilling jig to the front of the adapter plate is 3.410<br />
and also make sure the adapter is centered on top of the<br />
drilling jig.<br />
<strong>Drill</strong> holes in fire control area:<br />
<strong>Drill</strong> the (37) 1/8 diameter holes to a depth of 1.249 from<br />
the top surface of the receiver. Remove the drilling<br />
adapter plate and drill the (14) 3/8 diameter holes and<br />
the (1) 7/16 hole to the same depth. See (Fig. 1)<br />
<strong>Setup</strong> milling adapter plate:<br />
Bolt the milling adapter plate to the top of the drill jig.<br />
Again, insure the distance from the front of the drilling jig<br />
to the front of the adapter plate is 3.410 and the adapter<br />
plate is centered on top of the jig.<br />
Mill fire control area pocket:<br />
With a 3/8 carbide endmill secured in the drill chuck,<br />
plunge the endmill into the pocket of the milling adapter<br />
to a depth of approximately 0.025”. While holding the<br />
drill jig tight with your hands, move the jig into the<br />
endmill until the edge of the endmill touches the edge of<br />
the pocket. Let the endmill cut the entire perimeter of<br />
the pocket and then plunge the endmill another 0.025”<br />
and repeat the procedure until you reach a depth of<br />
1.249 from the top surface of the lower.<br />
Fire control area shelf: (optional)<br />
If the fire control area shelf needs to be milled out, bolt<br />
the milling adapter plate on the drill jig as described<br />
before and drill the (6) 1/8 diameter holes 0.630 deep.<br />
Remove the adapter plate and drill the (2) 1/2 diameter<br />
holes to the same depth. Attach the drilling adapter<br />
plate like before and use a 3/8 carbide endmill to mill<br />
the pocket out at 0.025” steps to a depth of 0.630.<br />
See (Fig. 2)<br />
For more detailed information, reference the tutorial on my website www.cncguns.com<br />
-- NOTICE --<br />
Cutting tools are dangerous. Always wear proper protection when using drills and endmills. The method<br />
described above has been proven to work. I am not responsible for any accidents resulting from the misuse<br />
of these tools.