Helena C-4 - Atest/Marketing
Helena C-4 - Atest/Marketing
Helena C-4 - Atest/Marketing
You also want an ePaper? Increase the reach of your titles
YUMPU automatically turns print PDFs into web optimized ePapers that Google loves.
Operation Manual<br />
<strong>Helena</strong> C-4 - Software C11.11b<br />
<strong>Helena</strong> Biosciences Europe<br />
UK<br />
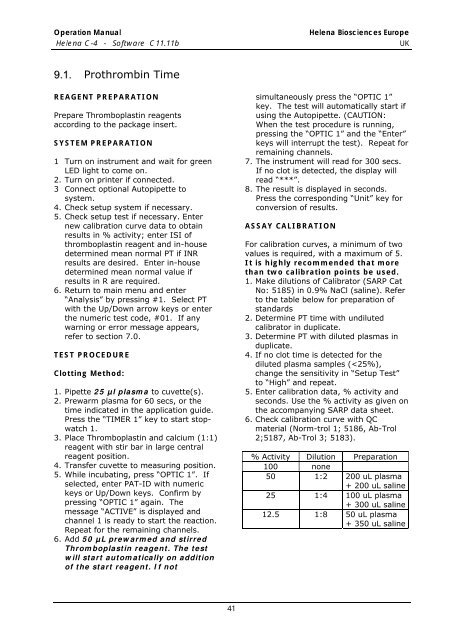
9.1. Prothrombin Time<br />
REAGENT PREPARATION<br />
Prepare Thromboplastin reagents<br />
according to the package insert.<br />
SYSTEM PREPARATION<br />
1 Turn on instrument and wait for green<br />
LED light to come on.<br />
2. Turn on printer if connected.<br />
3 Connect optional Autopipette to<br />
system.<br />
4. Check setup system if necessary.<br />
5. Check setup test if necessary. Enter<br />
new calibration curve data to obtain<br />
results in % activity; enter ISI of<br />
thromboplastin reagent and in-house<br />
determined mean normal PT if INR<br />
results are desired. Enter in-house<br />
determined mean normal value if<br />
results in R are required.<br />
6. Return to main menu and enter<br />
“Analysis” by pressing #1. Select PT<br />
with the Up/Down arrow keys or enter<br />
the numeric test code, #01. If any<br />
warning or error message appears,<br />
refer to section 7.0.<br />
TEST PROCEDURE<br />
Clotting Method:<br />
1. Pipette 25 µl plasma to cuvette(s).<br />
2. Prewarm plasma for 60 secs, or the<br />
time indicated in the application guide.<br />
Press the “TIMER 1” key to start stopwatch<br />
1.<br />
3. Place Thromboplastin and calcium (1:1)<br />
reagent with stir bar in large central<br />
reagent position.<br />
4. Transfer cuvette to measuring position.<br />
5. While incubating, press “OPTIC 1”. If<br />
selected, enter PAT-ID with numeric<br />
keys or Up/Down keys. Confirm by<br />
pressing “OPTIC 1” again. The<br />
message “ACTIVE” is displayed and<br />
channel 1 is ready to start the reaction.<br />
Repeat for the remaining channels.<br />
6. Add 50 µL prewarmed and stirred<br />
Thromboplastin reagent. The test<br />
will start automatically on addition<br />
of the start reagent. If not<br />
simultaneously press the “OPTIC 1”<br />
key. The test will automatically start if<br />
using the Autopipette. (CAUTION:<br />
When the test procedure is running,<br />
pressing the “OPTIC 1” and the “Enter”<br />
keys will interrupt the test). Repeat for<br />
remaining channels.<br />
7. The instrument will read for 300 secs.<br />
If no clot is detected, the display will<br />
read “***”.<br />
8. The result is displayed in seconds.<br />
Press the corresponding “Unit” key for<br />
conversion of results.<br />
ASSAY CALIBRATION<br />
For calibration curves, a minimum of two<br />
values is required, with a maximum of 5.<br />
It is highly recommended that more<br />
than two calibration points be used.<br />
1. Make dilutions of Calibrator (SARP Cat<br />
No: 5185) in 0.9% NaCl (saline). Refer<br />
to the table below for preparation of<br />
standards<br />
2. Determine PT time with undiluted<br />
calibrator in duplicate.<br />
3. Determine PT with diluted plasmas in<br />
duplicate.<br />
4. If no clot time is detected for the<br />
diluted plasma samples (



![[APTT-SiL Plus]. - Agentúra Harmony vos](https://img.yumpu.com/50471461/1/184x260/aptt-sil-plus-agentara-harmony-vos.jpg?quality=85)
![[SAS-1 urine analysis]. - Agentúra Harmony vos](https://img.yumpu.com/47529787/1/185x260/sas-1-urine-analysis-agentara-harmony-vos.jpg?quality=85)

![[SAS-MX Acid Hb]. - Agentúra Harmony vos](https://img.yumpu.com/46129828/1/185x260/sas-mx-acid-hb-agentara-harmony-vos.jpg?quality=85)
