You also want an ePaper? Increase the reach of your titles
YUMPU automatically turns print PDFs into web optimized ePapers that Google loves.
<strong>Blender</strong> <strong>3D</strong>: <strong>Noob</strong> <strong>to</strong> <strong>Pro</strong>/Printable Version - Wikibooks, collection of open-content textbooks<br />
10/24/2007 02:26 PM<br />
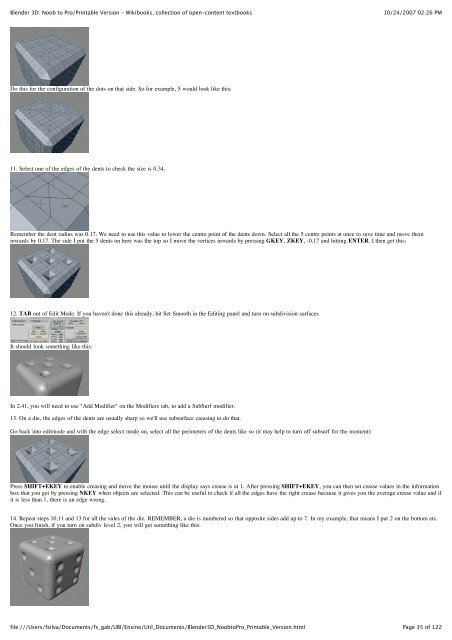
Do this for the configuration of the dots on that side. So for example, 5 would look like this:<br />
11. Select one of the edges of the dents <strong>to</strong> check the size is 0.34.<br />
Remember the dent radius was 0.17. We need <strong>to</strong> use this value <strong>to</strong> lower the centre point of the dents down. Select all the 5 centre points at once <strong>to</strong> save time and move them<br />
inwards by 0.17. The side I put the 5 dents on here was the <strong>to</strong>p so I move the vertices inwards by pressing GKEY, ZKEY, -0.17 and hitting ENTER. I then get this:<br />
12. TAB out of Edit Mode. If you haven't done this already, hit Set Smooth in the Editing panel and turn on subdivision surfaces<br />
It should look something like this:<br />
In 2.41, you will need <strong>to</strong> use "Add Modifier" on the Modifiers tab, <strong>to</strong> add a SubSurf modifier.<br />
13. On a die, the edges of the dents are usually sharp so we'll use subsurface creasing <strong>to</strong> do that.<br />
Go back in<strong>to</strong> editmode and with the edge select mode on, select all the perimeters of the dents like so (it may help <strong>to</strong> turn off subsurf for the moment):<br />
Press SHIFT+EKEY <strong>to</strong> enable creasing and move the mouse until the display says crease is at 1. After pressing SHIFT+EKEY, you can then set crease values in the information<br />
box that you get by pressing NKEY when objects are selected. This can be useful <strong>to</strong> check if all the edges have the right crease because it gives you the average crease value and if<br />
it is less than 1, there is an edge wrong.<br />
14. Repeat steps 10,11 and 13 for all the sides of the die. REMEMBER, a die is numbered so that opposite sides add up <strong>to</strong> 7. In my example, that means I put 2 on the bot<strong>to</strong>m etc.<br />
Once you finish, if you turn on subdiv level 2, you will get something like this:<br />
file:///Users/fsilva/Documents/fs_gab/<strong>UBI</strong>/Ensino/Util_Documents/<strong>Blender</strong><strong>3D</strong>_<strong>Noob</strong><strong>to</strong><strong>Pro</strong>_Printable_Version.html<br />
Page 35 of 122


