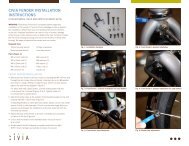
Create successful ePaper yourself
Turn your PDF publications into a flip-book with our unique Google optimized e-Paper software.
<strong>Civia</strong> <strong>Hyland</strong> <strong>Addendum</strong>
<strong>Civia</strong> <strong>Hyland</strong>: TeCH FeaTures<br />
This owner’s manual addendum provides details<br />
specific to your <strong>Civia</strong> <strong>Hyland</strong>. More information and<br />
video clips can be found at civiacycles.com.<br />
Fork<br />
The <strong>Civia</strong> carbon fork was designed for reliable high<br />
performance. We incorporated a post-mount disc brake<br />
tab for directly mounting a disc brake to the fork.<br />
By eliminating the IS adapter, we reduced materials<br />
and weight from the complete bike.<br />
CaBle CHannel For DynaMo-PoWereD lIgHT<br />
a specially designed cable channel in the right fork<br />
leg cleanly routes the dynamo light’s wire to the hub.<br />
The channel’s tight tolerances ensure a snug fit.<br />
Maintenance is easy:<br />
1. remove the wire by firmly pulling it out of<br />
the channel.<br />
2. reinstall by pushing the cable until it snaps back<br />
into place (figure 1).<br />
CarBon Fork<br />
The <strong>Civia</strong> carbon fork was not designed for use with a<br />
front rack. Installing clamps to anchor the rack is not<br />
recommended and can damage the fork. a front-rackcompatible<br />
steel fork with mid-blade rack attachments<br />
is available from your <strong>Civia</strong> dealer.<br />
1<br />
Figure 1: Pushing the light wire into the cable channel<br />
CarBon-FIBer STeerer TuBe<br />
The <strong>Civia</strong> carbon fork features a carbon-fiber steerer<br />
tube. If you need to adjust the stem, be sure to<br />
follow the stem manufacturer’s recommended torque<br />
specifications. Failure to do so can damage the unit.<br />
CoMPreSSIon Plug<br />
each <strong>Civia</strong> carbon fork comes with its own compression<br />
plug for properly tightening the headset. Do not use<br />
any other compression plug with this fork or damage<br />
may occur (figure 2).<br />
Figure 2: only use the compression plug included with<br />
<strong>Civia</strong> forks<br />
DynaMo-PoWereD HeaDlIgHT<br />
The <strong>Hyland</strong> features a dynamo-powered headlight.<br />
The light does not require batteries, ensuring reliable<br />
lighting whenever you need it. as with all dynamo hubs,<br />
the more electricity provided, the more resistance<br />
the hub creates. This means that there will be more<br />
resistance when the headlight is switched “on” than<br />
when it is “off.” When you are moving and the light is<br />
switched “off,” the small top safety leD remains on.<br />
This is similar to a car’s daytime running lights.
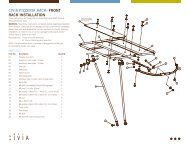
Frame support plate<br />
Sliding dropout<br />
rear rack<br />
rack stays<br />
Chain guard<br />
Chain guard<br />
mounting plate<br />
Cable guide<br />
plates (8)<br />
Fender stay<br />
Dynamo light<br />
Dynamo hub<br />
2
DISConneCTIng anD reConneCTIng<br />
THe DynaMo WIre<br />
1. grab the connecting piece with your fingers and pull<br />
up, away from the hub. This may require a small<br />
amount of force.<br />
2. To reconnect, orient the connector with the hub and<br />
press down firmly until the connector snaps into<br />
place (figure 3).<br />
FronT FenDer<br />
We created a clean look for the front fender by<br />
using an attachment bolt on the underside of the fork<br />
crown. To access the bolt, you must remove the wheel.<br />
If you choose to remove the fender, <strong>Civia</strong> recommends<br />
reinstalling the bolt in the fork crown. This prevents the<br />
threads from becoming contaminated with road grit.<br />
To ensure a tight fit, we treated each mounting bolt with<br />
a thread-lock coating and included a locking washer.<br />
This secures the bolt and fender, minimizing noise.<br />
TrIMMIng THe FenDer STay<br />
To optimize the fit of the front fender, you may trim the<br />
fender stay. This aluminum strut can be cut with a pair<br />
of diagonal-cut pliers.<br />
1. remove the stay by loosening the loop strap’s bolts<br />
at the fork dropouts.<br />
2. Carefully measure the amount to remove<br />
before cutting.<br />
3. Trim to length (figure 4).<br />
note: Fender stays that are cut too short are not<br />
covered under warranty.<br />
rear FenDer<br />
Sometimes, the fender lacks an evenly spaced—or<br />
concentric—fit. <strong>Civia</strong> provides a spacer kit to move the<br />
fender away from the chainstay bridge. refer to <strong>Civia</strong>’s<br />
online technical section for more details.<br />
3<br />
Figure 3: reconnecting the dynamo wire to the hub<br />
Figure 4: Trimming fender stay to proper length<br />
CaBle guIDe PlaTeS<br />
<strong>Civia</strong>’s removable cable guide plates make it easy to<br />
pull aside cable and hydraulic housing and thoroughly<br />
clean the frame.<br />
1. Secure the bike in a work stand where the cable<br />
guide plates are easily accessed.<br />
2. using a 2mm hex-head wrench, remove the bolt<br />
from one side of the plate.<br />
3. loosen the other side enough to swivel the plate out<br />
of the way, freeing the cable/brake housing.<br />
reaD BeFore reInSTallIng CaBle guIDe PlaTeS<br />
It is critically important to take care when reinstalling<br />
the cable guide plates. Start threading each bolt by<br />
hand. only aFTer the threads engage should you use<br />
a hex wrench to bring bolts to appropriate tightness.<br />
Stripped or cross-threaded frames are not covered<br />
under warranty.<br />
HyDraulIC DISC BrakeS<br />
The hydraulic disc brakes featured on the <strong>Civia</strong> <strong>Hyland</strong><br />
generate a great deal of stopping power. If you are not<br />
familiar with the strength of hydraulic brakes, ride the<br />
bike in a safe, traffic-free area at slow speeds until you<br />
are accustomed to the feel of the braking system.<br />
CauTIon:<br />
• When cleaning the bike or changing a flat tire do not<br />
pump the brake lever while the wheel is removed.<br />
This will compress the brake pads, making it<br />
impossible to replace the wheel without first prying<br />
the pads apart<br />
• Additionally, getting chain lube or grease on the brake<br />
rotors or pads dramatically decreases stopping power.<br />
If this occurs, immediately clean the rotors with a<br />
degreaser and replace the brake pads with a new,<br />
uncontaminated set
SlIDIng DroPouTS<br />
Chain tension is adjusted using <strong>Civia</strong>’s proprietary<br />
sliding dropouts. The sliding dropout accommodates<br />
20mm of fore and aft adjustment. The ideal chain<br />
tension allows ½" of chain deflection, which is the<br />
distance the bottom of the chain loop can be pushed<br />
upward toward the chainstay with the rear hub secured.<br />
aDjuSTIng THe SlIDIng DroPouTS<br />
1. using a 6mm hex wrench, loosen the anchor bolts<br />
on the sliding dropouts on both the drive and nondrive<br />
sides.<br />
2. once the bolts are loose, slide the dropouts as<br />
needed (figure 5).<br />
3. evenly position the dropouts by centering the wheel<br />
between the chainstays.<br />
4. once the wheel and dropouts have been adjusted,<br />
securely tighten the sliding dropout bolts to 18 nm.<br />
DrIveTraIn DroPouT oPTIonS<br />
The <strong>Hyland</strong>’s sliding dropouts are configured<br />
specifically to either the rohloff, alfine, iMotion3,<br />
or derailleur drivetrains. Changing from one style of<br />
drivetrain to another may require new sliding dropouts.<br />
replacement or substitute dropouts are available<br />
from your <strong>Civia</strong> dealer.<br />
PerIoDIC CHeCkS anD aDjuSTMenTS<br />
We recommend periodically checking the sliding<br />
dropout anchor bolts to ensure they are tight. If you<br />
ride frequently in wet, muddy or sloppy conditions<br />
the sliding dropout plates should be removed and<br />
cleaned to facilitate smooth operation and prevent<br />
binding. Do not grease the inside surfaces of the<br />
sliding dropout plates.<br />
Figure 5: loosen sliding dropout then pull back on<br />
wheel to tension the chain<br />
rear raCk<br />
The <strong>Civia</strong> rear rack attaches to the bike at the frame<br />
support plates and upper seatstays. Periodically<br />
check attachment hardware to ensure adequate<br />
tightness. The rack is rated to 40 lb. Carrying more<br />
weight risks product failure and affects the bikes<br />
handling and performance.<br />
loaD DISTrIBuTIon<br />
To facilitate optimum bike handling, loads should<br />
always be evenly distributed. Whenever possible,<br />
place heavier items in lower bags or panniers. never<br />
haul any load that impairs your balance or adversely<br />
affects the stability of the bicycle.<br />
CHaInguarD<br />
The <strong>Civia</strong> <strong>Hyland</strong> chainguard is designed to fit<br />
around the 45-tooth Shimano alfine chainring guard.<br />
To accommodate different drivetrains, the chainguard<br />
on pre-built <strong>Hyland</strong> models uses a mounting bracket<br />
specific to either a 42.7 or 49.2mm chainline.<br />
The alfine chainguard uses the 42.7mm bracket<br />
and the rohloff build uses the 49.2mm bracket.<br />
Modifications to the drivetrain may require a different<br />
bracket or spacers. Chainguards are available from<br />
your <strong>Civia</strong> dealer.<br />
FIne TunIng HorIzonTal aDjuSTMenT<br />
1. loosen the mounting bolts at the seat tube mounting<br />
bracket and the inside of the frame support plate<br />
(above the sliding dropout).<br />
2. Slide chainguard into position and securely tighten<br />
the mounting bolts.<br />
rear HuBS<br />
<strong>Hyland</strong>’s internally geared hubs are high performance,<br />
yet elegantly simple and reliable. When used properly,<br />
they will deliver many miles of hassle-free riding.<br />
SHIFTIng WHIle PeDalIng<br />
To shift while pedaling, ease up on pedaling pressure.<br />
This helps the hub transition smoothly to the next gear.<br />
you’ll find a low-pressure sweet spot in the “dead zone”<br />
at the top and bottom of the pedal stroke—when your<br />
feet are at 12 and 6 o’clock.<br />
4
eMovIng THe rear WHeel: SHIMano alFIne<br />
1. Shift the bike into 1st gear and grab the cable<br />
housing at the stop by the end of the stabilizing arm<br />
(figure 6a).<br />
2. Pull the cable housing and end ferrule away from<br />
the rear hub toward the bottom bracket.<br />
3. When the cable housing clears the stabilizing arm,<br />
move the cable slightly away from the center of the<br />
bike toward you. This disconnects the cable from<br />
the arm (figure 6b).<br />
4. next, use your finger to remove the cable from<br />
the guide on rear hub (figure 6c).<br />
5. gently pull up and out on the cable where the<br />
set-bolt connects with the shifting mechanism<br />
(figure 6d) (visit civiacycles.com for video).<br />
6. once the cable is completely disconnected, loosen<br />
the 15mm axle bolts and remove the wheel.<br />
reInSTallaTIon<br />
1. Place the wheel back in the dropouts and tighten<br />
the 15mm axle bolts.<br />
2. Put the set-bolt back on the shifting mechanism<br />
and position cable in guide around the hub.<br />
3. gently pull cable housing away from rear hub toward<br />
the bottom bracket and set the housing into the<br />
stabilizing arm (visit civiacycles.com for video).<br />
5<br />
Figure 6a: grasp cable housing near the stabilizing arm Figure 6b: Pull housing away from arm until the<br />
Figure 6c: gently remove cable from the rear<br />
hub’s guide<br />
ferrule is clear<br />
Figure 6d: gently pulling up and out, remove the set<br />
bolt from the shifting mechanism
SHIFTIng aDjuSTMenT: SHIMano alFIne<br />
To adjust the shifting for the alfine hub, begin by<br />
shifting into 4th gear. next, look at the rear hub’s<br />
yellow shift indicator lines. These two lines should<br />
line up and point directly at each other (figure 7).<br />
If they don’t, turn your shifter’s barrel adjuster in the<br />
appropriate direction until they do. When these two<br />
yellow lines point at each other in 4th gear, your<br />
hub should deliver perfect shifts.<br />
reMovIng THe rear WHeel: SraM I-MoTIon 3<br />
1. Twist the shifter into 1st gear.<br />
2. Slide the plastic retainer off of the cable stop bracket<br />
(figure 8).<br />
3. Disconnect the shift cable by disengaging the link<br />
from the cable nipple (figure 9).<br />
4. loosen the axle nuts with a 15mm box-end wrench<br />
and slide the wheel forward out of the dropouts.<br />
reInSTallaTIon<br />
1. Place the chain back on the cog.<br />
2. as you pull the axle back into the dropouts, be<br />
sure the retaining washers are on the outside of the<br />
dropouts and the disc brake rotor is aligned between<br />
the pads of the disc caliper.<br />
3. Pull back until the chain is taught.<br />
4. Make sure the cable stop bracket is parallel to the<br />
chainstay and the wheel is properly aligned.<br />
5. Tighten the 15mm axle nuts 30–40 nm.<br />
6. Make sure the shifter is in 1st gear.<br />
7. Hook the link onto the cable nipple.<br />
8. Slide the plastic retainer onto the cable stop bracket<br />
completely (figure 10).<br />
Figure 7: Properly adjusted shift indicator lines<br />
Figure 9: Separate the cable nipple and link<br />
Figure 8: remove the plastic retainer from the cable<br />
stop bracket<br />
Figure 10: Fully assembled<br />
6
SHIFTIng aDjuSTMenT: SraM I-MoTIon 3<br />
To make sure your shifting cable is properly adjusted,<br />
shift into 3rd gear. If your shifting is adjusted properly,<br />
you will not be able to pull the shift cable out of the hub<br />
any further. If you can, shift into first gear and turn the<br />
shifter’s adjustment barrel counter-clockwise to add<br />
tension. If the shift cable is too tight, you will not be<br />
able to shift into 3rd gear. reduce tension by turning<br />
the shifter adjustment barrel clockwise.<br />
reMovIng THe rear WHeel: roHloFF SPeeDHuB<br />
1. Shift into 1st gear and undo the retention bolt on the<br />
non-drive side of the bike (visit civiacycles.com<br />
for video).<br />
2. after removing the bolt, gently pull the shifting unit<br />
away from the bike.<br />
3. When unit is disconnected, open the quick release<br />
and remove the wheel in normal fashion.<br />
reInSTallaTIon<br />
repeat these steps in reverse order to reinstall<br />
TIreS<br />
The <strong>Hyland</strong> is equipped with durable, punctureresistant<br />
Panaracer T-Serv tires. These are proven,<br />
high-performance tires utilizing technology designed to<br />
minimize flats. Partnering with Panaracer, <strong>Civia</strong> added<br />
reflective sidewalls to improve nighttime visibility.<br />
PleaSe noTe:<br />
The <strong>Hyland</strong> was designed for a maximum<br />
recommended tire size of 700c x 35mm. Tires larger<br />
than 700c x 35mm may not have adequate clearance<br />
in the chainstay area. riding tires larger than 35mm<br />
may result in damage to the chainstays or the tire itself.<br />
7<br />
Torque SPeC<br />
- underside of fork crown: 5 nm<br />
- rack bolts: 5 nm<br />
- Sliding dropout bolts: 18 nm<br />
- Cable guide plate:<br />
hand tighten plus “a little”<br />
ToolS uSeD on<br />
CIvIa HylanD<br />
Hex WrenCHeS:<br />
- 2mm - 4mm<br />
- 2.5mm - 5mm<br />
- 3mm - 6mm<br />
Box-enD WrenCHeS:<br />
- 8mm - 15mm<br />
- 10mm
6400 West 105th Street<br />
Bloomington, MN 55438<br />
www.civiacycles.com<br />
952-229-5040<br />
100% Total Recycled Paper<br />
100% Post-Consumer Fiber<br />
© 2009 CIVIA