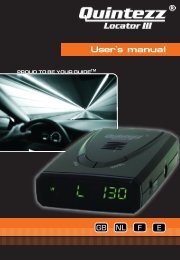
Drive Control manual GB - Quintezz
Drive Control manual GB - Quintezz
Drive Control manual GB - Quintezz

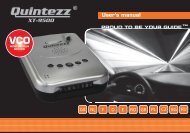
Create successful ePaper yourself
Turn your PDF publications into a flip-book with our unique Google optimized e-Paper software.
User’s <strong>manual</strong><br />
<strong>GB</strong> NL F E D I
ADDENDUM MANUAL PAGE <strong>GB</strong>-<strong>GB</strong>-4, 6, 11<br />
4.2 SETTING MENU<br />
The options ‘Ka’ and ‘KaN (Ka Narrow)’ are replaced by the following options: ‘Ka1’,<br />
‘Ka2’, ‘Ka3’.<br />
4.2.4 RADAR BAND Ka1, Ka2, Ka3<br />
This option allows you to switch off the Radar Band ‘Ka1’, ‘Ka2’ and/or ‘Ka3’.<br />
Ka1 (upto 34.3), Ka2 (from 34.3 to 35.1 Ghz), Ka3 (from 35.1 to 35.7 Ghz).<br />
6.2 RADAR FREQUENCIES<br />
Ka1: 34.0, 34.3 Ghz<br />
Ka 2: 34.3, 34.36, 34.7, 35.1 Ghz<br />
Ka 3: 35.5 Ghz<br />
ADDENDUM HANDLEIDING PAGINA NL-20, 22, 27<br />
4.2 SETTING MENU<br />
De opties ‘Ka’ en ‘KaN (Ka Narrow)’ werden vervangen door volgende opties: ‘Ka1’,<br />
‘Ka2’, ‘Ka3’.<br />
4.2.4 Ka1, Ka2, Ka3<br />
Deze optie laat u toe de Radar Band ‘Ka1’, ‘Ka2’ en/of ‘Ka3’ uit te schakelen.<br />
Ka1 (tot 34.3), Ka2 (van 34.3 tot 35.1 Ghz), Ka3 (van 35.1 tot 35.7 Ghz).<br />
6.2 RADARFREQUENTIES<br />
Ka1: 34.0, 34.3 Ghz<br />
Ka 2: 34.3, 34.36, 34.7, 35.1 Ghz<br />
Ka 3: 35.5 Ghz<br />
ADDENDUM MODE D’EMPLOI PAGE FR-36, 38<br />
4.2 MENU RÉGLAGES<br />
Les options ‘Ka’ and ‘KaN (Ka Narrow)’ ont été remplaçées par les options suivantes:<br />
‘Ka1’, ‘Ka2’, ‘Ka3’.<br />
4.2.4 BANDE RADARKa1, Ka2, Ka3<br />
Cette option vous permet de désactiver la bande radar ‘Ka1’, ‘Ka2’ et/ou ‘Ka3’.<br />
Ka1 (jusqu’à 34.3), Ka2 (de 34.3 jusqu’à 35.1 Ghz), Ka3 (de 35.1 jusqu’à 35.7 Ghz).<br />
6.2 Fréquence radar<br />
Ka1: 34.0, 34.3 Ghz<br />
Ka 2: 34.3, 34.36, 34.7, 35.1 Ghz<br />
Ka 3: 35.5 Ghz
ADDENDUM MANUAL DE INSTRUCCIONES PAGINA E-52, 54, 59<br />
4.2 MENÚ DE AJUSTE<br />
Las opciones ‘Ka’ y ‘kaN (Ka Estrecho)’ son reemplazadas por las siguientes opciones:<br />
‘Ka1’, ‘Ka2’, ‘Ka3’.<br />
4.2.4 BANDE DE RADAR Ka1, Ka2, Ka3<br />
Esta opción le permite apagar la Banda de Radar ‘Ka1’, ‘Ka2’ y/o ‘Ka3’.<br />
Ka1 (hasta 34.49), Ka2 (de 34.3 a 35.1 Ghz), Ka3 (de 35.1 a 35.7 Ghz).<br />
6.2 FRECUENCIAS DEL RADAR Y DEL LÁSER<br />
Ka1: 34.0, 34.3 Ghz<br />
Ka 2: 34.3, 34.36, 34.7, 35.1 Ghz<br />
Ka 3: 35.5 Ghz<br />
ADDENDUM BENUTZERHANDBUCH SEITE D-68, 70, 75<br />
4.2 EINSTELLUNG MENU<br />
Die Optionen ‘Ka’ und ‘KaN (Ka Narrow)’ werden durch die Folgende Optionen ersezt:<br />
‘Ka1’, ‘Ka2’, ‘Ka3’.<br />
4.2.4 RADAR BAND Ka1, Ka2, Ka3<br />
Diese Option ermöglicht das Ausschalten des Radar-Bandes ‘Ka1’, ‘Ka2’ und/oder<br />
‘Ka3’.<br />
Ka1 (bis 34.3), Ka2 (von 34.3 bis 35.1 Ghz), Ka3 (von 35.1 bis 35.7 Ghz).<br />
6.2 RADAR FREQUENZEN<br />
Ka1: 34.0, 34.3 Ghz<br />
Ka 2: 34.3, 34.36, 34.7, 35.1 Ghz<br />
Ka 3: 35.5 Ghz<br />
ADDENDUM MANUALE DELL’UTENTE PAGINA I-84, 86, 91<br />
4.2 MENU IMPOSTAZIONI<br />
Le opzioni “Ka” e “KaN” (Ka Narrow ) sono sostituite dalle seguenti opzioni: “Ka1”,<br />
Ka2”, “Ka3”.<br />
4.2.4 BANDA RADAR: Ka1, Ka2, Ka3<br />
Questa opzione permette la disattivazione delle Bande Radar “Ka1”, Ka2” e/o “Ka3”.<br />
Ka1 (fino a 34.3 GHz), Ka2 (da 34.3 a 35.1 GHz), Ka3 (da 35.1 a 35.7 GHz).<br />
6.2 FREQUENZE RADAR<br />
Ka1: 34.0, 34.3 Ghz<br />
Ka 2: 34.3, 34.36, 34.7, 35.1 Ghz<br />
Ka 3: 35.5 Ghz
Illustration I<br />
11<br />
15<br />
13<br />
12<br />
10<br />
9<br />
16<br />
8<br />
6<br />
14<br />
7 1 2 3 4 5<br />
Illustration II
TABLE OF CONTENTS<br />
INTRODUCTION ..........................................................................................................................................................................1<br />
DESCRIPTION OF THE DRIVE CONTROL ........................................................................................................................................1<br />
INSTALLATION IN THE CAR ..........................................................................................................................................................2<br />
OPERATION OF THE DRIVE CONTROL IN THE CAR .......................................................................................................................3<br />
SETTINGS OF THE DRIVE CONTROL .............................................................................................................................................4<br />
ALERT SCREENS OF THE DRIVE CONTROL ....................................................................................................................................9<br />
DEFAULT SETTINGS ...................................................................................................................................................................10<br />
SPEED TRAPS ............................................................................................................................................................................10<br />
PC OPERATING FOR THE QUINTEZZ DRIVE CONTROL .................................................................................................................12<br />
MAINTENANCE, DIRECTIVES AND TIPS ......................................................................................................................................15<br />
GUARANTEE .............................................................................................................................................................................15<br />
INTRODUCTION<br />
Congratulations!<br />
You are now the proud owner of one of the world’s most advanced GPS products.<br />
The <strong>Quintezz</strong> <strong>Drive</strong> <strong>Control</strong> is delivered as a GPS Locator for speed checks. It is possible to upgrade the device to a combined GPS<br />
Locator / Radar Detector / Laser Detector. The possession and use of a Radar / Laser Detector is forbidden in some countries. Please<br />
check if radar detection or laser detection is allowed in your country. The DRIVE CONTROL does not give you the right to exceed the<br />
speed limits. Always make sure you drive carefully!<br />
DESCRIPTION OF THE DRIVE CONTROL<br />
1.1 GENERAL<br />
The DRIVE CONTROL is a device that gives you information about your trip and warns you for unsafe situations. QUINTEZZ supplies<br />
a database for several countries with information about speed camera’s and/or dangerous locations. In addition you can save<br />
your own locations. A warning will be given at a distance of 600 meters of every location. For the information that is supplied by<br />
QUINTEZZ, you have some additional functions. The speed warning is depending from your speed and direction of driving. This<br />
means that you won’t get a warning if the camera is at the other side of the road. This also means that you will get a small warning<br />
in case of correct speed, but a big warning in case of speeding.<br />
Besides this function, your QUINTEZZ DRIVE CONTROL shows you: Compass, an indication of your real speed, your battery voltage,<br />
the date and the time<br />
-<strong>GB</strong>-1-
1.2 MEANING OF EACH PART IN THE BOX<br />
See illustration I<br />
1. Setting button: To enter the menu options and activate the download mode<br />
2. Save button:<br />
i. Allows the user to <strong>manual</strong>ly add new locations where from now on warnings will be given in driving<br />
mode.<br />
ii. Allows the user to <strong>manual</strong>ly delete locations.<br />
iii. The user’s preference for each option can be set in setting mode.<br />
3. Volume – button: To decrease the volume.<br />
4. Volume + button: To increase the volume.<br />
5. Red button:<br />
i. To de-activate the Radar / Laser Detector once you access countries where the Radar / Laser<br />
Detector is not allowed: press this button briefly (not longer than 2 sec.!). If you press this button<br />
too long, the device will set to ‘illumination’ mode and the Radar / Laser Detector will NOT be<br />
switched off.<br />
ii. To dim the display (long pressing, until you see ILLU: xxx).<br />
6. PC – USB Port: For downloading data from your computer<br />
7. Display<br />
8. Speaker<br />
9. Laser Detector lens – rear<br />
10. Laser Detector lens – front<br />
11. Radar Detector lens<br />
12. DC 12V: Power port for cigarette plug<br />
13. Lock switch for windshield bracket<br />
14. Windshield bracket<br />
15. Power cord<br />
16. Velcro<br />
Manual<br />
CD with PC software<br />
INSTALLATION IN THE CAR<br />
2.1 DRIVE CONTROL<br />
The QUINTEZZ DRIVE CONTROL is especially designed for use in the car. GPS signals are received through the built-in GPS antenna.<br />
The following are some guidelines for mounting the detector :<br />
• The unit may be positioned within 25° of horizontal without significantly degrading performance.<br />
• The information display of the DRIVE CONTROL has to be clearly visible to the driver.<br />
• Do not mount directly behind windshield wipers.<br />
-<strong>GB</strong>-2-
• Mount the unit so that the control panel is plainly visible for the driver.<br />
• Do not leave it in direct sunlight for long periods of time.<br />
2.2 MOUNTING TYPES<br />
See Illustration II<br />
We have provided 2 types of mounting methods.<br />
2.2.1 DASHBOARD MOUNTING<br />
The hook and loop fastener Velcro tape provided, may be used to mount your detector on a flat dashboard. The dashboard must<br />
be clean and dry for the fastener to adhere properly.<br />
• Remove backing from the “LOOP (fuzzy)” piece and press firmly to the bottom of your unit.<br />
• Clean dashboard with common rubbing alcohol to remove dirt and grease.<br />
• Peel the backing from the hook side and press the unit into the desired position on the dashboard.<br />
2.2.2 WINDSHIELD MOUNTING<br />
• Insert the supplied suction cups and cushion into each slot and windshield bracket.<br />
• Slide the windshield bracket into the groove of the detector.<br />
• Use the Lock switch (LOCK) to lock the windshield bracket.<br />
• Locate the bracket on a clean windshield and press firmly on each suction cup.<br />
2.3 POWER SUPPLY<br />
The DRIVE CONTROL is designed to be connected to the normal electrical circuit (12 Volts) of the car, which has a negative earthing.<br />
See the <strong>manual</strong> of your car, if you are not sure about the polarity. After installation, the power cable is to be plugged into the<br />
‘POWER Port’. Remove the cigarette lighter and insert the cigarette plug into this contact accordingly.<br />
OPERATION OF THE DRIVE CONTROL IN THE CAR<br />
3.1 AUTOMATIC TEST<br />
After being switched on, the DRIVE CONTROL will perform an automatic self test. If you hear the audio text ‘FASTEN YOUR SEAT<br />
BELT, BE CAREFUL’, the test has been properly performed and the display will show:<br />
> ><br />
3.2 LOOKING FOR SATELLITES<br />
Once the automatic test has been performed, the DRIVE CONTROL will try to contact the GPS satellites. The display will show ‘SRCH’<br />
(Search).<br />
-<strong>GB</strong>-3-
If the Radar / Laser Detector is installed, it will start working immediately. The GPS alarm will only be working after the connection<br />
to the satellites is established.<br />
ATTENTION:<br />
The first time the DRIVE CONTROL is switched ON, it can take about 15 minutes to catch the satellites. Obstacles in the direct<br />
environment and the moving of the car can extend the duration of the first connection to the satellites.<br />
The DRIVE CONTROL will stay connected with 4 to 12 satellites. If the connection is shortly cut (for example when passing through<br />
flyunders and tunnels) the display will go to connection mode, showing<br />
3.3 DRIVING MODE<br />
The DRIVE CONTROL is the perfect solution to prevent you from speeding a few kilometers by accident. When the connection with<br />
the satellites is OK, you will see the following display, showing the time.<br />
When the car is moving, the real speed and heading is shown.<br />
SETTINGS OF THE DRIVE CONTROL<br />
4.1 VOLUME SETTING<br />
You can set the volume by the VOL – or VOL + key.<br />
4.2 SETTING MENU<br />
The menu button is located at the top of the DRIVE CONTROL and indicated with “SETTING”. By pressing this button, you will access<br />
the setting menu that contains the following choices:<br />
1. Rlogic: 0 / 1 / 2 / 3 / 4 / CITY (visible when radar is on)<br />
2. X/Ku: ON/OFF<br />
3. K: ON/OFF<br />
4. Ka: ON/OFF<br />
5. Ka N: ON/OFF<br />
6. MAX: Maximum speed for overspeed warning<br />
7. Default / Details / Comfort: The screen information mode<br />
8. Bell: ON / OFF<br />
9. Lang: SP / FR / <strong>GB</strong> / D / I<br />
-<strong>GB</strong>-4-
10. SN 0 (visible when radar is off)<br />
11. ODO 0.0<br />
12. AVG: 0<br />
13. U: Kilo / Mile<br />
14. GMT: 0<br />
15. U1 …….Lat ……….Lon<br />
16. Ver 03.1<br />
17. DB: e.g. 9/11<br />
Each submenu will be described in the following chapters.<br />
- To scroll through the menu, press the SETTING button.<br />
- To enter a selected menu, press the SETTING button.<br />
- To save a selection, press the SAVE button.<br />
If no button is pressed within 3 seconds, the unit exits the menu.<br />
4.2.1 RLOGIC: 0 / 1 / 2 / 3 / 4 / CITY<br />
This function will only be visible whenever the Radar Detector function is enabled. The Radar Logic setting determines at which<br />
speed the Radar Detector starts working.<br />
- Logic0: The Radar Detector works always, so starting from 0 km/h.<br />
- Logic1: The Radar Detector starts working when the driving speed exceeds 20 km/h.<br />
- Logic2: The Radar Detector starts working when the driving speed exceeds 40 km/h.<br />
- Logic3: The Radar Detector starts working when the driving speed exceeds 60 km/h.<br />
- Logic4: The Radar Detector starts working when the driving speed exceeds the maximum speed chosen <strong>manual</strong>ly by<br />
you in the menu. (see chapter 4.2.5 ‘MAXIMUM SPEED’)<br />
- CITY: The Radar Detector works always, but the sensitivity is reduced to eliminate most false sources so that the unit<br />
will not alarm for weak signals. There are many sources of false alarm signals near cities. There are for instance several<br />
types of automatic doors that use the same signal as a radar. As soon as you have activated this CITY mode and you<br />
have set the display information mode (see chapter 4.2.6 ‘DEFAULT /COMFORT /DETAILS…’) to ‘Comfort’, the ‘C’ of CITY<br />
is shown together with the heading of the compass:<br />
E.g. Logic 2: Whenever de Radar Detector function is activated and you are driving 30 km/h, the Radar Detector is activated but will<br />
not give you a warning as soon as it detects radar signals. As soon as your driving speed exceeds 40 km/h you will start receiving all<br />
warnings. This function enables you to determine when the Radar Detector starts working in order to avoid false alarm signals.<br />
If there is no connection between the GPS and the satellites, the Radar Detector will still work in RLogic0 setting, as long as it has<br />
been enabled.<br />
-<strong>GB</strong>-5-
4.2.2 RADAR BAND: X/Ku<br />
This option allows you to switch off the Radar Band ‘X/Ku’.<br />
- Press the VOL + or VOL – button to switch this Radar Band ON or OFF.<br />
- To confirm this setting, press SAVE.<br />
4.2.3 RADAR BAND: K<br />
This option allows you to switch off the Radar Band ‘K’.<br />
- Press the VOL + or VOL – button to switch this Radar Band ON or OFF.<br />
- To confirm this setting, press SAVE.<br />
4.2.4.1 RADAR BAND: Ka / 4.2.4.2 RADAR BAND: Ka Narrow (Ka N)<br />
This option allows you to switch off the Radar Band ‘Ka’ / ‘Ka N’.<br />
- Press the VOL + or VOL – button to switch this Radar Band ON or OFF.<br />
- To confirm this setting, press SAVE.<br />
4.2.5 MAXIMUM SPEED FOR OVERSPEED WARNING<br />
The following display appears once the warning limit menu is accessed:<br />
The maximum speed can be set by the user in this mode.<br />
- Press the VOL + or VOL – button to set a maximum speed.<br />
- If the user exceeds a maximum speed, a speed alert is displayed followed by a warning sound.<br />
- To confirm the set warning limit, press SAVE.<br />
4.2.6 DEFAULT / COMFORT / DETAILS: THE DISPLAY INFORMATION MODE<br />
The DRIVE CONTROL has a display. The information on the display depends on whether you are driving or not. This information<br />
can be selected:<br />
Details display setting:<br />
During driving the speed of the car and the heading are shown.<br />
During non-moving the date, the trip time and the battery voltage are shown.<br />
Default display setting:<br />
During non-moving, the time is shown.<br />
-<strong>GB</strong>-6-
During moving, the speed of the car and the heading are shown.<br />
Comfort display setting:<br />
During moving and non-moving, the heading of the compass is shown in degrees.<br />
If you have set the RLogic function to ‘CITY’ (see chapter 4.2.1 ‘RLOGIC…’), the ‘C’ of City is also shown on the display.<br />
4.2.7 BELL / EXTRA SOUND<br />
The following display appears once the bell / extra sound menu is accessed:<br />
This option allows you to partially switch off the sound.<br />
- Press the VOL + or VOL – button to switch the sound ON or OFF.<br />
- To confirm this setting, press SAVE.<br />
If you have selected OFF, the following sounds will not be audible:<br />
- Start-up message: Fasten your seat belt, be careful.<br />
- Warnings for cameras, in case you are NOT speeding.<br />
4.2.8 LANGUAGE<br />
The following display appears once the language menu is accessed:<br />
- Press the VOL + or VOL – button to select the preferred language.<br />
- To confirm this setting, press SAVE.<br />
4.2.9 SN 0 DISPLAY<br />
This is only shown whenever the Radar Detector function is de-activated. To activate the Radar Detector, it needs to have the<br />
software enabled. To enable this software, you need to enter a secret code. The secret code consists of the last 4 digits of the serial<br />
number.<br />
-<strong>GB</strong>-7-
First, you need to enter the first digit. You can set the digit with the VOL + and VOL – key. To confirm the digit, you need to press the<br />
red button. Once all 4 digits are confirmed, the Radar Detector will be switched on, or you will receive a message ‘SN Fail’.<br />
To make sure your secret code remains secret, we suggest that you remove the last 4 digits from the serial number label, and store<br />
the information in a safe place.<br />
4.2.10 0.0 INDICATION<br />
When the product is not used, the display shows 0.0. This is the ODO meter. It shows the total traveled distance. To reset the<br />
Odometer to 0.0, press the red button.<br />
4.2.11 AVG INDICATION<br />
This display indicates the average speed of your trip after switching on the unit. When you switch off the unit, your average speed<br />
will automatically be reset.<br />
4.2.12 U: KILO / MILE<br />
The following display appears once the speed indication menu is accessed:<br />
With this indication you can choose whether your speed needs to be indicated in Kilometers/hour or Miles/hour.<br />
4.2.13 GMT SETTING<br />
The satellites broadcast the time based on GMT (Greenwich mean time). This time is not changed automatically from summer<br />
into winter time. To adjust the time to your region / season, you have to increase or decrease the hours. E.g. to set the unit to<br />
Amsterdam / Brussels / Paris summertime, you have to set this to 2.<br />
4.2.14 U1 LON ….. LATT ……<br />
You can save your own locations into the DRIVE CONTROL. The DRIVE CONTROL will give a warning once you reach these locations.<br />
In this menu, you can see the coordinates of your own stored locations.<br />
4.2.15 SOFTWARE VERSION<br />
The following display appears once the software version menu is accessed:<br />
This display shows you the current version of the software.<br />
4.2.16 DATE OF DATABASE<br />
The following display appears once the date of database menu is accessed:<br />
This display shows you the date when the database was last updated (DD/MM).<br />
-<strong>GB</strong>-8-
ALERT SCREENS OF THE DRIVE CONTROL<br />
The DRIVE CONTROL will show the following screen when you approach a speed camera. The following alert indicates a camera<br />
warning at a distance of 450 meter on the current road.<br />
While driving, the DRIVE CONTROL will give a warning sound when you approach a camera, a dangerous location, a track control<br />
section or a user data location. The sound of this warning depends on what you have set up for the ‘bell / extra sound’. In case this<br />
setting has been switched OFF, there will only be a warning whenever the speed limit is exceeded. The maximum speed on the<br />
particular location will also be shown on the display. In case this setting is ON, there will be a warning for every camera.<br />
The first warning will be given at a distance of 500 meters. The second warning (KEEP SAFETY DRIVING) will be heard at a distance<br />
of 300 meters.<br />
5.1 CAMERA & TWO-WAY CAMERA<br />
This alert indicates a camera or a two-way camera warning at a distance of 450 meter on the current road. Please check your speed<br />
and slow down in case of overspeed. At a distance of 500 meter of the camera you will hear ‘CAMERA’ or ‘TWO WAY CAMERA’ and<br />
at a distance of 300 meter the DRIVE CONTROL will say ‘BE CAREFUL’.<br />
5.2 DANGEROUS LOCATION, TRACK CONTROL & TRACK CONTROL END<br />
track control dangerous location warning<br />
This alert indicates a dangerous location, a track control or a track control end at a distance of 450 meter on the current road.<br />
Please check your speed and slow down. At a distance of 500 meter of the location you will hear ‘DANGEROUS LOCATION’, ‘TRACK<br />
CONTROL’ or ‘TRACK CONTROL END’ and at a distance of 300 meter the DRIVE CONTROL will say ‘BE CAREFUL’.<br />
5.3 A USER REGISTERED LOCATION<br />
You can <strong>manual</strong>ly add and delete locations from the memory of the DRIVE CONTROL while driving. These locations are called<br />
‘user data’ and can be exchanged with other people using the DRIVE CONTROL. The memory for user data has a capacity of 800<br />
locations.<br />
-<strong>GB</strong>-9-
How to add a location<br />
If you want to add a location <strong>manual</strong>ly, press the SAVE button at that location, while you are driving. The DRIVE CONTROL will<br />
confirm the saving of this location as indicated in the following display: (in this case the 3rd user location was saved).<br />
How to delete a location<br />
If you want to delete a <strong>manual</strong>ly added location, press the SAVE button at the respective location. This needs to be done during the<br />
visual and audible alarm for this particular location. The location will be deleted and the DRIVE CONTROL will confirm the deleting<br />
of this location as indicated in the following display:<br />
When you are driving, and when you are at a distance of 500 meter of a user’s location that has been saved in the memory of your<br />
DRIVE CONTROL, a warning will be shown and you will hear ‘DING DONG’ and ‘WATCH OUT’. When you are at a distance of 300<br />
meter, the DRIVE CONTROL will repeat ‘DING DONG DING DONG’. The alert shown hereafter indicates a user point warning at a<br />
distance of 450 meter.<br />
5.4 SPEED ALERT<br />
There are two kinds of speed alert warnings showing the above display: ‘warning limit speed alert’ and ‘system limit speed alert’.<br />
In case of a ‘warning limit speed alert’, you will hear a ‘DING’ tone. In case of a ‘camera limit speed alert’, you will hear ‘TING TING<br />
TING’ with a loud, sharp tone.<br />
DEFAULT SETTINGS<br />
1. Warning limit: 130 km/h<br />
2. Clockbell: ON<br />
3. Language: English<br />
4. Speed indication: Km/h<br />
SPEED TRAPS<br />
Police checks can be effected in many different ways. Frequently used speed-trap methods are radar speed cameras, laser guns,<br />
mobile radar speed cameras and track controls.<br />
-<strong>GB</strong>-10-
6.1 HOW THE RADAR WORKS<br />
The actual process involved in determining a vehicle’s speed is basically a simple one. It involves directing a beam of microwave energy<br />
at an approaching target vehicle. A portion of this beam is reflected by the target and is received by the radar unit that originally<br />
transmitted the signal. The reflected signal is shifted in frequency by an amount proportional to the speed of the target vehicle.<br />
This phenomenon is known as the Doppler effect. The radar unit determines the target vehicle speed from the difference in<br />
frequency between the reflected signal and original signal.<br />
To activate the Radar Detector, please read chapter 4.2.9 ‘SN 0 Display’. To de-activate the Radar Detector press the red button<br />
briefly (not longer than 2 sec.!). If you press this button too long, the device will set to ‘illumination’ mode and the Radar Detector<br />
will NOT be switched off.<br />
6.2 RADAR FREQUENCIES<br />
The QUINTEZZ DRIVE CONTROL can detect 5 radar bands with 14 different frequencies and includes Instant ON radar and POP<br />
radar.<br />
X band: 9.41 Ghz, 9.9 Ghz, 10.5 Ghz, 10.525 Ghz, 10.6 Ghz<br />
Ku band: 13.450 Ghz,<br />
K band: 24.1 Ghz, 24.125, 24.15 Ghz<br />
Ka narrow-band: 34.0 Ghz, 34.3 Ghz, 34.36 Ghz<br />
Ka wide-band: 34.7 Ghz, 35.5 Ghz<br />
POP detection<br />
6.3 LASER DETECTION<br />
Laser detection is another kind of signal that can be detected. Laser Speed Guns use pulses of infrared laser light to measure speed<br />
of target by timing each pulses over time as it is reflected back to the gun.<br />
6.4 LASER RANGE<br />
The effective range of clocking distance by a laser gun is less than 1 km. The operator of the laser gun is instructed to target on the<br />
number plate. So, mount your laser detector as low as possible in the car. The QUINTEZZ DRIVE CONTROL offers the possibility to<br />
detect a laser from front as well as from behind.<br />
If the Laser Detector is activated by reflection signals from the laser beam to a vehicle in front of you, then you still have time to<br />
react on the laser check.<br />
If the Laser Detector is activated by a laser beam that is pointed on your car, then your speed is already measured during the laser alarm.<br />
6.5 OTHER SPEED CHECKS<br />
There are a couple of other checks that cannot be detected by Radar or Laser Detectors. These checks include digital video recording,<br />
loops within the road and optical speed checks. These checks have to be detected by GPS.<br />
A Radar Detector is able to detect several of these traps, but not all of them. The new generation of radar speed traps is increasingly<br />
difficult to detect by means of a Radar Detector. Furthermore, the Radar Detector is forbidden in many countries. False alarms occur<br />
on a regular basis with each and every Radar Detector.<br />
-<strong>GB</strong>-11-
The DRIVE CONTROL is the perfect solution. This advanced GPS device signals overspeed, camera locations and offers additionally<br />
an electronic compass, trip time and an ODO-meter.<br />
You can activate the Radar/Laser detection update in countries where this is allowed. The Radar/Laser Detector can be set to switch<br />
off at speeds that are lower than 30 or 50 km/h to avoid false alarms.<br />
PC OPERATING FOR THE QUINTEZZ DRIVE CONTROL<br />
7.1. INSTALLING THE QUINTEZZ SOFTWARE<br />
1. Insert the CD into the CD-ROM network drive.<br />
2. Choose the language and click on ‘Next’.<br />
3. Click on ‘Next’ ‘Install’.<br />
4. As soon as you have installed the <strong>Quintezz</strong> software, an icon ‘<strong>Drive</strong> <strong>Control</strong> Easy Update’ will appear on the desktop of your<br />
computer.<br />
-<strong>GB</strong>-12-
7.2. DOWNLOAD DATABSE CAMERA LOCATIONS<br />
1. Click on the icon ‘<strong>Drive</strong> <strong>Control</strong> Easy Update’, created during the installation of the <strong>Quintezz</strong> software (see step 1).<br />
2. Go to www.quintezz.com and choose English as language.<br />
3. Click on ‘Download Center’.<br />
4. Click on ‘Accept’ to accept the <strong>Quintezz</strong> juridical statement.<br />
5. Select the database of your choice.<br />
6. Click on ‘Download’ to confirm your choice.<br />
7. Save the file ‘<strong>Drive</strong><strong>Control</strong>.mdb’ on your desktop.<br />
8. In a few moments the message ‘Download complete’ will appear on your screen. Click on ‘Close’.<br />
7.3. UPDATE YOUR QUINTEZZ DRIVE CONTROL<br />
1. Close the site www.quintezz.com.<br />
2. First of all, connect the USB cable to your computer.<br />
3. Take your <strong>Drive</strong> <strong>Control</strong> and press the button ‘SETTING’. Now keep this button pressed while connecting the <strong>Drive</strong> <strong>Control</strong> to<br />
the other end of the USB cable. When you have connected the <strong>Drive</strong> <strong>Control</strong> correctly, the display will show ‘DOWNLOAD’<br />
and ‘<strong>Quintezz</strong> is linked’ will be shown on the screen of your computer. If the button ‘SETTING’ was not pressed while<br />
connecting the USB cable to the <strong>Drive</strong> <strong>Control</strong>, the software will not be able to start downloading the database. In this case<br />
you will have to try again, starting from step 3.<br />
-<strong>GB</strong>-13-
4. Click on ‘Database’ and select the file ‘<strong>Drive</strong><strong>Control</strong>.mdb’ that was saved on your desktop. The software will now start<br />
downloading the database into your <strong>Drive</strong> <strong>Control</strong>.<br />
!!! Do not unplug the <strong>Drive</strong> <strong>Control</strong> until ‘ALL DONE’ is shown on your screen!!!<br />
5. Click on ‘Exit’.<br />
6. Your <strong>Drive</strong> <strong>Control</strong> is now up-to-date and ready to use!<br />
-<strong>GB</strong>-14-
MAINTENANCE, DIRECTIVES AND TIPS<br />
8.1 REPLACING THE FUSE<br />
There is a fuse in the cigarette plug of the DRIVE CONTROL. To replace the fuse, you need to loosen the screw cap of the cigarette<br />
plug. Always make sure you replace the fuse with one of equal value.<br />
8.2 ENVIRONMENT<br />
The DRIVE CONTROL is a very advanced GPS-system that is composed with high-quality components. Extreme low and high<br />
temperatures, heavy shocks, etc. should be avoided. Do not expose the DRIVE CONTROL to direct sunlight.<br />
8.3 THEFT<br />
QUINTEZZ appliances are also attractive to people with not so good intentions. In order to prevent theft, we advise you not to leave<br />
your DRIVE CONTROL unattended in your car.<br />
GUARANTEE<br />
QUINTEZZ is a registered trademark of TE-Group NV.<br />
The QUINTEZZ brand stands for superior product quality and outstanding customer service. That is why QUINTEZZ warrants this<br />
product against all defects in material and workmanship for a period of two (2) years from the date of original purchase of the<br />
product. The conditions of this limited guarantee and the extent of responsibility of QUINTEZZ under this limited guarantee are as<br />
follows:<br />
• This guarantee is limited to the original purchaser of the product and is not transferable to any subsequent purchaser/<br />
end user.<br />
• During the limited guarantee period, the sole responsibility of QUINTEZZ will be limited to repair or replace, at its option,<br />
any defective parts of the product if this is needed because of malfunction or failure under normal use and conditions. No<br />
charge shall be made to the customer for parts and/or repair labor.<br />
• The product must be shipped to an authorized service center in its original and complete packaging, with transportation<br />
charges prepaid. QUINTEZZ will not assume responsibility for any losses or damages during transportation.<br />
• To obtain repair or replacement within the terms of this guarantee, the customer must provide (a) a proof of purchase<br />
(e.g. dated bill of sale); (b) a written specification of the defect(s); (c) a return address and phone number.<br />
• This limited guarantee does not cover and is void with respect to the following: (a) Products which have been subjected<br />
to improper installation, unauthorized repair, improper maintenance, unauthorized modifications or other acts which<br />
are not the fault of QUINTEZZ; (b) Products which have been subjected to misuse, abuse, neglect, improper handling<br />
and storage, an accident or physical damage; (c) Products which have been subjected to fire, water, excessive humidity,<br />
sand, dirt, extreme changes in temperature or other conditions which are beyond the control of QUINTEZZ; (d) Products<br />
which have been used with non-QUINTEZZ approved accessories; (e) Products which have the serial number altered,<br />
defaced or removed; (f) Products which have been opened, altered, repaired or modified by any unauthorized service<br />
center.<br />
-<strong>GB</strong>-15-
• Excluded from any guarantee are consumable items which may need replacing due to normal wear and tear, such as<br />
batteries, ear cushions, decorative parts and other accessories.<br />
• This limited guarantee gives you specific legal rights, and you may also have other rights which vary from country to<br />
country.<br />
• Excluded from the guarantee are eg.: problems with your PC or Internet, damage to your car and fines.<br />
If there are any problems or uncertainties, you can ask your questions through info@quintezz.com.<br />
-<strong>GB</strong>-16-
<strong>Drive</strong> <strong>Control</strong>/05-10/V04<br />
PATENTED - ALL RIGHTS RESERVED