Staple Gun Arm Instructions - Watts Water Technologies, Inc.
Staple Gun Arm Instructions - Watts Water Technologies, Inc.
Staple Gun Arm Instructions - Watts Water Technologies, Inc.

You also want an ePaper? Increase the reach of your titles
YUMPU automatically turns print PDFs into web optimized ePapers that Google loves.
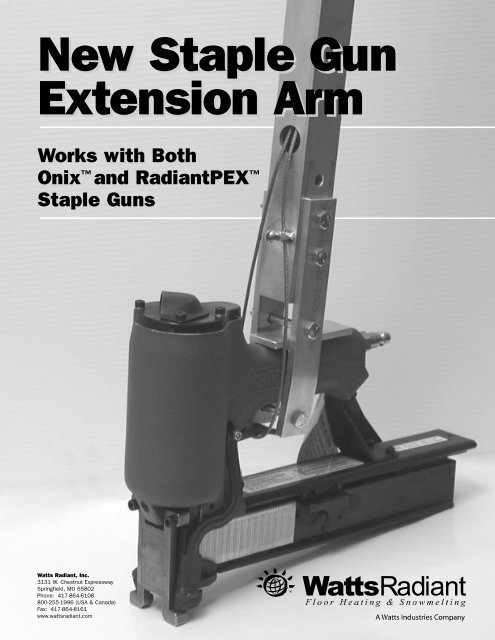
New w <strong>Staple</strong> <strong>Gun</strong><br />
Extension <strong>Arm</strong><br />
Works with Both<br />
Onix and RadiantPEX <br />
<strong>Staple</strong> <strong>Gun</strong>s<br />
<strong>Watts</strong> Radiant, <strong>Inc</strong>.<br />
3131 W. Chestnut Expressway<br />
Springfield, MO 65802<br />
Phone: 417-864-6108<br />
800-255-1996 (USA & Canada)<br />
Fax: 417-864-8161<br />
www.wattsradiant.com
<strong>Staple</strong> <strong>Gun</strong> Extension <strong>Arm</strong><br />
Installation <strong>Instructions</strong><br />
This Extension <strong>Arm</strong> (part # 668515) for staple guns is<br />
designed to fit many of the typical staple guns and perhaps<br />
other similar tools used today. Any pneumatic or<br />
power tool should be disconnected from its power source<br />
before beginning installation and before making any<br />
adjustments.<br />
You will need at least one 7/16" wrench or similar<br />
tool, two can make the process easier. You will also need a<br />
standard screwdriver. Using the RadiantPEX <strong>Staple</strong> <strong>Gun</strong><br />
with Extension <strong>Arm</strong> (part # 668505) or the Onix <strong>Staple</strong><br />
<strong>Gun</strong> with Extension <strong>Arm</strong> (part # 668500) and other tools<br />
with a similar 1.25" width handle, no handle shim piece<br />
should be required. For staple guns with a thinner handle,<br />
a shim could make the side plates fit the handle better<br />
without excessively bending them. The Extension <strong>Arm</strong><br />
(part # 668515) is also available without the purchase of<br />
the staple gun for $265.00.<br />
Step 1: Remove the lower bolt from the handle and set<br />
the extension on the handle of the staple gun to determine<br />
how high you want the handle. The handle comes preassembled<br />
at its lowest position. If you prefer the extension<br />
handle to be positioned higher remove the remaining<br />
bolts and reinstall the bolts and side plates through the<br />
holes provided to set the handle at the height you prefer.<br />
It can be set 1" or 2" higher. Do not discard any of the<br />
bolts, reinstall all of them.<br />
Step 2: After determining the preferred height for the<br />
extension, the bolts are tightened uniformly by hand to hold<br />
the extension loosely on the handle of the staple gun. It<br />
generally should not be all the way forward or all the way<br />
back on the staple gun handle. The extension must be<br />
properly located to allow the steel cable to be positioned<br />
near the middle of the staple gun trigger. Be sure the base<br />
plate of the extension handle is in full contact with the<br />
handle of the staple gun<br />
and tighten the bolts<br />
securely. The steel cable<br />
goes on top of the trigger<br />
of the staple gun and then<br />
inserted through the eye<br />
of the set screw. Insert<br />
the loose end of the cable<br />
into the same hole it<br />
comes out of. Please note<br />
picture on the bottom right<br />
for improper arrangement<br />
for the cable. Without the<br />
air line attached to the<br />
tool, the trigger of the staple<br />
gun should depress<br />
Extension <strong>Arm</strong> on staple gun<br />
fitted with Onix Guide plate.<br />
easily to its firing position. You may have to apply pressure<br />
to a trigger safety devise on the base of the staple<br />
gun to get the trigger to depress fully. It is recommended the<br />
installer not use a hand to do this especially if there are<br />
any staples in the tool. Now squeeze the trigger on the<br />
extension arm, pull any excess cable through the eye of<br />
the set screw and initially tighten the set screw at this<br />
position.<br />
A short length of hose or plastic tubing is necessary for<br />
testing the <strong>Watts</strong> Radiant staple guns. Attach the air line<br />
to the staple gun. Press the staple gun against a suitable<br />
test material and squeeze and release the extension arm<br />
trigger to see if the trigger has its full range of motion and<br />
actuates the staple gun. The gun should fire one staple<br />
and continue to work in a normal fashion. If it did not work<br />
an adjustment of the location of the extension arm or the<br />
tension on the cable should fix it. Disconnect the air line<br />
BEFORE making any adjustments.<br />
New from <strong>Watts</strong> Radiant:<br />
<strong>Staple</strong> <strong>Gun</strong> Extension <strong>Arm</strong> only #668515 $255.00 ea.<br />
3/8" Onix <strong>Staple</strong> <strong>Gun</strong> w/extension <strong>Arm</strong> #668500 $1380.00 ea.<br />
1/2" RadiantPEX <strong>Staple</strong> <strong>Gun</strong> w/extension <strong>Arm</strong> #668505 $1380.00 ea.<br />
How to Assemble Extension <strong>Arm</strong> to the <strong>Gun</strong><br />
Step 1<br />
Attach handle<br />
to staple gun<br />
Step 2<br />
Place steel cable on<br />
trigger of staple gun.<br />
Then insert through<br />
eye of set screw.<br />
Finally insert loose<br />
cable through<br />
original hole.<br />
© <strong>Watts</strong> Radiant 2002 <strong>Staple</strong> <strong>Gun</strong> Extension <strong>Arm</strong> <strong>Instructions</strong> LIT#EXTARM0103 Effective 01/01/2003