Arctic Quick Start Guide, V3.1 - Viola Systems
Arctic Quick Start Guide, V3.1 - Viola Systems
Arctic Quick Start Guide, V3.1 - Viola Systems

Create successful ePaper yourself
Turn your PDF publications into a flip-book with our unique Google optimized e-Paper software.
<strong>Arctic</strong> Product Family 1(4)<br />
<strong>Quick</strong> <strong>Start</strong> <strong>Guide</strong><br />
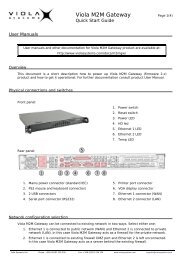
User Manuals<br />
User manuals and other documentation for <strong>Arctic</strong> product family are available at:<br />
-<strong>Arctic</strong> GPRS Router<br />
http://www.violasystems.com/docs/router/<br />
-<strong>Arctic</strong> GPRS Gateway<br />
http://www.violasystems.com/docs/gateway/<br />
-<strong>Arctic</strong> IEC-104 Gateway http://www.violasystems.com/docs/iec104/<br />
-<strong>Arctic</strong> Modbus Gateway http://www.violasystems.com/docs/modbus/<br />
Overview<br />
This document is a short description how to power up <strong>Arctic</strong> series (firmware 4.x.x and 5.x.x)<br />
product and how to get it operational. For further documentation consult product User Manuals.<br />
Physical connections and switches<br />
1 2 3 4 5 6 7 8<br />
9 10<br />
Connector side:<br />
1. Power supply connector<br />
2. Power switch<br />
3. Console/application serial port (RS1)<br />
4. Console/application port selection switch<br />
5. Application serial port (RS2)<br />
6. DIP switches (RS2 hardware settings)<br />
7. I/O connector<br />
8. Ethernet connector<br />
Antenna side:<br />
9. Antenna connector (FME)<br />
10.SIM card slot<br />
NOTE: Some <strong>Arctic</strong> models can have<br />
different amount of connectors than<br />
listed here.<br />
Installing SIM card<br />
NOTE: If you have PIN code querying enabled on your SIM card, do not install the card before<br />
setting the code. The SIM card could lock up if done otherwise. SIM card is not included.<br />
1. Power off the <strong>Arctic</strong>. It is recommended to turn power off while installing/removing the SIM card.<br />
2. Push the yellow button in the SIM card slot to eject the SIM card tray.<br />
3. Insert the SIM card to the tray and push the SIM card tray firmly and carefully back to its holder.<br />
<strong>Viola</strong> <strong>Systems</strong> Ltd. Phone: +358 (0)201 226 226 Fax: +358 (0)201 226 220 www.violasystems.com support@violasystems.com
<strong>Arctic</strong> Product Family 2(4)<br />
<strong>Quick</strong> <strong>Start</strong> <strong>Guide</strong><br />
Connecting <strong>Arctic</strong> to Ethernet network<br />
There are two different ways to configure the network settings, serial port or web access. The<br />
recommended method is using web access.<br />
Method 1: Setting IP Address Using Web Browser (Recommended)<br />
1. Connect the cross-over Ethernet cable between the <strong>Arctic</strong> and your computer.<br />
2. Configure your computer to use the same IP address space than <strong>Arctic</strong> (laptop IP for example<br />
10.10.10.11 with netmask 255.0.0.0). Check the connection to <strong>Arctic</strong> with ping utility.<br />
3. Connect to the <strong>Arctic</strong> using your web browser. The default IP address of <strong>Arctic</strong> is 10.10.10.10<br />
(netmask 255.0.0.0).<br />
4. From the initial page click <strong>Start</strong> configurator and enter login information in the following<br />
page. Username is root and by default no password is set (just leave the field empty).<br />
5. Navigate to Network page 1 and from there to Ethernet subpage. 2<br />
6. Enter the IP address and other network settings of your choice and click Apply 3 and<br />
then Commit 4 to store the settings.<br />
7. Reboot the <strong>Arctic</strong> for the settings to take effect.<br />
1<br />
2<br />
3<br />
4<br />
Figure 1: <strong>Arctic</strong> TM Configurator screen, Ethernet settings<br />
NOTE: You could check the current network status from the Network-->Summary subpage.<br />
<strong>Viola</strong> <strong>Systems</strong> Ltd. Phone: +358 (0)201 226 226 Fax: +358 (0)201 226 220 www.violasystems.com support@violasystems.com
<strong>Arctic</strong> Product Family 3(4)<br />
<strong>Quick</strong> <strong>Start</strong> <strong>Guide</strong><br />
Method 2: Using serial console<br />
1. Switch off the <strong>Arctic</strong> if necessary<br />
2. Connect a null modem serial cable to console serial connector (RS1)<br />
3. Open a terminal connection to <strong>Arctic</strong> using the following serial communication settings:<br />
19200-8-N-1, no flow control.<br />
4. Switch on the <strong>Arctic</strong> by turning the power switch to ON position<br />
5. Wait for the text “Hit any key to stop autoboot” and press enter before the counter<br />
goes to zero. If you missed it, just reboot and try again.<br />
6. You are now supposed to be on the PPCBoot console. Figure 2 shows how it looks like.<br />
7. Now enter the following commands to the console, parameter fields substituted with your<br />
parameters (see figure 2 for example):<br />
setenv ipaddr your_IP_address<br />
setenv netmask your_netmask<br />
setenv gatewayip 0 (By default, GPRS or SSH-VPN is defined as default Gateway)<br />
8. Check that the configuration was entered properly by issuing command printenv.<br />
9. If everything is correct, save the setting with command savenv.<br />
10.Reboot the <strong>Arctic</strong> for the settings to take effect.<br />
PPCBoot 1.1.6 (Apr 14 2005 - 18:44:18)<br />
<strong>Viola</strong> <strong>Systems</strong> <strong>Arctic</strong> Board<br />
CPU: MOTOROLA Coldfire MCF5272<br />
Board: <strong>Viola</strong> <strong>Systems</strong> Oy <strong>Arctic</strong> Board<br />
http://www.violasystems.com/<br />
DRAM: 32 MB<br />
FLASH: 8 MB<br />
In: serial<br />
Out: serial<br />
Err: serial<br />
Net: 00:06:70:01:02:23<br />
Hit any key to stop autoboot: 0<br />
arctic> setenv ipaddr 192.168.0.50<br />
arctic> setenv netmask 255.255.0.0<br />
arctic> setenv gatewayip 0<br />
arctic> printenv<br />
baudrate=19200<br />
loadaddr=0x20000<br />
...<br />
ipaddr=192.168.0.50<br />
netmask=255.255.0.0<br />
gatewayip=0<br />
Environment size: 407/4092 bytes<br />
Disabling watchdog<br />
arctic> savenv<br />
Saving Enviroment to EEPROM...<br />
arctic><br />
Figure 2. Network parameter configuration using serial console<br />
<strong>Viola</strong> <strong>Systems</strong> Ltd. Phone: +358 (0)201 226 226 Fax: +358 (0)201 226 220 www.violasystems.com support@violasystems.com
<strong>Arctic</strong> Product Family 4(4)<br />
<strong>Quick</strong> <strong>Start</strong> <strong>Guide</strong><br />
GPRS Network Settings<br />
1. Login to the <strong>Arctic</strong> Configurator (for instructions, see page 2).<br />
2. Navigate to Network page 1 and from there navigate to GPRS subpage. 2<br />
3. Set access point name appropriately (usually INTERNET).<br />
4. Set GPRS network username and password 4 appropriately if your GPRS service requires<br />
authentication. Enable “Default Route” setting.<br />
5. Optionally set the PIN code, PPP idle timeout and ICMP Echo settings (Network-->Monitor<br />
menu) to meet your requirements.<br />
• If your SIM card has PIN code set, type the code to the PIN code field.<br />
• PPP idle timeout defines the time in seconds how ofter <strong>Arctic</strong> resets the GPRS connection<br />
if the connection is idle.<br />
6. Finally click Apply and then Commit 5 to store the settings.<br />
7. Reboot the <strong>Arctic</strong> for the settings to take effect.<br />
3<br />
1<br />
2<br />
3<br />
4<br />
5<br />
Figure 3: GPRS Network Settings<br />
Using <strong>Arctic</strong> GPRS Router as Wireless Access Point<br />
1. Set your Ethernet device to use the IP address of the <strong>Arctic</strong> as its default gateway.<br />
2. Check that the IP address of your Ethernet device belongs to the same network as the <strong>Arctic</strong>.<br />
3. Check GPRS Settings. Note that “Default Route” needs to be enabled in GPRS settings.<br />
Final words<br />
In order to get better understanding about the <strong>Arctic</strong> product, it is recommended to read the<br />
User Manual, as it will help you during the installation process. Building more complex<br />
networking schemes with <strong>Arctic</strong> requires more knowledge about networking, especially routing.<br />
<strong>Viola</strong> <strong>Systems</strong> Ltd. Phone: +358 (0)201 226 226 Fax: +358 (0)201 226 220 www.violasystems.com support@violasystems.com