
Create successful ePaper yourself
Turn your PDF publications into a flip-book with our unique Google optimized e-Paper software.
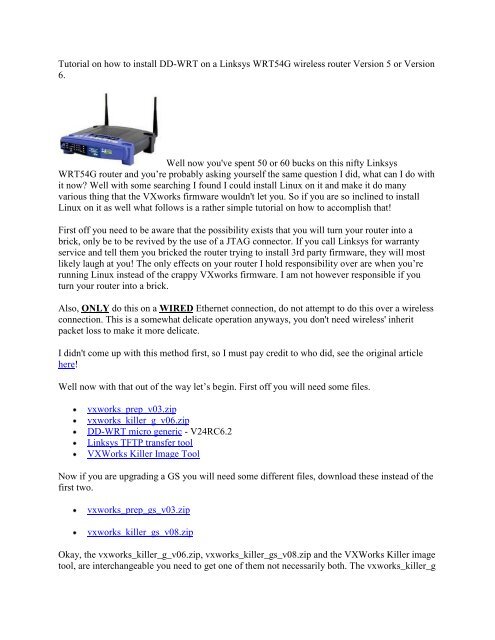
Tutorial on how to install <strong>DD</strong>-<strong>WRT</strong> on a Linksys <strong>WRT</strong>54G wireless router Version 5 or Version<br />
6.<br />
Well now you've spent 50 or 60 bucks on this nifty Linksys<br />
<strong>WRT</strong>54G router and you’re probably asking yourself the same question I did, what can I do with<br />
it now Well with some searching I found I could install Linux on it and make it do many<br />
various thing that the VXworks firmware wouldn't let you. So if you are so inclined to install<br />
Linux on it as well what follows is a rather simple tutorial on how to accomplish that!<br />
First off you need to be aware that the possibility exists that you will turn your router into a<br />
brick, only be to be revived by the use of a JTAG connector. If you call Linksys for warranty<br />
service and tell them you bricked the router trying to install 3rd party firmware, they will most<br />
likely laugh at you! The only effects on your router I hold responsibility over are when you’re<br />
running Linux instead of the crappy VXworks firmware. I am not however responsible if you<br />
turn your router into a brick.<br />
Also, ONLY do this on a WIRED Ethernet connection, do not attempt to do this over a wireless<br />
connection. This is a somewhat delicate operation anyways, you don't need wireless' inherit<br />
packet loss to make it more delicate.<br />
I didn't come up with this method first, so I must pay credit to who did, see the original article<br />
here!<br />
Well now with that out of the way let’s begin. First off you will need some files.<br />
vxworks_prep_v03.zip<br />
vxworks_killer_g_v06.zip<br />
<strong>DD</strong>-<strong>WRT</strong> micro generic - V24RC6.2<br />
Linksys TFTP transfer tool<br />
VXWorks Killer Image Tool<br />
Now if you are upgrading a GS you will need some different files, download these instead of the<br />
first two.<br />
vxworks_prep_gs_v03.zip<br />
vxworks_killer_gs_v08.zip<br />
Okay, the vxworks_killer_g_v06.zip, vxworks_killer_gs_v08.zip and the VXWorks Killer image<br />
tool, are interchangeable you need to get one of them not necessarily both. The vxworks_killer_g
and gs file has a generic MAC address in it and the VXWorks Killer image tool allows you to<br />
create a VXworks killer image with your mac address embedded in it. Also, you may want to<br />
check the <strong>DD</strong>-<strong>WRT</strong> website to see if there is anything newer than V24RC6.2. When<br />
downloading off the <strong>DD</strong>-<strong>WRT</strong> website be sure to download ONLY the micro generic version.<br />
After you have all the files, we need to extract them to a temporary location. Then you need to<br />
point your web browser to http://192.168.1.1 to access your routers web-admin page.<br />
From there we need to access the Administration tab.<br />
When you get to the Administration tab, we need to access the Firmware upgrade tab<br />
Then finally we arrive here.
We then need to hit browse, and then browse to the location in which you extracted all the files<br />
you downloaded earlier. Then select the vxworks_prep_v03.bin file. After that press the upgrade<br />
button on the web interface. After a few minutes your web browsers screen will go blank. At this<br />
point unplug the router from its power source and plug it back in, this is called power cycling.<br />
When I refer to power cycle the router in the future you will know what to do.<br />
On the next page we will upload the VXworks Killer, and I will show you how to use the<br />
VXworks killer image tool.
Well now that we have waited a little bit and the router should be<br />
rebooted we need to go about creating the VXworks killer image to upload to the router. We will<br />
be using the VXWorks Killer image tool that you downloaded earlier. So navigate on your PC to<br />
where you extracted the zip earlier and launch the vximgtoolgui.exe and we are presented with a<br />
screen like this:<br />
We need to fill out the desired MAC field. The original MAC address can be found on the<br />
bottom of your router like in this picture:
It will be in the form 1A:2B:3C:4D:5E:6F once you have acquired this information insert it onto<br />
the vximgtool program and select a place to save it to with the ... button next to the output image<br />
field. You will be presented with a browse dialog like this:<br />
I chose to save it as vxkillermac.bin so I wouldn't have any problems distinguishing it from the<br />
generic VXkiller bin. Then hit create. Then we need to point our web browser back to the<br />
<strong>WRT</strong>54G at http://192.168.1.1 and we will get a new screen it will look something like this:
Now that we are at the management mode screen click Browse... and navigate to the file we<br />
created in the vximgtool. Once you have it in the filename field click Apply. Now we wait for<br />
the word Success! to appear on the screen. After this has occurred we need to power cycle the<br />
router again. After the router comes back on the Power light should be blinking, this is expected<br />
and actually good. On the next page I will show you how to manually assign your computer an<br />
IP address because after you hit apply the DHCP server on the router is inactive and won't assign<br />
you an IP.
Well now that we are all done with uploading the custom vxkiller to<br />
the router we need to assign our computer an IP address so that we can TFTP the <strong>DD</strong>-<strong>WRT</strong><br />
firmware to the router. First off we need to go to Start and then go to Control Panel. Once in the<br />
Control Panel we need to open the Network Connections Panel. There you should have at least<br />
one connection. One of them should be under the LAN or High-Speed internet category. We<br />
need to right click on the one that connects to the router. It should look something like this:<br />
Then select Properties from the right click menu. You will get a screen that looks like this:
From there we need to double click on the Internet Protocol (TCP/IP) entry, it will bring up a<br />
screen like this:
Now we need to change Obtain an IP address automatically to Use the following IP address.<br />
Then in the IP address field enter 192.168.1.101 and in the subnet field if it doesn't automatically<br />
enter it, put 255.255.255.0. In the default gateway enter 192.168.1.1. So when you’re all done it<br />
should look like this:
You don't really need to enter a DNS server, but if you wish 192.168.1.1 will work. Now click<br />
OK at the bottom of the Internet Protocol (TCP/IP) Properties page, and click OK at the bottom<br />
of the Local Area Connection Properties page and if will take a few seconds but your PC will<br />
change you IP address to 192.168.1.101. Well finally on the next page we can get to TFTPing<br />
the new image to your router.
Well now that we have a set IP we can TFTP the <strong>DD</strong>-<strong>WRT</strong> image to<br />
the router. To do this we need to open the Linksys TFTP tool we downloaded earlier. When you<br />
open it you will be presented with this:<br />
We need to enter the Server name as 192.168.1.1 and the password will be blank. The file is the<br />
dd-wrt.v24_micro_generic.bin that we downloaded earlier, or the update micro generic version<br />
you downloaded from the <strong>DD</strong>-<strong>WRT</strong> website. Go ahead and leave the retry to 3 times, when you<br />
have all the info in it should look like this:<br />
With that all in go ahead and click upgrade. DO NOT REBOOT OR POWER CYCLE THE<br />
ROUTER. It will do so itself after it has upgraded. It will take anywhere from 1-10 minutes to
complete the flashing process. If the power is interrupted before the router reboots itself, you've<br />
got a 60 dollar paperweight. After the router reboots itself, you will have access to the <strong>DD</strong>-<strong>WRT</strong><br />
interface at http://192.168.1.1. The default login and password for <strong>DD</strong>-<strong>WRT</strong> is User : root and<br />
Password : admin . After doing this procedure you can update to future versions of <strong>DD</strong>-<strong>WRT</strong><br />
with the <strong>DD</strong>-<strong>WRT</strong> web gui, much the same way we uploaded the first file in the Linksys web<br />
gui. At this point you should revert your IP address settings we changed earlier to Obtain an IP<br />
address automatically. Well, have fun with your new Linux running Linksys <strong>WRT</strong>54G!