Mechanized Plasmarc Cutting Torch - ESAB Welding & Cutting ...
Mechanized Plasmarc Cutting Torch - ESAB Welding & Cutting ...
Mechanized Plasmarc Cutting Torch - ESAB Welding & Cutting ...

Create successful ePaper yourself
Turn your PDF publications into a flip-book with our unique Google optimized e-Paper software.
section 5<br />
Maintenance<br />
5.7 Removal and Replacement of the <strong>Torch</strong> Body<br />
WARNING<br />
Electric Shock Can Kill!<br />
Before performing torch maintenance:<br />
• Turn power switch of the power source console to the OFF position<br />
• Disconnect primary input power.<br />
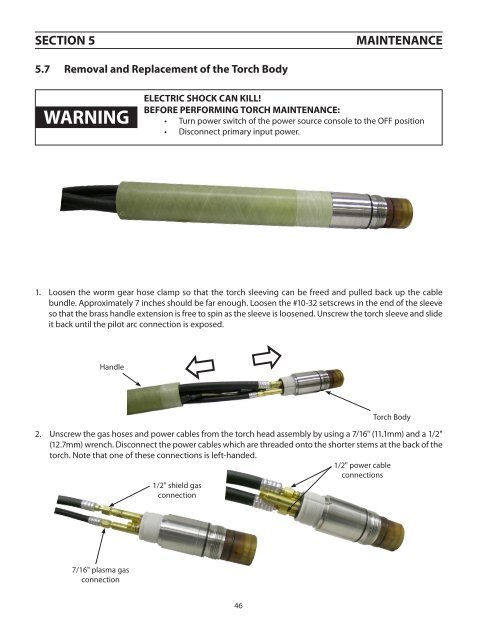
1. Loosen the worm gear hose clamp so that the torch sleeving can be freed and pulled back up the cable<br />
bundle. Approximately 7 inches should be far enough. Loosen the #10-32 setscrews in the end of the sleeve<br />
so that the brass handle extension is free to spin as the sleeve is loosened. Unscrew the torch sleeve and slide<br />
it back until the pilot arc connection is exposed.<br />
Handle<br />
<strong>Torch</strong> Body<br />
2. Unscrew the gas hoses and power cables from the torch head assembly by using a 7/16" (11.1mm) and a 1/2"<br />
(12.7mm) wrench. Disconnect the power cables which are threaded onto the shorter stems at the back of the<br />
torch. Note that one of these connections is left-handed.<br />
1/2" power cable<br />
connections<br />
1/2" shield gas<br />
connection<br />
7/16" plasma gas<br />
connection<br />
46