LEVITATOR - MediaMind
LEVITATOR - MediaMind
LEVITATOR - MediaMind
You also want an ePaper? Increase the reach of your titles
YUMPU automatically turns print PDFs into web optimized ePapers that Google loves.
<strong>LEVITATOR</strong><br />
OVERVIEW<br />
User experience<br />
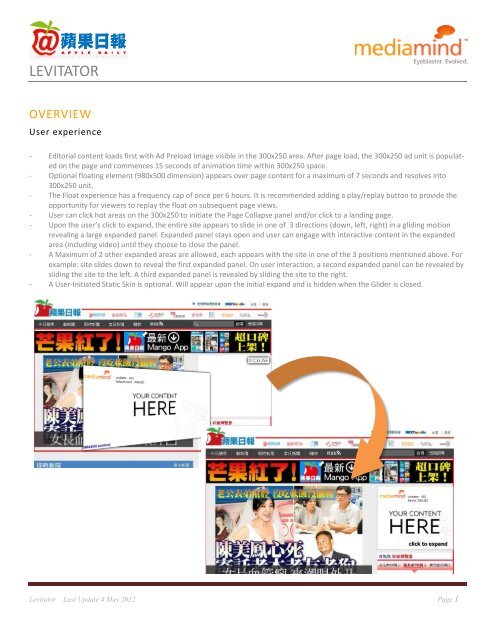
- Editorial content loads first with Ad Preload Image visible in the 300x250 area. After page load, the 300x250 ad unit is populated<br />
on the page and commences 15 seconds of animation time within 300x250 space.<br />
- Optional floating element (980x500 dimension) appears over page content for a maximum of 7 seconds and resolves into<br />
300x250 unit.<br />
- The Float experience has a frequency cap of once per 6 hours. It is recommended adding a play/replay button to provide the<br />
opportunity for viewers to replay the float on subsequent page views.<br />
- User can click hot areas on the 300x250 to initiate the Page Collapse panel and/or click to a landing page.<br />
- Upon the user’s click to expand, the entire site appears to slide in one of 3 directions (down, left, right) in a gliding motion<br />
revealing a large expanded panel. Expanded panel stays open and user can engage with interactive content in the expanded<br />
area (including video) until they choose to close the panel.<br />
- A Maximum of 2 other expanded areas are allowed, each appears with the site in one of the 3 positions mentioned above. For<br />
example: site slides down to reveal the first expanded panel. On user interaction, a second expanded panel can be revealed by<br />
sliding the site to the left. A third expanded panel is revealed by sliding the site to the right.<br />
- A User-Initiated Static Skin is optional. Will appear upon the initial expand and is hidden when the Glider is closed.<br />
Levitator Last Update 4 May 2012 Page 1
<strong>LEVITATOR</strong><br />
Levitator Last Update 4 May 2012 Page 2
<strong>LEVITATOR</strong><br />
Demo<br />
http://demo.eyeblaster.com/sea/Joe/html/TWnextLevitatorDemo.html<br />
Specification<br />
Creative Assets Dimension (W x H) Format File size Requirement<br />
- Audio must be user initiated. Mute by default.<br />
Initial Banner 300x250 SWF*
<strong>LEVITATOR</strong><br />
CONFIGURING IN FLASH<br />
The following procedure describes how to configure the Levitator Block assets using Flash. Since this Block is different than the other<br />
Blocks, the process is laid out differently as well. Here you can see how to open each asset and customize it to your liking.<br />
Note: The Levitator Block is only compatible with AS3.<br />
To configure in Flash:<br />
Banner<br />
1. Open the "Banner_300x250.fla" file.<br />
Make sure you leave keyframe1 and 2 empty from graphic content.<br />
2. On keyframe 3 you can add the advertiser’s graphic content as follows:<br />
Custom script 1 triggers the function "showGraphicsOnDefaultBanner" (layer "as", keyframe 2, line 10) and then the banner<br />
proceeds to keyframe 3 after the default panel collapses.<br />
Default Panel<br />
1. Open the "Panel_Default_980x500.fla" file.<br />
Note: This asset contains the flipping panel.<br />
2. To edit the 300x250 initial side of this panel, edit the "300x250 content" movie clip in the FLA library.<br />
3. To edit the 295x294 side of this panel, edit the "600x250 content" movie clip in the FLA library.<br />
4. To edit the close button of this panel, edit the "close_btn" button in the FLA library.<br />
Levitator Last Update 4 May 2012 Page 4
<strong>LEVITATOR</strong><br />
Levitator Panel<br />
1. Open the "Panel_Levitator_1680x1280.fla"file.<br />
This asset loads the site snap of the publisher’s site into the "box_mc" movie clip.<br />
The SiteSnap takes an image from the publisher’s site every 30 minutes by default. To make sure that the image of your ad appears<br />
in the SiteSnap (and not some other ad that may be in the rotation for the same spot) you must add a 300x250 image of<br />
the banner to the "banner_default_image" movie clip as follows:<br />
2. You may have to fine tune the "banner_default_image" and the file snap’s position, according to the publisher’s page and the<br />
position of the banner. The Site Snap URL and the position of the "banner_default_image" are configured in the class<br />
‘com.<strong>MediaMind</strong>.Config’ as follows:<br />
Variable<br />
Variable url_image<br />
Variable fileSnap_x_position<br />
Variable fileSnap_y_position<br />
Variable defaultImage_x_position<br />
Variable defaultImage_y_position<br />
Description<br />
The path to the SiteSnap.<br />
The X position of the SiteSnap relative to the stage.<br />
The Y position of the SiteSnap relative to the stage.<br />
The X position of the "banner_default_image" movie clip relative<br />
to the SiteSnap’s movie clip "box_mc".<br />
The Y position of the "banner_default_image" movie clip relative<br />
to the SiteSnap’s movie clip "box_mc".<br />
Notes:<br />
• Do not place the ‘banner_default_image’ on the stage, it will be added automatically (by code) to the SiteSnap image.<br />
• Do not delete the ‘banner_default_image’ from the library and do not change the linkage class name.<br />
Levitator Last Update 4 May 2012 Page 5
<strong>LEVITATOR</strong><br />
Additional Assets 1,2 and 3<br />
These are the additional assets that are displayed by the Levitator Panel.<br />
"Additional_Asset_01_HOME.fla": The initial additional asset and also displayed when the user clicks on the "home" button. This<br />
FLA contains the video player that displays the additional asset #10.<br />
You can add creatives according to your needs on the "Content" layer and also create additional layers beneath this layer.<br />
The clickthrough URL for the overlay button is "CTR_content_1".<br />
"Additional_Asset_02_LEFT.fla" and "Additional_Asset_03_RIGHT.fla": Both of these assets have the same structure. The<br />
first one is loaded when the user clicks the "LEFT" button, the second one when the user clicks on the "RIGHT" button.<br />
You can add creatives according to your needs on the "Content" layer and also create additional layers beneath this layer.<br />
The Clickthrough URLs for the overlay button are:<br />
Additional_Asset_02_LEFT.fla: "CTR_content_2"<br />
Additional_Asset_03_RIGHT.fla: "CTR_content_3"<br />
Levitator Last Update 4 May 2012 Page 6
<strong>LEVITATOR</strong><br />
Flash Guideline<br />
Setup Eyeblaster Workshop (only install once)<br />
- Download the Flash Plugin (MXP)<br />
- Click here for installation guideline<br />
Create new ad<br />
- Open Eyeblaster Workshop in Flash. Select Window > Other Panels > Eyeblaster Workshop<br />
- Create an ad using template.<br />
- Select Expandable banner as Ad Format.<br />
Eyeblaster code in Flash<br />
- Leave the first frame BLANK. Include the following script:<br />
For Action Script 3.0:<br />
For Windows XP or Vista & For Apple OS:<br />
EB.Init(stage);<br />
- Apply this script to expand the panel from default banner:<br />
EB.ExpandPanel("Panel_Levitator_1680x1280","user"); or EB.ExpandPanel("Panel_Default_980x500", "User");<br />
- Close the panel using this script:<br />
EB.CollapsePanel("Panel_Levitator_1680x1280","user"); or EB.CollapsePanel("Panel_Default_980x500", "User");<br />
- Click Through and redirect user to ad URL:<br />
EB.Clickthrough();<br />
- Custom Click Through for additional ad URL. (if any):<br />
EB.Clickthrough("targetName");<br />
Example of targetName: BlogURL, OrderURL, FacebookURL<br />
- Track user initiated interaction:<br />
EB.UserActionCounter("interactionName");<br />
Example of InteractionName: ReplayAd, StartGame<br />
- Track automated event.<br />
EB.AutomaticEventCounter("eventName");<br />
Example of eventName: DisplayedProduct, LoadedGame<br />
*For Panel 2 banner, see template for full script<br />
Levitator Last Update 4 May 2012 Page 7
<strong>LEVITATOR</strong><br />
Panel setting<br />
Make sure the Panel_Default_980x500.swf is the default panel and define its settings as follows:<br />
Auto Retract: Never<br />
Banner: Relative<br />
X:-660<br />
Y: -86<br />
Make sure the Panel_Levitator_1680x1280.swf has the following settings:<br />
Auto Retract: Never<br />
Banner: Relative<br />
X:-1010<br />
Y: -339<br />
*Kindly note that the position is different according to different site layer<br />
Adding the Levitator Custom Script<br />
Define the custom JavaScript as follows:<br />
1. To define the custom JavaScript for the pre-load, select the Advanced Features tab then expand the Custom JS section as follows:<br />
Levitator Last Update 4 May 2012 Page 8
<strong>LEVITATOR</strong><br />
2. In the Trigger JavaScript on Scripts Pre-load field, enter the following URL:<br />
http://ds.serving-sys.com/BurstingRes/CustomScripts/MMBlock_Levitator.js<br />
This script triggers the banner to proceed to the keyframe with the graphic elements, after the default panel collapses.<br />
3. Click Save.<br />
4. To define the custom JavaScript for the ad download, select the Interactions & Ad URLs tab and then select the Ad URLs subtab<br />
as follows:<br />
5. Click Add another tracking URL:<br />
6. From the drop-down list, select On Ad Download (JavaScript) then enter the following URL:<br />
http://ds.serving-sys.com/BurstingRes/CustomScripts/Background_Dimmer_Block_ver2.js?zindex=0<br />
This script implements the Background Dimmer block on the part of the publisher’s page that is not covered by the Levitator<br />
panel.<br />
Levitator Last Update 4 May 2012 Page 9
<strong>LEVITATOR</strong><br />
Best Practice<br />
- Place the CLOSE button away from the mouse over button in default banner.<br />
- CPU usage less than 50%.<br />
Setup Video Player (if any)<br />
Setup ad<br />
- Select to add video as Additional Assets<br />
- Drag and drop Eyeblaster Video Components: VideoLoader, PlayBtn, StopBtn, MuteBtn<br />
- Setup VideoLoader using Component Inspector.<br />
- Additional Asset ID is 1 by default.<br />
- Select on Eyeblaster Workshop<br />
- Select the file for default image (backup image)<br />
- Select Ad URL to enter the Target URL. eg: http://www.mediamind.com<br />
- Position the panel to appear on the correct coordinate relative to the banner.<br />
eg: Expand to the left, Y=0, X = width of default banner – width of panel<br />
Testing & Upload<br />
- Preview the ad and test the ad using Interactions Monitor.<br />
- Make sure that all the scripts are tracked.<br />
- Submit the ad to <strong>MediaMind</strong> platform from Eyeblaster Workshop.<br />
Levitator Last Update 4 May 2012 Page 10
<strong>LEVITATOR</strong><br />
CREATIVE SUBMISSION TO MEDIAMIND PLATFORM<br />
Basic Introduction<br />
- Overview of <strong>MediaMind</strong> Platform<br />
- Edit an Ad<br />
Create Video Package (only applicable to ad with standard video )<br />
- Select Manage > Video Studio<br />
- Click on to create new video package<br />
- Follow through the wizard.<br />
- Link the additional assets to the video package in Video Packages folder.<br />
Publish Ad<br />
- Select Manage > Ad<br />
- Select the ad and click on Attach to attach the ad to the correct placement. The ad icon will change to<br />
Note: Publisher and Campaign Trafficker can only preview ad attached to the placement.<br />
- Setup for Custom Click Through (if any)<br />
- Select the ad and click on Review > Publish. The ad icon will change to<br />
Note: Publisher can only test on published ads.<br />
SUPPORT<br />
E-mail your enquiries to: seasupport@mediamind.com<br />
Online training: Eyeblaster Training Zone<br />
Levitator Last Update 4 May 2012 Page 11


