view dfc instructions (pdf) - dyna-flo control valves
view dfc instructions (pdf) - dyna-flo control valves
view dfc instructions (pdf) - dyna-flo control valves

You also want an ePaper? Increase the reach of your titles
YUMPU automatically turns print PDFs into web optimized ePapers that Google loves.
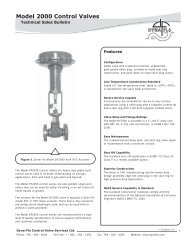
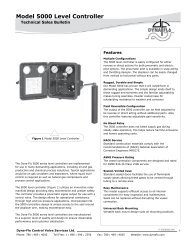
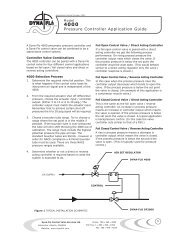
Model DFC Valve Actuator<br />
Operation, Parts, and Instruction Manual<br />
Lower Diaphragm Casing Removal<br />
1 Remove the lower diaphragm casing cap screws (Key 18)<br />
and lift lower diaphragm casing (Key 4) off of the yoke<br />
(Key 1). Remove the lower casing gasket (Key 13) clean<br />
and inspect the yoke / lower casing sealing surfaces for<br />
damage. O-rings and gaskets should be replaced during<br />
maintenance.<br />
NOTE<br />
For the DFC Size 3220 inspect the o-ring groove on<br />
the top surface of the yoke (Key 1) for any deep<br />
scratching or corrosion. Also check the lower<br />
diaphragm casing (Key 4) for any deformation<br />
excessive tightening may have caused. O-rings<br />
and gaskets should be replaced during maintenance.<br />
Actuator Assembly<br />
CAUTION<br />
Before assembling the actuator, make sure that the<br />
yoke and actuator are securely supported with a<br />
clamping device and on a surface that will support<br />
the assembled actuator weight.<br />
NOTE<br />
Use an anti-seize compound that is approved for the<br />
service conditions that the actuator is being installed<br />
into.<br />
Lower Diaphragm Casing Bushing Installation<br />
1 Coat the lower diaphragm gasket (Key 13) with anti-seize<br />
compound and place on to the yoke (Key 1) (on a DFC size<br />
3220 actuator there is an o-ring in place of the gasket).<br />
The holes of the gasket should align with the holes on the<br />
yoke.<br />
2 Install the lower diaphragm casing (Key 4), tighten cap<br />
screws (Key 12) using a criss-cross pattern. DO NOT over<br />
tighten the cap screws as excessive tightening could warp<br />
the casing or deflect and cause the gasket to leak.<br />
3 Lubricate the bushing seals (Keys 16 & 17) with siliconebased<br />
lubricant and place them into the bushing (Key 15)<br />
as shown in Figure 6. Pack the inside of the bushing with<br />
lubricant (Lubriplate ® Mag-1 or equivalent) and insert the<br />
bushing into the yoke (Key 1). The bushing is held in place<br />
with the snap ring (Key 14) that fits into the groove in the<br />
yoke above the bushing (Refer to Figure 6).<br />
Spring Installation<br />
NOTE<br />
It may be desirable to have an appropriately sized<br />
block of wood nearby to be placed in the bottom of<br />
the yoke to be used as support for the stem/spring<br />
assembly while working on the actuator.<br />
1 Coat the stem (Key 3) threads with anti-seize compound<br />
and thread the spring adjuster (Key 21) onto the stem.<br />
Place the spring seat (Key 20) onto the stem so that it<br />
rests on the spring adjuster as show in Figure 7.<br />
2 Insert the spring (Key 2) into the barrel on the yoke (Key<br />
1) and slide stem assembly from Step 1 into the yoke. It<br />
may be necessary to support the spring/stem assembly<br />
using a block of wood or similar item while assembling<br />
the upper portion of the actuator.<br />
Upper Diaphragm Casing Assembly<br />
1 Place the lower diaphragm plate (Key 6) into the lower<br />
diaphragm casing (Key 4) and onto the actuator stem (Key<br />
3) as shown in Figure 7. Insert the diaphragm (Key 7) into<br />
the lower casing over the lower diaphragm plate and align<br />
the holes on the diaphragm with those of the lower casing.<br />
2 Install the upper diaphragm plate (Key 8) onto the actuator<br />
stem so that it rests in the diaphragm (for a two piece<br />
diaphragm plate design both parts of the plate will need to<br />
be installed Figure 6 Key 9).<br />
3 Place the travel stop (Key 10) over the actuator stem so<br />
that it rests on the upper diaphragm plate. Coat the<br />
threads of the hex head bolt with anti-seize and thread it<br />
into the top of the actuator stem (Key 3), tighten the hex<br />
head bolt completely making sure that the holes on the<br />
diaphragm still align with those of the lower casing (Refer<br />
to Torque Chart on Page 11).<br />
4 Lift and place the upper diaphragm casing (Key 5) onto the<br />
top of the actuator, make sure that the holes of the upper<br />
casing align with those of the lower casing (Key 4) and<br />
diaphragm (Key 7). Install the casing cap screws (Key 18)<br />
into the casings, Do Not coat the cap screws with<br />
anti-seize. Thread the nuts (Key 19) onto the casing cap<br />
screws, Do Not over tighten the cap screws refer to Torque<br />
Chart on Page 11. Tighten the casing cap screws in a<br />
crisscross pattern to half required torque and in the same<br />
pattern completely tighten cap screws to full torque. In a<br />
circular pattern re-tighten the casing cap screws (Key 18)<br />
to full torque.<br />
5 Refer to Bench Setting Actuator portion of manual to<br />
complete the actuator assembly.<br />
Dyna-Flo Control Valve Services Ltd.<br />
Phone: 780 • 469 • 4000 Toll Free: 1 • 866 • 396 • 2356 Fax: 780 • 469 • 4035 Website: www.<strong>dyna</strong><strong>flo</strong>.com<br />
P-DFCM0613A<br />
8