Windows Live Mail (Vista/XP) - JARMail WEB - JAARS
Windows Live Mail (Vista/XP) - JARMail WEB - JAARS
Windows Live Mail (Vista/XP) - JARMail WEB - JAARS

Create successful ePaper yourself
Turn your PDF publications into a flip-book with our unique Google optimized e-Paper software.
Setting up <strong>Windows</strong> <strong>Live</strong> <strong>Mail</strong> on <strong>Windows</strong> <strong>XP</strong> or pre-<br />
Service Pack 2 <strong>Vista</strong> for JAR<strong>Mail</strong>/SIL Directory<br />
(If you have upgraded your <strong>Vista</strong> operating system to Service Pack 2, use the link for<br />
<strong>Windows</strong> <strong>Live</strong> <strong>Mail</strong> 2012 (<strong>Windows</strong> 7/<strong>Vista</strong> SP2…) located on the Setup Instructions page.)<br />
1. Read the System Requirements and Download and Installation Notes beginning on page 12<br />
of this document before installing. You can download the program from Microsoft here:<br />
http://windows.microsoft.com/en-US/windows-live/essentials-home. You will have the<br />
option to install several programs that are included in the <strong>Windows</strong> <strong>Live</strong> Essentials Suite. All<br />
of the programs that you select will be installed to the “<strong>Windows</strong> <strong>Live</strong>” program folder. You<br />
only need to install <strong>Windows</strong> <strong>Live</strong> <strong>Mail</strong>. To do this, de-select all other options.<br />
2. Start <strong>Windows</strong> <strong>Live</strong> <strong>Mail</strong>.<br />
You can do this by selecting the <strong>Windows</strong> <strong>Live</strong> <strong>Mail</strong> icon from the <strong>Windows</strong> <strong>Live</strong> folder<br />
under All Programs on your Start Menu.<br />
If you are installing to a <strong>Windows</strong> <strong>XP</strong> computer that has a working version of Outlook<br />
Express, the first time you run <strong>Windows</strong> <strong>Live</strong> <strong>Mail</strong> it will automatically import all of your<br />
accounts and mail from Outlook Express.<br />
If you are installing on a <strong>Windows</strong> <strong>Vista</strong> computer that has a working version of <strong>Windows</strong><br />
<strong>Mail</strong>, the first time you run <strong>Windows</strong> <strong>Live</strong> <strong>Mail</strong> it will automatically import all of your<br />
accounts and mail from <strong>Windows</strong> <strong>Mail</strong>.<br />
If you do not have either of these situations you will automatically be prompted to Add an<br />
E-mail account as in step 7 below.<br />
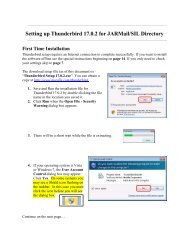
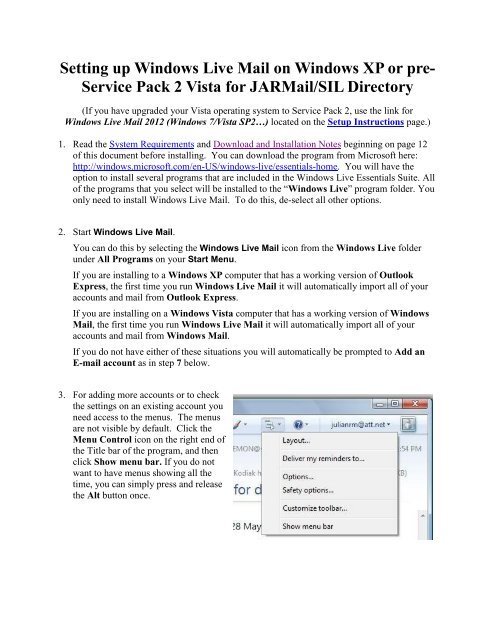
3. For adding more accounts or to check<br />
the settings on an existing account you<br />
need access to the menus. The menus<br />
are not visible by default. Click the<br />
Menu Control icon on the right end of<br />
the Title bar of the program, and then<br />
click Show menu bar. If you do not<br />
want to have menus showing all the<br />
time, you can simply press and release<br />
the Alt button once.
Setting up <strong>Windows</strong> <strong>Live</strong> <strong>Mail</strong> on <strong>Windows</strong> <strong>XP</strong> or pre-Service Pack 2 <strong>Vista</strong> for JAR<strong>Mail</strong>/SIL<br />
Directory 2<br />
4. In <strong>Windows</strong> <strong>Live</strong> <strong>Mail</strong>,<br />
on the Tools menu,<br />
click Accounts. The<br />
Internet Accounts<br />
dialog box appears.<br />
Remove existing <strong>Mail</strong><br />
accounts that you do not<br />
use.<br />
To remove a name,<br />
select the name, click<br />
Remove and then click<br />
Yes.<br />
5. Click Add…<br />
6. Click E-mail Account and then<br />
click Next.<br />
Setting_up_<strong>Windows</strong>_<strong>Live</strong>_<strong>Mail</strong>_for_JAR<strong>Mail</strong>_C&D.docx<br />
Edited on 10/4/2012 4:13:00 PM
Setting up <strong>Windows</strong> <strong>Live</strong> <strong>Mail</strong> on <strong>Windows</strong> <strong>XP</strong> or pre-Service Pack 2 <strong>Vista</strong> for JAR<strong>Mail</strong>/SIL<br />
Directory 3<br />
7. Type your full E-mail<br />
address and Password in<br />
the boxes.<br />
Be sure the box for<br />
Remember password is<br />
selected.<br />
In the Display Name box<br />
type the name that you<br />
want to appear on your<br />
sent emails. This is a<br />
"friendly name".<br />
Select Manually<br />
configure server settings<br />
for e-mail account.<br />
8. Click Next.<br />
9. In the Incoming mail server type box, POP3 should display. This is the default. To use<br />
IMAP change this setting.<br />
10. Type mail.jaars.org in the<br />
Incoming mail (POP3 or<br />
IMAP) server box.<br />
11. Select This server requires<br />
a secure connection (SSL).<br />
The Port number will change<br />
to 995. (993 for IMAP)<br />
12. Type your full e-mail address<br />
again in the Login ID (if<br />
different from e-mail<br />
address) box.<br />
13. Type mail.jaars.org in the<br />
Outgoing e-mail server<br />
(SMTP) name box.<br />
14. Type 465 in the Port: box.<br />
15. Select This server requires<br />
a secure connection (SSL).<br />
16. Select My Outgoing server requires authentication.<br />
17. Click Next.<br />
Setting_up_<strong>Windows</strong>_<strong>Live</strong>_<strong>Mail</strong>_for_JAR<strong>Mail</strong>_C&D.docx<br />
Edited on 10/4/2012 4:13:00 PM
Setting up <strong>Windows</strong> <strong>Live</strong> <strong>Mail</strong> on <strong>Windows</strong> <strong>XP</strong> or pre-Service Pack 2 <strong>Vista</strong> for JAR<strong>Mail</strong>/SIL<br />
Directory 4<br />
18. If this is the first account to<br />
be created, you will not see a<br />
selection box for Set this<br />
account as the default mail<br />
account. If you want this<br />
account to be the default,<br />
select the check box.<br />
19. Click Finish.<br />
The Accounts window<br />
reappears.<br />
20. Click Close.<br />
If you selected to use IMAP the following screen will appear after you click finish.<br />
Setting_up_<strong>Windows</strong>_<strong>Live</strong>_<strong>Mail</strong>_for_JAR<strong>Mail</strong>_C&D.docx<br />
Edited on 10/4/2012 4:13:00 PM
Setting up <strong>Windows</strong> <strong>Live</strong> <strong>Mail</strong> on <strong>Windows</strong> <strong>XP</strong> or pre-Service Pack 2 <strong>Vista</strong> for JAR<strong>Mail</strong>/SIL<br />
Directory 5<br />
Click OK.<br />
Setting_up_<strong>Windows</strong>_<strong>Live</strong>_<strong>Mail</strong>_for_JAR<strong>Mail</strong>_C&D.docx<br />
Edited on 10/4/2012 4:13:00 PM
Account Properties 6<br />
Account Properties<br />
You must now set additional (Recommended marked by *) account properties for your new<br />
JAR<strong>Mail</strong> account. Most of these settings are already done. Verify each as you go through the<br />
following screens. You do not have<br />
to re-enter the correct items.<br />
On the Tools menu, click<br />
Accounts. The dialog box will<br />
appear.<br />
1. Click the name of the account to<br />
select it and then click<br />
Properties.<br />
The User account Properties<br />
dialog box appears.<br />
2. * In the <strong>Mail</strong> Account box, type a<br />
name for your account to identify it.<br />
JAR<strong>Mail</strong> is a suggested name for this<br />
account, but you can use any name<br />
you want.<br />
3. In the E-mail address box, verify<br />
your full email address.<br />
4. Select Include this account when<br />
receiving or synchronizing.<br />
5. Click the Servers tab.<br />
Setting_up_<strong>Windows</strong>_<strong>Live</strong>_<strong>Mail</strong>_for_JAR<strong>Mail</strong>_C&D.docx<br />
Edited on 10/4/2012 4:13:00 PM
Account Properties 7<br />
Most of this page will be filled out<br />
for you. Do not select Log on<br />
using Secure Password<br />
Authentication (SPA).<br />
My incoming mail server is a [POP3<br />
or IMAP] server.<br />
6. Under Outgoing <strong>Mail</strong> Server,<br />
select My server requires<br />
authentication.<br />
7. Click Settings.<br />
The Outgoing <strong>Mail</strong> Server dialog<br />
box appears.<br />
8. Verify that Use same settings as<br />
my incoming mail server is<br />
selected.<br />
9. Click Ok.<br />
10. Click the Advanced tab.<br />
Setting_up_<strong>Windows</strong>_<strong>Live</strong>_<strong>Mail</strong>_for_JAR<strong>Mail</strong>_C&D.docx<br />
Edited on 10/4/2012 4:13:00 PM
Account Properties 8<br />
11. Under Outgoing mail (SMTP),<br />
select This server requires a<br />
secure connection (SSL).<br />
12. Change the Outgoing mail<br />
(SMTP) box to 465.<br />
13. Under Incoming mail (POP3),<br />
select This server requires a<br />
secure connection (SSL).<br />
The Incoming mail (POP3) box<br />
will change to 995 (for IMAP this<br />
number will be 993) automatically.<br />
14. * Using the mouse to adjust the<br />
slider, set the Server Timeouts to<br />
3 minutes.<br />
15. Click Ok.<br />
This will return to the<br />
Internet Accounts dialog<br />
box.<br />
If you have more than one<br />
mail account, you must<br />
select one to be the default<br />
service for sending your<br />
mail. Select your JAR<strong>Mail</strong><br />
account and click Set as<br />
Default.<br />
16. Click Close.<br />
<strong>Windows</strong> <strong>Live</strong> <strong>Mail</strong> is now set up to send and receive mail. You can send a message to<br />
yourself to check your account.<br />
Setting_up_<strong>Windows</strong>_<strong>Live</strong>_<strong>Mail</strong>_for_JAR<strong>Mail</strong>_C&D.docx<br />
Edited on 10/4/2012 4:13:00 PM
Folders Settings for IMAP Users 9<br />
Folders Settings for IMAP Users<br />
After setting up an IMAP account users should change<br />
the default folder settings for their account. The<br />
preferred setting is to have <strong>Windows</strong> <strong>Live</strong> <strong>Mail</strong> place<br />
sent items in the Sent folder on the JAR<strong>Mail</strong> server.<br />
To do this, use the following procedure.<br />
1. Right click your account and click Properties.<br />
This will open the User Properties dialog box.<br />
2. Click the IMAP tab<br />
3. Change the name in the Sent Items path:<br />
from “Sent Items” to Sent.<br />
4. Change the name in the Deleted Items<br />
path: from “Deleted Items” to Trash.<br />
5. Click OK.<br />
The Junk E-mail functions provided in <strong>Windows</strong> <strong>Live</strong> <strong>Mail</strong> will create a folder on the server<br />
automatically. This folder cannot be deleted from <strong>Windows</strong> <strong>Live</strong> <strong>Mail</strong>. You can set the options<br />
for Junk e- mail handling by clicking on the Actions menu, selecting Junk e-mail, and then<br />
Safety options…<br />
Setting_up_<strong>Windows</strong>_<strong>Live</strong>_<strong>Mail</strong>_for_JAR<strong>Mail</strong>_C&D.docx<br />
Edited on 10/4/2012 4:13:00 PM
10<br />
The Sent Items folder was created automatically also by <strong>Windows</strong> <strong>Live</strong> <strong>Mail</strong>. It will still be<br />
visible in the folders list. It can be deleted in <strong>Windows</strong> <strong>Live</strong> <strong>Mail</strong>. If you prefer not to display<br />
this folder rather than deleting, use the following steps.<br />
1. Right click<br />
your username,<br />
and then click<br />
IMAP Folders…<br />
2. Scroll down<br />
the list on the All<br />
tab and select Sent<br />
Items<br />
3. Click Hide,<br />
and then click OK.<br />
Every so often you may want to empty your Trash folder to get rid of the deleted messages from<br />
the server. You will find when you right click on the Trash folder in your list of folders that the<br />
option will be displayed as Empty ‘Deleted<br />
Items’ folder. This is simply how <strong>Windows</strong> <strong>Live</strong><br />
<strong>Mail</strong> refers to the designated folder.<br />
Setting_up_<strong>Windows</strong>_<strong>Live</strong>_<strong>Mail</strong>_for_JAR<strong>Mail</strong>_C&D.docx<br />
Edited on 10/4/2012 4:13:00 PM
System Requirements 11<br />
System Requirements<br />
<strong>Windows</strong> <strong>Live</strong> products require the following:<br />
<br />
<br />
<br />
Operating system: <strong>Windows</strong> <strong>XP</strong> with Service Pack 2 (32-bit edition only), <strong>Windows</strong><br />
<strong>Vista</strong> (32-bit or 64-bit editions), <strong>Windows</strong> 7 (32-bit or 64-bit editions), or <strong>Windows</strong><br />
Server 2008. Note: <strong>Windows</strong> <strong>Live</strong> Movie Maker is not supported on <strong>Windows</strong> <strong>XP</strong><br />
Processor: 1 GHz or higher for <strong>Windows</strong> <strong>Vista</strong>; 800 MHz or higher for <strong>Windows</strong> <strong>XP</strong><br />
Memory: 128 MB of RAM (256 MB or more recommended) for <strong>Windows</strong> <strong>XP</strong>; 512 MB<br />
for <strong>Windows</strong> <strong>Vista</strong> or <strong>Windows</strong> 7<br />
Resolution: Minimum 1024 x 768<br />
<br />
<br />
<br />
Internet connection: Internet functionality requires dial-up or broadband Internet access<br />
(provided separately). Local or long-distance charges may apply.<br />
Browser: <strong>Windows</strong> <strong>Live</strong> Toolbar requires Microsoft Internet Explorer 6 or later<br />
Graphics or video card: <strong>Windows</strong> <strong>Live</strong> Movie Maker requires a video card that<br />
supports DirectX 9 or higher, and Shader Model 2 or higher.<br />
View detailed release notes (pdf)<br />
Additional requirements<br />
The following components are needed for specific <strong>Windows</strong> <strong>Live</strong> programs, and may be<br />
installed for you if they’re not already on your computer.<br />
<br />
<br />
For Writer: Microsoft .NET Framework 2.0 or higher*<br />
For Photo Gallery: SQL 2005 Compact Edition and <strong>Windows</strong> Imaging Codecs*<br />
For Photo Gallery and Movie Maker: Some components of DirectX 9.<br />
* Not required when installing on <strong>Windows</strong> <strong>Vista</strong>.<br />
Note<br />
To install or uninstall <strong>Windows</strong> <strong>Live</strong> products, you must have administrator rights on the<br />
computer.<br />
Setting_up_<strong>Windows</strong>_<strong>Live</strong>_<strong>Mail</strong>_for_JAR<strong>Mail</strong>_C&D.docx<br />
Edited on 10/4/2012 4:13:00 PM
Download and Installation Notes 12<br />
Download and Installation Notes<br />
Web Based Installer<br />
If you follow the download link at the beginning<br />
of this document your browser will open the<br />
download site for <strong>Windows</strong> <strong>Live</strong> Essentials. A<br />
portion of the page is displayed here.<br />
Choose your default language and then click the<br />
Download now button.<br />
When the File Download – Security Warning<br />
dialog boxes appear, click Run in both cases.<br />
You will have to wait a few seconds while<br />
the installer prepares your system for the<br />
installation.<br />
Setting_up_<strong>Windows</strong>_<strong>Live</strong>_<strong>Mail</strong>_for_JAR<strong>Mail</strong>_C&D.docx<br />
Edited on 10/4/2012 4:13:00 PM
Download and Installation Notes 13<br />
All of the programs listed will be selected by<br />
default when the download process begins.<br />
You should uncheck all of these except for<br />
<strong>Windows</strong> <strong>Live</strong> <strong>Mail</strong>. Be sure to clear the<br />
check marks from all the other programs. The<br />
final download size depends on how many of<br />
these programs you choose to download and<br />
install.<br />
Click Install when you are ready.<br />
The initial installer file is 1.18 MB. However<br />
if you choose to install all of these programs<br />
the download will be over 200 MB. A high<br />
speed connection is is recommended.<br />
This dialog box will give you the opportunity<br />
to save your work and close any programs<br />
you may be working in with a warning that<br />
you might lose some of your work if you<br />
don’t close the programs yourself. In this<br />
case only Internet Explorer is open and the<br />
default selection is selected “Close these<br />
programs for me”.<br />
Click Continue.<br />
This dialog box simply shows a progress bar.<br />
The amount of time it takes to install will<br />
vary depending on your computer and<br />
Internet setup.<br />
Setting_up_<strong>Windows</strong>_<strong>Live</strong>_<strong>Mail</strong>_for_JAR<strong>Mail</strong>_C&D.docx<br />
Edited on 10/4/2012 4:13:00 PM
Download and Installation Notes 14<br />
When this dialog box appears,<br />
Set your search provider and<br />
Set your home page<br />
will be selected by default. If you do not<br />
wish to use Bing as the default search for<br />
router in your browser be sure to clear the<br />
selection box. The same applies for setting<br />
MSN as your home page. Be sure to clear the<br />
selection box if you do not want MSN for<br />
your home page.<br />
Click Continue.<br />
This last dialog box is a confirmation that<br />
<strong>Windows</strong> <strong>Live</strong> <strong>Mail</strong> has been installed.<br />
There is an offer to sign up for a <strong>Windows</strong><br />
<strong>Live</strong> ID. This is not a requirement for you to<br />
use <strong>Windows</strong> <strong>Live</strong> <strong>Mail</strong> to access your<br />
JAR<strong>Mail</strong> account.<br />
Click Close.<br />
Setting_up_<strong>Windows</strong>_<strong>Live</strong>_<strong>Mail</strong>_for_JAR<strong>Mail</strong>_C&D.docx<br />
Edited on 10/4/2012 4:13:00 PM
Setup <strong>Windows</strong> <strong>Live</strong> <strong>Mail</strong> in <strong>Vista</strong> or <strong>XP</strong> to Use a SIL Directory Service 15<br />
Setup <strong>Windows</strong> <strong>Live</strong> <strong>Mail</strong> in <strong>Vista</strong> or<br />
<strong>XP</strong> to Use a SIL Directory Service<br />
1. To open <strong>Windows</strong> <strong>Live</strong> <strong>Mail</strong>, open the Start<br />
menu then point to All Programs and either<br />
wait for two seconds or left click.<br />
For <strong>XP</strong> of course these first two images<br />
will be different.<br />
The process is the same.<br />
2. Scroll to the <strong>Windows</strong> <strong>Live</strong> folder and Click.<br />
3. You should now be able to find <strong>Windows</strong> <strong>Live</strong> <strong>Mail</strong><br />
in the list of programs. Point and double click to<br />
open the program.<br />
4. When <strong>Windows</strong> <strong>Live</strong> <strong>Mail</strong> opens first click on<br />
Tools, then Accounts…<br />
Setting_up_<strong>Windows</strong>_<strong>Live</strong>_<strong>Mail</strong>_for_JAR<strong>Mail</strong>_C&D.docx<br />
Edited on 10/4/2012 4:13:00 PM
Setup <strong>Windows</strong> <strong>Live</strong> <strong>Mail</strong> in <strong>Vista</strong> or <strong>XP</strong> to Use a SIL Directory Service 16<br />
5. When the Accounts window appears,<br />
click Add…<br />
6. In the Select Account Type window, select<br />
Contacts Directory Account, and then click Next.<br />
7. In this Add a Contacts directory account<br />
window, type “mail.jaars.org” in the<br />
contacts directory LDAP server name box.<br />
8. Check the box for “This Contact directory<br />
requires me to log on with a name and<br />
password”.<br />
9. Click Next.<br />
Setting_up_<strong>Windows</strong>_<strong>Live</strong>_<strong>Mail</strong>_for_JAR<strong>Mail</strong>_C&D.docx<br />
Edited on 10/4/2012 4:13:00 PM
Setup <strong>Windows</strong> <strong>Live</strong> <strong>Mail</strong> in <strong>Vista</strong> or <strong>XP</strong> to Use a SIL Directory Service 17<br />
10. In this Add a Contacts directory account<br />
window, type your full Wycliffe or SIL e-mail<br />
address in the Account name box.<br />
11. Type your e-mail password in the Password<br />
box.<br />
12. Click Next.<br />
When the Do you want <strong>Mail</strong> to automatically<br />
check for addresses… window appears, be sure<br />
that the radio button is selected for “Use for<br />
manual address checks only ”.<br />
13. Click Next.<br />
Don’t be fooled by the Finish window. There are a<br />
few more steps.<br />
14. Click Finish and go on to the next page.<br />
Setting_up_<strong>Windows</strong>_<strong>Live</strong>_<strong>Mail</strong>_for_JAR<strong>Mail</strong>_C&D.docx<br />
Edited on 10/4/2012 4:13:00 PM
Setup <strong>Windows</strong> <strong>Live</strong> <strong>Mail</strong> in <strong>Vista</strong> or <strong>XP</strong> to Use a SIL Directory Service 18<br />
15. The Accounts window appears again. Use<br />
the scroll bar to scroll down and display the<br />
contents under Contacts Directory.<br />
16. Find the mail.jaars.org directory you<br />
created in the list and highlight it by clicking on<br />
the item.<br />
17. Click the Properties button.<br />
18. Change the name from mail.jaars.org to SIL<br />
Corporate<br />
19. Check to be sure your Account name is<br />
accurate and your Password has been entered.<br />
20. Click the Advanced tab.<br />
Setting_up_<strong>Windows</strong>_<strong>Live</strong>_<strong>Mail</strong>_for_JAR<strong>Mail</strong>_C&D.docx<br />
Edited on 10/4/2012 4:13:00 PM
Setup <strong>Windows</strong> <strong>Live</strong> <strong>Mail</strong> in <strong>Vista</strong> or <strong>XP</strong> to Use a SIL Directory Service 19<br />
21. Place a check in the box for “This server<br />
requires a secure connection (SSL)”.<br />
22. The number in the Server Port<br />
Number/Contacts Directory box should change to<br />
636 automatically.<br />
23. Type o=wsfo (lowercase letters) in the Search<br />
base: box.<br />
24. Click Apply.<br />
25. Click OK.<br />
26. Click Close on the Accounts window.<br />
Setting_up_<strong>Windows</strong>_<strong>Live</strong>_<strong>Mail</strong>_for_JAR<strong>Mail</strong>_C&D.docx<br />
Edited on 10/4/2012 4:13:00 PM
Setup <strong>Windows</strong> <strong>Live</strong> <strong>Mail</strong> in <strong>Vista</strong> or <strong>XP</strong> to Use a SIL Directory Service 20<br />
Using the SIL Directory to Find People<br />
1. In the bottom left pane of the <strong>Windows</strong> <strong>Live</strong> <strong>Mail</strong><br />
main window, click Contacts.<br />
2. When the <strong>Windows</strong> <strong>Live</strong> Contacts window opens,<br />
click on Contact directories.<br />
3. Select SIL Directory<br />
from the drop down list.<br />
4. Type in the name or a<br />
few letters of the<br />
person’s name you are<br />
looking for.<br />
5. Click the Search button.<br />
Setting_up_<strong>Windows</strong>_<strong>Live</strong>_<strong>Mail</strong>_for_JAR<strong>Mail</strong>_C&D.docx<br />
Edited on 10/4/2012 4:13:00 PM
Setup <strong>Windows</strong> <strong>Live</strong> <strong>Mail</strong> in <strong>Vista</strong> or <strong>XP</strong> to Use a SIL Directory Service 21<br />
If matching names are found,<br />
the window will expand as<br />
shown here.<br />
You can then select by double<br />
clicking, or single clicking the<br />
name, and then click the<br />
Properties button.<br />
The Add a Contact window appears.<br />
You can use the Add contact button to save the name in your personal contacts.<br />
Setting_up_<strong>Windows</strong>_<strong>Live</strong>_<strong>Mail</strong>_for_JAR<strong>Mail</strong>_C&D.docx<br />
Edited on 10/4/2012 4:13:00 PM
Setup <strong>Windows</strong> <strong>Live</strong> <strong>Mail</strong> in <strong>Vista</strong> or <strong>XP</strong> to Use a SIL Directory Service 22<br />
Using the SIL Directory to Find People from a new email<br />
You can also use the contacts directory service to find<br />
an address when you start a new email. When the<br />
new email window appears click on the<br />
To: button, and then click Look in Contact directories.<br />
Setting_up_<strong>Windows</strong>_<strong>Live</strong>_<strong>Mail</strong>_for_JAR<strong>Mail</strong>_C&D.docx<br />
Edited on 10/4/2012 4:13:00 PM