iso-area square twist project.pdf - Origami Tessellations
iso-area square twist project.pdf - Origami Tessellations
iso-area square twist project.pdf - Origami Tessellations

Create successful ePaper yourself
Turn your PDF publications into a flip-book with our unique Google optimized e-Paper software.
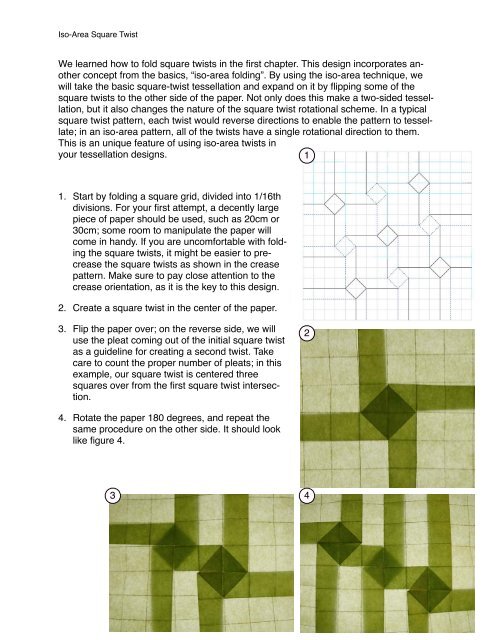
Iso-Area Square Twist<br />
We learned how to fold <strong>square</strong> <strong>twist</strong>s in the first chapter. This design incorporates another<br />
concept from the basics, “<strong>iso</strong>-<strong>area</strong> folding”. By using the <strong>iso</strong>-<strong>area</strong> technique, we<br />
will take the basic <strong>square</strong>-<strong>twist</strong> tessellation and expand on it by flipping some of the<br />
<strong>square</strong> <strong>twist</strong>s to the other side of the paper. Not only does this make a two-sided tessellation,<br />
but it also changes the nature of the <strong>square</strong> <strong>twist</strong> rotational scheme. In a typical<br />
<strong>square</strong> <strong>twist</strong> pattern, each <strong>twist</strong> would reverse directions to enable the pattern to tessellate;<br />
in an <strong>iso</strong>-<strong>area</strong> pattern, all of the <strong>twist</strong>s have a single rotational direction to them.<br />
This is an unique feature of using <strong>iso</strong>-<strong>area</strong> <strong>twist</strong>s in<br />
your tessellation designs.<br />
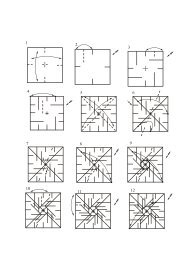
1<br />
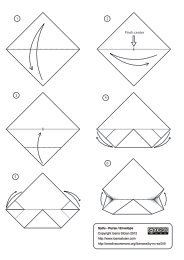
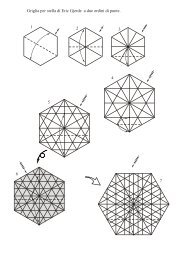
1. Start by folding a <strong>square</strong> grid, divided into 1/16th<br />
divisions. For your first attempt, a decently large<br />
piece of paper should be used, such as 20cm or<br />
30cm; some room to manipulate the paper will<br />
come in handy. If you are uncomfortable with folding<br />
the <strong>square</strong> <strong>twist</strong>s, it might be easier to precrease<br />
the <strong>square</strong> <strong>twist</strong>s as shown in the crease<br />
pattern. Make sure to pay close attention to the<br />
crease orientation, as it is the key to this design.<br />
2. Create a <strong>square</strong> <strong>twist</strong> in the center of the paper.<br />
3. Flip the paper over; on the reverse side, we will<br />
use the pleat coming out of the initial <strong>square</strong> <strong>twist</strong><br />
as a guideline for creating a second <strong>twist</strong>. Take<br />
care to count the proper number of pleats; in this<br />
example, our <strong>square</strong> <strong>twist</strong> is centered three<br />
<strong>square</strong>s over from the first <strong>square</strong> <strong>twist</strong> intersection.<br />
2<br />
4. Rotate the paper 180 degrees, and repeat the<br />
same procedure on the other side. It should look<br />
like figure 4.<br />
3 4
Iso-Area Square Twist<br />
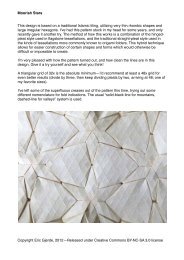
5<br />
5. Rotate the paper 90 degrees, so your three <strong>square</strong><br />
<strong>twist</strong>s are aligned vertically. To fold the <strong>square</strong> <strong>twist</strong> to<br />
your left, you will need to also fold the <strong>twist</strong>s above it<br />
and below it at the same time. This is easier than it<br />
sounds- shape out the <strong>twist</strong>s as shown, and pinch the<br />
pleats into place. After some encouraging and adjustment,<br />
the <strong>twist</strong>s should fall into alignment. It is important<br />
not to force this, but to let the existing crease<br />
lines do the work for you.<br />
6<br />
6. The left side completed; finish the right side using<br />
the same method from step 5.<br />
7. The finished <strong>iso</strong>-<strong>area</strong> <strong>square</strong> <strong>twist</strong>.<br />
7