
Create successful ePaper yourself
Turn your PDF publications into a flip-book with our unique Google optimized e-Paper software.
A Division Of Templeton, Kenly & Co., Inc.<br />
Revised 02-03<br />
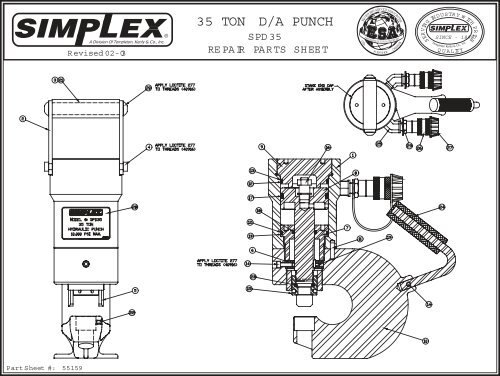
<strong>35</strong> <strong>TON</strong> D/A <strong>PUNCH</strong><br />
SPD<strong>35</strong><br />
RE PAIR PARTS SHEET<br />
USA<br />
EQUIPM ENT SERVI<br />
REBUILDERS OF TOOLS &<br />
M<br />
EM<br />
CE ASSOCIATION<br />
BER<br />
EQUIPM ENT<br />
CANADA<br />
SERVI NG<br />
INDUSTRY<br />
Templeton<br />
Kenly&<br />
W<br />
Co., Inc.<br />
Q U A LITY<br />
ITH<br />
PRIDE<br />
SINCE - 1899<br />
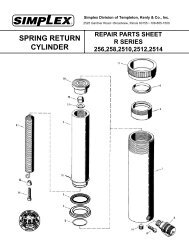
Part Sheet #: 55159
<strong>Simplex</strong> Division of Templeton, Kenly & Co., Inc.<br />
2525 Gardner Rd. Broadview, IL 60155 Phone: (708) 865-1500 Fax: (708) 865-0894 www.tksimplex.com<br />
ITEM<br />
NO.<br />
1<br />
2<br />
3<br />
4<br />
5<br />
6<br />
7<br />
8<br />
9<br />
10<br />
11<br />
12<br />
13<br />
14<br />
15<br />
16<br />
17<br />
18<br />
19<br />
20<br />
21<br />
22<br />
23<br />
24<br />
25<br />
26<br />
PARTS SHEET FOR<br />
SPD<strong>35</strong><br />
DESCRIPTION<br />
QTY.<br />
PART NO.<br />
SPD<strong>35</strong><br />
Punch Cylinder Housing<br />
Punsh Handle Link<br />
Punch Handle<br />
Handle Link Screw<br />
Punch Stripper D/A<br />
Bearing Ring<br />
Punch Ret. Nut D/A<br />
Punch Piston Rod D/A<br />
Punch Cylinder End Cap. D/A<br />
Punch Frame D/A<br />
Dowel Pin 1/4 X 1"<br />
1<br />
2<br />
1<br />
2<br />
1<br />
1<br />
1<br />
1<br />
1<br />
1<br />
1<br />
43042<br />
43043<br />
43044<br />
43045<br />
43046<br />
43047<br />
43048<br />
43049<br />
43050<br />
43051<br />
43052<br />
O-Ring<br />
2 *<br />
Back-Up<br />
2 5608232<br />
SHCS 1/4 - 20 X 3/4 LG<br />
Punch Holder<br />
Relief Valve Assembly<br />
Piston T-Seal<br />
Rod T-Seal<br />
Punch Key<br />
BHSCS 5/16 - 18 X 1/2"<br />
Handle Grip<br />
Set Screw 1/4 - 20 X 1/4<br />
2<br />
1<br />
1<br />
1<br />
1<br />
1<br />
2<br />
1<br />
1<br />
9<strong>35</strong>82<br />
41999<br />
84027<br />
*<br />
*<br />
43891<br />
43931<br />
43932<br />
93622<br />
O-Ring<br />
1 *<br />
Punch Handle Asm.<br />
1 42038<br />
45 Elbow 3/8 NPTF<br />
Ram Half Coupler<br />
1<br />
2<br />
18110<br />
18211<br />
*Packing Kit<br />
55158<br />
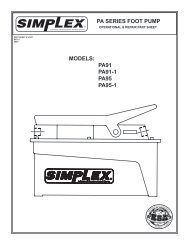
INSTRUCTIONS-HYDRAULIC <strong>PUNCH</strong>- <strong>35</strong> <strong>TON</strong> D/A<br />
Guidelines listed below will help ensure safe operation and aid in prolonging tool life.<br />
1. Do not exceed maximum punch limits shown on the tool decal. The tool is compatible<br />
with pumps designed for 4,000 psi capacity up to 10,000 psi.<br />
2. Keep the punch and the die sets as clean as possible. Lubrication is not required.<br />
3. Always match the punch and die correctly. Install the dies with the larger opening<br />
facing down to prevent clogging the die during operation.<br />
4. Protect the punch and die sets. Return them to the storage case after using.<br />
5. SIMPLEX hydraulic oil is recommended for the punch and pump system.<br />
6. Cracked, chipped or worn punches and dies should be replaced immediately. Refer to<br />
the repair parts sheet when ordering replacement parts.<br />
7. Punch and die replacement:<br />
a. Screw punch stripper item #5, counter-clockwise tightening the stripper upwards to<br />
be able to see the hole on the punch holder.<br />
b.Remove the punch from the upper jaw by using the pin tool is placed in hole in the<br />
punch holder Item #15, then used as a lever to loosen the nut. Remove the punch<br />
holder and extract the punch. Do not remove the o-ring from the punch holder.<br />
c. Loosen the set screw on the main frame lower jaw. Item # 14 (Tools supplied with<br />
each punch)<br />
d.Remove the die from the lower jaw. Install a new die with the larger opening facing<br />
down and the "flat" toward the set screw. Tighten the set screw.<br />
e. Insert a punch in the punch holder, long stem facing down. Install the punch holder<br />
and tighten, using the tool.<br />
f. Before using the punch, adjust the punch stripper to the hight of the material.<br />
g.Before using the punch, check to make sure the set screw and punch holder are<br />
tightened securely.<br />
CAUTION:<br />
* Always wear safety glasses and other prescribed safety items when<br />
operating the punch.<br />
*Do not operate the punch using worn or damaged punch and die set.<br />
* Avoid using hydraulic hose with sharp bend or kinks. Never apply<br />
pressure to sharply bent or kinked hose.<br />
W ARNING:<br />
* Keep hands and tools away from the punch throat area during operation.<br />
* Do not use the punch for brittle plastic, glass or wood materials; shattering<br />
materials could endanger the operator.<br />
* Do not punch holes smaller than the thickness of plate.