OPERATOR'S MANUAL
OPERATOR'S MANUAL
OPERATOR'S MANUAL

Create successful ePaper yourself
Turn your PDF publications into a flip-book with our unique Google optimized e-Paper software.
Adjusting Feed Rate<br />
Rate of feed is adjusted by turning the cutting<br />
pressure control knob on the control panel. Rate of<br />
feed is important to bandsaw performance;<br />
excessive pressure may break the blade or stall the<br />
saw. Insufficient pressure rapidly dulls the blade.<br />
Material chips or shavings are the best indicator of<br />
proper speed and pressure. The ideal chip is thin,<br />
tightly curled, and warm to the touch. Chips that<br />
range from golden brown to black indicate<br />
excessive force. Blue chips indicate extreme heat<br />
from too high a band speed which will shorten blade<br />
life. Thin or powdered chips indicate insufficient<br />
feed pressure.<br />
A detailed explanation on feed rate can be found in<br />
the enclosed "Guide to Band Sawing" published by<br />
American Saw and Manufacturing Company.<br />
Reprinted by permission.<br />
Changing Blades<br />
it. WARNING<br />
Disconnect machine from the power source<br />
before making any adjustments or repairs!<br />
Failure tQ comply l1'1ayresult in serious injury!<br />
1. Disconnect machine from power source.<br />
2. Raise saw arm approximately 6". Hold saw<br />
arm in place by closing cutting pressure<br />
control valve. Remove screw (#145),<br />
washer(#146), and brush (#147) from the wire<br />
brush post (#148) as shown on page 13.<br />
3. Open both wheel covers and clean chips out<br />
of both wheel housings. Loosen two lock<br />
knobs and remove upper blade guard.<br />
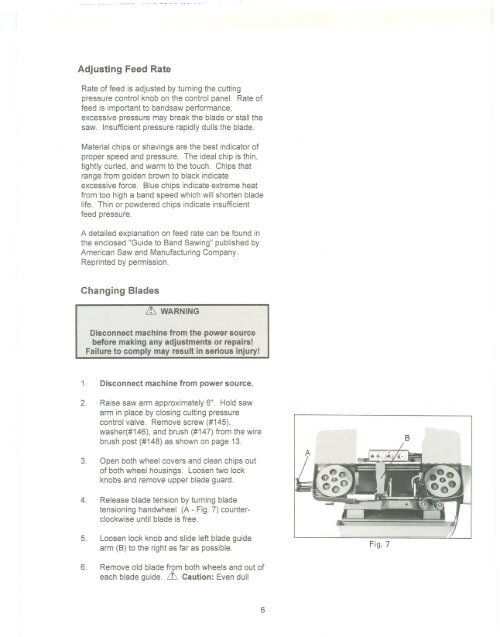
4. Release blade tension by turning blade<br />
tensioning handwheel (A - Fig.7) counterclockwise<br />
until blade is free.<br />
5. Loosen lock knob and slide left blade guide<br />
arm (B) to the right as far as possible.<br />
6. Remove old blade from both wheels and out of<br />
each blade guide. it Caution: Even dull<br />
6<br />
Fig. 7<br />
B