- Page 1: READ THIS MANUAL CAREFULLY!
- Page 10 and 11: You should review this information
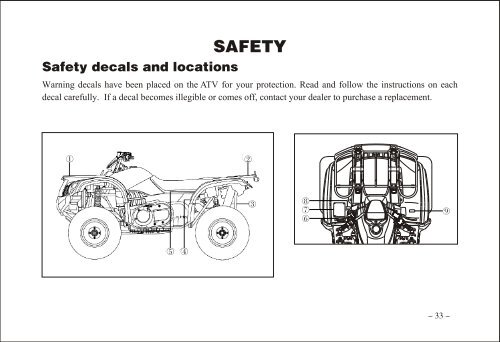
- Page 12 and 13: Read this manual and all labels car
- Page 14 and 15: the hill when possible. Always foll
- Page 16: We are concerned with the safety of
- Page 44 and 45: Off-road style gloves with knuckle
- Page 46 and 47: When the switch is at this position
- Page 48 and 49: Operating the ATV with a spongy bra
- Page 50 and 51: When parking, stop the engine and s
- Page 52 and 53: Gasoline is highly flammable and ex
- Page 54 and 55: To extend belt life, use low forwar
- Page 56 and 57: To change from 2WD to 4WD, stop the
- Page 58 and 59: Check the operation of the throttle
- Page 60 and 61: : This indicator comes on when the
- Page 62 and 63: when the temperature indicator is i
- Page 64: 6. Pull only light loads. 7. During
- Page 67 and 68:
Position : Cold engine start ambien
- Page 69 and 70:
3. Open the throttle lever graduall
- Page 71 and 72:
Carrying a load on only the front r
- Page 73 and 74:
1. Sit upright with both feet on th
- Page 75 and 76:
Whenever riding on slippery surface
- Page 77 and 78:
Braking and handling are greatly af
- Page 79 and 80:
Improper hill climbing procedures c
- Page 81 and 82:
Avoid operating the vehicle through
- Page 83 and 84:
Follow these precautions when opera
- Page 85 and 86:
To achieve maximum traction while r
- Page 87 and 88:
Auxiliary power outlets provide 12V
- Page 89 and 90:
Perform all services at whichever m
- Page 91 and 92:
Shift Linkage 28H 1 M 310 (500) Ins
- Page 93 and 94:
Clutches (drive and driven) 100H 12
- Page 95 and 96:
Always check and change the engine
- Page 97 and 98:
7. Apply a light coat of engine oil
- Page 99 and 100:
6. Install the filler bolt and tigh
- Page 101 and 102:
3. If the coolant is at or below th
- Page 103 and 104:
Coolant reservoir capacity (up to t
- Page 105 and 106:
The spark plug is an important engi
- Page 107 and 108:
1. Remove the seat. 2. Remove the a
- Page 109 and 110:
4. Insert the tailpipe into the muf
- Page 111 and 112:
A diagnostic tachometer must be use
- Page 113 and 114:
Inspect the brake pads for damage a
- Page 115 and 116:
Complete fluid replacement should b
- Page 117 and 118:
The top of the brake pedal should b
- Page 119 and 120:
1. Loosen the wheel nuts. 2. Elevat
- Page 121 and 122:
1. When the machine is not used for
- Page 123 and 124:
5. Insert a new headlight bulb into
- Page 125 and 126:
The spring preload can be adjusted
- Page 127 and 128:
Keeping your ATV clean will not onl
- Page 129 and 130:
Inspect and clean or replace the pr
- Page 131 and 132:
Remove the battery from the vehicle
- Page 133 and 134:
Driving the ATV onto a pickup or ta
- Page 135 and 136:
Contact your dealer for service if
- Page 137 and 138:
Weak spark from spark plugs Incorre
- Page 139 and 140:
Out of fuel Kinked or plugged fuel