
Create successful ePaper yourself
Turn your PDF publications into a flip-book with our unique Google optimized e-Paper software.
B<br />
A<br />
A<br />
A<br />
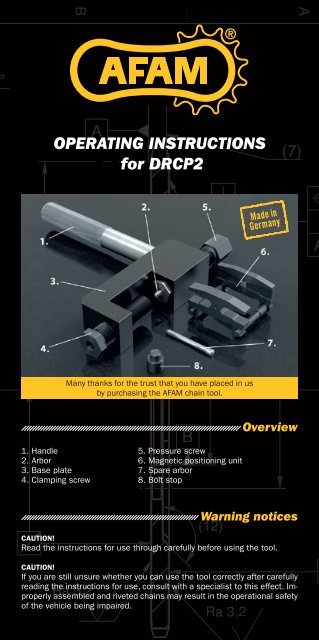
OPERATING INSTRUCTIONS<br />
for DRCP2<br />
(7)<br />
(11)<br />
B<br />
(3)<br />
Many thanks for the trust that you have placed in us<br />
by purchasing the <strong>AFAM</strong> chain tool.<br />
(4)<br />
1. Handle<br />
2. Arbor<br />
3. Base plate<br />
4. Clamping screw<br />
B<br />
5. Pressure screw<br />
6. Magnetic positioning unit<br />
7. Spare arbor<br />
8. Bolt stop<br />
Overview<br />
Warning notices<br />
(12)<br />
CAUTION!<br />
Read the instructions for use through carefully before using the tool.<br />
CAUTION!<br />
If you are still unsure whether you can use the tool correctly after carefully<br />
reading the instructions for use, consult with a specialist to this effect. Improperly<br />
Ra<br />
assembled<br />
3,2<br />
and riveted chains may result in the operational safety<br />
of the vehicle being impaired.<br />
Ra 3,2
B<br />
A<br />
ATTENTION !<br />
The motorcycle toppling over can cause injuries and result in damages to<br />
the motorcycle. You must thus ensure that the motorcycle is in a secure<br />
position and switch the engine and ignition off.<br />
Procedure for changing the chain<br />
Replacement of the chain without replacing the chain wheel and pinion at<br />
the same time generally results in greatly enhanced wear of the new chain.<br />
We therefore re<strong>com</strong>mend replacing the chain wheel and pinion together<br />
with the chain as a Abasic principle. When making a purchase, ensure that<br />
all of the <strong>com</strong>ponents are suitable for your vehicle. You need a chain, a<br />
chain pinion, a chain wheel and a chain lock with hollow bolts, and if necessary<br />
new locking devices for the fastening screws of the chain wheel and<br />
(7)<br />
pinion in the form of locking washers or similar fi ttings. Ask your specialist<br />
dealer!<br />
(11)<br />
1. DISASSEMBLING THE WORN CHAIN KIT<br />
>> To disassemble the worn chain, clamp it in the chain tool. Pull the arbor<br />
back until it can no longer be seen by turning the pressure screw.<br />
To disconnect the chain, clamp one of its bolts in the tool by turning<br />
the clamping screw. The bolt is centred in the recess into which the<br />
arbor also disappeared.<br />
A<br />
>> Press out the bolt by turning the pressure screw (Fig. 1). To do this,<br />
hold the tool fi rmly and turn the pressure screw clockwise using a<br />
wrench WAF19.<br />
B<br />
>> Disassemble the chain wheel and pinion.<br />
ARBOR<br />
(3)<br />
(4)<br />
Fig 1<br />
CLAMPING<br />
SCREW<br />
B<br />
PRESSURE<br />
SCREW<br />
(12)<br />
Ra 3,2<br />
Ra 3,2
A<br />
B<br />
2. FITTING THE NEW CHAIN<br />
>> Assemble the new chain wheel and pinion, not forgetting the locking<br />
devices of the fastening screws, and observe the manufacturer‘s instructions.<br />
>> Set the spring tensioning device to minimum tension.<br />
>> With most motorcycles, it is only possible to assemble a new chain<br />
without having to remove the link when the chain is open. When using<br />
an endless chain, this must fi rst of all be disconnected. To disconnect,<br />
two neighbouring A bolts that have a shared outer plate as shown in<br />
Fig.2 must be pressed out.<br />
Press out the bolts as described in Point 1 for the worn chain.<br />
(11)<br />
(7)<br />
CAUTION!<br />
Incorrect selection of the bolts leads to the loss of a chain link and renders<br />
the chain unusable!<br />
Fig 2<br />
CORRECT<br />
SHARED OUTER PLATE<br />
A<br />
B<br />
INCORRECT<br />
INCORRECT<br />
3. ASSEMBLING THE CHAIN LOCK<br />
(3)<br />
(4)<br />
>> Slide one gasket ring each on to both bolts of the chain lock and generously<br />
lubricate the bolts with grease.<br />
>> Fit the chain on the chain wheel and pinion and loosely connect the<br />
ends with the prepared part of the chain B lock. To do this, slide the<br />
bolts through the open sleeves on the two chain ends. In doing this, it<br />
can be helpful to fi t the open ends of the chain on the chain wheel for<br />
the purpose of fi xing the chain (Fig. 3).<br />
Fig 3<br />
(12)<br />
ASSEMBLE<br />
THE CHAIN LOCK<br />
HERE<br />
Ra 3,2<br />
Ra 3,2
B<br />
A<br />
A<br />
>> After the chain has been loosely connected, turn the rear wheel and thus<br />
bring the chain lock into the middle between the chain wheel and pinion at<br />
the bottom, where it is easily accessible for pressing out the outer plate.<br />
>> Slide a gasket ring onto both bolts of the chain lock. Stick the outer<br />
plates of the chain lock to the bolts using a little grease and surround<br />
the chain lock from below using the enclosed positioning unit, such that<br />
it is possible to see through the recesses of the positioning unit whether<br />
the holes in the outer plate are flush with the ends of the bolts. The<br />
positioning unit remains stuck to the chain lock due to the integrated<br />
magnets (Fig. 4).<br />
Fig 4<br />
A<br />
(7)<br />
(11)<br />
B<br />
>> Position the arbor of the chain tool by turning the pressure screw, such that<br />
the arbor sticks out by around 5mm, and tension the working space using<br />
the clamping screw such that the tool can be slid upwards from the bottom<br />
using the positioning unit. Slide the tool using the positioning unit and<br />
tighten the pressure screw by hand, such that the chain (including the positioning<br />
unit) is clamped in the tool. Ensure once again that the bolts are<br />
flush with the holes, then slide the outer plate on by turning the pressure<br />
screw. As regards its width, the positioning unit stretches not only beyond<br />
the chain lock, but also beyond the two neighbouring links. If, when sliding<br />
on the outer plate, the neighbouring plate and the positioning unit <strong>com</strong>e<br />
into contact with one another, the outer plate is in the correct position and<br />
the sliding-on process is <strong>com</strong>plete. This can be determined with the naked<br />
eye. Under no circumstances should you turn B the screw further! (Fig. 5)<br />
(3)<br />
(4)<br />
(12)<br />
Fig 5<br />
Ra 3,2<br />
Ra 3,2
B<br />
A<br />
NOTICE ABOUT THE FUNCTION OF CHAIN LINKS:<br />
Chain links should be able to move easily. There must therefore be play between<br />
the sleeves and the outer plate. If one slides the outer plate on too<br />
far, it touches the sleeves on the inside of the chain lock and there is no<br />
longer any play. In addition, the gasket rings be<strong>com</strong>e too greatly tempered<br />
(squashed). The function is impaired and a high level of wear or spontaneous<br />
failure can be the consequences.<br />
Should the outer plate be accidentally slid on too far and the chain lock<br />
link be diffi cult to access, press the bolts out and use a new chain lock.<br />
A<br />
4. RIVETING THE CHAIN LOCK BOLTS<br />
(7)<br />
>> After sliding on the outer plate of the chain lock, it is necessary to rivet<br />
both bolts of the chain lock. To do this, turn the pressure screw such<br />
that the arbor sticks out around fi ve millimetres from the guide. Stick<br />
the bolt stop on the clamping screw and clamp the bolts to be riveted<br />
by turning the clamping<br />
(11)<br />
screw. Ensure that the arbor is centred in the<br />
hollow bolts of the chain lock (Fig. 6).<br />
Fig 6<br />
A<br />
B<br />
(3)<br />
(4)<br />
B<br />
BOLT STOP<br />
(12)<br />
MAX. 5MM<br />
CLAMPING SCREW<br />
>> Rivet the bolts by turning the pressure screw. A torque of more than 35<br />
Nm when riveting can result in damages to the tool, especially the arbor.<br />
Ra<br />
We re<strong>com</strong>mend<br />
3,2<br />
using a torque key. Riveting with 20 Nm is entirely<br />
suffi cient for the conventional 5xx chains (in the case of older chain<br />
types, please observe the following torques: 4xx:10 Ra 3,2 Nm, 6xx: 25 Nm).
A<br />
B<br />
5. TENSIONING THE CHAIN<br />
>> Tension the chain according to the manufacturer‘s specifi cation.<br />
NOTICE ON TENSIONING THE CHAIN:<br />
The distance between the chain piston and chain wheel determines the<br />
chain tension. It is at its maximum when the link is slightly horizontal; it<br />
should therefore be measured in this position and in the middle of the<br />
chain wheel and pinion, where the sagging is at its greatest. It is normal<br />
that the chain does not lengthen evenly, so never measure the tension in<br />
one position only, but change the chain position by turning the rear wheel<br />
and measuring at several A points.<br />
The consequence of too little chain tension is increased wear due to smaller<br />
wrap angles and loss of <strong>com</strong>fort when changing loads. The chain (7) can<br />
knock, grind and bounce off the link or the engine housing.<br />
The consequence of too much chain tension is increased wear and the<br />
risk of the chain ripping, which can cause accidents and result in broken<br />
motor housings. Another possible consequence is increased wear of the<br />
transmission output<br />
(11)<br />
bearing and a modifi ed driving behaviour.<br />
If the chain is elongated greatly or in a very different way, it is worn and<br />
must be replaced. The chain always lengthens at a faster pace before ripping.<br />
We re<strong>com</strong>mend replacing the chain kit if you notice an increase in<br />
the wear speed.<br />
NOTICE ABOUT USING CHAIN SPRAY:<br />
Spray specifi cally in the area between the rollers and inner plates. The rollers<br />
run openly and must therefore be regularly supplied with lubricant from<br />
outside, such that they and their friction partners do not wear prematurely.<br />
Wipe away excess grease following ventilation, such that the motorcycle is<br />
not unnecessarily dirty. The gasket rings will also last longer when they are<br />
lubricated. The maintenance Bre<strong>com</strong>mendations of the chain manufacturer<br />
are decisive for chain maintenance.<br />
A<br />
(3)<br />
(4)<br />
B<br />
(12)<br />
We are more than happy to help should you have questions<br />
about this product.<br />
Ra 3,2<br />
www.afam.<strong>com</strong><br />
Ra 3,2