564 SS / 564 E Arched Face - Avalon
564 SS / 564 E Arched Face - Avalon
564 SS / 564 E Arched Face - Avalon

Create successful ePaper yourself
Turn your PDF publications into a flip-book with our unique Google optimized e-Paper software.
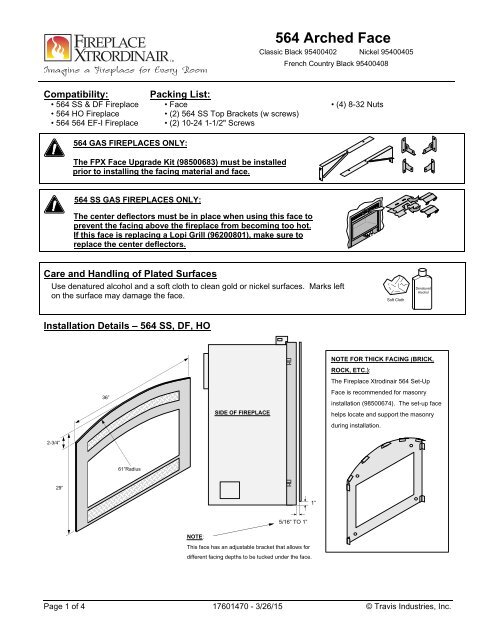
<strong>564</strong> <strong>Arched</strong> <strong>Face</strong><br />
Classic Black 95400402 Nickel 95400405<br />
French Country Black 95400408<br />
Compatibility:<br />
• <strong>564</strong> <strong>SS</strong> & DF Fireplace<br />
• <strong>564</strong> HO Fireplace<br />
• <strong>564</strong> <strong>564</strong> EF-I Fireplace<br />
Packing List:<br />
• <strong>Face</strong><br />
• (2) <strong>564</strong> <strong>SS</strong> Top Brackets (w screws)<br />
• (2) 10-24 1-1/2" Screws<br />
• (4) 8-32 Nuts<br />
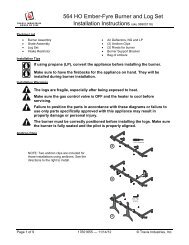
<strong>564</strong> GAS FIREPLACES ONLY:<br />
The FPX <strong>Face</strong> Upgrade Kit (98500683) must be installed<br />
prior to installing the facing material and face.<br />
<strong>564</strong> <strong>SS</strong> GAS FIREPLACES ONLY:<br />
The center deflectors must be in place when using this face to<br />
prevent the facing above the fireplace from becoming too hot.<br />
If this face is replacing a Lopi Grill (96200801), make sure to<br />
replace the center deflectors.<br />
Care and Handling of Plated Surfaces<br />
Use denatured alcohol and a soft cloth to clean gold or nickel surfaces. Marks left<br />
on the surface may damage the face.<br />
Soft Cloth<br />
Denatured<br />
Alcohol<br />
Installation Details – <strong>564</strong> <strong>SS</strong>, DF, HO<br />
2-3/4”<br />
29”<br />
<br />
36”<br />
<br />
<br />
<br />
<br />
<br />
61”Radius<br />
<br />
<br />
<br />
<br />
SIDE OF FIREPLACE<br />
5/16” TO 1”<br />
NOTE:<br />
This face has an adjustable bracket that allows for<br />
different facing depths to be tucked under the face.<br />
1”<br />
NOTE FOR THICK FACING (BRICK,<br />
ROCK, ETC.):<br />
The Fireplace Xtrodinair <strong>564</strong> Set-Up<br />
<strong>Face</strong> is recommended for masonry<br />
installation (98500674). The set-up face<br />
helps locate and support the masonry<br />
during installation.<br />
Page 1 of 4 17601470 - 3/26/15 © Travis Industries, Inc.
<strong>564</strong> <strong>Arched</strong> <strong>Face</strong><br />
Classic Black 95400402 Nickel 95400405<br />
French Country Black 95400408<br />
Installation<br />
1 Remove the glass barrier screen (see owner's manual for details). Secure the arch cover to the barrier<br />
following the directions below (arch cover is shipped with the fireplace). Replace the glass barrier.<br />
Lift the barrier up, pivot the top forward,<br />
and remove from the fireplace.<br />
Arch Cover<br />
Bend the tabs over to<br />
secure the arch cover to<br />
the barrier.<br />
Page 2 of 4 17601470 - 3/26/15 © Travis Industries, Inc.
<strong>564</strong> <strong>Arched</strong> <strong>Face</strong><br />
Classic Black 95400402 Nickel 95400405<br />
French Country Black 95400408<br />
Installation (continued)<br />
2 The facing and hearth (if applicable) must be installed prior to attaching the face. See the installation<br />
manual for complete details.<br />
Raised<br />
Fireplaces<br />
<br />
<br />
<br />
<br />
<br />
<br />
<br />
<br />
<br />
<br />
<br />
<br />
<br />
<br />
<br />
<br />
<br />
<br />
<br />
<br />
<br />
<br />
<br />
<br />
<br />
<br />
<br />
<br />
Floor-Level<br />
Fireplaces<br />
Note how the tile is 1”<br />
(maximum) above the<br />
base of the fireplace.<br />
<br />
<br />
<br />
<br />
<br />
<br />
<br />
<br />
<br />
<br />
<br />
<br />
<br />
<br />
<br />
<br />
<br />
<br />
<br />
<br />
<br />
<br />
<br />
<br />
<br />
<br />
Maximum 1`” Hearth<br />
Page 3 of 4 17601470 - 3/26/15 © Travis Industries, Inc.
<strong>564</strong> <strong>Arched</strong> <strong>Face</strong><br />
Classic Black 95400402 Nickel 95400405<br />
French Country Black 95400408<br />
Installation (continued)<br />
3 Install the face following the directions below.<br />
<br />
<br />
<br />
<br />
<br />
<br />
<br />
<br />
<br />
<br />
<br />
<br />
<br />
<br />
<br />
<br />
<br />
<br />
<br />
<br />
<br />
<br />
<br />
<br />
<br />
<br />
<br />
a<br />
Attach the upper brackets<br />
to the face with the<br />
included nuts.<br />
c<br />
The face is secured to the fireplace<br />
with four screws. Two of the screws<br />
are fastened to the upper brackets<br />
with press nuts. The lower screws<br />
are included with the face.<br />
b<br />
Slide the face into place. The<br />
tabs on the upper brackets insert<br />
into the slots on the fireplace<br />
brackets, holding the face in place<br />
while the screws are tightened.<br />
Plated Surfaces<br />
Use denatured alcohol and a soft cloth to clean plated surfaces. Marks<br />
left on the surface may damage the face.<br />
Soft Cloth<br />
Denatured<br />
Alcohol<br />
Page 4 of 4 17601470 - 3/26/15 © Travis Industries, Inc.