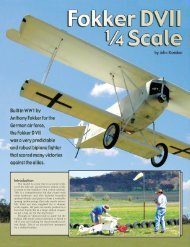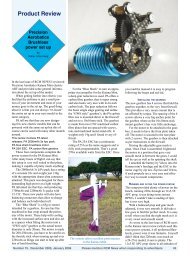
Introduction - Precision Aerobatics
Introduction - Precision Aerobatics
Introduction - Precision Aerobatics

Create successful ePaper yourself
Turn your PDF publications into a flip-book with our unique Google optimized e-Paper software.
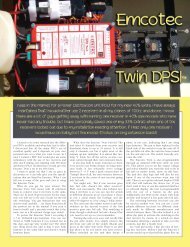
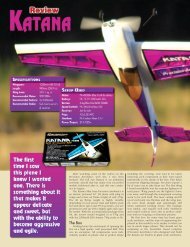
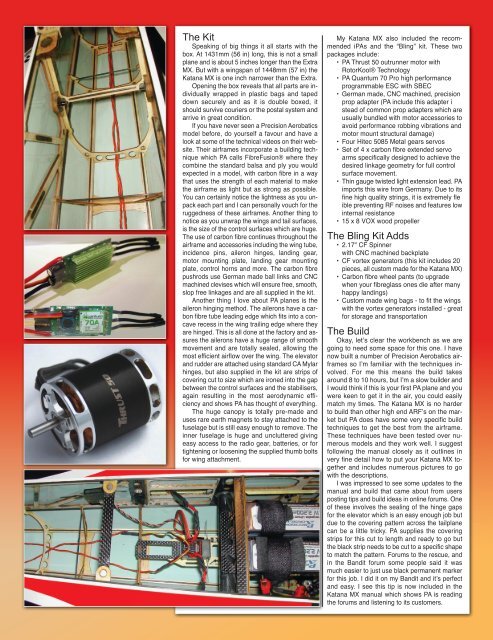
The Kit<br />
Speaking of big things it all starts with the<br />
box. At 1431mm (56 in) long, this is not a small<br />
plane and is about 5 inches longer than the Extra<br />
MX. But with a wingspan of 1448mm (57 in) the<br />
Katana MX is one inch narrower than the Extra.<br />
Opening the box reveals that all parts are individually<br />
wrapped in plastic bags and taped<br />
down securely and as it is double boxed, it<br />
should survive couriers or the postal system and<br />
arrive in great condition.<br />
If you have never seen a <strong>Precision</strong> <strong>Aerobatics</strong><br />
model before, do yourself a favour and have a<br />
look at some of the technical videos on their website.<br />
Their airframes incorporate a building technique<br />
which PA calls FibreFusion® where they<br />
combine the standard balsa and ply you would<br />
expected in a model, with carbon fibre in a way<br />
that uses the strength of each material to make<br />
the airframe as light but as strong as possible.<br />
You can certainly notice the lightness as you unpack<br />
each part and I can personally vouch for the<br />
ruggedness of these airframes. Another thing to<br />
notice as you unwrap the wings and tail surfaces,<br />
is the size of the control surfaces which are huge.<br />
The use of carbon fibre continues throughout the<br />
airframe and accessories including the wing tube,<br />
incidence pins, aileron hinges, landing gear,<br />
motor mounting plate, landing gear mounting<br />
plate, control horns and more. The carbon fibre<br />
pushrods use German made ball links and CNC<br />
machined clevises which will ensure free, smooth,<br />
slop free linkages and are all supplied in the kit.<br />
Another thing I love about PA planes is the<br />
aileron hinging method. The ailerons have a carbon<br />
fibre tube leading edge which fits into a concave<br />
recess in the wing trailing edge where they<br />
are hinged. This is all done at the factory and assures<br />
the ailerons have a huge range of smooth<br />
movement and are totally sealed, allowing the<br />
most efficient airflow over the wing. The elevator<br />
and rudder are attached using standard CA Mylar<br />
hinges, but also supplied in the kit are strips of<br />
covering cut to size which are ironed into the gap<br />
between the control surfaces and the stabilisers,<br />
again resulting in the most aerodynamic efficiency<br />
and shows PA has thought of everything.<br />
The huge canopy is totally pre-made and<br />
uses rare earth magnets to stay attached to the<br />
fuselage but is still easy enough to remove. The<br />
inner fuselage is huge and uncluttered giving<br />
easy access to the radio gear, batteries, or for<br />
tightening or loosening the supplied thumb bolts<br />
for wing attachment.<br />
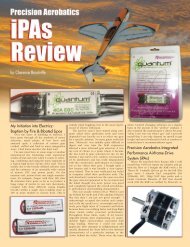
My Katana MX also included the recommended<br />
iPAs and the “Bling” kit. These two<br />
packages include:<br />
• PA Thrust 50 outrunner motor with<br />
RotorKool® Technology<br />
• PA Quantum 70 Pro high performance<br />
programmable ESC with SBEC<br />
• German made, CNC machined, precision<br />
prop adapter (PA include this adapter i<br />
stead of common prop adapters which are<br />
usually bundled with motor accessories to<br />
avoid performance robbing vibrations and<br />
motor mount structural damage)<br />
• Four Hitec 5085 Metal gears servos<br />
• Set of 4 x carbon fibre extended servo<br />
arms specifically designed to achieve the<br />
desired linkage geometry for full control<br />
surface movement.<br />
• Thin gauge twisted light extension lead. PA<br />
imports this wire from Germany. Due to its<br />
fine high quality strings, it is extremely fle<br />
ible preventing RF noises and features low<br />
internal resistance<br />
• 15 x 8 VOX wood propeller<br />
The Bling Kit Adds<br />
• 2.17" CF Spinner<br />
with CNC machined backplate<br />
• CF vortex generators (this kit includes 20<br />
pieces, all custom made for the Katana MX)<br />
• Carbon fibre wheel pants (to upgrade<br />
when your fibreglass ones die after many<br />
happy landings)<br />
• Custom made wing bags - to fit the wings<br />
with the vortex generators installed - great<br />
for storage and transportation<br />
The Build<br />
Okay, let’s clear the workbench as we are<br />
going to need some space for this one. I have<br />
now built a number of <strong>Precision</strong> <strong>Aerobatics</strong> airframes<br />
so I’m familiar with the techniques involved.<br />
For me this means the build takes<br />
around 8 to 10 hours, but I’m a slow builder and<br />
I would think if this is your first PA plane and you<br />
were keen to get it in the air, you could easily<br />
match my times. The Katana MX is no harder<br />
to build than other high end ARF’s on the market<br />
but PA does have some very specific build<br />
techniques to get the best from the airframe.<br />
These techniques have been tested over numerous<br />
models and they work well. I suggest<br />
following the manual closely as it outlines in<br />
very fine detail how to put your Katana MX together<br />
and includes numerous pictures to go<br />
with the descriptions.<br />
I was impressed to see some updates to the<br />
manual and build that came about from users<br />
posting tips and build ideas in online forums. One<br />
of these involves the sealing of the hinge gaps<br />
for the elevator which is an easy enough job but<br />
due to the covering pattern across the tailplane<br />
can be a little tricky. PA supplies the covering<br />
strips for this cut to length and ready to go but<br />
the black strip needs to be cut to a specific shape<br />
to match the pattern. Forums to the rescue, and<br />
in the Bandit forum some people said it was<br />
much easier to just use black permanent marker<br />
for this job. I did it on my Bandit and it’s perfect<br />
and easy. I see this tip is now included in the<br />
Katana MX manual which shows PA is reading<br />
the forums and listening to its customers.