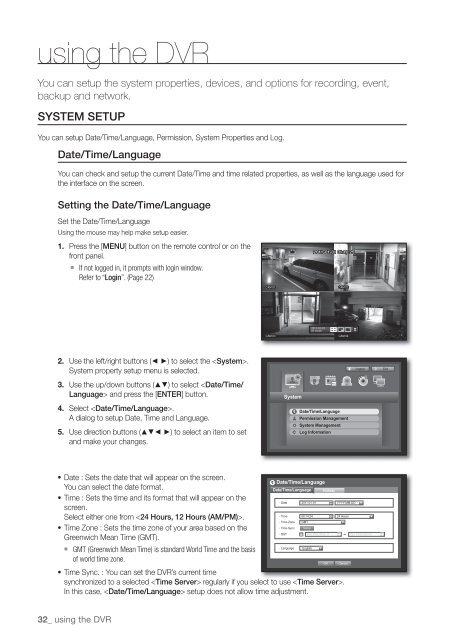
using the <strong>DVR</strong>You can setup the system properties, devices, and options for recording, event,backup and network.SYSTEM SETUPYou can setup Date/Time/Language, Permission, System Properties and Log.Date/Time/LanguageYou can check and setup the current Date/Time and time related properties, as well as the language used forthe interface on the screen.Setting the Date/Time/LanguageSet the Date/Time/LanguageUsing the mouse may help make setup easier.1. Press the [MENU] button on the remote control or on thefront panel. If not logged in, it prompts with login window.Refer to “Login”. (Page 22)2011-01-01 01:10:252011-01-0101:10:252. Use the left/right buttons (◄ ►) to select the .System property setup menu is selected.3. Use the up/down buttons () to select and press the [ENTER] button.4. Select .A dialog to setup Date, Time and Language.5. Use direction buttons (◄ ►) to select an item to setand make your changes.SystemDate/Time/LanguagePermission ManagementSystem ManagementLog InformationLogoutExit• Date : Sets the date that will appear on the screen.Date/Time/LanguageYou can select the date format.Date/Time/Language Holiday• Time : Sets the time and its format that will appear on thescreen.Select either one from .• Time Zone GMT• Time Zone : Sets the time zone of your area based on the• Time Sync. SetupGreenwich Mean Time (GMT).• Language English GMT (Greenwich Mean Time) is standard World Time and the basisof world time zone.OK• Time Sync. : You can set the <strong>DVR</strong>’s current timesynchronized to a selected regularly if you select to use .In this case, setup does not allow time adjustment.• Date 2011-01-01 YYYY-MM-DD• Time 08:14:24 24 Hours• DST Dec First (Sun) 0 Dec First (Sun) 0Cancel32_ using the <strong>DVR</strong>
- Time Server : Enter an IP or URL address of the timeDate/Time/Languageserver.Date/Time/Language Holiday- Last Sync Time : Displays the most recent• Date Time Synchronization 2011 -01-01 Setup YYYY-MM-DDsynchronization time from the selected time server.• SynchronizationUse- Activate as Server : Set to to allow the <strong>DVR</strong> to act• Time 08:14:24 24 Hours• Time Server 203.248.240.103• Time Zone GMT+08:00as a Time Server for other <strong>DVR</strong>s.• Last Sync TimeFail• Time Sync. Setup Not Used• Activate as Server Use• DST Dec First (Sun) 0H Dec First (Sun) 0H• DST : Set up Daylight Saving Time with its period to makeOK Cancelthe time earlier than the GMT of its time zone by 1 hour• Language Englishduring the set period.OK Cancel• Language : Select your language. Sets the language for theinterface.English, French, German, Spanish, Italian, Chinese, Russian, Korean, Polish, Japanese, Dutch, Portuguese,Turkish, Czech, Danish, Swedish, Thai, Romanian, Serbian, Croatian, Hungarian and Greek are available.6. When the Date/Time/Language setup is done, press .M You can also use numeric buttons on the remote control or front panel to enter values for Date, Time and othernumeric fields. USING THE <strong>DVR</strong>Setting HolidayYou can set specific dates to Holidays according to your preferences.Holidays are applied to and too.Using the mouse may help make setup easier.1. Use the up/down buttons () in window to select , andpress the [ENTER] button.2. Select .Date/Time/LanguageA calendar for Holiday setup appears.Date/Time/Language Holiday3. Use the left/right < > buttons to select year or month,2011 Janand press the [ENTER] button.Sun Mon Tue Wed Thu Fri Sat12 3 4 5 6 7 89 10 11 12 13 14 1516 17 18 19 20 21 2223 24 25 26 27 28 2930 31OKCancel4. Use direction buttons (◄ ►) to select a desired date,and press the [ENTER] button.You will see the “Setting Holiday” screen. Ex : Select January 10th and check on only to makeevery January 10th a holiday. Check both on and to make every January 10th and 2nd Monday ofJanuary holidays.5. When the Holiday setup is done, press .Date/Time/LanguageDate/Time/Language Holiday2011 JanSetting HolidaySun Mon Tue Wed Thu Fri Sat11 / 102 3 4 5 6 7 8Jan 2nd Mon11 12 9 10 13 14 1516 17 18 OK 19 Cancel 20 21 2223 24 25 26 27 28 2930 31OKCancelUsing the CalendarUsing the mouse may help make setup easier.Select year and month.Select the left/right < > key on the left/right side of year/month and press [ENTER] button toadjust by 1 year/month. Use direction buttons to select a date and press [ENTER] button. A date with recorded data to be searched will appear in yellow in the System Log, Event Log, Time Search and EventSearch.English _33