New handles - Steelcase Village
New handles - Steelcase Village
New handles - Steelcase Village

Create successful ePaper yourself
Turn your PDF publications into a flip-book with our unique Google optimized e-Paper software.
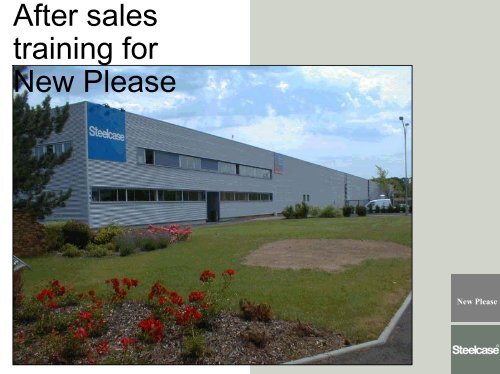
Trainingpresentation
Everything is newon Please 2 , alsothe after sales
Packaging Readyto assemble
Packaging Eco SmartBox size : 660 X 660 x 700<strong>New</strong> packaging :Eco Smart
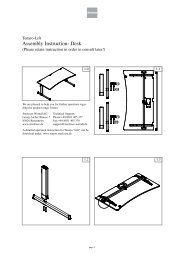
Backrest assemblyinstruction
All the project teamslistened to you
Two majorchallenges> Keeping the same adjustments> Easier for after sales
Design
InnovationsIn order to avoid too many options anddifferent parts Please proposes series> Seat depth adjustment> Back limiter> One type of mechanism> 65mm castors
Adjustmentsmore simple
Adjustment> <strong>New</strong> <strong>handles</strong>– Seat height adjustment– Tension adjustment
Adjustment> <strong>New</strong> <strong>handles</strong>– Seat height adjustment– Tension adjustment– Lumbar tension
Adjustment> <strong>New</strong> <strong>handles</strong>– Seat height adjustment– Tension adjustment– Lumbar tension– Tilt limiter
A ecologicproduct> Eco-design since beginning– 30% less components– 4 Kg lighter
Easily modifiable> Fast and easy addition of options
Easily modifiableFast and easy addition of optionsArms
Easily modifiableFast and easy addition of optionsArmsHeadrest
Easily modifiable> The back cushions can bedismounted easily to clean orchange the colour
Adjustments / OptionsTask chair> LTC2 back> Back tension > Lumbar tension> Seat height > seat depth> Back hight> Back locking > back limiter (VBS)> Castors diam. 65mm> Shock absorberOptions> 2D Headrest ( hight & angle )> Adjustable arms:* Hight adjustable or* 3D ( Hight-angle and depth )> Seat upholstery sewed version
Visitor chairs4 feet> Seat and back upholsteredSledbase‣Seat and back upholstered‣Stacking Version or not
ToolsScrewdriverPhilippsTorx N°30Maillet
Exchangethoracic cushionUnclip the cushion on thelow part in the center (1)Then pull upwards todisunite the cushion fromthe shell. The cushion isheld by hooks to the shell(2) To fix the new onestart on the top of theshell. Lock with thecentral clip in the middle.
Exchange lumbarcushionSame as thoracic cushionUnclip the cushion on thelow part in the centerThen pull upwards todisunite the cushion fromthe shell. The cushion isheld by hooks to the shellLock with the central clipin the middle.
Exchange seatpad(1)With a screwdriverunlock the seat depthsystem while pushing onthe metal bar (fig.1)Hang the end of the metalbar on the mecanism side(fig.2).
Exchange seatpad (2)With a screwdriverunlock the seat depthsystem while pushing onthe metal bar on the otherside of the mecanism ,then pull the seat padforwards , the seat padcomes out completely
Exchange seatpad (3)To fix the new pad: presson the lever and engagethe seat on the guide infront and back of themechanism( fig.1 - fig.2 )
Headrestassembly(1)Headrest kit (fig.1) CodeSAV 568 420/440/460Remove thoracic cushion ,drill 3 holes , diam. 4,5mmin the shell ( positions aremarked ) (fig.2).
Headrestassembly (2)Put the headrest guide inposition , start fixing withthe screw on the bottomof the part (fig.1)Push the headrest insidethe guide , headrest willlock (fig.2). Reassemblethe thoracic cushion.
Arms addition(1)With a flat screwdriverremove the adjustmenthandle (fig.1)Unscrew the obturatorwith a Torx T25 (fig.2).
Arms addition(2)Place the arm on themetal bar and screw it(fig.1).Fix the new handle andthe red plastic washer onthe arm (fig.2).
Arms addition(3)Handle and obturator forchairs without arms(fig.1).Handle and red plasticwasher for chairs witharms (fig.2) this parts arealways delivered with anew pair of arms.
Arm padexchangeUnscrew the 4 screws andplace the new arm pad ,fix it with the samescrews.CAUTION: there are leftand right pads.SAV code numberalways contains a pair ofarm pads.
Height adjustmenthandle exchange(1)Remove the tensionhandle by knock on a flatmetal bar with a plasticmallet (fig.1 et 2 ) We’llstart to develope a specialtool to do this operationmore easily
Heightadjustmenthandle exchange(2)Remove the handle fromhis axis (fig.1).Place the new handle andfix the tension lever onthe axis (fig.2)
Tilt limiter handleexchangeWith a flat screwdriverremove the adjustmenthandle
Heightadjustment cableexchange (1)After removing the seat pad ,unhook the cable (fig.1)With a small screwdriverremove the clip (fig.2)
Heightadjustment cableexchange (2)Unhook the cable from theplastic handle and from themechanism (fig.1)Fixthenew cable(likePlease1)fix the clip ,hook the cable onthe mechanism and finally on thelever (fig.2) Détail (fig.3)
Back plastic shellexchange (1)Remove the two cushions(fig.1).Unscrew all the 3 points ,start with the one on theadjustment arms (fig.2)
Back plastic shellexchange (2)Place the new shell , startscrewing in the middle ofthe shell (fig.1).Fix the screws on bothsides , take care about theposition of the screws(fig.2 and 3 )
Changing aGasliftRemove the five starbase,then install the tool(fig.1). Press the gasliftwith the 2 screws (fig.2).Knock against the toolwith a hammer (fig.3).Thegaslift is now loose fromthe mechanism. Fix thenew gaslift and check thechair.
5 star baseexchangePlace a piece ofmetal,wood or plastic underthe central column ( fig.1)Take a plastic mallet andknock on one of the arms(fig.2).Lift up the chair , thebase in loose . (fig.3)
CastorsPull the castor out (fig.1)Push on the castor to fix it(fig.2)
Maintenanceoperation on VBS( Variable BackStop )Vision of the VBS andthe adjustment screw, incase of maintenanceoperation.
Mechanism exploding view
Chair exploding view
Modificationpossibility> Add arms> Add a headrest> Modify a chair with arms vs a chairwithout arms> Change easily cushion colors
Modification notpossible‣Modify height adjustable arms vs 3darms‣Other shell colors