Line 6 FBV MkII Advanced User Guide, English (Rev. 2)
Line 6 FBV MkII Advanced User Guide, English (Rev. 2)
Line 6 FBV MkII Advanced User Guide, English (Rev. 2)

Create successful ePaper yourself
Turn your PDF publications into a flip-book with our unique Google optimized e-Paper software.
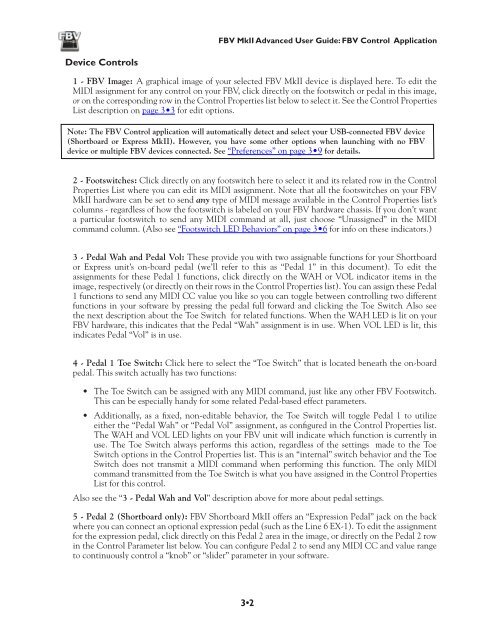
<strong>FBV</strong> <strong>MkII</strong> <strong>Advanced</strong> <strong>User</strong> <strong>Guide</strong>: <strong>FBV</strong> Control ApplicationDevice Controls1 - <strong>FBV</strong> Image: A graphical image of your selected <strong>FBV</strong> <strong>MkII</strong> device is displayed here. To edit theMIDI assignment for any control on your <strong>FBV</strong>, click directly on the footswitch or pedal in this image,or on the corresponding row in the Control Properties list below to select it. See the Control PropertiesList description on page 3•3 for edit options.Note: The <strong>FBV</strong> Control application will automatically detect and select your USB-connected <strong>FBV</strong> device(Shortboard or Express <strong>MkII</strong>). However, you have some other options when launching with no <strong>FBV</strong>device or multiple <strong>FBV</strong> devices connected. See “Preferences” on page 3•9 for details.2 - Footswitches: Click directly on any footswitch here to select it and its related row in the ControlProperties List where you can edit its MIDI assignment. Note that all the footswitches on your <strong>FBV</strong><strong>MkII</strong> hardware can be set to send any type of MIDI message available in the Control Properties list’scolumns - regardless of how the footswitch is labeled on your <strong>FBV</strong> hardware chassis. If you don’t wanta particular footswitch to send any MIDI command at all, just choose “Unassigned” in the MIDIcommand column. (Also see “Footswitch LED Behaviors” on page 3•6 for info on these indicators.)3 - Pedal Wah and Pedal Vol: These provide you with two assignable functions for your Shortboardor Express unit’s on-board pedal (we’ll refer to this as “Pedal 1” in this document). To edit theassignments for these Pedal 1 functions, click directly on the WAH or VOL indicator items in theimage, respectively (or directly on their rows in the Control Properties list). You can assign these Pedal1 functions to send any MIDI CC value you like so you can toggle between controlling two differentfunctions in your software by pressing the pedal full forward and clicking the Toe Switch Also seethe next description about the Toe Switch for related functions. When the WAH LED is lit on your<strong>FBV</strong> hardware, this indicates that the Pedal “Wah” assignment is in use. When VOL LED is lit, thisindicates Pedal “Vol” is in use.4 - Pedal 1 Toe Switch: Click here to select the “Toe Switch” that is located beneath the on-boardpedal. This switch actually has two functions:• The Toe Switch can be assigned with any MIDI command, just like any other <strong>FBV</strong> Footswitch.This can be especially handy for some related Pedal-based effect parameters.• Additionally, as a fixed, non-editable behavior, the Toe Switch will toggle Pedal 1 to utilizeeither the “Pedal Wah” or “Pedal Vol” assignment, as configured in the Control Properties list.The WAH and VOL LED lights on your <strong>FBV</strong> unit will indicate which function is currently inuse. The Toe Switch always performs this action, regardless of the settings made to the ToeSwitch options in the Control Properties list. This is an “internal” switch behavior and the ToeSwitch does not transmit a MIDI command when performing this function. The only MIDIcommand transmitted from the Toe Switch is what you have assigned in the Control PropertiesList for this control.Also see the “3 - Pedal Wah and Vol” description above for more about pedal settings.5 - Pedal 2 (Shortboard only): <strong>FBV</strong> Shortboard <strong>MkII</strong> offers an “Expression Pedal” jack on the backwhere you can connect an optional expression pedal (such as the <strong>Line</strong> 6 EX-1). To edit the assignmentfor the expression pedal, click directly on this Pedal 2 area in the image, or directly on the Pedal 2 rowin the Control Parameter list below. You can configure Pedal 2 to send any MIDI CC and value rangeto continuously control a “knob” or “slider” parameter in your software.3•2