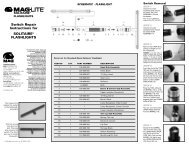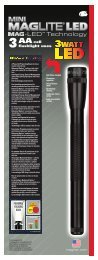
Schematic - Maglite
Schematic - Maglite
Schematic - Maglite
- No tags were found...

You also want an ePaper? Increase the reach of your titles
YUMPU automatically turns print PDFs into web optimized ePapers that Google loves.
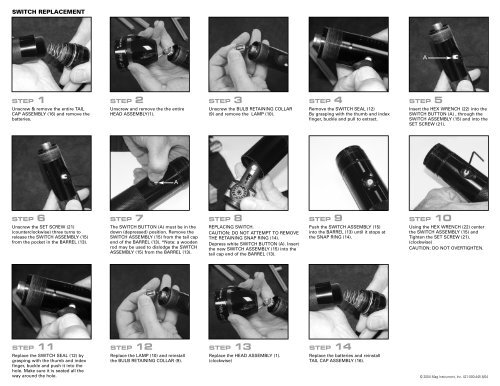
SWITCH REPLACEMENTASTEP 1Unscrew & remove the entire TAILCAP ASSEMBLY (16) and remove thebatteries.STEP 2Unscrew and remove the the entireHEAD ASSEMBLY(1).STEP 3Unscrew the BULB RETAINING COLLAR(9) and remove the LAMP (10).STEP 4Remove the SWITCH SEAL (12)By grasping with the thumb and indexfinger, buckle and pull to extract.STEP 5Insert the HEX WRENCH (22) into theSWITCH BUTTON (A) , through theSWITCH ASSEMBLY (15) and into theSET SCREW (21).ASTEP 6Unscrew the SET SCREW (21)(counterclockwise) three turns torelease the SWITCH ASSEMBLY (15)from the pocket in the BARREL (13).STEP 7The SWITCH BUTTON (A) must be in thedown (depressed) position. Remove theSWITCH ASSEMBLY (15) from the tail capend of the BARREL (13). *Note: a woodenrod may be used to dislodge the SWITCHASSEMBLY (15) from the BARREL (13).STEP 8REPLACING SWITCH.CAUTION: DO NOT ATTEMPT TO REMOVETHE RETAINING SNAP RING (14).Depress white SWITCH BUTTON (A). Insertthe new SWITCH ASSEMBLY (15) into thetail cap end of the BARREL (13).STEP 9Push the SWITCH ASSEMBLY (15)into the BARREL (13) until it stops atthe SNAP RING (14).STEP 10Using the HEX WRENCH (22) centerthe SWITCH ASSEMBLY (15) andTighten the SET SCREW (21).(clockwise)CAUTION: DO NOT OVERTIGHTEN.STEP 11Replace the SWITCH SEAL (12) bygrasping with the thumb and indexfinger, buckle and push it into thehole. Make sure it is seated all theway around the hole.STEP 12Replace the LAMP (10) and reinstallthe BULB RETAINING COLLAR (9).STEP 13Replace the HEAD ASSEMBLY (1).(clockwise)STEP 14Replace the batteries and reinstallTAIL CAP ASSEMBLY (16).© 2004 Mag Instrument, Inc. 421-000-445 8/04