Instruction Manual - Kellyco Metal Detectors
Instruction Manual - Kellyco Metal Detectors
Instruction Manual - Kellyco Metal Detectors

Create successful ePaper yourself
Turn your PDF publications into a flip-book with our unique Google optimized e-Paper software.
Camouflage11”DDCoilBracketBotomRodTouchScreenDisplayBateryCompartmentLockBracketArmCufw/StrapTopRodWireHandleUnitPistolGripw/TriggerPinpointingStand
Table of ContentsCONGRATULATIONS! ................................................................................................................................. 1Getting Started............................................................................................................................................ 2Assembly ..................................................................................................................................................... 2Understanding the LCD Display .................................................................................................................. 5True Touch Screen Operation ..................................................................................................................... 8Using the GPS Function ............................................................................................................................ 10Operating Modes……….…………………………………………………………………………………………..…………………………..11Getting Started the Right Way ................................................................................................................. 13Let’s Find Something ................................................................................................................................ 14Identifying Targets Before You Dig with Tone ......................................................................................... 15Target Recovery........................................................................................................................................ 16Detecting Tips........................................................................................................................................... 16Care & Maintenance ................................................................................................................................ 17Troubleshooting ....................................................................................................................................... 18Treasure Commander TC3X Specifications ...............................................................................................18Treasure Hunters Code of Ethics.............................................................................................................. 19Warranty & Service Information...............................................................................................................20<strong>Metal</strong> Detector Terminology ....................................................................................................................21Please Read this <strong>Instruction</strong> <strong>Manual</strong>Successful metal detector users will be the first to tell you to Read and then Re-Read your <strong>Instruction</strong> <strong>Manual</strong> ifyou want to get the most fun and “Treasure Finds” using your new metal detector. If you are new to metaldetecting or even an experienced detectorist, it will help you more easily understand all the functions of thisdetector and how they work with you to find treasure of all types including coins, rings, jewelry, relics, artifacts,gold and more!
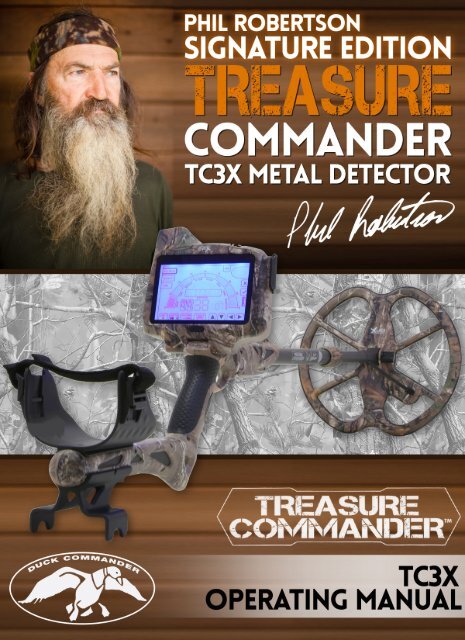
CONGRATULATIONS ON YOUR PURCHASEof your new Treasure Commander TM TC3X metal detector is part of a new series of metaldetectors designed to help you find treasure no matter where you live and what yourexperience level is when it comes to treasure hunting.Designed by an experienced engineering team using input from veteran treasure huntersincluding Phil’s brother “Uncle” Si Robertson of the Duck Commanders TV show. TreasureCommander TM metal detectors will let you start finding lost valuables as soon as youunpack the box. The TC3X is the first metal detector to feature a True Touch Screen LCD.The “Flagship” of the Treasure Commander Digital <strong>Metal</strong> Detector Series is the PhilRobertson Signature Edition endorsed by Phil Robertson himself. Phil Robertson started asmall company in Louisiana called “Duck Commanders” making duck calls in a small shed.Through hard work and producing high quality products that really worked as advertised,his company “Duck Commanders” is now the largest manufacturers of duck calls in theworld. Phil Robertson’s signature says it all. The NEW Treasure Commander TC3X is a highquality metal detector that will work as advertised. You can find treasures whileeliminating most trash and junk!We welcome you to America’s fastest growing sport - hunting for treasures with a metaldetector. <strong>Metal</strong> Detecting is an Adventure that you, your family and friends will enjoy foryears to come. It’s fun and exciting to find old valuable silver and gold coins, gold anddiamond rings and gold jewelry. Recover relics from the Civil War and other historicbattles. Discover lost and hidden buried treasures. All these treasures and more arewaiting to be found with the latest and most advanced metal detectors now available.Your Treasure Commander TM TC3X is capable of meeting your needs in a wide range oftreasure hunting situations. As with any other metal detector, familiarity with thisinstrument is probably the limiting factor in determining how successful you can be. Irecommend that you read this manual and fully understand how to operate this detectorbefore attempting to use it in the field. As you become more familiar with your detectorthrough practice, your rate of success will increase dramatically.Your new Treasure Commander TM TC3X is a quality electronic device that will last foryears. We hope your adventure is one that brings excitement every time you use yournew metal detector!Phil Robertson and the <strong>Kellyco</strong> staff!1
Getting StartedYour Treasure Commander TC3X comes complete and ready to use. The first step is tounpack the box and check to make sure you have all the items needed to quicklyassemble the detector. You should find the following parts inside the box:• Handle Unit with Arm Cuff and Stand• Top Rod with Locking Collar• Bottom Rod• Search Coil with Bolt Assembly• Cable Pulling Tool• Operator <strong>Instruction</strong> <strong>Manual</strong>• Warranty CardIf any of these items are missing, contact <strong>Kellyco</strong> <strong>Detectors</strong> immediately. It isrecommended that you make a record of your detector's serial number and store it alongwith your proof of purchase in a safe place in case you ever need this information forwarranty service.AssemblyAssembly of your new Treasure Commander TC3X is very simple and requires no specialtools.1 Connect the Search Coil and Bottom Rod:Unscrew the bracket from the bottom rod as it comesshipped from the factory. Place the bottom rod insidethe tabs on the search coil and insert the bolt throughthe hole. Tighten the bolt until snug but take care notto over tighten it as you can damage the coil or thebolt.NOTE: The large hole in the end of the bottom rodmust be facing downwards - this is where the search coil cable will enter the rod and befed upwards to connect into the control housing.2 Connect the Bottom and Top Rods:Loosen the locking collar on the top rod (do not2
emove it) and slide the bottom rod into the top rod.Adjust the rods to the desired length and tighten the locking collar by turning it counterclockwiseuntil snug. Do not over tighten as it may be difficult to adjust the length ordisassemble the detector for storage.NOTE: The groove on the top rod needs to face away from you when you perform thisstep. Align the grooves to ensure the rods remain properly positioned.3 Connect the Search Coil Cable to the Control Housing: The TreasureCommander TC3X's search coil cable is run through the inside ofthe bottom and top rods which keeps it from being caught bybranches or underbrush when searching for treasure inovergrown areas. This is yet another feature that was addedwith the active treasure hunter in mind.Take the Cable Pulling Tool and slide it down the inside of therods starting from the top end. When the end with the screwconnector appears in the large hole on the bottom rod, connect itto the Search Coil Cable and slowly pull the cable back up theinside of the rods.Once the connector on the Search Coil Cable has exited the TopRod, remove the Cable Pulling Tool.Lineup the white arrow imprinted on the SearchCoil Cable Connector with the alignment arrow onthe corresponding connection at the base of theControl Housing. Push the two connectionstogether but take care not to force them as thisindicates the connectors are not properly aligned.Once they have mated, screw the metal collar untilsnug to ensure the cable does not come loose.4 Securing the Top Rod to the ControlHousing: The Top Rod is connected to theHandle Unit through the use of a cam-lockfitting located at the base of the LCD Assembly.Pull the cam-lock lever downward and slide theTop Rod into the Handle Unit. When the TopRod is fully seated, press the cam-lock leverupwards so that it is flush with the rod.3
5 Installing the Batteries: Your Treasure Commander TC3X is powered by six (6)AA batteries contained in the compartment found on the rear of the LCD Assembly pod.To access the battery compartment, unscrew the two (2) screws found on the top of thecover. Insert the batteries according to the markings inside the compartment makingsure that the batteries are properly aligned. Replace the battery compartment cover andtighten the screws.Either standard AA or rechargeable AA batteries can be used on the TC3X. Alkaline AAbatteries are recommended for optimal performance and service life.NOTE: The Treasure Commander TC3X features a continuous battery strength indicatoron the LCD screen which will help ensure you do not find yourself with dead batteriesmiles from the nearest store. If the display indicates less than 25% of battery strengthremains, either replace the batteries or bring a spare set with you when you head out intothe field.6 Adjusting the Display: The TC3X offers a full range of adjustment to provide userswith optimal screen visibility. To adjust the angle ofthe LCD Assembly pod for viewing under differentlighting conditions, you can tilt the pod forwards orbackwards.NOTE: Be careful not to force the pod into positionin order to avoid damaging the adjustment point.4
Understanding the LCD DisplayThe LCD True Touch screen on the Treasure Commander TC3X provides a wealth ofuseful information that will help you find more treasure while ignoring unwanted trashtargets such as aluminum, rusted iron and the like. The figure above shows all of theinformation that is available on the LCD screen; however, not all of the information isprovided at all times; i.e., the information displayed will depend on the mode selected(more on that subject will follow). The information includes the following:• Battery Life: The battery symbol in the lower right area of the display shows thestrength of the batteries. New or fully charged rechargeable batteries will beindicated by 6 dark segments. As the batteries discharge, the number of darksegments will decrease. When only two segment remains, the batteries should bereplaced or recharged.• GPS Locator: The half circle in the upper right area of the display is used toprovide GPS-based directional information when the GPS option is activated and awaypoint has been saved. Additional details on this function are provided in theOperating Modes section.5
• <strong>Metal</strong> Categories: The eight (8) segments that appear in a semi-circle on the LCDTrue Touch screen provide you with an indication of what a detected target mightbe. Categories of commonly found targets - treasure and trash - are provided onthe screen. The following figure shows what types of targets will register in each ofthe eight segments. A useful function on the TC3X is the ability to accept or rejectany of the segments independently from each other allowing you to quickly andeasily create a custom program designed to handle any conditions you might comeacross in the field. Use the Notch Mode to setup a custom Notch or DiscriminationPattern. ( see Page 10)It is important to note that the eight segments capture commonly found targets butnot all targets you might come across are listed. Military artifacts including leadbullets, brass buttons and iron artillery shells or cannon balls can register insegments that might indicate they are trash. The same holds true for jewelry whichcan vary greatly in terms of content and size. The following figure shows the widerange of segments that can indicate a gold target has been detected. The rejectionof specific segments should be based on a combination of the likelihood of findingwhat might be rejected in the specific search area, how much trash is actuallypresent and how much time you have available to search.• Sensitivity: This function determines how strong a signal is needed to produce andaudio / visual response from a target. Detecting deeper or smaller targets typicallyrequire higher levels of Sensitivity to be used; however, erratic operation can occurif the level is too high for conditions at the specific site being searched. Theselected level is indicated in the lower section of the LCD display to the right of the6
IRON segment. NOTE: Ground mineralization, trash or nearby electricalinterference can require a lower Sensitivity level to be selected. Sensitivity rangecan be adjusted for 1 to 8. Volume: The selected volume level is indicated by thenumber to the right of the Sensitivity setting. CAUTION: If you are usingheadphones that do not have a built-in volume control, it is recommended that youset the Volume level at a low value before plugging the headphones in. Adjust thevolume to a comfortable level by sweeping the coil across a target. The Volumelevel can be adjusted from 1 to 4.• Depth: When a target is detected, the target’s approximate depth will bedisplayed in inches on the right side of the LCD next to the QUARTER segment.• NOTE: This indication assumes the target is coin-sized so a larger target willappear to be shallower that it really is and a smaller target will appear deeper thanit really is. Use this as a guide to avoid damaging targets when recovering thembut recognize that the accuracy depends on the size of the target.• Factory Preset Detect Modes and Discrimination / Notch Modes: The upperleft area of the LCD screen will indicate which mode you are in as well as whensearching, which of the three (3) factory Preset programs are active. Same is truefor the two (2) Custom Discrim and Notch programmable modes.• Signal Strength: Located just beneath the P-TAB / S-CAP segments, this icon willprovide indication of how strong the signal from a detected target is when thePinpoint trigger is activated. Combined with the Depth indication, the SignalStrength indication can help you determine the relative size and depth of a targetbefore you recover it.• Identification: Located in the center of the LCD screen, this will provide an 8-digitidentifier active when one of the five (5) Detecting Modes or the GPS function isselected.7
TC3X True Touch Screen OperationWhile the Treasure Commander TC3X offers a high level of performance under a widerange of conditions, all of its functions are controlled through the use of twenty-four (24)True Touch screen mode buttons and one (1) Power button located below the LCD• Power touch pad button: This touchpad powers the TC3X on and off• Discrimination Mode: This True Touchscreen button is used to enter theDiscrimination Mode. In this mode you can set your own discrimination levels. Toadjust the levels use the right arrow button to increase discrimination and the leftarrow to decrease the discrimination level. When you reach the desired level pushthe Save/ Enter button.• Pinpoint Trigger: When a metal is detected hold the trigger to activate thePinpoint function. Sweep the coil over the target in an “X” pattern. While in Pinpointthe signal strength and the depth indicator is active.• Ground Grab: This True touchscreen button is used to enter the Ground GrabMode. This mode enables the TC3X to sense the ground mineralization present andmake the necessary adjustments automatically to provide maximum performanceunder varying conditions.• GPS: This True Touchscreen button is used to enter the Save/Waypoint list8
• Sensitivity: Use the True touchscreen button to change the Sensitivity settings byusing the Up and Down Arrow Buttons. Push the Save/Enter button to Save yourChange• Volume: Use the True touchscreen button to change the Volume levels by usingthe Up and Down Arrow Buttons. Push the Save/Enter button to Save your Change• LED Light: Use the True touchscreen button to turn the LED Light on and off.• All <strong>Metal</strong> Mode: Use this True touchscreen button to detect all metals.• Jewelry Mode: Use this True touchscreen button to detect only those metals foundin jewelry.• Coin Mode: Use this True touchscreen button to detect only those metals found incoins.• Notch Mode button: Press this True touchscreen button to enter the customNotch mode. In this mode you can deselect up to (8) of the Custom Mode button’s.After deselecting press the (Check) Save/Enter button.• Save and Enter button: This True touchscreen button is used to save or enter.Example uses it to save a new Waypoint or Save a Custom Discrimination setting.• Delete Button: This touchscreen button is used to delete, example use it to deletean old Waypoint.Illustration of Touch Screen Operations9
Using the GPS FunctionThe Treasure Commander TC3X incorporates Global Positioning System (GPS) technology whichallows you to relocate sites that you have discovered.To name and save a Waypoint or coordinates of a site or spot you want to revisit, press the "GPS"touchscreen button. You will now see the word “LOCATING” flashing on the LCD. Wait till you seethe word “SAVE”, now press the Save/Enter button to name your waypoint. Use the left/right arrowbuttons to move between letters and press the Up/Down buttons to change the selected letter orletters. After you have named your waypoint ( 8 letters max) Press the Save/Enter button, you willnow see “Save OK”To return back to normal metal detector operation Press the GPS button. At this point you canstart metal detecting. Note: you can Save up to (10) Waypoints. To do so, simply repeat the aboveprocess.When you are ready to return to your Saved Waypoint location, press the "GPS" touchpad and waitfor the word “Save” to appear. Use the left/right Arrow buttons till you see your named“Waypoint”, now press the Save/Enter button. If you have more than one location saved you canscroll through list of saved waypoint locations use the left/right Arrow buttons. When you find thelocation you want to visit or return to, press the Save/Enter touchscreen button.You will now see the GPS icon (upper right half circle on the LCD screen) will show you whichdirection to head with an arrow and the LCD will show how many yards remain to the location.The arrow and distance will change as you approach the location.Once you arrive at the location, the arrow will disappear and the distance displayed will read "000"indicating you are now at your Saved Waypoint.To DELETE any Saved Waypoints while in the GPS Mode you simply go to the Saved Waypoint andPress the “DELETE” touchscreen button. Repeat the same process for any additional SavedWaypoints you want to delete. Remember if you saved more than one Waypoint use the left/rightArrow buttons to scroll through them.10
Operating ModesThe Treasure Commander TC3X has eight (8) modes of operation which are described below.1 GROUND GRAB MODE (Ground Balance): All soil contains minerals which canimpact the ability for any metal detector to locate small or deeply buried targets. TheTC3X has been designed to sense the actual ground mineralization present at the searchlocation and automatically calibrate itself to reduce or eliminate the effect themineralization would otherwise have on detection depth and sensitivity. This ensures youobtain maximum performance from your detector under a wide range of soil conditions.The following steps cover the proper method of using the GROUND GRAB (GroundBalance) function:• Find an area that is free of metal - use the Discrimination mode option with notargets discriminated out to check the area before proceeding.• Hold the search coil about 6 inches above the ground and press the "G Grab" Truetouchscreen button to activate the ground grab process, then lower down thesearch coil several times until the LCD shows “Grab OK”• If you receive the "GRAB ER" message, either repeat the process or try a differentlocation as there may be metal or some other problem at the spot you initiallyattempted to calibrate the coil to the ground conditions with the GROUND GRAB(Ground Balance) function.Remember, optimal performance of your detector will depend on its proper calibrationthrough the use of the GROUND GRAB (Ground Balance) function. It is recommendedthat you occasionally repeat the process to ensure that changes in ground conditions arebeing compensated for as conditions can change even at the same location.2 DISCRIMINATION MODE: A metal detector by its design locates all metals;however, it is not possible to recover every piece of metal in a given site. TheDISCRIMINATION mode is the one that is used for actual searching and allows you toselect what targets will be accepted or rejected. You can adjust the level of rejection fromnone (all metal objects will produce a response) to a level at which most unwantedtargets will be rejected (silver coins, silver jewelry and similar targets will produce aresponse). To adjust the discrimination mode press the “DISCRIM” Touchscreen buttonand use the left and right arrow buttons to increase or decrease the amount ofdiscrimination. When set to your desired level save by pressing the Save/enter button.Sweep speed can affect the ability of the detector to accurately identify and discriminatetargets. Sweeping too slow can impact detection depth and discrimination capabilities ofyour TC3X.3 NOTCH DISCRIMINATION MODE: The TC3X was designed with ease-of-use in mindand the NOTCH DISCRIMINATION function allows you to quickly select a predefinedprogram designed to let you find treasure and dig less trash. Unlike conventional11
discrimination circuits where rejecting targets is done starting at iron and moving upwardsin a clockwise manner (see the figure on page 6), NOTCH DISCRIMINATION allows youto select which of the eight segments are accepted or rejected individually. For example,if you want to reject pull tabs using the DISCRIMINATION MODE, you would need toalso reject the iron, foil and nickel segments. NOTCH DISCRIMINATION MODE allows youto only reject the pull tab segment while still accepting the other seven segments.SETTING THE NOTCH MODE: Press the Notch touchscreen button to enter the customnotch mode. In this mode you can deselect up to (8) of the custom <strong>Metal</strong> Categorytouchscreen buttons. (See page 6). To deselect you simply press one of the (8) metalcategory buttons, if you change your mind you can reselect any category by pressing thesame button again. After deselecting the categories you want, next press the Save/Enterbutton to save your changes. The TC3X comes with three predefined nonadjustableCustom programs to meet your specific needs. The Treasure Commander’s programsinclude:4 ALL METALS: This mode is designed to be used when you are looking for any type ofmetal that might be present. Treasure hunters searching for old military or settlerartifacts made of iron often use this to ensure no relics are inadvertently overlooked. It isalso a good choice when trying to find where a site used to be and no visible signs remain.Once metal objects are located indicating you are in the right area, additionaldiscrimination can be applied.5 COIN: This mode is designed for coin hunters that want to find coins and other itemswhile rejecting iron and tinfoil that are often found in the areas where coins arerecovered.6 JEWELRY: This mode is designed to eliminate some trash while ensuring gold andsilver jewelry including rings, pendants, chains, earrings and other items are detected.7 PINPOINT: When you want to zero-in on a target that has been detected, enteringthe PINPOINT mode will enable you to quickly identify where to dig in order to recover thetarget. To pinpoint squeeze the pinpoint Trigger while sweeping the coil across the areacontaining the target. The target depth in inches will be shown on the LCD screen alongwith the pinpoint intensity target signal strength. To exit the Pinpoint mode, simplyrelease the pinpoint Trigger.8 GPS: This function allows you to setup and save up to (10) Waypoints that you mightwant to revisit through the power of Global Positioning System technology. The farthest itwill read from your destination is 999 yards or approximately 0.6 miles. The indicateddistance will decrease as you get closer to the saved location. NOTE: When using thismode, ensure the control box is kept away from metal objects such as a shovel as theycan affect the accuracy of the TC3X’s internal compass.12
Getting Started the Right WaySpending a little time getting familiar with the response of your Treasure CommanderTC3X before you head out in search of treasure will make your time in the field moreenjoyable and productive.The first activity you should try is to perform bench testing using a sample of targets.This will help you learn what response various targets will produce and how to eliminatethose you do not wish to recover. Collect items including a nail, a wad of tin foil, a pulltab, a nickel, a zinc penny (from 1983 and later), a dime and a quarter. If you haveadditional items that you might be seeking such as gold / silver jewelry or relics, includethem in your sample pile.Place the TC3X on a table (non-metal) with the coil hanging over the edge. Ensure thecoil is not near any metal objects. Remove your watch and any jewelry you might haveon such as rings. Turn the detector on and select the ALL METAL mode.Pass each object across the search coil and take note of the indication on the LCD screenas well as the different tones each produces. Switch to the COINS and then the JEWELRYmode and repeat the test. Note which targets are rejected by the detector in each of themodes.The NOTCH mode allow you to select which of the eight segments are accepted orrejected and is very useful when you find yourself bothered by a specific piece of trashand want to ignore it.Make a record of what your test results show so that you can refer back to them if youhave questions in the field on actual targets.Many successful treasure hunters take the bench testing concept to the next level andconstruct a test garden in their yard. By burying a range of targets, you can see howground impacts signal response and practice pinpointing targets which will improve yourrecovery rate in the field. Bury several items at depths of 2 to 4 inches. Place them atleast 18 inches apart so that you are not detecting more than one target at the sametime. Mark the location of each target (golf tees work well for this) so that you knowwhere each item was buried.NOTE: Freshly buried targets will be harder to detect than those that have been buriedfor years. Take the time to see the impact different settings; i.e., Sensitivity, Volume andDiscrimination, as well as the coil sweep speed have on the response you receive from thevarious targets.13
Let's Find SomethingSo you have spent some time getting familiar with your new Treasure Commander TC3Xdetector and are ready to head out and see what you can discover. Let's get started!(See pages 8 through 11 for more detailed operational instructions)1. Extend the rods to the desired length. The detector should be resting on theground about 2-3 feet in front of you.2. Turn the TC3X on by pressing the POWER touchpad3. Press the touchscreen buttons for both the SENSITIVITY and VOLUME (do eachbutton separately) and adjust to the desired values which will be dependent on siteconditions and personal preferences. Once the adjustments have been made, makesure you remember to press SAVE/ENTER button each time to save them.4. Select either of the (3) Factory Predefined Modes or the “DICRIM” or “NOTCH”custom Modes. If selecting either “Discrim” or “Notch” modes now is a good time tomake whatever discrimination changes you need. Don’t forget to press theSave/Enter button each time to save your changes. Press the Ground Grabtouchscreen button to enable the detector to determine the ground mineralizationpresent and calibrate the circuitry to provide maximum performance. Sweep thecoil over the ground in a side-to-side motion. The optimum sweep speed is 3 to 5seconds per pass (left-to-right or right-to-left). Remember, it is not a race to seehow quickly you can cover an area but rather how thoroughly you cover the area toensure you have not overlooked any valuables. Most good targets will produce aclear, repeatable signal. Trash targets (those that are being rejected) generally donot produce a signal or will only give a broken or non-repeatable response.Experience will tell you when to investigate those marginal signals but initially,focus on repeatable signals that produce consistent indications on the LCD screen.5. When a target has been detected, move the coil off to one side and squeeze andhold the Pinpoint Trigger. Move the coil over the area wherethe target is buried in an “X” shaped pattern.Observe the Target Depth indication and listen to the audioresponse. When the indicated depth is the shallowest andthe audio volume is the loudest, the target should be directlybeneath the center of the search coil.6. Carefully recover the target and be sure to replace the soil / grass before movingon to the next target.14
Identifying Targets before You Dig with toneThe Treasure Commander TC3X provides you with two ways to identify targets beforerecovering them. The first is the indication on the LCD screen via the eight <strong>Metal</strong>Category segments. In addition to the visual indication, the audio response will varybased on the type of metal that has been located. The four tones and the metals thatcorrespond to each are defined below:• Bass Tone: Ferrous metals such as nails, smaller bolts, stainless steel, cast ironand very small pieces of gold• Low Tone: Tinfoil, aluminum, nickels, newer pull tabs (rectangular style) and somegold jewelry• Medium Tone: Older pull tabs (winged style), bottle and screw caps, newer U.S.pennies (post 1982), newer Canadian $1 and $2 coins, small silver jewelry, mostgold jewelry and military artifacts such as bullets and buttons• High Tone: Older pennies (pre-1982), dimes, quarters, half dollars, dollars, andsilver jewelry15
Target RecoveryOnce you have established the exact location of the target, the next step is to dig a smallhole to recover it. In order to preserve the environment and keep from having areasclosed to metal detecting, it is essential to make the hole as small as possible and alwaysreplace the soil / grass before moving on.Recommended tools for target recovery include a sand scoop when searching sandy areasor a small knife / small gardening trowel when searching grassy areas such as parks,schools, private yards or ball fields.To recover a target from grassy areas, use a sharp tool (knife / trowel) and cut a plugleaving a portion connected. Fold the plug out of the hole and pass the search coil overboth the plug and the hole to determine where the target is. If the target is still in thehole, start removing dirt and place it on a sheet of plastic or a rag which makes it easierto replace the loose dirt when you have found the target. Once you have recovered thetarget, check the hole to ensure there are no additional targets before refilling the hole.Put the loose dirt back in the hole, fold the plug back in-place and step down on the areato compact the soil.TIP: The use of an electronic pinpointer probe will reduce the time it takes to locate andrecover targets. This is an accessory that most treasure hunters have found to beinvaluable and is highly recommended.Detecting TipsYour success will increase as you gain experience in the field but the following tips canhelp you shorten the learning curve and reduce frustration that may arise.• The search coil must be moving in order to detect a target; however, only a slightmotion is required. If you stop moving the coil, the signal will be lost.• At times you might receive a signal from a target that is not repeatable andproduces varying audio signals. This may be caused by trash or multiple targetsbeneath the coil. Switch to the ALL METAL mode and sweep the coil across thetarget area in different directions to see if you can isolate the signals. If youdetermine that there is more than one target present, switch back to theDISCRIMINATION or NOTCH mode and try sweeping the coil at different angles toavoid going over more than one target at a time. This will allow you to identifyeach one and determine if it is worth recovering.• If the trash in an area is so much that you are getting numerous choppy or nonrepeatablesignals, you can improve performance of the detector by slowing yoursweep speed down or reducing the Sensitivity level.16
• Sweep the search coil carefully, especially when using around rocks and buildingfoundations. Avoid hitting the search coil against hard, solid objects and surfaces.• Keep your search coil slightly off of the ground during the sweep, especially whenusing in gravel or hard, rocky dirt.Care & MaintenanceYour Treasure Commander TC3X has been built to last but proper care and maintenancewill ensure you receive years of trouble free operation. It is recommended that youobserve the following tips.• Keep it Clean - Take a few minutes after each use to remove dirt and dust. Wipethe case clean. Wash the loop, especially if it has been dipped in saltwater.• Keep it Cool - Never keep your detector in an extremely hot environment such asthe trunk of your vehicle in the summer for extended periods of time. Damage tothe electronics and the LCD display screen can occur.• Keep it Safe - Never transport your detector in a way that it can be subjected tosudden shock or dropped. Cushion the detector with a blanket or use a carryingcase that can be purchased to carry the detector and accessories.17
• Protect the Electronics - A plastic bag placed over the LCD control pod will keeprain from reaching the electronics or at an ocean beach, will help protect thedetector from blowing sand and prevent corrosion from the salt air. Remember,the coil is waterproof but the electronics are not!• Storage - When storing your detector for more than a month, remove the batteriesto prevent them from leaking and damaging the electronics.TroubleshootingPROBLEMThe detector won't turn ONThere is no soundPOSSIBLE SOLUTION(S)• Ensure the batteries are new or charged• Check that the batteries are installed properly• Check that all connections are secure• If using headphones, unplug them to check forsound from the internal speaker (headphones maybe defective)The detector operates erratically • Check that all connections are secure• Lower the Sensitivity level• Try searching in a different location as electricalinterference at the current site may be causing theerratic operation. This includes high-voltage powerlines, electric transformers and even undergroundcables and pet containment fencesLCD indication does not lock onMultiple tones are produced whenthe coil passes over a spot• Multiple targets may be present - move the coilslowly at different angles in order to seperate themfrom one another• The Sensitivity may be set too high for theconditions at the search area, reduce the settingand resweep the areaTreasure Commander TC3X Specifications• Licensed RealTree Xtra Camo Finish• GPS Technology (GEO-X) allows saving and locating up to 10 locations• PST “Precision Search Technology• Durable lightweight poly carbonate construction• 11 inch Double D coil, detects treasures while eliminating trash and junk18
• Built in LED Light• Large simple to use digital backlit interface• Touch Screen Technology with 5 inch LCD Display allows simple touch operation• 8 metal categories and adjustable discrimination• 3 Preset elimination modes: All-<strong>Metal</strong>, Coin, Jewelry, let's you find treasures ratherthan junk.• 2 Custom programmable modes, Discrimination and Notch• 4 individual audio tones to aid in target identification• Over 60 different elimination possibilities• Built-in Trigger Pinpoint• Signal strength and depth indicators in pin point mode. Locates "Targets" Quickly.• Quick release extension rod design, adds up to 7" to shaft for "tall" users.• Adjustable arm guard with strap• External 3.5mm headphone jack (headphones not included)• Right or Left handed use• Uses 6 AA-Cell Alkaline batteries (not included)• 1–Year warrantyTreasure Hunters Code of Ethics• I Will respect private property and will not treasure hunt without the owner'spermission.• I Will Not destroy private property, buildings, or what is left of ghost towns anddeserted structures.• I Will Not litter and will pick up any trash that I dig up or find on the ground whiletreasure hunting.• I Will leave gates as found.19
• I Will Not contaminate wells, creeks, or other water supplies.• I Will fill all excavations that are made while treasure hunting.• I Will Not tamper with signs, structural facilities or equipment.• I Will appreciate and protect our heritage of natural resources, wildlife, and privateproperty.• I Will use thoughtfulness, consideration and courtesy at all times.• I Will protect my hobby, and always act as a goodwill ambassador.Be polite and informative to those who inquire about your hobby - you are theambassador of a pastime we want to protect and we will be judged by how you act &respond.Warranty & Service InformationFor the warranty to be in effect, you MUST completely fill out and mail the warranty card alongwith your proof of purchase to WGI Innovations, LTD within 14 days after the date of purchase. Asan alternative, you may also visit the WGI Innovations website and register your purchase athttp://www.groundefx.com (you are still required to mail WGI Innovations your proof of purchasebefore the warranty is placed in effect.) Follow the onscreen directions to complete the process.WGI Innovations, LTD will replace all workmanship defects free of charge for one (1) year after thedate of purchase as long as your warranty is in effect.This warranty does not cover damage, expense or injury caused by unauthorized repairs,alternations, improper assembly, shipping, abuse, theft, accident, neglect or collateral loss.When returning product(s) for service you must obtain a Return Merchandise Authorization (RMA)number from WGI Innovations, LTD. Please include your name, UPS address (no P.O. Box),telephone number, RMA number and a complete description of the problem on all enclosedcorrespondence. When possible, pack the equipment carefully in the original carton. Customersare responsible for any shipping costs to WGI Innovations, LTD. WGI Innovations, LTD will pay forthe shipping cost of replacement product to the customer. WGI Innovations, LTD is not responsiblefor damage incurred in returning items for repair.For product service send product(s) to:WGI Innovations, LTD602 Fountain ParkwayGrand Prairie, TX 5050(800) 847-8269Thank you for your purchase!20
<strong>Metal</strong> Detector TerminologyAir Test: A test performed by moving various sized metal samples beneath the metal detector search coil tocheck the detector's features and target response. This test is not an accurate indicator of ground depthpenetration capability.All <strong>Metal</strong>: Any operating mode or control setting which allows total acceptance of any type of metal targets.Usually associated with the Ground Balance mode.Bench Test: An air test to determine at what approximate discriminate settings various metal samples arerejected or accepted. The test is conducted in a non- metallic area.Coin Depth Indicator: A visual indicator used in conjunction with calibrated circuitry to indicate depth ofburied coins in inches or millimeters.Discrimination: Adjustable circuitry which ignores or nulls audio responses from a specific conductivity rangeallowing positive responses to be heard from metals higher in conductivity above the discriminate controlsetting. Designed primarily to eliminate audio response from trash metals. See also Motion Discriminator.Electronic Pinpointing: An automated detuning feature which narrows signal response for the purpose oftarget pinpointing.Ground Grab (Ground Balance): A state of operation using specialized circuitry to ignore the masking effectthat iron ground minerals have over metal targets.LED or Light Emitting Diode: A semiconductor which produces an illuminated visual response.Meter: A detector component that provides visual information to aid in target identification. Meters featureeither an LCD or needle indicator which may display intensity of signal, target depth, target identification, typeof metal, or battery condition.Mode: A condition of operation, selected by the operator, for specific desired function(s).Notch Discrimination: Filtering circuitry which allows a "window" of desirable targets to be accepted withinthe entire rejection range of unaccepted targets, i.e., rejecting nails, foil and pull tabs while accepting nickelsand gold rings of the same conductivity. This circuitry can also be adjusted to reject all metal targets whileaccepting only a specific conductivity range.Pinpointing: Finding the exact target location with respect to a search coil’s designated center. Accomplishedby interpreting the centers of audio response width in perpendicular directions or scans. See also Detuning.Sensitivity: The capacity of a metal detector to perceive changes in conductivity within the detection pattern.Generally, the more sensitivity a detector can smoothly provide, the more depth it will achieve in sensingtargets.Tone ID: Circuitry producing different audio tones for each target's conductivity range, i.e., low tone fornickel, high tone for coins.Visit us at: www.kellycodetectors.comCall Us Toll Free At: 1-888-535-59261085 Belle Avenue, Winter Springs, FL 3270821