Supplier Relationship Management (SRM) E-Invoicing ... - TM
Supplier Relationship Management (SRM) E-Invoicing ... - TM
Supplier Relationship Management (SRM) E-Invoicing ... - TM

You also want an ePaper? Increase the reach of your titles
YUMPU automatically turns print PDFs into web optimized ePapers that Google loves.
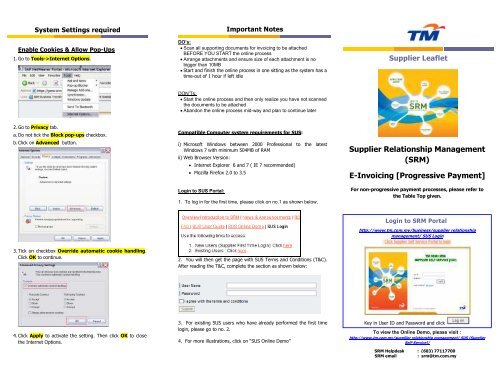
System Settings required<br />
Enable Cookies & Allow Pop-Ups<br />
1. Go to Tools->Internet Options.<br />
2. Go to Privacy tab.<br />
a. Do not tick the Block pop-ups checkbox.<br />
b. Click on Advanced button.<br />
3. Tick on checkbox Override automatic cookie handling.<br />
Click OK to continue.<br />
4. Click Apply to activate the setting. Then click OK to close<br />
the Internet Options.<br />
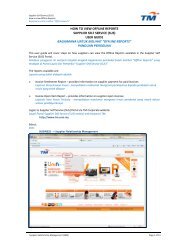
Important Notes<br />
DO’s:<br />
• Scan all supporting documents for invoicing to be attached<br />
BEFORE YOU START the online process<br />
• Arrange attachments and ensure size of each attachment is no<br />
bigger than 10MB<br />
• Start and finish the online process in one sitting as the system has a<br />
time-out of 1 hour if left idle<br />
DON’Ts:<br />
• Start the online process and then only realize you have not scanned<br />
the documents to be attached<br />
• Abandon the online process mid-way and plan to continue later<br />
Compatible Computer system requirements for SUS:<br />
i) Microsoft Windows between 2000 Professional to the latest<br />
Windows 7 with minimum 504MB of RAM<br />
ii) Web Browser Version:<br />
• Internet Explorer 6 and 7 ( IE 7 recommended)<br />
• Mozilla Firefox 2.0 to 3.5<br />
Login to SUS Portal:<br />
1. To log in for the first time, please click on no.1 as shown below.<br />
2. You will then get the page with SUS Terms and Conditions (T&C).<br />
After reading the T&C, complete the section as shown below:<br />
3. For existing SUS users who have already performed the first time<br />
login, please go to no. 2.<br />
4. For more illustrations, click on “SUS Online Demo”<br />
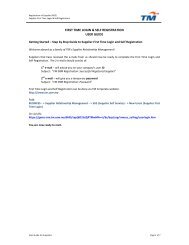
<strong>Supplier</strong> Leaflet<br />
<strong>Supplier</strong> <strong>Relationship</strong> <strong>Management</strong><br />
(<strong>SRM</strong>)<br />
E-<strong>Invoicing</strong> [Progressive Payment]<br />
For non-progressive payment processes, please refer to<br />
the Table Top given.<br />
Login to <strong>SRM</strong> Portal<br />
http://www.tm.com.my/business/supplier relationship<br />
management/ SUS Login<br />
Key in User ID and Password and click<br />
To view the Online Demo, please visit :<br />
http://www.tm.com.my/suppllier relationship management/ SUS (<strong>Supplier</strong><br />
Self-Service)/<br />
<strong>SRM</strong> Helpdesk : (603) 77117700<br />
<strong>SRM</strong> email : srm@tm.com.my
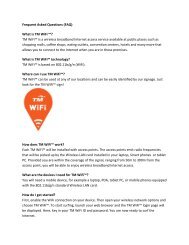
<strong>SRM</strong> <strong>Supplier</strong> Self Service: E-<strong>Invoicing</strong> [Progressive Payment]<br />
1. In the screen, click on<br />
.<br />
2. At the , click on<br />
Document number under the column<br />
that shows or<br />
in the status column.<br />
3. Click on the PO no. [e.g ] to access PO<br />
screen.<br />
4. Scroll to the right and click on quantity next to<br />
symbol in the ‘Outstanding Quantity’ column. A<br />
pop-up window will display the Progressive<br />
Payment Milestone for Purchase Order as shown in<br />
the example below:<br />
5. The green indicator above shows that the milestone<br />
progress can be invoiced. Click on<br />
creation.<br />
to proceed with invoice<br />
6. On the screen, enter the<br />
document name:<br />
enter and<br />
.<br />
. Then<br />
7. To include Payee information, ensure Factoring Box is<br />
checked i.e. . Select<br />
from the dropdown<br />
menu. A new window will be displayed . Select<br />
the relevant beneficiary and click . Click on the<br />
dropdown for Account Number<br />
to select a payee account.<br />
A new window will be displayed: . Select<br />
relevant account and click .<br />
8. <strong>Supplier</strong> is required to attach a scanned copy of invoice as<br />
attachment, as well as other supporting documents. To<br />
attach supporting documents, click on under<br />
the Section. Select a file to be attached and<br />
click and then click . Then selected<br />
file will be attached as shown in the example below.<br />
<strong>Supplier</strong> is required to enter Document File Name as<br />
shown in the example below:<br />
Note: Attachments can be contract, supplier invoice, etc.<br />
9. To enter notes, type in under the Section.<br />
10. When all the information has been entered, click<br />
. A message will be displayed at the top of screen<br />
informing that the Invoice has been created<br />
. <strong>Supplier</strong> is required to tick the<br />
data privacy statement before submitting the invoice.<br />
11. Click and the message below will appear:<br />
In summary, the process<br />
flow is depicted here.<br />
Please ensure that all<br />
supporting documents<br />
have been scanned<br />
before you start creating<br />
the invoice.<br />
Invoices can only be<br />
created for POs,<br />
i. where Goods<br />
Receipt has been<br />
done, and<br />
ii. with status of “can<br />
be invoiced.”<br />
iii. with status of<br />
“partial invoice”<br />
For further enquiries:<br />
Contact <strong>SRM</strong> Helpdesk or email:<br />
<strong>SRM</strong> Helpdesk: (603) 77117700<br />
<strong>SRM</strong> e-mail : srm@tm.com.my